Lecture
Two planes intersect in a straight line. To build the line of their intersection, it is necessary to find two points belonging to this line. The task is simplified if one of the intersecting planes occupies a particular position. In this case, its degenerate projection includes the projection of the line of intersection of the planes.
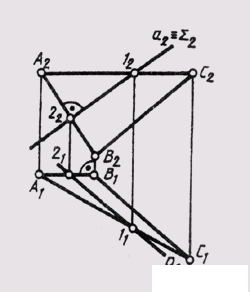
In fig. 122 shows a complex drawing of two intersecting planes £ and 0, with the Sum plane of a particular position being frontally projecting. It intersects the lines AB and AC of the plane 0, given by triangles ABC - the plane of general position. The intersection points 1 and 2 define the intersection line of the planes. Combining them, we obtain the desired line: a ( 1 , 2) = Sum ^ Q.
The intersection line of two planes occupying a common position can be constructed in the initial system of projection planes. To do this, twice solve the problem of building a straight line of one plane with a second plane. The task can be solved in a new system of projection planes by constructing an image of one of the intersecting planes as a projecting plane.
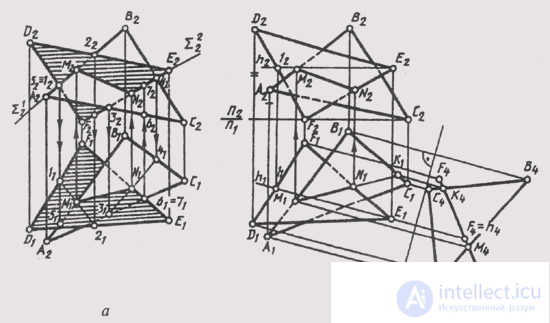
In fig. 123, and the line of intersection of two triangles ABC and DEF is constructed by constructing the point M of intersection of the line AB with the plane DEF and the point N of intersection of the line EF with the plane ABC:
1) AB ~ Sum 1 (Sum 1 _ | _P 2 ), Sum 1 ^ DEF = l -2 (1 2 —2 2 ; 1 1 —2 1 ), 1 1 —2 1 ^ А 1 B 1 = М 1 , M 1 , M 2 || A 1 A 2 , M 1 M 2 ^ A 2 B 2 = M 2 , M (M, M 2 );

Fig. 122

Fig. 123
2) EF ~ Sum 2 (Sum 2 _ | _P 2 ), Sum 2 ^ ABC = 3-4 (3 2 —4 2 ; 3 1 —4 1 ), 3 1 -4 1 ^ E 1 F 1 = = N 1 , N 1 N 2 || A 1 , A 2 ; N 1 N 2 ^ E 2 F 2 = N 2 ; N (N 1 , N 2 );
3) M 1 UN 1 , = M 1 N 1 , M 2 UN 2 = M 2 N 2 ;
4) ABC ^ DEF = MN.
After construction, determine the visibility of intersecting planes. On the frontal plane, it is determined using frontally competing points 1 and 5. To determine the visibility on the horizontal plane of the projections, horizontally competing points 6 and 7 were used.
In fig. 123, b, the same intersection line is constructed with the help of additional projections of these planes on the plane P 4 , relative to which the DEF plane occupies the projection position. Additional projections are constructed from the condition that the horizontal h € DEF is projected to a point on the plane P 4 _ | _ h . New communication lines were drawn. Through irreplaceable horizontal projections of points A,
B, C, D, E, F parallel to h 1 , and the new axis of the projections P 1 / P 4 _ | _ h 1 . Measured on the plane P 2 the heights of the points determined their projections on the plane P 4 .
A 4 B 4 C 4 ^ D 4 E 4 F 4 = M 4 K 4 , since A 4 B 4 ^ D 4 E 4 F 4 = M 4 and B 4 C 4 ^ D 4 E 4 F 4 = = K 4 In the direction of the new communication lines, we determine the horizontal projection of the MK line (M 1 K 1 ). Mark the intersection point of the side EF with the line MK: E 1 F 1 ^ M 1 K 1 = N 1 . The points of the segment NK have no common points with the plane DEF.
Intersecting planes in the particular case can be perpendicular. To identify cases of perpendicularity, one must remember that if two planes are mutually perpendicular, then one of them passes through the perpendicular to the other plane. In fig. 122 given a comprehensive drawing of mutually perpendicular intersecting planes: one frontally projecting Sum (Sum 2 ), and the second - in general position (ABC) - contains the perpendicular AB to the plane Sum (AB || P 2 ; A 2 B 2 Sum 2 ).
In general, two planes can intersect at infinity. Then there is a parallelism of these planes. In identifying this case, it should be taken into account that, in parallel planes, two intersecting straight lines of one plane are parallel to two intersecting straight lines of another plane. In fig. 91 the S plane is parallel to the Sum 2 plane, since a || c, b || d.
Comments
To leave a comment
Descriptive Geometry and Engineering Graphics
Terms: Descriptive Geometry and Engineering Graphics