Lecture
At the intersection of two surfaces, a line is formed, generally representing a spatial curve that can break up into two parts or more. Moreover, the resulting parts can be both flat and curved.
If face surfaces intersect, in the general case a spatial broken curve is obtained.
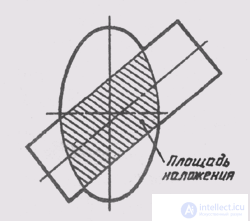
The intersection line of two planes is built on separate points. First, at the intersection of the contour lines of one surface with another, the reference points are determined and built. The construction of these points makes it possible to see within which limits the projections of the intersection line are located and where between them it makes sense to construct intermediate (or random) points. When constructing the points of intersection of two surfaces, it should be remembered that the projections of these lines are always located within the overlapping area of like projections of intersecting planes. In fig. 131 depicts two intersecting surfaces. Sectional area - shaded. Within this area, the intersection of the specified surfaces on the given projection plane will be located.

Fig. 131
A common way to build points of the line of intersection of two surfaces is the method of auxiliary surfaces - intermediaries. Intermediaries cross the given surfaces along the lines, preferably graphically simple. Then at the intersection of these lines are obtained points belonging to both surfaces, and hence the lines of their intersection. Either planes or spheres are used as mediating surfaces. Depending on the type of intermediary adopted, the method of constructing the intersection line is also called: the method of auxiliary cutting planes or the method of auxiliary spheres.
Comments
To leave a comment
Descriptive Geometry and Engineering Graphics
Terms: Descriptive Geometry and Engineering Graphics