Lecture
The lines parallel to the projection plane can be attributed to special lines in the plane. They are called level lines.
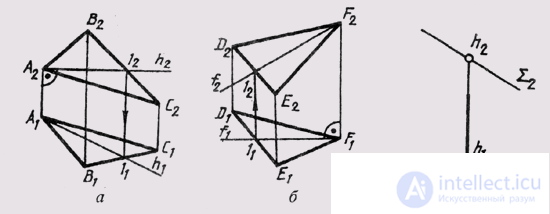
The line belonging to the plane and parallel to the horizontal plane of the projections is called the horizontal plane (Fig. 92, a). The construction of the horizontal line always starts with its frontal projection: h (A 1 1) ~ Q (ABC); h 2 ~ A 2 ; h 2 _ | _ A 2 A l ; h 2 ^ B 2 C 2 = l 2 , l 2 l 1 || A 2 A 1 .
The line belonging to the plane and parallel to the frontal plane of the projections is called the front of the plane (Fig. 92, b). The construction of the frontal start with a horizontal projection: f (F 1 1) ~ ^ (DFE); F 1 ~ f 1 , f 1 , _ | _F 1 F 2 ; f1 ^ D 1 E 1 = l 1 ; l 1 l 2 || F 1 F 2 ;
l 1 l 2 ^ D 2 E 2 = l 2 ^ F 2 = l 2 .
Considering the special lines in the planes of a particular position, one can make sure that the corresponding level lines in this case will be projecting as well.
In fig. 92, in shows the horizontal h of the frontally projecting plane Sum. In this case, it will also be the frontal projecting line, i.e. h e Sum; Sum _ | _ P 2 .

Fig. 92
Comments
To leave a comment
Descriptive Geometry and Engineering Graphics
Terms: Descriptive Geometry and Engineering Graphics