Lecture
In the practice of building perspectives, the most widely used is the way of architects.
This method is used in the construction of perspective images of various structures, which in plan have two dominant directions of lines (for example, buildings, bridges, overpasses).
The use of two vanishing points of the prospects of parallel horizontal lines of the object of the dominant directions provides greater graphic accuracy and ease of constructing a perspective image.
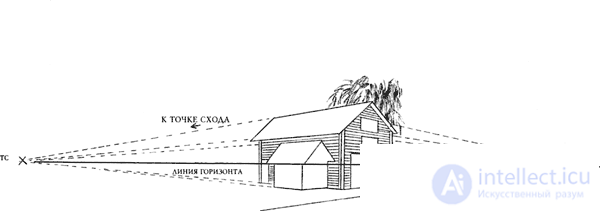
Two-point perspective
The old stable and the shed with her turned to the artist angles rather than vertical planes. Therefore, the front walls of both buildings have their own vehicle (right), and for the side (long) walls there is another (left). Note that both vehicles do not have to be inside the borders of the drawing.
You need to make a deliberate decision about the location of the horizon line and the vehicle, and then everything will turn out "automatically": roofs, cladding boards, gates, windows, doors, etc. will take the right places according to the laws of linear perspective.
For the sake of a better understanding, copy the contours of the buildings from the finished picture reproduced below, and extend the lines - part to the right, part to the left - to merge at the vanishing points.
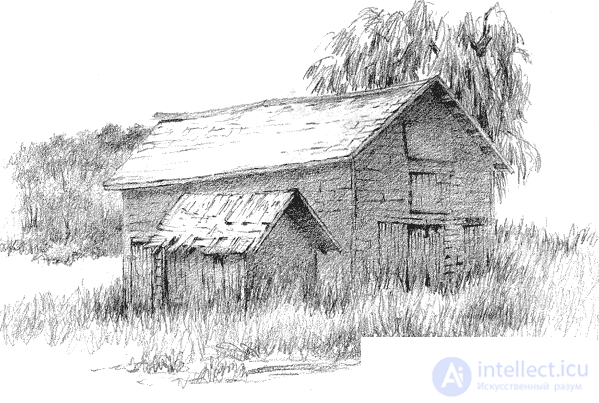
"Away from the roads."
Bristol double cardboard from Strathmore, graphite pencil, 28x36 cm.
Perspective with two vanishing points
The principles of building perspectives with one vanishing point are applicable only when they look at the object frontally and it is located at eye level. In most cases, there are not one, but two vanishing points. In such situations, you need to use the rules of perspective with two vanishing points. Figure 3.11 in perspective with two vanishing points shows a box in three positions - at eye level, above and below this level. Compare this illustration with Figure 3.9, which shows the same rule for a single vanishing point perspective. In both cases, the lines that extend the edges of the box converge to a point. For example, a sketch of the barn (Figure 3.12) shows how the lines that follow the walls of the barn follow the same rule. Since the shed is visible from the front, the horizon is close to the center of the picture; The head of a human figure is placed on the horizon line.
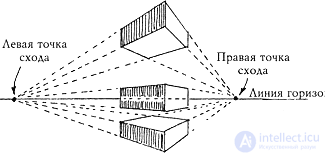
Figure 3.11.
The box in perspective with two vanishing points is shown at eye level, below and above. Notice how all the horizontal lines converge at two points.
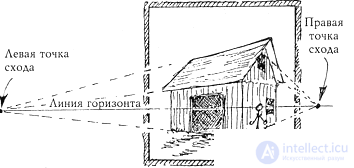
Figure 3.12.
If you look directly at the subject, the horizon line will be located in the space of the picture.
If you look at the subject from the bottom, as in Figure 3.13, the horizon line will be located at the very bottom of the picture or even beyond its borders. Both vanishing points are still on the horizon, and all lines should converge in them as shown. It is the correct angle of inclination of the sides of the depicted object that makes the whole composition look realistic.
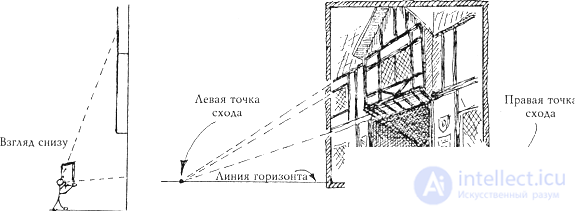
Figure 3.13.
If the object is viewed from below, the horizon line is located at the bottom of the picture or even lower.
Your drawings will improve significantly if you spend some time thinking about the vanishing points and using the ruler to link the sides of the object to the desired point when thinking about the composition.
If one or both of the vanishing points are placed too close to the object, the image will be distorted even when everything else is done in strict accordance with the rules. In Figure 3.14, the right vanishing point is too close to the shed. Figure 3.14 B shows how the sketch improved when the right vanishing point was moved to the right.

Figure 3.14.
If the detours are too close to the subject, the image is distorted. In Figure A, the right vanishing point is placed too close to the shed. In Figure B, it is moved to the right, and the barn looks more natural.
Now the picture looks "right." It will become even more “correct” if I move the left vanishing point to the left.
Comments
To leave a comment
Descriptive Geometry and Engineering Graphics
Terms: Descriptive Geometry and Engineering Graphics