Lecture
The theoretical properties of drawing construction in engineering graphics are based on the rules for constructing images based on the projection method. The image of three-dimensional space objects on a plane is obtained by the projection method. Projection is the process by which images are obtained that are projections onto planes.
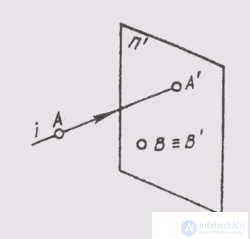
The projection apparatus includes the objects depicted - points A, B, projecting rays i and the projection plane n ', on which an image of the objects is obtained (Fig. 43). The process of projection is to conduct projection rays through given points before meeting with the plane of projections. The point of intersection of the projecting beam with the plane of projections determines the projection of this point. Thus, the projection of point A is point A ', i.e. [i ~ A; i ^ n '= A']. The projection of point B is point B ', although the projection of point B lying in the plane n' coincides with the point itself. To get a projection of any shape, it is necessary to construct the projections of its characteristic points and connect them in the drawing with the corresponding lines.

Fig. 43
Comments
To leave a comment
Descriptive Geometry and Engineering Graphics
Terms: Descriptive Geometry and Engineering Graphics