Lecture
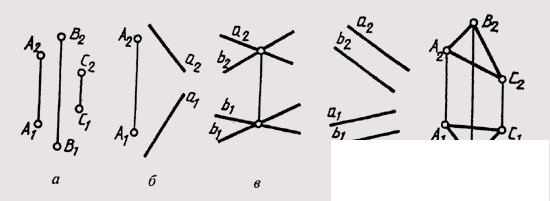
The plane in the drawing can be defined in various ways: by three points not lying on one straight line Q (A, B, C) (Fig. 88, a);
a straight line and a point not lying on one straight line Q (aA; A does not belong to a) (Fig. 88, b);

Fig. 88
two intersecting straight lines Q (a || b) (Fig. 88, c);
two parallel straight lines Q (a ^ b) (Fig. 88, d);
any flat figure, for example, a triangle Q (ABC) (Fig. 88, e).
Planes specified in the drawing by one of such methods are not limited to projections of its defining elements.
Considering the complex drawing of the plane, it is possible to make sure that each of the above mentioned methods for defining it allows for the possibility of transition from one of them to another.
Comments
To leave a comment
Descriptive Geometry and Engineering Graphics
Terms: Descriptive Geometry and Engineering Graphics