Lecture
The main elements of any drawing are the lines. Depending on their purpose, they have the appropriate type and thickness. Images of objects in the drawing are a combination of different types of lines.
The types of lines, their purpose and thickness are set by GOST 2.303-68 (Table 2). The solid thick main line is taken as the original. Its thickness S should be chosen in the range from 0.6 to 1.5 mm. It is selected depending on the size and complexity of the image, format and purpose of the drawing. Based on the thickness of the solid thick base line, the thickness of the remaining lines is selected, provided that for each type of lines within one drawing it will be the same on all images.
table 2
|
Name |
Line thickness in relation to the main line thickness |
Main purpose |
||
|
one . Solid thick main line |
0.6 ... 1.5 mm S |
Visible contour lines; visible transition lines; the contour line of the section (made and included in the section) |
||
|
2. Solid thin |
From S / 2 to S / 2 |
Contour lines superimposed section; dimensional and remote lines; hatching lines; leader lines; shelves of callout lines and underline labels; lines for the image of border details ("situation"); Limit lines of external elements on views, sections and sections; transition lines imaginary (traces of planes, lines of construction of characteristic points in special constructions) |
||
|
3. Solid wavy |
From S / 3 to S / 2 |
Cliff line; lines of view and section |
||
|
4. Dashed |
From S / 3 to S / 2 |
Invisible contour lines; transition lines invisible |
||
|
5. Barcode- dotted thin |
From S / 3 to S / 2 |
Axial and center lines; section lines that are axes of symmetry for superimposed or extended sections |
||
|
6. Shtrihpunk-tyrnaya thickened |
From S / 3 to (2/3) S |
Lines denoting surfaces to be heat treated or coated; lines for the image of elements located in front of the secant plane (“superimposed projection”) |
||
|
7. Open 8. Solid thin with a dash |
From S to 1.5 S From S / 3 to S / 2 |
Lines of sections Long lines of break |
||
|
Mami 9. Double-dotted tirnaya with two points thin |
From S / 3 to S / 2 |
Fold lines on reamers; lines for displaying parts of products in extreme or intermediate positions; lines for the image sweep, combined with a view |
||
Note.
The thickness of the lines S / 3 is allowed only for drawings made with ink on formats from A4 to A2.
In dashed lines, the strokes should be of equal length, and the intervals between them should be the same. Dash-dotted lines should intersect and end with strokes. Center lines should go beyond the circumference of 3 ... 5 mm. For circles with a diameter of 12 mm or less, the center lines are drawn in continuous thin.
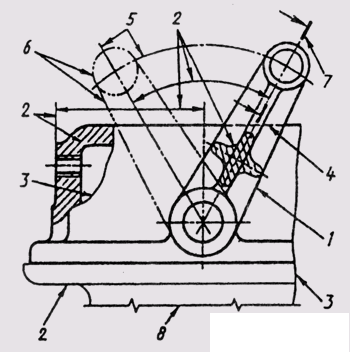
Examples of the use of different types of lines in the drawing are shown in Fig. five.
Lines may have a special purpose, for example, for imaging threads, spline borders, zones with different surface roughness, etc. Their use is governed by ESKD special standards.
The quality of the drawing largely depends on the correct choice of the type of lines, maintaining the same thickness of the stroke, the length of the strokes and the distance between them, and the accuracy of their drawing.

Fig. five
Comments
To leave a comment
Descriptive Geometry and Engineering Graphics
Terms: Descriptive Geometry and Engineering Graphics