Lecture
Projections obtained by central and parallel projection, have a number of properties.
Projection point is a point. For a given center P (... or direction S), the projection of any point A of space corresponds to the plane of the projections n 'the only point A'. In this case, the projection of the point B lying in the plane of the projections coincides with the point itself (see Fig. 43).
The projection of a straight line is straight. In fig. 46 the rays projecting the line m create the plane S, which intersects the plane of projections n ' along the line m', which is a projection on the plane n '; S ~ t; S n p = m '. The projection of a line is defined if the projections of at least two of its points are known (Fig. 49). If in space a straight line is parallel to the projection plane n ', then its projection is parallel to the straight line itself (Fig. 50). In this case, with the central projection, the projections of the segments are proportional to the segments themselves, and with parallel projections, they are equal to them.
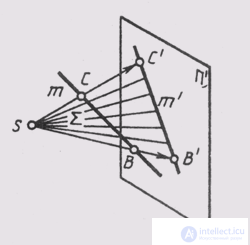
Fig. 49
With parallel projection, the ratio of the values of the straight line segments and their projections is preserved (Fig. 51):
AB / BC = A'B '/ B'C.
With parallel projection, the projections of parallel lines are straight parallel (Fig. 52). If the lines m and n in space are parallel, then the planes S m and S n projecting them will also be parallel. When intersecting them with the plane of the projections n ' we get m' || P'.
The projection of the plane is the plane of the projections. The plane consists of an infinite set of points. When projecting this set, the projecting rays fill the whole space, and
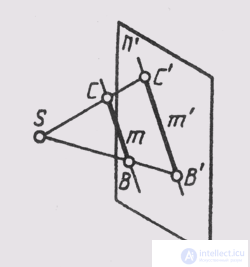
Fig. 50
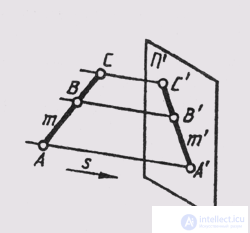
Fig. 51
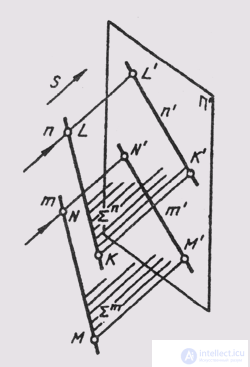
Fig. 52
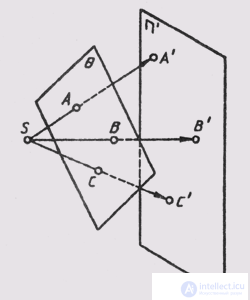
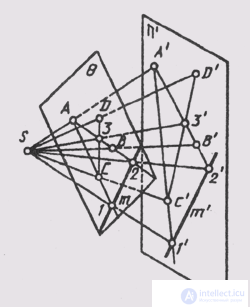
Fig. 53
their points of intersection with the plane of projections n ' are the entire plane of projections.
Since the position of any plane in space is determined by its three points that do not lie on one line, the projection of three such points of the plane (Fig. 53 a) establishes a one-to-one correspondence between the projecting plane and the projection plane n ', which allows defining the projections (Fig. 53, b) any point D or a line of this plane.
If the plane is parallel to the projection plane, then the projections of its flat figures are central to the figures themselves (fig. 54, a), while they are parallel to the parallel projection (fig. 54, 6).
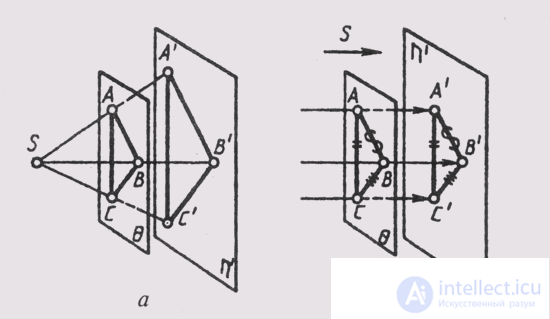
Fig. 54
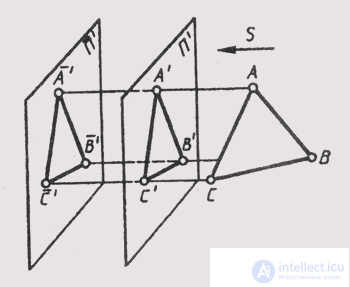
Fig. 55
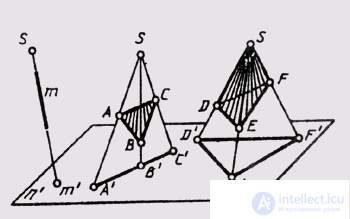
Fig. 56
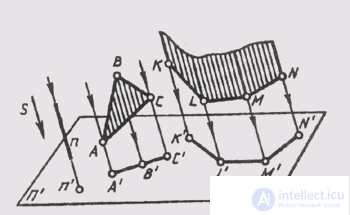
Fig. 57
If the plane of the angle is parallel to the plane of the projections, the magnitude of the projection of the angle, both at the central and parallel projection, is equal to the natural value. In fig. 54, a angle ABC = angle A'B'C ', since ABC is infinite A'B'C', and in fig. 54, b angle ABC = angle A'B'C ', since ABC = A'B'C'.
When parallel projection of the projection of the figure does not change when parallel to the plane j of the projections (Fig. 55).
Straight lines and planes (surfaces) can occupy a projecting position in space if the projecting rays coincide with them. In central projection, these are straight lines and planes passing through the center of projections, pyramidal and conical surfaces, whose vertices coincide with the center of projection (Fig. 56). With parallel projection, these are straight lines and planes parallel to the direction of projection, prismatic and cylindrical surfaces, the edges of which are parallel to the direction of projection (Fig. 57).
All these geometrical figures can be considered consisting of projecting rays, each of which is represented by a point. From this it follows that the projections of lines, planes, surfaces occupying a projection position are points or lines of their intersection with the plane of projections (“degenerate” projections).
Comments
To leave a comment
Descriptive Geometry and Engineering Graphics
Terms: Descriptive Geometry and Engineering Graphics