Lecture
All inscriptions on drawings must be in standard drawing font. The drawing font is also used for writing on other technical documents. In this case, the letters of the font, numbers, individual inscriptions and text are performed by hand. Separate inscriptions may consist of one uppercase letters. The numbers found in the text are also performed with a height equal to the height of capital letters.
All inscriptions and dimensional numbers on drawings must be clear and precise. Inscriptions are made with fonts provided for by GOST 2.304-81 “Drawing fonts”. These fonts include Russian, Latin, and Greek alphabets, as well as Arabic and Roman numerals.
The standard establishes the following font sizes: (1,8); 2.5; 3.5; 5; 7; ten; 14; 20; 28; 40. Font size h defines the height of uppercase (uppercase) letters and numbers in millimeters.
The data concerning the fonts of types A (d = h / 14) and B (d = h / 10) are given in Table 2 , respectively. 3 and 4.
Table 3
|
Font options |
Bypass reading |
Relate- body size, d |
Sizes, mm |
||||||||
|
Font size - height of capital letters |
h |
14d |
2.5 |
3.5 |
5.0 |
7.0 |
10.0 |
14.0 |
20.0 |
||
|
Lowercase height |
with |
10d |
1.8 |
2.5 |
3.5 |
5.0 |
7.0 |
10.0 |
14.0 |
||
|
Spacing between letters |
but |
2d |
0.35 |
0.5 |
0.7 |
1.0 |
1.4 |
2.0 |
2.8 |
||
|
Maximum row pitch (height of the auxiliary grid) |
d |
22d |
4.0 |
5.5 |
8.0 |
11.0 |
16,0 |
22.0 |
31.0 |
||
|
The minimum distance between words |
e |
6d |
1.1 |
1.5 |
2.1 |
3.0 |
4.2 |
6.0 |
8.4 |
||
|
Font line thickness |
d |
d |
0.18 |
0.25 |
0.35 |
0.5 |
0.7 |
1.0 |
1.4 |
||
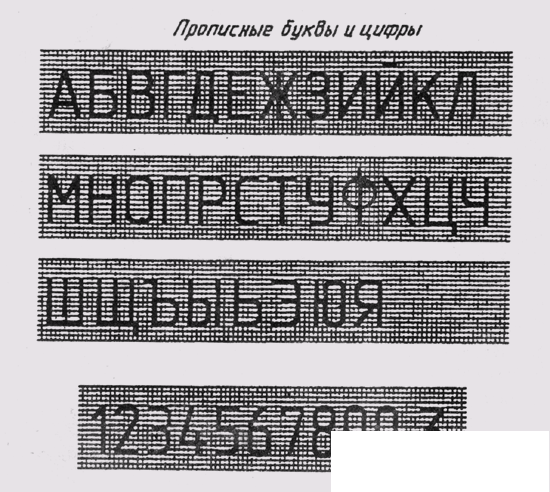
The standard establishes the following two types of font depending on the thickness of d lines of the font: type A (d = 1 / 14h) without inclination and with a slope of about 75 ° to the horizontal line; Type B (d = 1 / 10h) without tilt and with a tilt under 75 °. In fig. 6 shows the shape of the letters of the Russian alphabet and Arabic numerals, executed in font B without a slope.

Figure 6.
Table 4
|
Font options |
OFFICIAL reading |
Relate- body size, d |
Sizes, mm |
|||||||||
|
Font size - height of capital letters |
h |
10d |
1.8 |
2.5 |
3.5 |
5.0 |
7.0 |
10.0 |
14.0 |
20.0 |
||
|
Lowercase height |
with |
7d |
1,3 |
1.8 |
2.5 |
3.5 |
5.0 |
7.0 |
10.0 |
14.0 |
||
|
Spacing between letters |
but |
2d |
0.35 |
0.5 |
0.7 |
1.0 |
1.4 |
2.0 |
2.8 |
4.0 |
||
|
Minimum row spacing (auxiliary grid height) |
b |
17d |
3.1 |
4.3 |
6.0 |
8.5 |
12.0 |
17.0 |
24.0 |
34.0 |
||
|
The minimum distance between words |
e |
6d |
1.1 |
1.5 |
2.1 |
3.0 |
4.2 |
6.0 |
8.4 |
12.0 |
||
|
Font line thickness |
d |
d |
0.18 |
0.25 |
0.35 |
0.5 |
0.7 |
1.0 |
1.4 |
2.0 |
||
Note. The minimum distance between words divided by a punctuation mark is the distance between the punctuation mark and the word following it.
When writing on standard drawings in the standard fonts, the distance a between letters, the connection of lines that are not parallel to each other (for example, G and A, A and T, etc.), is reduced by half, i.e. by the thickness of the font. For all text, the thickness of the lines of one font should be the same.
Executed drawings often have a large number of alphabetic and numeric inscriptions. They must, as a rule, be positioned horizontally. You should avoid placing labels inside the contour of the projections (except for dimensional numbers). If the inscription is applied under the line or underlined with a line, then it should be about 1 mm away from it.
If the inscription crosses the line, then at the intersection of the line must be interrupted. When filling in the graph of the main inscription and other graphic documents, the inscription should be placed at the same distance from the lines bounding the graph.
Comments
To leave a comment
Descriptive Geometry and Engineering Graphics
Terms: Descriptive Geometry and Engineering Graphics