
Lecture
Servicing household microwave ovens is a vivid example of consumer-society ideology in action: the warranty period is set fairly long, but once it expires, repair often turns out to be more expensive than buying a new unit. But you should always keep your receipts.
How this "grind-to-landfill" industrial practice affects ecology and economics is well understood by a narrow circle of trained experts, whose ranks are carefully filtered. That's why for the average citizen the question of how to repair a microwave yourself is obviously important economically, since it is quite technically feasible at home.
However, the microwave oven is no less a clear illustration of another consumer-ideological problem, where the qualities of a product that drive demand for it are pushed to the forefront in every way, genuinely useful but less flashy features are mentioned only in passing, and potential hazards are glossed over with vague wording. The latter is quite significant and insidious in the case of a microwave oven, so microwave oven repair must be carried out with a clear understanding of what and how can be done, what must not be done, and what should be avoided and feared. The purpose of this publication is precisely to give readers such an understanding.
Let's take another look at our "micro", see fig. We immediately notice that the latch tabs have different configurations: they are not merely fasteners, but also parts of the electromechanical interlock system (EMI, see below). Let's also note the waveguide output window, which usually isn't very noticeable. Microwave oven repair will most often involve the assemblies marked with letters; the external control elements for the programmer and power regulator are also indicated. In "digital" microwaves with fully touch control, the electromechanical programmer and power regulator are replaced by electronic ones. Repairing them requires special knowledge, but everything else in "digi-micros" works the same way.
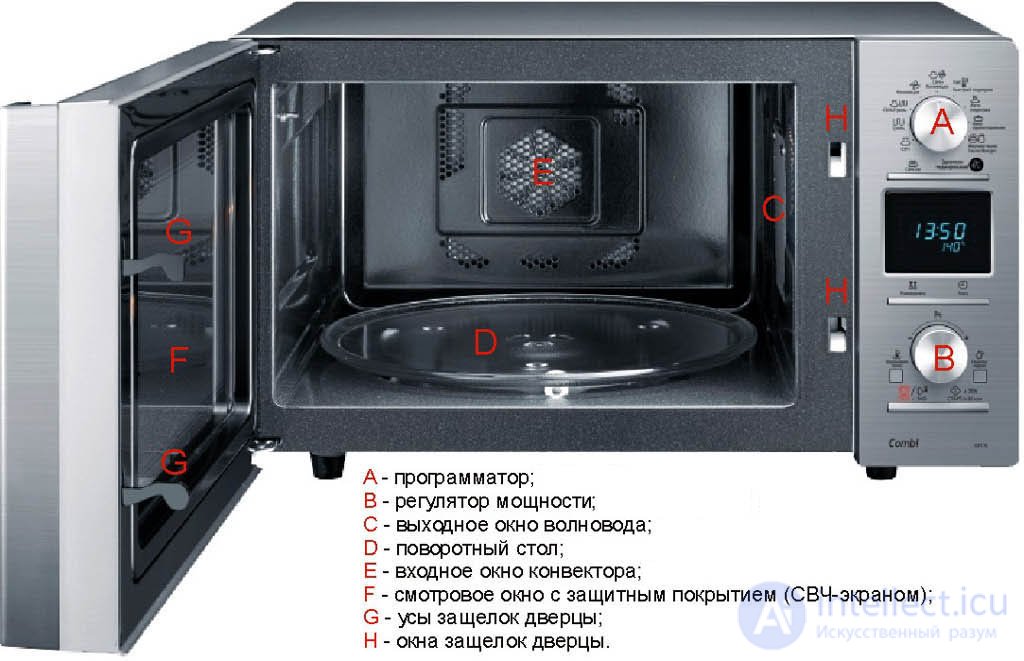
Main external components of a microwave oven
Note: the programmer is often called a timer, even in manufacturer manuals. In fact, the timer is only one of the programmer's functional components.
If you remove the outer casing of the microwave, its construction is shown in more detail, see fig. In newer ovens (on the right in the figure), the assemblies critical to reliability (the high-voltage unit, the EMI, and the programmer) are covered by protective shrouds, and a high-voltage fuse is always added; the first microwaves did not have one.
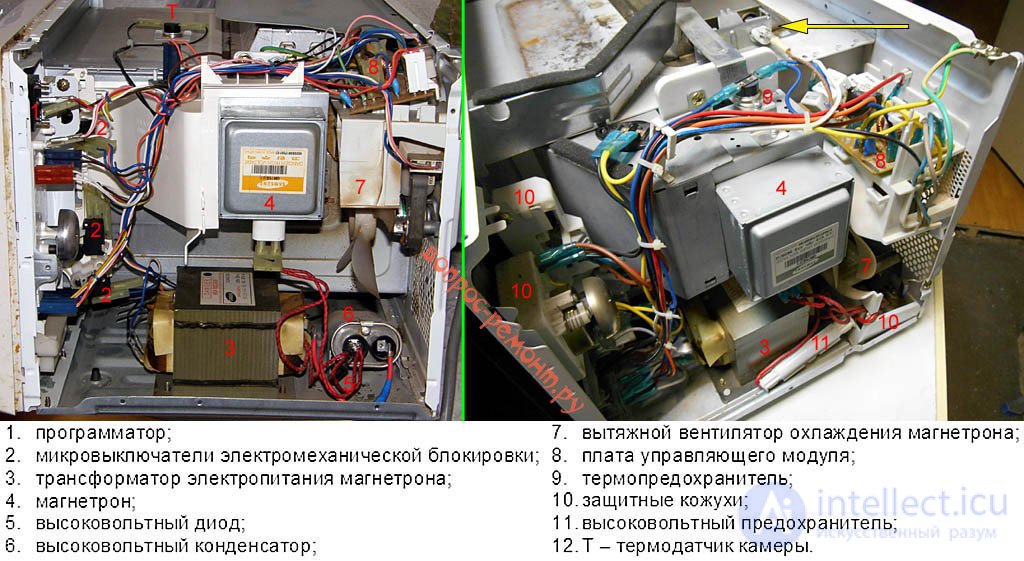
Microwave ovens without the outer protective casing
The two previous figures don't show the light bulb, grill, and turntable mechanism. This is not accidental: reaching them without removing the cooking chamber or without fully disassembling the oven is possible in most modern models (yellow arrow on the right in the figure), and in a few old ones. This complicates DIY repair, since to fix what is generally a simple fault, you most often have to remove the magnetron, which is bad, see below.
All this internal machinery is needed to heat a load of food throughout its entire mass at once using microwave (MW) radiation. It is generated by a powerful, compact microwave generator — the magnetron. For what a magnetron is, how it's built, and how it works, see the video:
In partially electrically conductive media, microwaves penetrate to a depth approximately equal to their wavelength and are absorbed by the medium, releasing thermal energy. The wavelength of microwaves at the standard microwave-oven frequency of 2.45 GHz (sometimes 2.85 GHz) is exactly right to ensure complete absorption of the microwaves by the food load. Here the most useful property of microwave heating manifests itself: because heating occurs throughout the mass, the product's temperature doesn't rise to levels at which fat hydrolysis begins, which produces toxins and carcinogens. This is especially important for reheating food, because if it's done over a flame or with a heating element, hydrolysis of the fats remaining in the food continues, and its already-formed byproducts break down further into even more harmful substances.
Note: microwaves barely penetrate metals at all, since their conductivity is caused not by individual charge carriers but by the so-called degenerate electron gas. This same gas gives metals their luster and malleability. Therefore, placing metal objects in the microwave chamber is strictly forbidden — all the microwave energy will concentrate on their surface, causing excessive heating, arc discharges, etc., after which the only thing left to do is throw the oven away. Though the magnetron's power transformer might come in handy for a homemade spot welder.
However, for that same reason, the physiological effect of microwaves on living organisms is strong, harmful, and may initially be unnoticeable. This requires the application of special safety measures during the design, manufacturing, ongoing operation, and repair of microwave ovens, see below.
The functional diagram of a microwave oven is given in the figure. The configuration of the waveguide and the microwave flow are shown schematically; a more or less accurate diagram is given in the inset at the bottom right.
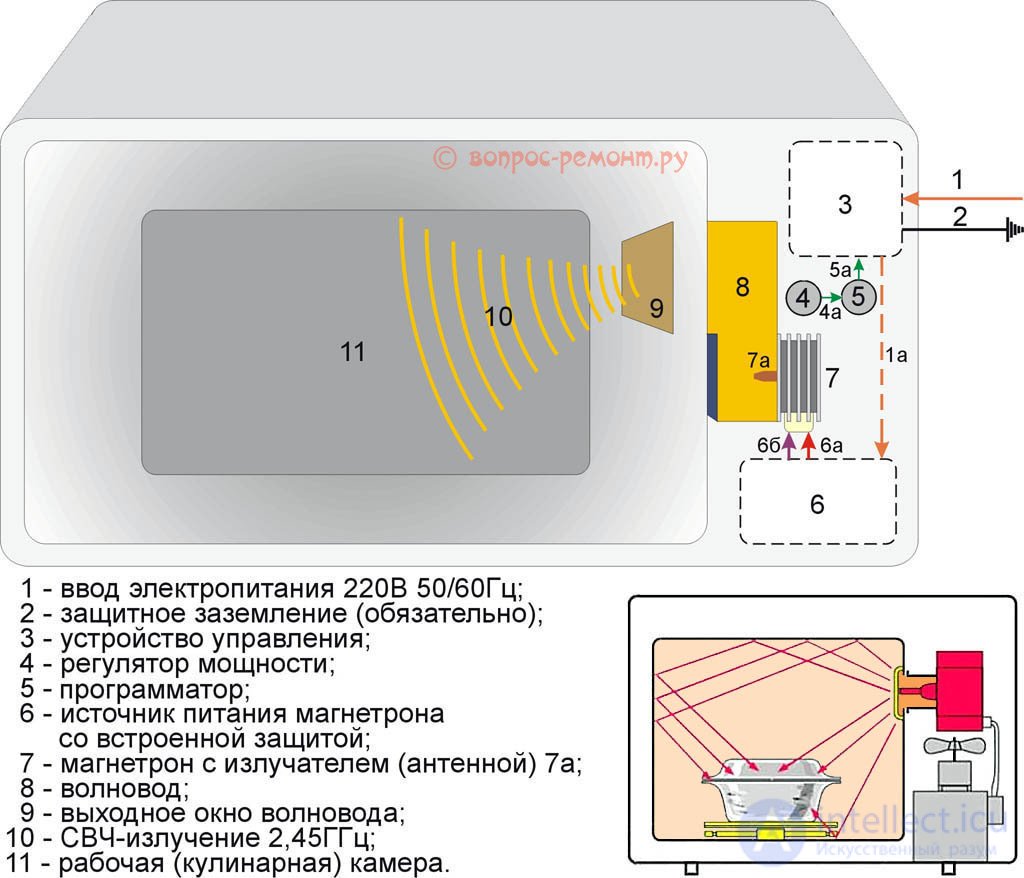
Functional diagram of a microwave oven
1a — mains current pulses at 220 V. The magnetron's radiated power cannot be smoothly regulated, so pulse-width modulation (PWM, see below) has to be used to control it. 4a and 5a — internal control signals. 6a — high DC voltage supplying the magnetron's cathode (emitter) — 4000V; 6b — power for the magnetron's filament circuit, 6.3V 50/60Hz.
Modern microwave ovens are built on the so-called shortened-microwave-path scheme, which increases the oven's efficiency. In this case, the chamber is made to be resonantly tuned, which means, firstly, that without a load absorbing the microwave energy, the oven will burn itself out with its own radiation. This is in fact stated in its instructions.
Secondly, the magnetron produces coherent radiation, so due to interference of the reflected waves within the chamber, the product is exposed to microwaves unevenly. To ensure the load cooks through properly, it is placed on a turntable. As a consequence, a fault in its mechanism can lead to more serious problems, see below. The same is true for a fault in the internal convection system in the chamber, with which modern microwaves are equipped for completely even heating of food.
We will look at this question only superficially, so as not to stray from the main topic. The information will be as simplified as possible, since not every home handyman has deep knowledge of electrical engineering. Let's start with a description and purpose of the main structural elements, shown in the figure below.
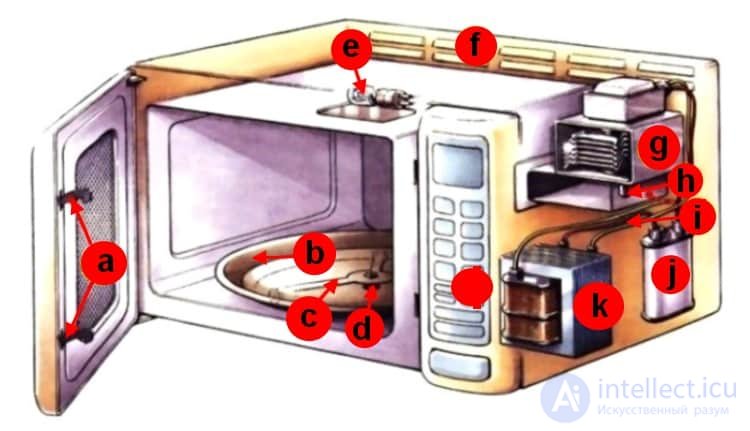
Fig. 1. Microwave oven construction
Legend:
We will not give the complete schematic diagram of the device, since it can differ significantly between various microwave oven models. In our case, the magnetron's power supply circuit will be sufficient. As a rule, it has a standard design.
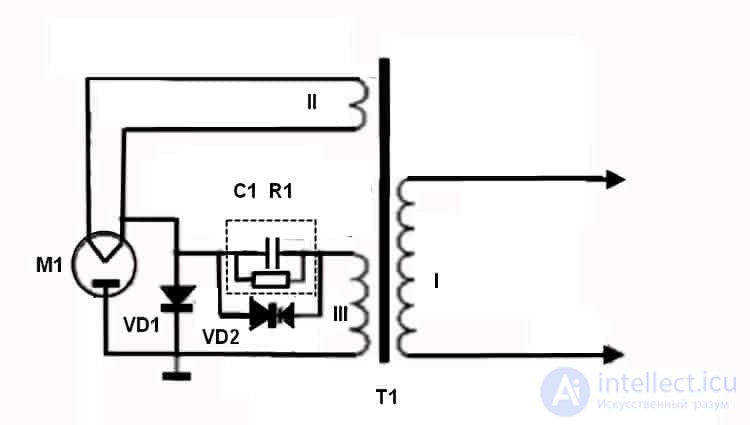
Typical circuit diagram of the magnetron power supply
Let's briefly describe the operating principle of the circuit shown. Power to the transformer's primary winding (I) comes from the external control circuit, which regulates the power and duration of the microwave radiation. One of the secondary windings (II) supplies voltage to the magnetron's filament. Winding II is made of 2-4 turns of thick wire, since the current in the filament circuit can reach 10.0 A at a voltage of about 3 volts.
Another secondary winding (III), which supplies a high voltage level (up to 3.0 kV), is customarily called the anode winding. As can be seen from the figure, in this circuit a rectifier-voltage-doubler is built on the basis of a high-voltage diode (VD1) and a capacitor (C1). Here VD1 is connected so that it turns on during the positive half-cycle, causing the capacitor to begin charging. When the negative half-cycle begins, diode VD1 turns off and the voltage is applied to magnetron M1 together with the charge accumulated on the capacitor. This results in a doubling of the voltage and the formation of an electric field of the required intensity in the magnetron.
Resistance R1 in this case is needed to discharge C1. As a rule, this resistor is located inside the capacitor's housing. As for VD2, it provides protection in case of a voltage rise across capacitor C1 or a short circuit occurring in magnetron M1.
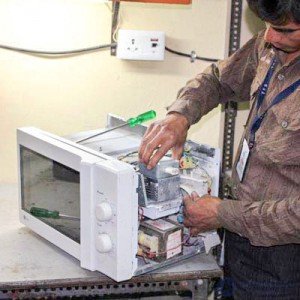
Before starting the repair, you need to gather as much information as possible about the failed device. Ideally, this is the service manual for the specific model. In this document, the manufacturer provides all the necessary data, ranging from the assembly drawing (exploded view) to the fault-finding algorithm.
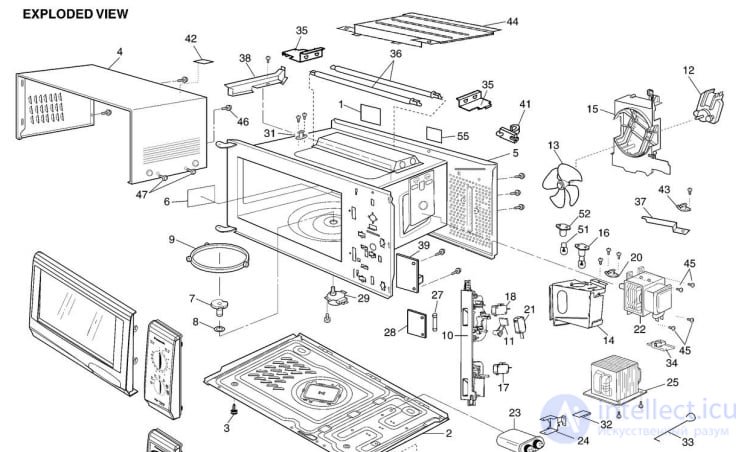
Fragment of a microwave oven exploded view
Unfortunately, manufacturers are in no hurry to share this information, distributing it only among networks of certified service centers. If you manage to find the technical repair documentation, be prepared for it to be in English.
If you weren't able to find the documentation, which will happen in most cases, don't get discouraged — typical microwave oven faults can be identified even without a schematic diagram. It's enough to know what the main components look like and where they may be located. A photo of the microwave with the casing removed will help you with this.
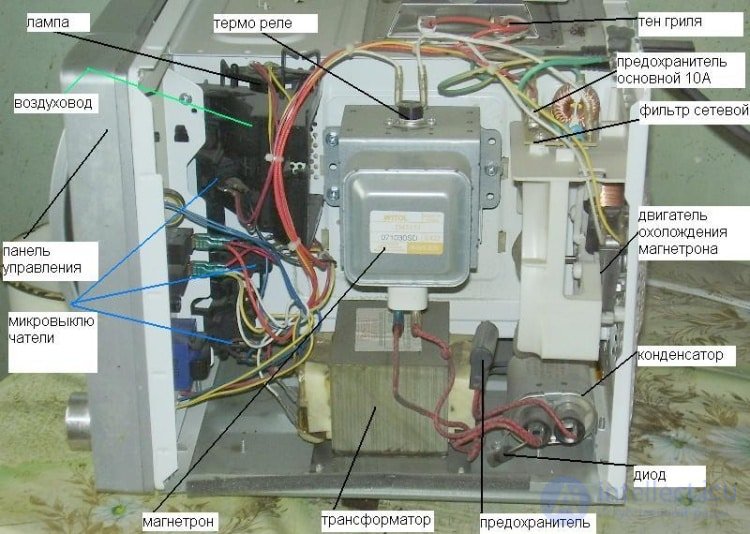
Appearance and layout of the main components inside the microwave oven housing
In most cases the intuitiveness of the process allows you to remove the casing and reach the main structural elements even without an assembly drawing. But in this case you need to remember the order of operations and try not to leave any "extra" parts after reassembly.
What tools are needed?
In most cases, a Phillips screwdriver and a multimeter will suffice. In some cases you may also need a soldering iron. Accordingly, you will also need spare parts, and which ones exactly will become clear after diagnostics.
Already from the functional diagram, a household microwave oven can be conditionally divided into assemblies and modules that require compliance with the corresponding safety precautions during repair:
Look at the back of your microwave oven. You'll see a contact pad down there with a metal threaded stud and a nut on it – if someone hasn't already unscrewed it. This means the microwave oven belongs to Class I hazard electrical installations, which must be connected to a separate protective earthing loop with a current spreading resistance of up to 4 Ohm, permanently, i.e. via a non-detachable connection. A detachable connection to the earthing electrode via a Euro socket is not considered a permanent earth connection. Such requirements for the microwave oven are due to the coincidence, formally speaking, of more than 2 hazard factors in it:
About earthing
In countries with a metal-economical power supply system with a solidly earthed neutral TN-C, including in Russia, it is technically not possible to provide all residential buildings with protective earthing loops, and no global solution to this problem is foreseen in the near future. Safety guidelines send the reader from paragraph to paragraph and from clause to clause, without giving general instructions suitable for every specific case. The general idea: the rescue of drowning people is the work of the drowning people themselves. Seek out any opportunity to arrange a protective earthing loop, even if only an individual one of simplified construction. If there isn't one – regularly check the microwave oven for shielding quality and "leakage" of microwave radiation, see further below. Although formally this would be a gross violation of safety regulations and electrical installation rules, and suing even a helpless homeless person for damage caused by the microwave oven would be pointless. True, there's no need to fear a fine for the violation either; given the wide spread of microwave ovens, this is already legally unrealistic.
The degree of electric current's effect on a person depends on the state of their body, the current strength, the duration of its exposure, and the amount of electrical energy released in the body. Therefore, for example, a television with a CRT and a stun gun (up to 25 kV at the 3rd anode of the CRT and 35 kV at the output, respectively) do not belong to Class I: the high-voltage rectifier of the former is not capable of delivering a dangerous current even in normal operating mode, and the portion of energy at the output of the latter is precisely dosed. Although, if you stick your hand into the television's line scan circuit, the sensations will be most unpleasant. The defining parameters of electric current's effect on a person are as follows:
From this follows the division of electrical installations into 2 broad categories: up to 1000V and over 1000V. The former can still be safe; the latter are unconditionally dangerous. By the way, the television and the stun gun are also dangerous, it's just that their degree of danger is not the highest, since it is caused by a single factor.
One more point must be taken into account: individual susceptibility to electric current varies within very wide limits. This is especially true for the permissible discharge power, which, frankly speaking, is "rule of thumb". It is taken from the calculation that a person under normal conditions releases approx. 60 W of heat, but there is no reliable physiological justification. 60-watt pulses are sometimes used to treat severely and dangerously mentally ill patients, but it is better to avoid pulsed current discharges through oneself altogether, since it is precisely these that most often produce long-term consequences. The microwave oven is particularly dangerous in this respect, since power is supplied to the magnetron in pulses. Therefore, before repairing it, the following preparatory procedures must be strictly followed:
Note: forcibly discharging high-voltage capacitors by any means (e.g., shorting the leads with a screwdriver) outside a specialized laboratory is extremely dangerous! Remember – the energy stored in a capacitor is proportional to the square of the voltage across it!
High voltage is especially dangerous for the electrical installation itself as well – if you work with it incorrectly. For example, grabbing a high-voltage wire with your fingers. Completely de-energized, safe, and discharged. During work, under the influence of the electric field, skin sebum fairly quickly diffuses (as they say nowadays – migrates) into the insulation, which will soon lead to its breakdown. Therefore, work with high-voltage components should be done in clean latex gloves, parts should be handled with tools whenever possible, and upon completion of the work should be wiped with 96% technical ethyl alcohol. Not medical distilled alcohol! Technical alcohol leaves small salt streaks, since sulfation is used in its production. The streaks, once the part is completely dry, are removed with a clean, dry, laundered flannel cloth or, better, a microfiber cloth for cleaning glasses.
The effect of microwave radiation on the human body is in many ways similar to that of penetrating radiation:
Microwave radiation also differs from ionizing radiation in a bad way: it easily leaks out of the volume allotted to it, both through gaps and along protruding electrical conductors. Specialists say – microwave radiation "leaks" very well. Therefore, it is better not to undertake repair of the microwave oven's microwave path, from the power input into the magnetron to the waveguide's output window, yourself without deep specialized knowledge and equipment: if, according to test results (see below), it doesn't leak right after the repair, it will start leaking later.
The matter is further complicated by the fact that the limits of individual susceptibility to microwave radiation are even wider than to electric current. The perception threshold is so blurred that, for example, in the USA a monstrous value of PFD was adopted as the maximum permissible – 1 (W*s)/sq. m. A person directly senses such exposure and must immediately leave the danger zone, since a microwave PFD of this magnitude causes plasmolysis of the body's cells. Long-term consequences – you have health insurance paid by the company. Is medicine powerless in your case? Sorry, you were warned about the possible consequences from the start.
In the USSR they went to the other extreme, adopting a permissible PFD a million times lower – 1 (µW*s)/sq. m; this is approximately 5 times lower than the natural microwave background in mid-latitude regions with infrequent and mild thunderstorms. Everything would be fine, but it turned out to be technically impossible to provide the necessary degree of shielding for microwave installations. Although, by the way, the incidence of occupational diseases among personnel working with microwave radiation in the USSR was approximately three times lower than in America.
At home, without the necessary qualifications, experience, or the required equipment and PPE against microwave radiation, it is still better to be guided by the Soviet standard. Fortunately, testing at home for the presence of stray microwave radiation from a microwave oven can be done with tools at hand and without significant additional expenses. All you need is a digital multitester with the ability to measure temperature and a standard temperature probe. Such devices are usually used to monitor the heating of electronic components in operating devices. Checking for stray microwave radiation is especially important for owners of microwave ovens who have problems with protective earthing. More precisely – who do not have it at all, due to a complete lack of ability to arrange it, e.g., in old apartment buildings.
A new microwave oven, or one right after repair, needs to be checked, firstly, for shielding quality; secondly, whether it leaks microwave radiation during operation. In exactly this order: if the shielding is good, then the dose of microwave radiation you will receive within an hour at a distance of more than 1 m from the oven will not exceed the single-exposure permissible dose for even the most sensitive person.
Shielding
To check the microwave oven for shielding quality, first you need to completely de-energize the apartment/house, by switching off the main breaker on the input panel or unscrewing the fuses on the electricity meter. Leave the RCDs (residual current devices), if there are any, switched on. This is necessary in order to make sure that microwave radiation doesn't leak out through the mains and earthing wires.
Next, place a switched-on mobile phone in the microwave oven, close the door, and try to call it from another phone. From where – doesn't matter, even from Antarctica. What matters to us is to make sure that the nearest cell tower doesn't pick up the marker signal of what's lying in the oven. As is well known, mobile phones, even when switched off, respond about once a minute with something like "I'm on the network," and the phone transmitter's pulse is quite
powerful.
So, if the call did not go through and a message came in like "The subscriber you are calling is out of network coverage or switched off," then everything is basically OK, the oven's shielding is fine and it can be tested further. If, however, the message was "Subscriber unavailable" or "Call failed," then this means the control phone's marker got through to the cell tower, but the voice channel could not be established – the oven's shielding is poor. What to do next with such an oven – is up to you, American-style: "You were warned about the possible consequences."
Leakage
Mobile phones operate in the 900 or 1800 MHz frequency range, and the phone's transmitter is much weaker than the magnetron. Therefore, it is also necessary to check whether the microwave oven's shielding against its own radiation is sufficiently reliable. For this you will need 2 disposable plastic cups with water, an aluminum pot with a lid, and a load of a not-very-moist product that you won't mind overcooking, e.g., potatoes boiled in their skins. The water in the cups should be of the same temperature, equal to room temperature. Therefore, if the experiment is planned in advance, tap water should be poured into any clean container about a day beforehand, and poured into the cups only once it is already in thermodynamic equilibrium with the ambient environment: for a 200 ml container filled with it to reach that state will take at least 2-3 hours.
For the experiment, load the product into the oven and close its door, without starting the timer yet. Place cups of water 10-40 cm in front of the oven door: one «bare», the other in a lidded pot. Measure the water into the cups equally with a graduated cylinder in the amount of 100-500 ml with an accuracy of no worse than 0.5 ml. Set the oven power regulator to maximum without the grill. If possible, it is better to turn off the cavity light. The room should be as dark as possible, and there definitely should be no direct light, including from light bulbs. Now turn the timer knob to the maximum time (usually 30 min) and get well out of harm's way. The power density value decreases with the square of the distance from the source, so going to another room will be completely safe.
As soon as the microwave's bell rings, come back, turn on the light (now it's fine), remove the lid from the pot and, without touching the cups with your hands (!), measure the water temperature in them, carefully stirring with a temperature probe. If the temperature difference between the containers is less than 1 degree (this is twice the probe's own error margin, although the tester shows temperature with a resolution of 0.1 degree), then everything is OK – this microwave can be used for an hour to an hour and a half a day even by Soviet standards. If it's more – again, it's up to you, American style.
Checking the door
If a seemingly serviceable microwave leaks, then most likely the gap between the closed door and the oven housing is more than 0.15 mm. On the Russian internet it's correctly written that it can be checked with a sheet of writing paper with a density of 90-110 g/cubic dm, which happens to be just the right thickness, but the checking method given is wrong. The correct way is to cut a strip of paper 5-7 cm wide and place it under the door before closing it 6 times: at the top and bottom near the hinges, then the same in the middle and near the latches. Each time, the paper should not be able to be pulled out from under the closed door. This way the door will be checked for skew both horizontally and vertically, and it can be corrected by using the play of the hinge mounting bolts in the mounting holes.
Well, now you know enough about microwaves and microwave ovens to decide whether it's worth taking on the repair yourself. If the desire remains, then to finally understand how a microwave oven works, what can break in it, and what degree of caution is needed during its repair, you'll have to turn to the schematic diagram of the microwave oven. Its typical layout, used in many Samsung models and other manufacturers, is shown on the left in the figure. Highlighted in green is the mains filter, designed to keep microwave energy from escaping onto the power supply wires (see below). In blue – the control module with the EMI (electromechanical interlock) system. In mustard – the magnetron power pulse forming device (PFD). Formally, the PFD is part of the control module; their components are located on the same PCB. But PFD faults are specific, so it should be considered functionally separate. Pink denotes the magnetron power supply unit (MPSU).
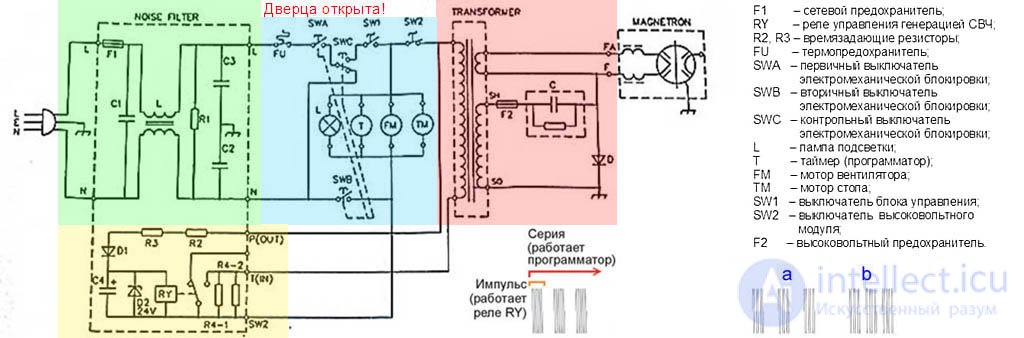
Schematic diagram of a microwave oven
In the mains filter there is a common fuse F1, which can blow in many cases, see below. If the fault that caused it to blow has been fixed, the new F1 must be installed with the same rating (the same current, time, and trip temperature) as the original. F1 provides overall overcurrent protection for the oven, so if the thought of a «jumper wire» has crossed your mind, it's better to switch straight to a new microwave.
The thermal fuse (thermal cutoff) is mounted on the housing of the component that heats up the most – the magnetron – and trips repeatedly: it resets after cooling down. If the microwave oven shuts off due to overheating before the programmer switches it off, this is a sign that the magnetron cooling exhaust fan, its outlet grille, or inlet duct is clogged. If the fan motor is running with knocking, squeaking, or a lot of noise, mechanical wear is likely, requiring motor replacement.
EMI (electromechanical interlock)
Microswitches SWA, SWB and SWC make up the electromechanical interlock system. SWA and SWB are actuated by the upper tab of the door latch, SWC by the lower one. Since the microwave oven is a Class I hazard device and is often operated improperly (without grounding), a complex EMI system is used: double for opening, with a control switch for short-circuiting. This implements one of the safety principles: if an invisible hazard cannot be 100% avoided, it should at least be made visible. The invisible hazard in this case is microwave radiation leaking through a not-fully-closed door, and the visible one is F1 burning out.
Electromechanical interlock circuit of the microwave oven (door closed)
Given the importance of the EMI for the oven's safety and its susceptibility to failure due to grease deposits (see below), the EMI circuit needs to be examined in more detail, separately from the overall circuit, in the state with the door closed (see figure on the right). As we can see, if SWA sticks in the closed position while the door is open, SWC will short-circuit the common power supply circuit, causing F1 to burn out. To prevent false triggering of the EMI, SWC needs to switch slightly slower than SWA. Therefore, first of all, faulty SWA and SWC must be replaced only with switches of the same type.
Secondly, a situation is possible where all the EMI microswitches test normal both with the door open and closed, but F1 burns out immediately upon opening the door. This means that fumes from the food have penetrated the microswitches, their switching times have «drifted», and the EMI has become unbalanced in timing. There's only one solution – replace SWA, SWB and SWC all at once, since they are non-serviceable and cannot be repaired.
Note: these same door electromechanical interlock microswitches should be the first thing checked if the oven doesn't turn on with the door closed. Very often their contacts simply fail to close/switch due to grease deposits stuck on them.
Grease and fumes
We encountered the role of grease and the fumes from it in causing microwave oven faults right away, and there will be even more trouble from it further on. Grease in food doesn't boil in a microwave oven the way it does in a frying pan, but it evaporates, and its vapors settle anywhere, forming a film of residue. This disrupts the operation of the mechanics, causing complex malfunctions (see below). A slightly damp residue film has noticeable conductivity, «confusing» the control automation, while a dry one breaks down at a voltage of less than 500V, which is dangerous for the high-voltage section. It is especially undesirable for residue to get into the microwave waveguide path – repairing the microwave oven in that case turns out to be the most complex and expensive.
To make sure of the ubiquity of grease vapors, you can perform an experiment for which you'll need a completely new pan with a lid. Set the lid aside for now, and melt any cooking fat on the pan until it spreads out. Then let it fully solidify on the pan, cover it with the lid, and keep it like that at room temperature for a day or more. After that, the inside of the lid turns out sticky to the touch – grease residue has settled on it. What will happen from grease in the oven cavity at a temperature of 100 degrees or more is a rhetorical question. Grease residue in a microwave oven is not dark and burnt like in a kitchen, but almost transparent and therefore hard to notice, yet no less harmful.
Let's say our oven is still working fine for now. The product is loaded, the door is closed. The power regulator (see below) is set correctly. We turn the timer knob to the needed time – SW1 closes immediately, turning on the light, turntable rotation, magnetron cooling, and the convector. When they «get up to speed», SW2 will trip and turn on the magnetron power pulse forming device (PFD), and the oven will start heating. When the timer returns to zero, SW1 and SW2 open, turning everything off, and the bell rings. In simple microwave ovens, its spring is wound mechanically when the door is closed, and released by a lever that is pushed by the timer's cam.
Timer
The microwave oven timer is an electromechanical cam programmer, driven by the timer itself: a coiled ribbon spring with a clockwork mechanism, or a micromotor with a gearbox. Several discs with cams that open and close contact groups are mounted on the timer shaft.
Timer faults (we'll call it that for brevity) are most often caused by grease residue. Less often – by breakage of mechanical parts. Even less often, if the timer is fully mechanical – by a weakened spring. The characteristic signs of timer faults are as follows:
The LG microwave oven problem
In some old LG microwave ovens, due to residue in the timer, an occasional and quite exotic fault occurs: the oven turns on by itself and keeps «running» until it shuts off on thermal cutoff. When FU cools down, it turns on again. This is a dangerous fault, since with an empty cavity the magnetron soon fails, and the replacement ends up being more expensive than a new oven. It is observed most often in the off-season before the heating is turned on, but only with the door closed. The cause, as it turns out, is SW1 stuck due to residue and, at the same time, a lump of residue between the contacts of SW2. Its resistance in damp air turned out to be comparable to that of the PFD's timing resistors (see below); the storage capacitor gradually charged and triggered the relay supplying power to the magnetron.
The deposition of residue in the turntable rotation mechanism and the convector acts progressively: uneven heating of the load intensifies the release of grease vapor from overheated spots. Eventually the cover of the waveguide outlet window burns through, which means a complex and expensive repair of the microwave path. Therefore, if uneven rotation of the table or clogging of the convector grilles with residue is noticed, you should, without waiting for it to get worse, disassemble the oven and clean the mechanics. On the condition: don't touch the magnetron and the microwave path, if the oven's design allows it. Otherwise, it's better to contact a service center, prices for such repairs are reasonable.
Based on the claim that food in a microwave oven is cooked from the inside, many think that the heating of the product starts right from its middle and moves outward toward its surface. This is not correct. Unfortunately, microwaves penetrate only 15-20 mm into the product. The depth of microwave penetration largely depends on the density and composition of the food being cooked. Moreover, the microwaves in the oven cavity are also distributed far from uniformly. The distribution area of microwaves in the cavity has a certain constant shape, the configuration of which depends on the design of the specific oven. Some part of the microwaves is absorbed by the product immediately, and some only after multiple reflections from the cavity walls. All this leads to uneven heating of food.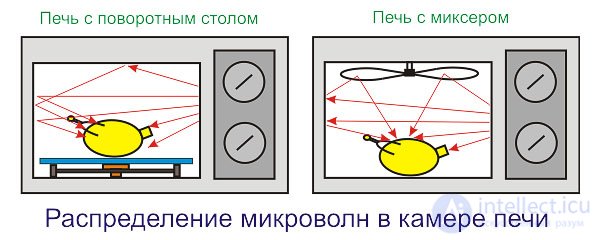
Initially, to solve this problem, microwave oven designers used a so-called mixer. Such a mixer was a metal impeller located at the top of the cavity, driven by an electric motor. Microwaves hitting the blades of the rotating impeller were reflected from them at various angles and scattered throughout the cavity space. But this method of distributing microwaves did not catch on. First, the mixer's design took up part of the cavity volume, and second, the energy of a reflected wave is always weaker than that of a direct one.
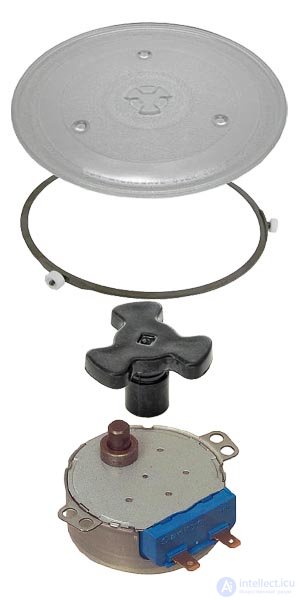
Turntable components, option 1
In modern ovens, the problem of uneven food heating is solved using a turntable. A turntable is a rotating tray (glass or metal) located at the bottom of the cavity. The food being prepared is placed on the tray, and during the oven's operation the food slowly and smoothly rotates in the horizontal plane, which provides more even heating. To achieve smooth and easy sliding of the tray along the bottom of the oven cavity, rollers are used, and a synchronous electric motor with a removable coupling adapter (the coupling is commonly called the turntable's "triangle") is used as the drive for the tray. Various options can be used in turntable designs. One option is when the glass tray has a recess in the center matching the shape of the coupling adapter. The coupling adapter fits onto the motor shaft on one side, and enters the recess of the tray on the other, thereby transferring the rotation of the motor shaft to the tray. In this case, the rollers are a plastic ring with three rollers attached to it, positioned around the circumference at 120-degree intervals. This ring is placed in a recess in the bottom of the oven cavity, between the bottom and the tray. The edges of this recess prevent the rollers from sliding sideways during rotation.
Another turntable design option can combine the coupling adapter and rollers into a single unit. In this case, the triangle is a star with three arms and a coupling adapter in the center. A rotating roller is attached to the end of each arm, and the arm length approximately corresponds to the radius of the tray. The bottom of the tray in such a design is made smooth, without a recess in the middle. To prevent the tray from sliding off the rollers during operation, such a tray has a rim around the edge of the circle. Both turntable design options are widely used in modern microwave ovens.
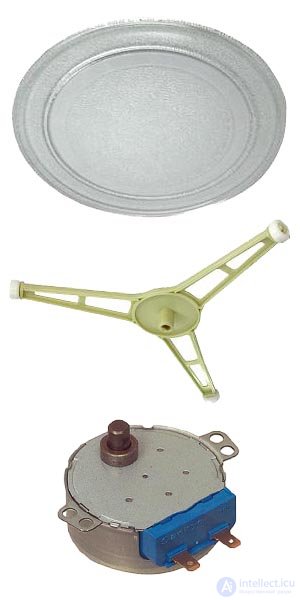
Turntable components, option 2
The magnetron power supply pulse-forming device operates as follows: the large-capacity electrolytic capacitor C4 is charged through the low-power rectifier diode D1 and resistors R2/R3. The zener diode D2 is designed to protect the low-voltage C4 and relay RY from overvoltage. When the voltage on C4 reaches the RY pickup voltage, it applies 220V 50/60Hz to the primary winding of the magnetron power transformer, which delivers a microwave pulse into the cavity. After a short time, C4 discharges through the RY winding, RY drops out, then the cycle repeats until the timer opens SW2 or FU trips. Thus, microwave energy is delivered to the cavity in pulses (see the inset at the bottom center of the schematic diagram).
In the simplest case, power is regulated by switching R2/R3. This changes the charging time of C4, while its discharge time remains unchanged. Accordingly, the ratio of the pulse repetition period to the pulse duration changes -- this is the so-called duty cycle of the pulse sequence. This is pulse-width modulation (PWM), which, as we can see, is by no means the exclusive domain of "digital" microwave ovens. The average power delivered by the magnetron depends on the pulse duty cycle, which the food load, thanks to its thermal inertia, perceives as constant.
To prevent the magnetron from producing a large microwave surge, capable of leaking through any shield, due to energy stored in the transformer windings when power is abruptly switched off, the primary winding of the transformer is not fully disconnected from the 220V neutral, but remains connected to it through high-resistance resistors R4. If they are removed, an otherwise functional oven will stubbornly leak with any grounding. If, on the other hand, the R4 solder joints on the board become charred/degraded, the magnetron will run each pulse longer than it should, overheat, and the oven will shut off due to thermal protection. So remember these "little resistors" well.
In a number of microwave oven models, dual PWM is used, providing greater stability of the magnetron's average power. For this, additional discs with a different number of cams and their own contact groups are mounted on the timer shaft. Power is regulated by switching the power supply pulse-forming device's power from one group to another. In this case, a series of power pulses proceeds in bursts, following one another less or more often (positions a and b in the diagram), while the pulse duty cycle within a burst remains unchanged.
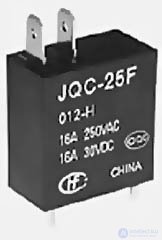
Relay for supplying power to the magnetron
In the power supply pulse-forming device, the relay most often fails (see figure on the right) -- its contacts need to switch a large current. In this case, the magnetron does not turn on and the oven does not heat, although everything else is functional. To test, the RY winding leads are connected to an adjustable power supply, and a multimeter set to ohmmeter mode is connected to the leads of the closing contacts. If, when the voltage on the winding is increased from 3 to 24V, the tester does not show a short circuit, RY needs to be replaced, regardless of whether a click of the actuated contacts was heard or not.
Another characteristic fault is that the oven heats weaker than set by the control knob. It develops gradually: to achieve the same heating, the knob needs to be turned further and further. A possible cause is loss of capacitance in C4, which is replaced with a known-good one of the same type.
Note: another possible cause of a decrease in microwave oven power is the magnetron reaching the end of its service life. Characteristic signs -- the oven is more than 5 years old, has been used intensively, and the power drop develops much more slowly, not over days and weeks as with loss of capacitance in the timing capacitor, but over months. Accurate diagnosis -- at a service center or a production laboratory with the appropriate equipment.
Finally, occasionally a pop is suddenly heard,
and the oven stops heating. Upon opening it up, it turns out that the C4 housing has bulged and cracked. The cause -- D1 has shorted or D2 has failed. In addition to replacing both of them and C4, RY must also be checked, as described above -- its winding could very well have burned out too.
During repair of the high-voltage section (magnetron power supply), its components will need to be tested for continuity. An ordinary tester "can't get" them, its battery voltage is not enough. On the Russian internet it is recommended to test high-voltage (HV) components using a 15-25W 220V incandescent test lamp. "Ringing out" circuits with a "test lamp" is, firstly, directly prohibited by safety regulations. Secondly, this method is very crude and does not give a 100% reliable result.
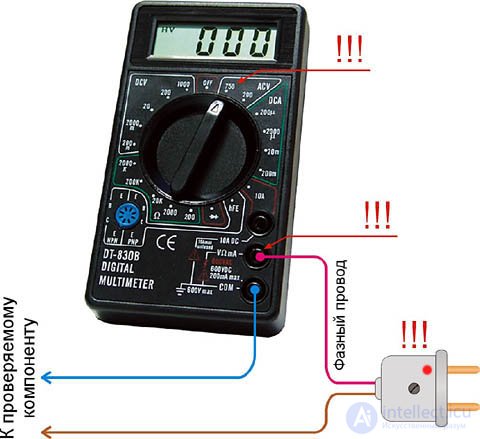
Test circuit for high-voltage electronic components of a microwave oven
A homemade rig for testing HV components (see figure on the right) is, first of all, completely safe: the input resistance of a multitester at the 750V AC measurement range is several megohms. If you accidentally touch the blue wire end, as shown in the diagram, the sensation will be no greater than when using a phase indicator/voltage tester. You only need to mark on the outlet housing where the phase is (determined with the same phase tester), and on the plug -- which pin the red wire (per the diagram) goes to, and insert the plug into the outlet so that the marks line up.
In addition, this rig is much more sensitive and allows finding even potentially faulty elements that cause intermittent oven malfunctions:
Note: nevertheless, remember -- any manipulation of the component being tested (connecting, disconnecting, switching) can only be done with the plug pulled out of the outlet!
The HV magnetron power supply, due to its pulsed mode of operation, is made using a half-wave voltage-doubler circuit. Do not try to build something similar for your own needs -- its transformer must be rated to withstand a short-circuited secondary winding for 5 minutes.
The positive half-wave from the secondary winding of the transformer, closing through the high-voltage diode D, charges the high-voltage capacitor C to its peak voltage of 2000V. The negative half-wave, through the same diode, charges it further to 4kV, as in the voltage-boost circuit of old televisions. Under such emitter voltage (negative relative to the common wire), the magnetron begins to generate microwave energy, C discharges, and everything repeats from the start.
The high-voltage fuse F and discharge resistor R are protective. The first disconnects the magnetron in case of instantaneous overload leading to overheating (e.g., with an empty or overloaded cavity, metal objects or unsuitable food items inside it, or breakdown of the high-voltage diode). Through R, the capacitor discharges quickly, which prevents a microwave "splash" to the outside if the door is suddenly opened while the oven is running.
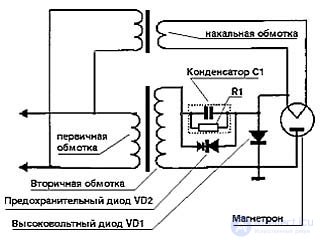
Magnetron power supply circuit of a microwave oven with a protective diode
In this circuit, when F burns out, a microwave splash to the outside is possible in the case of poor shielding and/or grounding, since an electric arc burns for several milliseconds in a blowing fuse. Therefore, in a number of microwave oven models, a magnetron power supply circuit with a protective diode is used (see figure on the right). In it, microwave surges are excluded, but the downside is that the protective diode is just as single-use as the fuse, fails more often, and costs the same as the high-voltage capacitor. The protective diode is tested on the rig described above, just like the high-voltage diode: when it is switched in both the forward and reverse directions, the tester should show approximately half the mains voltage. With a difference of more than 20%, it is faulty, although "cranking" with an induction megohmmeter and a test-lamp test would pass normally.
Any fault in the HV power supply results in the oven not heating, although all its other functions work. In this case, F always burns out. This is basically the same fuse link, only with a spring-loaded wire for faster opening. It is tested for continuity with an ordinary tester. The high-voltage capacitor is tested on the rig described above; the tester should show 10-70V in both directions, depending on the capacitance of the given sample (marked on the housing).
Transformer
After testing all 4 HV components, the magnetron power transformer must be checked. The microwave oven may fail to heat due to an interturn short circuit in its windings (turn-to-turn short). This is not detected by continuity testing with a tester, since it has almost no effect on the winding's DC resistance. It is best to send the suspect transformer for testing to a company specializing in electrical measurements (not in electrical installation work!) or to an electrical measurement laboratory of the power grid company or consumer inspection authority. Prices for such a service are reasonable everywhere.
If it is not possible to get to a lab, the transformer can be checked at home with a fairly high degree of confidence. The method is based on the fact that when there is a shorted turn, the transformer's no-load current increases several times over. Here you'll have to bend the rules a bit and use that same 220V 15-25 W test lamp. You can't determine this on a bench: the current through a multimeter in voltmeter mode is too small, and measuring in ammeter mode is very dangerous.
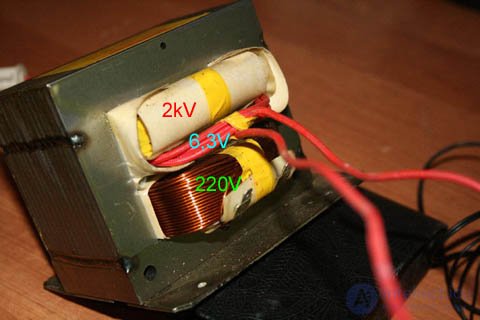
Power transformer of a microwave oven
The test lamp is connected in series with the high-voltage winding. Specifically with the high-voltage winding – with the other one it is extremely dangerous! It's not hard to find the high-voltage winding: it is heavily insulated and, together with the filament winding, is wrapped in additional insulation, see figure on the right. The assembled circuit is briefly plugged into the mains, for no more than 5-10 s. If the transformer is good, the lamp either won't light at all, or its filament will warm to a dull red glow. If there is noticeable glow, there is a shorted turn.
Without experience it can be hard to tell what counts as "dull red" and "noticeable glow". To be sure, let's create an artificial shorted turn. Disconnect the circuit from the mains (!!!), short the filament winding, and briefly plug it into the mains again. The lamp should flash much brighter than in the first case. If the glow doesn't change, or changes only slightly, the transformer has a shorted turn and is unusable.
If all the high-voltage components have been checked and there is still no microwave generation, the problem is likely the magnetron. Without removing it or disassembling the waveguide path, you can use an ordinary multimeter to check the magnetron for an internal short. This occurs due to delamination of the cathode coating, which shorts the gap between it and the anode.
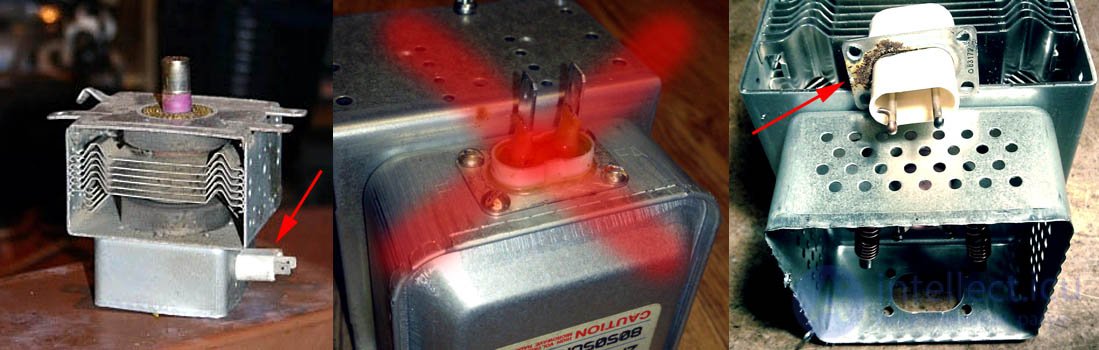
Typical faults of a microwave oven magnetron
Almost as often as an internal short, the magnetron's cathode filter breaks down (shown by the red arrow on the left in the figure). This is not just a connector, but a pair of high-voltage feedthrough capacitors. Don't try to pick apart the capacitor potting compound (in the center of the figure); firstly, this is unlikely to show anything, and secondly, its crumbs, and especially its dust, are toxic. First of all, you need to measure the resistance between the leads with an ordinary multimeter. It should be close to zero: the leads are connected to the filament, whose current is about 10A at 6.3V.
You need to carefully unscrew the collar holding the feedthrough capacitors; in many cases this can be done without removing the magnetron or touching the waveguide path. Most likely, the breakdown will be visible right away (right side of the figure); if not – carefully cut the collar away from the filter inductors and, on the bench, ring out each lead to the flange. If the "feedthroughs" are good, the multimeter will show zero in every case. If there is even a couple of volts – there is a hidden breakdown or leakage under voltage. If everything seems fine but the oven still doesn't heat – the cathode has suddenly lost emission entirely and the magnetron is unusable. This happens with magnetrons, high-power generator klystrons, and traveling-wave tubes (TWT); the cause is loss of hermetic sealing in the housing, which is supposed to hold a deep vacuum. What else can happen specifically with a magnetron – the magnets have demagnetized from overheating. In that case the high-voltage fuse will blow immediately on power-up.
Logically, the microwave cavity comes last in this discussion, but it causes, and suffers, more damage than anything else. A disaster like the one in position 1 of the figure may not be as bad as it looks: the cavity coating is generally designed to handle such cases. Unless someone tried to boil eggs in the microwave – boiled-over denatured protein bakes permanently into the coating, which means a new oven is needed. Debris should be carefully removed from the cavity, it should be washed with the detergent recommended by the manufacturer, and inspected for scratches deeper than roughly 0.1 mm by eye. After that, check the smoothness of the turntable rotation by hand and perform a shielding and "leakage" test. There is a good chance the oven will still be usable. But if the coating has burned all the way through (position 2), it's a lost cause – a new oven is needed. No matter how you repair it, it will leak "point blank, straight through".

Damage to the cavity and waveguide window of a microwave oven
Perhaps the most common fault in household microwave ovens is: everything works as it should, the load is appropriate and previously heated without issues, but there's arcing in the cavity. In that case, with clean hands in a clean, dry room, carefully remove the protective cover of the waveguide's output window – if it can be removed from outside, without disassembling the waveguide path. The cover is made of muscovite mica or mica cloth and is fairly fragile. The outer side of the cover may look clean or have barely noticeable damage, but on the waveguide side you'll find a completely different picture, positions 3 and 4. That's the work of grease vapor and cooking fumes.
The cover must be replaced with an identical one. Home tinkerers eagerly suggest: "I'll cut one from 1.5 mm material! Four times the lifespan of the factory 0.4 mm one!" In reality, mica is not perfectly transparent to microwaves; a thick cover will heat up, strongly absorb grease vapors, and last less than the original. But the main issue – the oven will fall out of its proper mode and start leaking badly.
If the microwave has a short waveguide path, the inside of the waveguide (more precisely, the output cavity) and the magnetron's antenna (radiator) will be visible under the cover. If the cavity's coating hasn't blistered, cracked, or
продолжение следует...
Часть 1 Microwave Oven Repair: Algorithm and Example of Fault Finding
Часть 2 Sealed containers, such as plastic bottles, cups with screw-on lids,
Часть 3 Algorithm for troubleshooting a microwave oven - Microwave Oven Repair:

Comments