
Lecture
An intercom (most often referring to an intercom system) is an electronic system consisting of devices that transmit a signal from the call unit to the handset/talking device.
An intercom system is a type of access control system. It may be equipped with automatic locking devices (ALDs) of either electromechanical or electronic type. By the method of signal transmission: wired or radio.
The most sophisticated intercoms are used to ensure the safety of residents and the security of their property, and are installed at the entrances of apartment buildings. Modern apartment building intercoms are equipped with the following devices and functions:
Intercom systems are constantly being improved for specific tasks and requirements set by customers, and today represent a multifunctional microprocessor-based system with modular addition of one function or another. As of 2015, there are no legislative acts or decisions by which an intercom could be classified as a PLD (talk-and-lock device) system or as an internal communication system. Certification is not required for the installation of these systems. Also, there is still no unified naming: intercom, intercom system, PLD, etc.
An intercom – is a piece of equipment that has its own service life, during or at the end of which various failures of individual components arise.
In this article we will look at the repair of such fundamental components as the electromechanical lock and the handset. Less often, the problem occurs in the wiring or call panels.
Low-subscriber-count intercoms for a single apartment, private house, enterprise, company…
Multi-subscriber intercoms are most often installed at the entrances of multi-story apartment buildings.
Multi-subscriber intercoms are divided by addressing principle into coordinate-matrix and digital types. Coordinate-matrix intercoms are the most widespread.
Audio intercoms (the audio handset is similar to a regular telephone and a mini-PBX (microphone, speaker, buttons) with reduced functions, for example you cannot call from one apartment to another by dialing its number; near the entrance there is a hands-free phone without a handset) are inconvenient in that you cannot see who is at the door, and the conversation is not recorded; it happens that people have similar voices, etc.; audio intercoms cannot be used by deaf people.
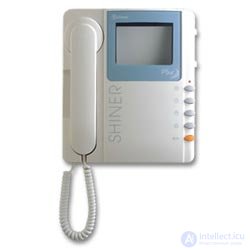
Video intercoms (similar to a videophone) are equipped with a video camera and transmit sound and image; some models allow automatic recording of photo, video, and audio of those who press the intercom buttons. There are models with black-and-white or color screens.
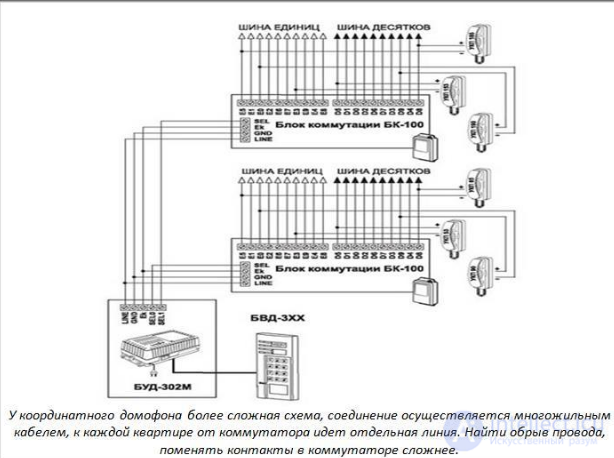
Operating principle of the coordinate-based communication and access system of an apartment building:
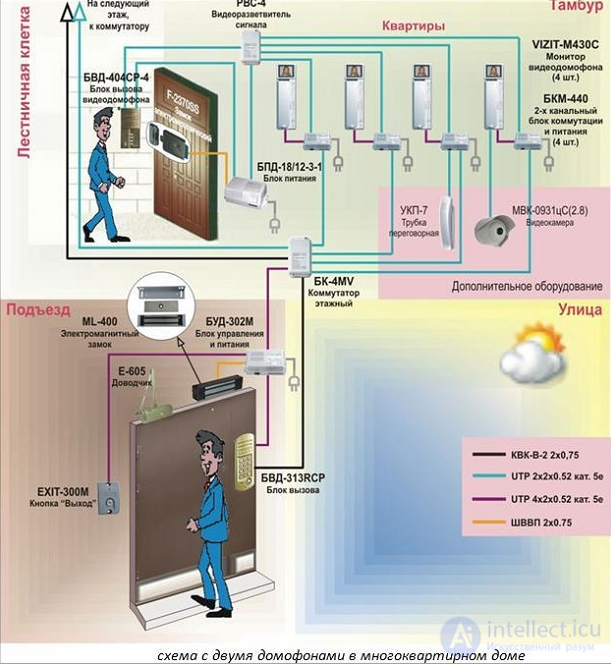
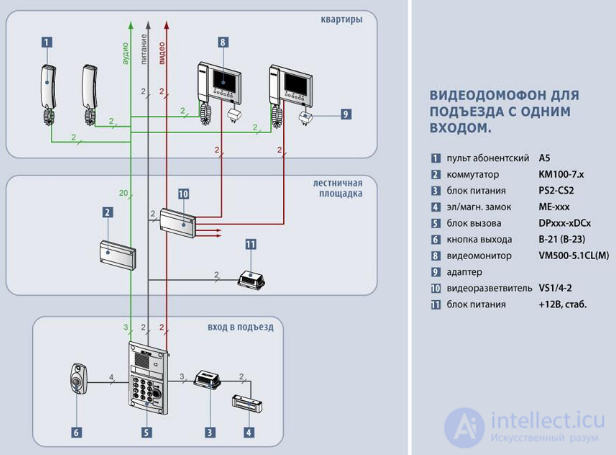
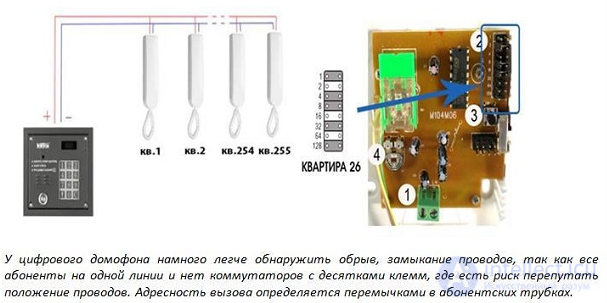
In coordinate systems, the CU's switch recognizes the room number and directs the signal specifically to the selected subscriber. The latter answers the call, and, if they decide to open the door, performs a return action — pressing a button on their unit (handset), which unlocks the lock on the door (most often magnetic) via the control unit. In a digital system the principle is the same, except that signal delivery is handled not by a switch but by a chip in the main control unit.
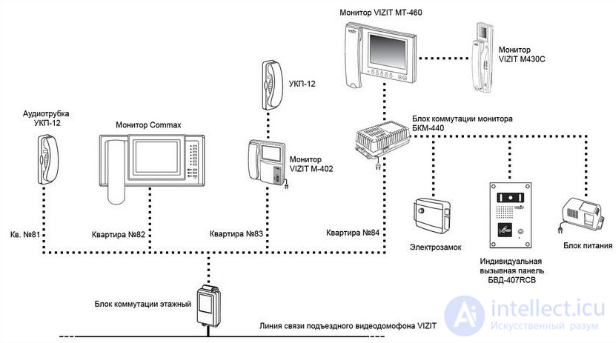
Knowledge of the design and operation of the intercom will help understand which parts may break. Most often these are:
«The intercom business» — the activity of companies in Russia and the CIS countries that install intercoms and reinforced doors at entrance entryways, as well as servicing intercoms — often causes complaints from some residents. In particular, opinions are expressed about the inadmissibility of collecting money for the installation of an intercom without holding a general meeting and approving the decision by a majority vote , instead of which residents are often presented with a "done deal," justified by difficulties in obtaining the consent of the majority of residents.
Complaints and doubts about the legality of the actions of intercom-installing companies also arise in cases where the installation of an intercom is promoted (sometimes with signs of fraud) by one of the residents of the building, who then concludes a contract with the company on behalf of the residents, without a power of attorney from them authorizing such a contract. Residents who did not consent to the installation, and who are defending their right to refuse services they did not order, oppose being forced to pay for intercom installation and maintenance services.
Also causing misunderstanding is the requirement of an additional monthly maintenance fee for a device that residents purchased and installed at their own expense. There is no such requirement, however a number of residents find the proposed subscription maintenance scheme for the intercom convenient, since it is designed to guarantee prompt fault correction and technical maintenance of the device and relieves them of the need to pay for each technician call-out.
Criticism of the actions of intercom-installing companies is also based on the assumption that the monthly subscription fee they charge residents under a «maintenance agreement» is disproportionate to the volume of maintenance services provided for the device. For instance, the annual maintenance fee for an intercom in Russia is around 300—700 rubles per apartment, which, calculated for a 100-apartment building, brings the company about 50 thousand rubles in annual revenue. At the same time, one should not forget that companies servicing intercoms maintain a staff of repair technicians and repair (or replace) unrepairable intercom equipment at their own expense in the event of vandalism or scheduled replacement. It has been suggested that the intercom maintenance business operates on the threshold of a healthy profitability of 10-15%.
A common case is the inclusion of the intercom maintenance fee in payment documents for housing and utility services. This is carried out on a paid basis by billing centers, which are instructed to do so either by the management organization (or homeowners' association) that has concluded a maintenance agreement with the intercom company, or directly by the intercom company that has concluded a maintenance agreement with the residents. In doing so, very often there are simply no lawful grounds for collecting payment from residents (arbitration court rulings.).
An important point when installing an intercom is the ownership of the installed equipment (except for the in-apartment subscriber units, which almost always become the property of the residents) — whether it belongs to the residents or to the intercom-installing company — which is determined by the terms of the installation agreement concluded. Equipment owned by the servicing organization may be dismantled by that organization upon termination of service.
Denying a resident access to the entrance and apartment because the resident did not want to pay for the intercom installation and does not wish to use the handset is unlawful. As a rule, these situations are resolved by issuing such residents with free keys or access codes. Experienced intercom-installing companies include the cost of keys for residents who declined the installation in the overall estimate. However, if there are enough residents refusing to pay, this may lead to termination of intercom maintenance and possible dismantling of equipment owned by the intercom company.
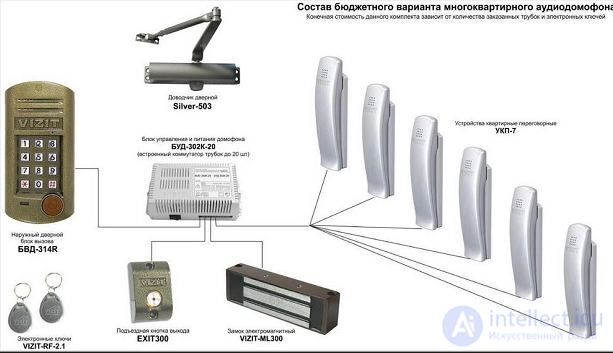
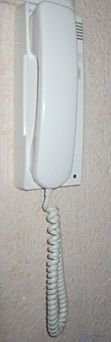
With the growing popularity of intercoms and their prevalence in multi-apartment buildings, many owners often encounter a problem such as a broken handset – the very one through which people outside the building request entry.
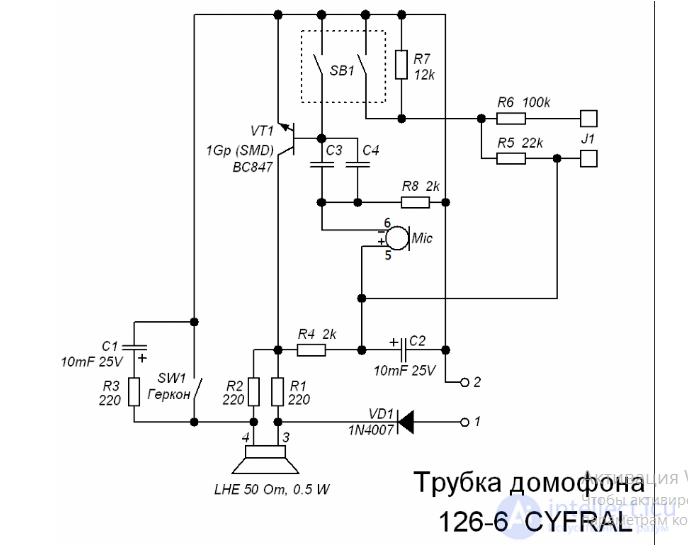
Particularly cunning technicians may hike up the repair price if they discover that the apartment owner has no idea whatsoever about how a given piece of equipment works. And if the handset is also of poor-quality manufacture and prone to frequent breakdowns, one might just clutch their head at how much money goes into repairs! If this problem is familiar to the reader, then it's high time to learn to repair this protective element by hand, practically free of charge.
Among the typical problems, the following can be highlighted:
And these occur due to malfunctions of the intercom's calling system, but there are also physical faults within the handset itself. Depending on the model and manufacturer, the handset is fitted with LEDs, the ability to mute sound, change the ring tone, ring volume, and the ability to connect a second handset, along with its own standard functions – the intercom door-opening button and the intercom speaker unit.
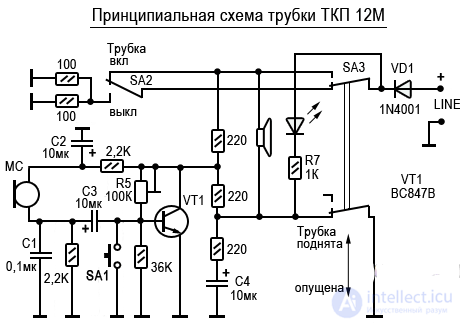
If you take apart the handset's housing, you can see an ordinary circuit: a small board, several wires, a speaker, a switch, a button, a reed switch, and all of it amid a huge amount of free space. Most often it is the reed switches, switches, buttons, and the housing itself that break. The main causes of their failure are:
Most often it is the housing's «tabs», which serve as the holder for the handset itself, that break. The repair method could not be simpler: just solder the broken-off part back into place, and if you have good super glue – that will do too, though not for very long. If such a «tab» also includes the speech circuit, then you will have to use only a soldering iron and with extra care, so as not to cause a failure of the entire rest of the system.
Another common handset problem is poor functioning of the door-opening button. It may not work on the first try or may act purely as a reset.
The root of the problem is always the microswitch under this button.
To begin the repair, you need to open the handset and inspect the switch. It is usually installed in one of two positions:
If pressing the door-opening button causes the ring to reset while the door does not budge at all, then you need to assess the soldering quality of the wires near the speaker in the handset. By re-soldering the wire, you can get rid of this problem completely.
But a rarer case may also occur: a break in the wire of the speaker coil, and, unlike the first problem, it cannot be visually diagnosed – you will have to use the continuity tester function of a multimeter or tester. But the most frequent cause is contamination of the contacts designed to disable the ring, so as not to wake the whole building because of a late guest who dialed the wrong number.
Another problem – the ring resetting immediately after picking up the handset. Depending on the handset model, either a reed switch or a switch located under the tab is responsible for disconnecting the circuit when the handset is returned to its base without the door being opened. In this case it is enough simply to replace the faulty switch.
Reset when dialing an apartment – a situation that occurs right after the intercom and handsets are installed in the building. If the technician did not account for the polarity of the many wires and contacts when connecting them, which is significant and is the root of the fault, then the caller simply will not be able to get through to the desired apartment.
With modern intercoms this may not happen, because polarity markings are present at the base connection point to the trunk line, as well as on the wires.
Poor audibility during a call – a fault in the microphone and speaker. On the board of most intercoms there is a trimmer resistor, directly linked to adjusting the balance between the microphone and the speaker. By memorizing the initial position of the slider, nudging it back and forth and returning it to its original position, you can get rid of poor audibility entirely. But it is worth noting that terrible audibility, interference, and unpleasant sounds may be a consequence of frugality – a consequence of buying a cheap intercom.
Defining this element is simple – it is the mechanism that directly closes the intercom. There are several factors behind its failure, and they may occur either together or separately:
The first and most necessary step in repairing any part – diagnostics. Thanks to it, you can determine the plan, duration, and cost of the work, and it should be carried out regardless of how obvious the problems seem.
Repair and restoration work continues with the purchase of the parts needed for replacement, followed by – checking the condition of the cable line. You can install new parts yourself, but whether they will actually work – that's a different question, and it's better to find the answer in the early stages of the work.
A rubber pad should be installed under the lock's armature, thanks to which no external forces will be able to force the door open, thereby deforming the armature or mounting hardware.
Surface irregularities to which the electromechanical lock will be mounted must be measured, leveled with a hammer, and holes drilled in the required locations, calculating them as precisely as possible several times to avoid misalignment. Leaving gaps for future adjustment, you can then fine-tune the lock's position and how tightly it fits against the armature. The lock installation is complete.
If the cable line is also in poor condition, it needs to be restored. You should check the joints, seal them with electrical tape or corrugated conduit if needed, and splice or fully replace torn wires if their appearance is unsatisfactory. If everything is done correctly, the mechanism will work instantly.
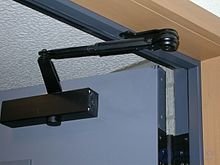
All that remains is to check the operation of the door closer. If it's not suited for outdoor use, replace it, and adjust the pressure regulation seasonally, where the closing motion of the door moves quickly for the first 2/3 and slowly for the remaining third. This way, you can avoid loud, unpleasant slamming in summer, and slow, heat-preserving closing in winter. Repairing the lock will cost around two and a half thousand rubles, and together with the handset – in most cases it's free.
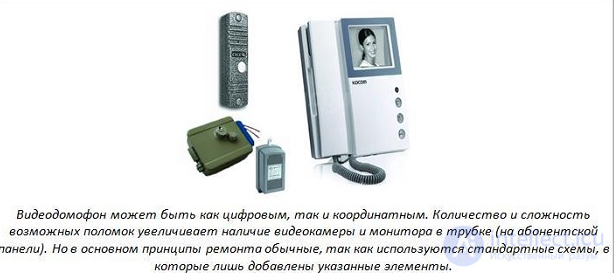
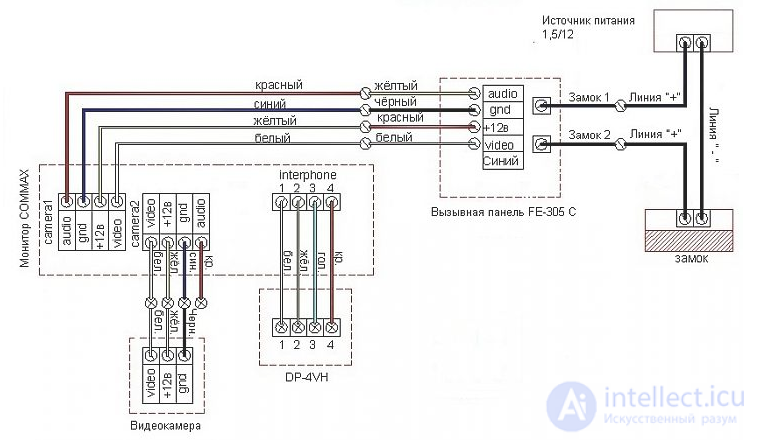
All malfunctions can be divided into the following groups:
The most common causes of intercom system failure are as follows:
It's better to entrust these problems to the experienced hand of a specialist rather than doing it yourself: this way you might not only fail to fix the intercom, but also make things worse, causing extra trouble for the company that will have to be called out anyway.
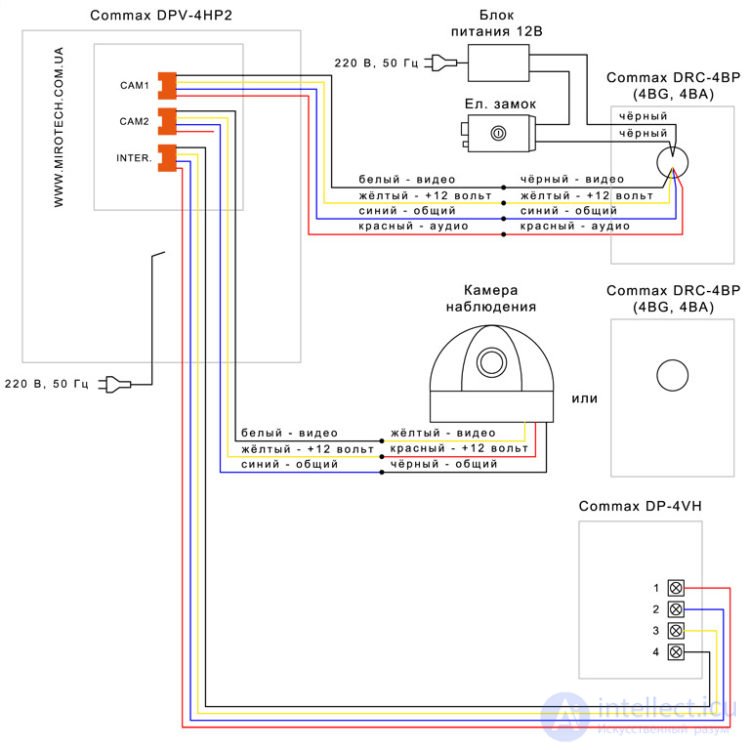
But, in order not to become the victim of sometimes greedy technicians who see a complete lack of knowledge about intercom technology in the owner, here is a list of necessary work that technicians are obligated to carry out:
Faults in a separate video camera are caused by dust and rust getting onto the control (mother)board.
In this case, both the owner and specialists can simply disassemble the camera and thoroughly clean it of contamination; the only difference is that in the first case it will be completely free. Standalone video cameras, which have a solid, one-piece housing with an anti-vandal, weatherproof, and thermal-resistant design, completely eliminate all contamination risks.
There is a large group of problems directly related to the electronic and electrical aspects of intercom operation. The main types of faults: breaks, short circuits in wires, contacts, as well as incorrect polarity, damage to power supplies, speakers, microswitches.
The sign of a malfunction is that when the handset is picked up, there is no connection with the caller. The case of mechanical damage to the holder was discussed above. But the microswitch may also be a reed switch — this is a small tube with contacts that close/come together when a magnetized element approaches.
If there is no visible mechanical damage, you can connect two wires (without unsoldering the part itself) before and after the reed switch and short them directly, thereby checking whether the connection appears. In fact, any switches are checked this way. To fix it, you need to buy and solder in a new part.
The essence of the fault in more detail: a ring, a call, the subscriber conducts a conversation, presses the open key, but the entrance (lock) remains blocked or several presses are required.
The cause lies in the microswitch (SB1 or 2, tact button). To fix it, you need to remove the cover and inspect the mounting point and this «tact switch». If the part is located separately from the board, check how the contacts are soldered — they may have come loose; if they are held securely, then most likely the tact button itself has broken.
It should be noted separately that the «tact switch» is a fairly unreliable part; over time its contacts oxidize or it fails on its own. This element, like the reed switch, is easy to replace: it's cheap and sold in all electronics stores. Resoldering requires some experience, but the manipulation is manageable for those with even minimal soldering iron skills.
The diagnostic process is standard: solder the contacts of any switch, for example from a desk lamp, before and after the «tact switch», and by turning it on/off, check the handset's functionality. You can simply use wires and close/open them. If unlocking occurs, then the problem was in the tact button.
Description of the malfunction: when access is granted by button, instead of unlocking the lock, the call is reset and the entrance remains locked. You should check whether there is a break in the wires, or loose contacts near the speakers. Loose wires should be soldered back. It's important to observe polarity here.
There are also cases of no connection, but the lock unlocks when the button is pressed. The problem is related to a break or short circuit in the wires of the speaker winding. Such a fault cannot be determined visually — you need to use a multimeter.
Certain models, for example, the domestic Cifral KL-2, are equipped with a component that disables the speaker (sound indication) during a call. This option is practical if the subscriber doesn't want to be disturbed. In models with this feature, due to wear or contact contamination, sometimes the call gets reset instead of unlocking the door.
When the device is functioning properly, a reset occurs when the handset is placed back on the base without pressing the open key, but with a fault, the reset occurs when it is picked up. The switch — mechanical (under the tongue-holder) or reed — disconnects (opens) the circuit. The solution to the problem — replacing the microswitch, checking and resoldering its loose contacts.
The fault where there's no connection, and the call resets immediately or during dialing on the outdoor unit, often appears after installing the handset unit inside the premises. The cause — a swapped position of «+» and «–». This is especially typical when a trunk wire running into the premises is used in the form of ordinary flat telephone cable with ends indistinguishable from each other.
The contact points connecting the base to the trunk line are typically marked with «+» and «−», but problems sometimes arise distinguishing the wires, so it's recommended to mark them additionally. Failure to observe polarity leads to a reset instead of a ring tone. The solution to the problem — «repolarization», swap the wires in the handset connecting it to the outdoor call panel.
First of all, attention is paid to the speaker and microphone. First, the elementary points are checked — contacts, soldering. You can easily wiggle the cord and connector — if significant interference or periodic increase/decrease in volume is observed, the contacts are probably loose.
As a rule, there is a trim potentiometer on the board (some products don't have one, for example, the Cifral KL-2), which adjusts the balance of the microphone and speaker. Before touching it, remember (or photograph with a smartphone) the slider's position. Then move the regulator in different directions and return it to how it was. Perhaps dust or dirt got into the contact — the movement will eliminate these defects.
Another factor of malfunction — capacitors on the microchip, but replacing them requires the skills of an electronics hobbyist.
Signs of a fault in the power supply of the building's intercom and access system:
Typically, the system has two channels at 12 and 18 V from the power supply: for the electronic part and the lock. In this case, if the contacts and wires are all fine, attention is paid to the fuses, and they are replaced. Such a repair requires the experience of an electronics hobbyist and correctly selected new parts, so technicians are more often called in.
Breaks in the power supply cable are checked with a multimeter: set the tester to continuity mode; a sound signal (if the tester has this option) and «0» on the display indicate the cable is intact; if it shows «1» and the device doesn't beep — there is a break.
Repairing a video intercom is more complicated due to the presence of the lens and monitor, but overall the repair principles are as described above: analysis of the condition and position of the contacts, microswitches, and so on. To check the video camera's functionality, it needs to be removed and connected directly to the indoor panel. If the device works, then the cause of the malfunction is most likely a break in the wire or contacts. If all the power and connection cables have been checked and there's still no video — the issue lies in the device's microchips, and then the repair is only accessible to users experienced in electronics repair.
As it turns out, intercom repair and maintenance is a necessary and not overly complicated procedure that ensures the reliability of the protection for which funds were collected from the entire entryway, or even the whole building. If you managed to convince stingy neighbors to chip in for the purchase and installation of an intercom, then to avoid wasting even more nerves, we can advise simply taking on the repair yourself, since if you want something done well – do it yourself. And if your neighbors are amicable toward you and you've encountered a breakdown – it's a chance to earn a little money, one that shouldn't be missed.
The total cost of a complete repair of the entire video intercom system can exceed several hundred dollars. It should be noted that the technicians are required to provide a document listing all stages of diagnostics and restoration. Only if all items have been completed and no further faults are observed can the owner sign the document.
Therefore, it is very worthwhile to repair and service such relatively simple but expensive equipment.

Comments