
Lecture
Open Source projects are gaining more and more momentum every day: new ones appear, and popular ones develop actively.
Projects such as Bootstrap, Angular.js, Elasticsearch, Symfony Framework, Swift and many others attract new developers, and their communities keep growing. All of this drives tremendous growth for the projects, and the developers themselves find it exciting to take part in building something used by the whole world.
Like many other programmers, I couldn't resist and, from time to time, also take part in developing Open Source projects, mainly in PHP. But when I started out, I ran into a problem — I didn't know how to properly organize the process of «contributing», where to begin, how to make sure my Pull Request would be reviewed, and so on.
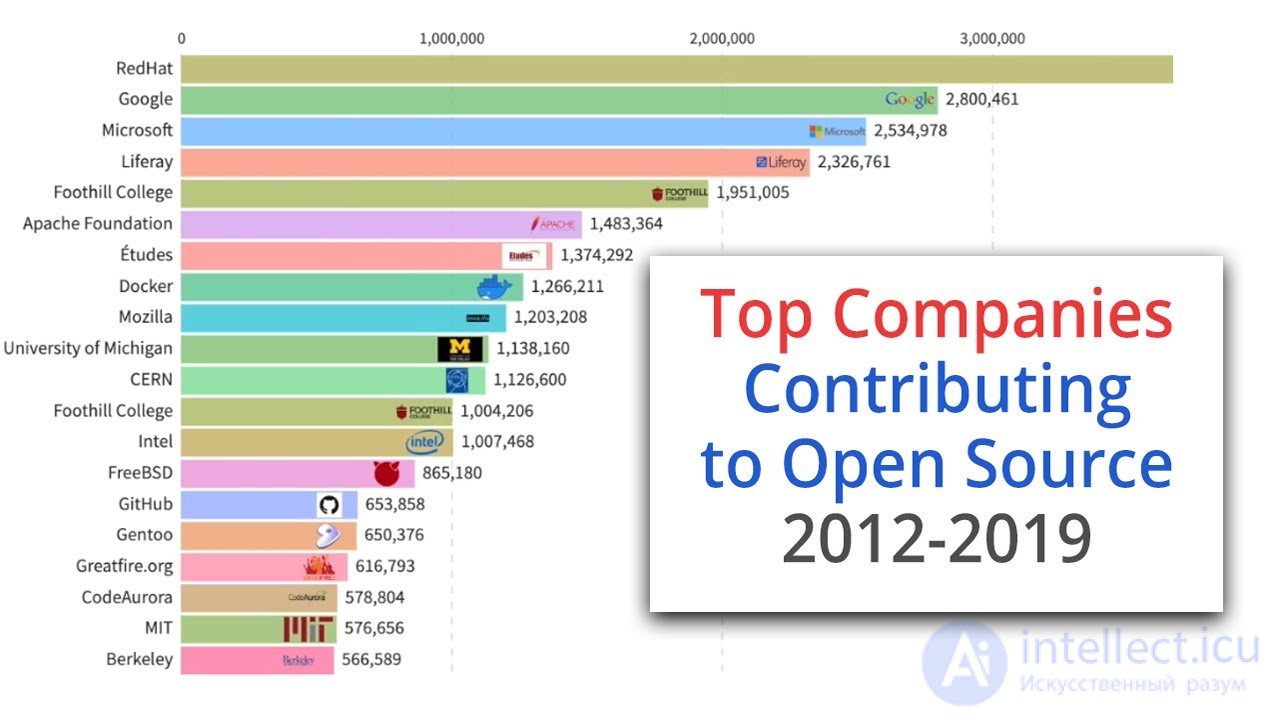 A chart of the most active companies contributing to Open Source from 2012 to 2019. Based on the number of commits and users exported from the GitHub archive.

Let's look at the process of participating in an Open-Source project using various PHP frameworks as examples; we'll take Symfony and Yii2.
The first thing you need to do — is create a GitHub account (if you don't already have one). Fill it out carefully, because your GitHub profile — is effectively your business card in the Open Source world.
Next, you should familiarize yourself with the contribution guidelines for the project you've chosen. These guidelines are usually located in the file
CONTRIBUTING.md
at the root of the repository. For Symfony, for example, this is Symfony Contributing.
Symfony is an open source, community-driven project.
If you'd like to contribute, please read the following documents:
Usually, there are several ways to participate in the development of an Open Source project; the main ones — are submitting a report about some bug or a desired improvement (Submitting an Issue) or directly creating a Pull Request with your fix or improvement (Code Contributing). You can also take part in improving the documentation, answering questions raised by other developers, and much more.
This is the smallest, least labor-intensive, and most important kind of contribution you can make.
You could say it's not a real contribution, but I consider it very important. In fact, Github counts it as a contribution:
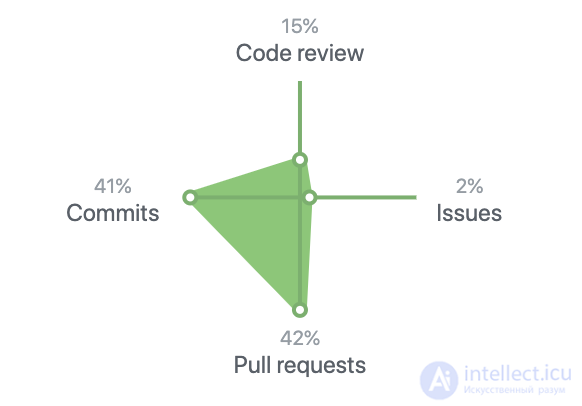
The 4 types of contribution recognized by Github
Let's start with an obvious observation - without creating an issue, the maintainers will never learn about the problem with their software and won't be able to improve it.
If you want to notify the developers about some bug you've found or an improvement, you need to create a corresponding GitHub Issue. But before creating it, check whether the same or a similar one already exists, created by someone else. Before creating it, also don't forget to familiarize yourself with the bug-reporting guidelines for that project. For example, here are the guidelines for the Yii Framework. Usually the description should be as clear and understandable as possible, ideally with examples and a description of how to reproduce the bug. This will save an enormous amount of time for both the developers and you, as it will spare you from answering clarifying questions and so on.
If you've found a GitHub Issue you'd like to fix or created your own, then your next step will be submitting a corresponding Pull Request.
Again, to start off, don't forget to familiarize yourself with the contribution guidelines for the project you've chosen.
Next, I'd like to describe the most commonly encountered process of working with Git and GitHub when participating in Open Source projects (Git Workflow).
This process may differ from project to project, and in general it's inherent not only to Open Source projects, but also to many closed projects on GitHub and BitBucket.
Naturally, for development you need to prepare your working environment. Many Open Source projects specify exactly how it should be set up: which libraries, packages, and tools, their versions, and so on are required.
For PHP projects, you'll usually need approximately this minimal list
In addition, PHPUnit is often required. Usually it comes bundled with the project itself, and it's better to use that exact one, because tests may simply fail to work across different PHPUnit versions, and what works for you with the newest version may not work on the project's CI server, where the library is older.
Go to the page of the project you've chosen and click the «Fork» button. This command will create your own copy of that project's repository.

Next, you need to clone your copy of the repository.
git clone https://github.com/<Your-GitHub-name>/<Repository-Name>.git
Next, you need to add an upstream branch for the project, which will point to the base repository (option for Yii)
cd <Local-Project-Folder>
git remote add upstream https://github.com/yiisoft/yii2.git
Next, you need to do a little configuration of your Git so that your correct name is displayed when you submit commits.
To do this, it's enough to run these commands:
git config --global user.name "Your Name"
git config --global user.email you@example.com
If you want to configure these values locally for this project, run the following in the project folder
git config --local user.name "Your Name"
git config --local user.email you@example.com
Next, in 99% of cases you'll have to download the libraries for the project via Composer
cd <Local-Project-Folder>
composer install
Before you start working, set up PHPUnit (less often Behat, PhpSpec, etc.) in your favorite IDE or simply in the console to run and work with tests.
After setting it up, run the tests for the project and make sure they pass correctly.
When you start working on your fix, you first need to create a corresponding Git branch based on the current code from the base repository.
Choose a clear and concise branch name that reflects the essence of the changes.
It's considered good practice to include the GitHub issue number in the branch name.
git fetch upstream
git checkout -b 1234-helper-class-fix upstream/master
Now you can safely get down to working on the code.
While working, keep the following rules in mind:
While you were working on the code, other changes may have been made to the project's main branch. Therefore, before submitting your changes, you need to rebase your branch.
This is done as follows:
git checkout <YOUR-BRANCH-NAME>
git fetch upstream
git rebase upstream/master
Now you can submit your changes.
git push origin <YOUR-BRANCH-NAME>
After this, go to your clone repository of the project you're participating in and click the «New Pull Request» button.
And we see the following form:

On the left, you need to select the branch into which you want to merge the changes (usually this is master, but in general it's the branch you rebased onto).
On the right — the branch with your changes.
Next, you'll see a message from GitHub about whether the changes can be merged automatically or not.
In most cases, you'll see Able to merge.
If there are conflicts, you'll most likely have to review your changes.
Next, we click the button — Create Pull Request.
When filling in the name and description of your Pull Request, it's considered good practice to specify the number of the Issue for which your Pull Request was created.
Usually, many large projects have a CI server set up, often Travis-CI.
After the Pull Request is created, it will run the tests, possibly some metrics tools, and so on. You'll see the results of its work in your Pull Request as shown below:

In case the tests don't pass or the build doesn't compile, you'll see a red error message, and via the Details link you'll be able to see what exactly is wrong. In most cases, you'll need to fix your Pull Request so that all checks pass successfully.
If everything is fine with your Pull Request, it will soon be merged by someone from the team.
But it often happens that the developers will ask you to make some changes.
To do this, we simply return to step 6, and after making changes and committing, we run similar commands:
git checkout <YOUR-BRANCH-NAME>
git fetch upstream
git rebase upstream/master
git push origin <YOUR-BRANCH-NAME>
Note: Personally, I like to submit a Pull Request with just 1 commit. To do this, I «squash» the unnecessary commits. You can read how to do this here: gitready.com/advanced/2009/02/10/squashing-commits-with-rebase.html
After your Pull Request has been accepted or rejected, you need to delete the branch with your changes.
This is done simply
git checkout master
git branch -D <YOUR-BRANCH-NAME>
git push origin --delete <YOUR-BRANCH-NAME>
Instead of the last command, you can also run
git push origin :<YOUR-BRANCH-NAME>
Don't be lazy and take part in Open Source projects. It's a huge and interesting experience, as well as a checkmark on your resume.


Comments