
Lecture
Objective: to build students' knowledge of the types of first aid for wounds, the types of dressings, and methods of applying them; to learn to provide first, pre-medical aid; and to cultivate in students a sense of responsibility and moral readiness for unexpected and extreme situations.
Possible equipment used: sterile gauze pads, 5x10 bandage, 7x14 bandage, ice pack, triangular bandage, 5% iodine solution, ethyl alcohol, stretcher.
First aid for abrasions:
ATTENTION!!! When working with a casualty who is bleeding - do not forget about your own safety! Before examining the casualty and beginning to provide medical aid, put on disposable medical gloves!!!
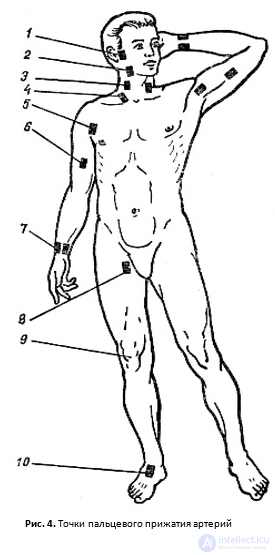
Fig. 4. Points of digital compression of arteries
Digital compression of an artery is performed at specific anatomical points where the arteries lie close to bones against which they can be pressed (Fig. 4).
In the case of limb wounds, the vessels are compressed above the wound; in the case of neck wounds, the vessels are compressed below the wound.
Bleeding from wounds of the head and neck is stopped by:
• pressing the temporal artery (Fig. 4-1) against the temporal bone above the tragus of the ear.
Bleeding in the upper part of the shoulder is stopped by:
• pressing the subclavian artery (Fig. 4-4) against the rib - the patient's arm is drawn down and back, after which the artery is compressed behind the clavicle;
• pressing the axillary artery (Fig. 4-5) in the armpit against the head of the humerus.
Bleeding from the lower and middle thirds of the upper arm and forearm is stopped by:
Bleeding at the thigh and lower leg is stopped by:
• pressing the femoral artery (Fig. 4-8) at the middle of the lower third of the inguinal ligament against the horizontal branch of the pubic bone;
• pressing the popliteal artery (Fig. 4-9) against the posterior surface of the tibia in the region of the popliteal fossa;
• pressing the posterior tibial artery (Fig. 4-10) against the posterior surface of the medial malleolus of the lower leg.
Indication: temporary arrest of arterial bleeding.
To stop arterial bleeding when no tourniquet or soft auxiliary materials are available, maximal flexion of the limb at the joints can be used.
In the case of bleeding from wounds of the forearm and hand, arrest
of the bleeding is achieved by flexing the elbow joint as far as it will go and securing the bent forearm with a triangular bandage (belt, bandage), drawing it toward the shoulder (Fig. 5, b). In the case of bleeding from wounds of the upper part of the arm and the subclavian region, both arms are drawn back with the elbow joints bent and pulled toward each other with a triangular bandage (belt, bandage; Fig. 5, a). In the case of bleeding from the arteries of the lower limbs, the leg should be bent as far as it will go at the knee joint and fixed in this position (Fig. 5, c,d). All these methods do not always achieve the desired result and are not possible if a fracture is present.
Note. A pad must first be placed at the site of maximal flexion of the limb
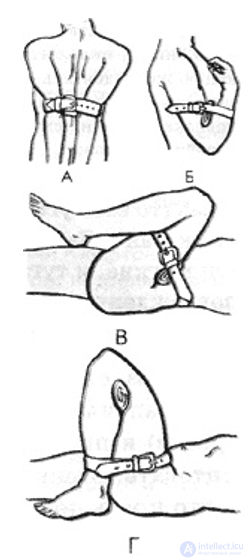
(Fig.5) made of cotton wool, gauze or other materials.
Indication: to stop venous bleeding in the case of a soft-tissue wound.
Equipment:
Sequence of actions:
Note. If an individual dressing packet is used, one pad is placed over the other on the wound and secured with turns of bandage.
4.1 Providing aid for capillary, venous and arterial bleeding
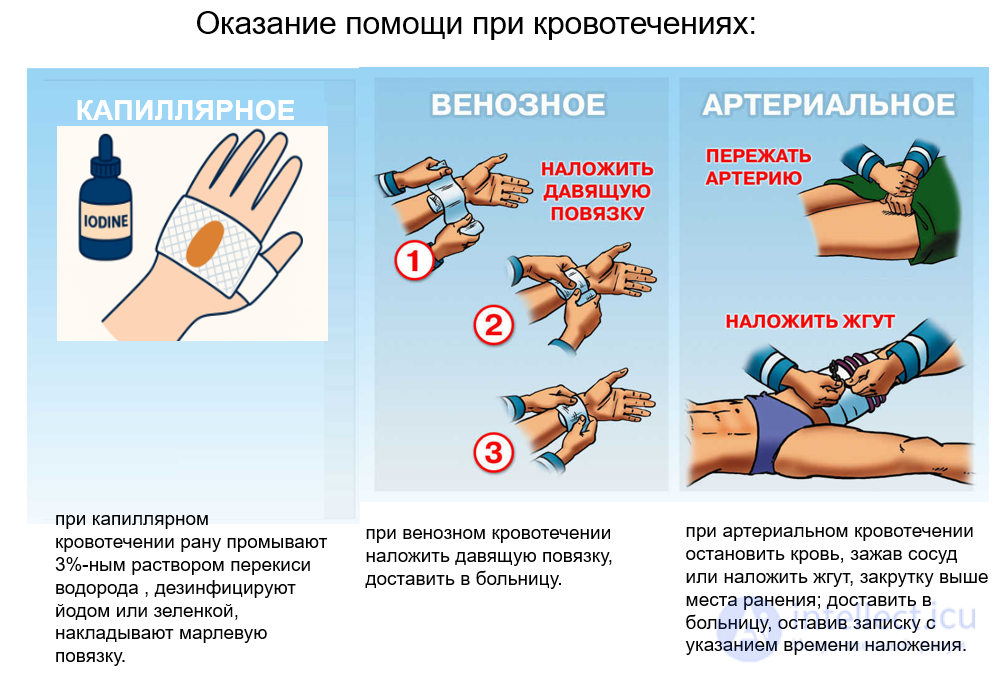
Rules for applying a tourniquet:
- the tourniquet is applied to the limb as distally as possible, over clothing or a soft bandage padding;
- the time the tourniquet was applied, with the date, hour and minute, is noted on a slip of paper placed under the tourniquet so that it is clearly visible, or written on the casualty's forehead with a marker (or blood);
- the tourniquet may be left in place for no more than 30 – 60 minutes, to avoid necrosis of the tissue below the site of application; if the bleeding has not stopped, other methods of stopping the bleeding must be used, and the tourniquet loosened.
- if 2 hours or more have passed since the tourniquet was applied, it may only be removed by medical personnel.
A tourniquet may only be applied to the limbs at four points:
as high as possible on the thigh and on the upper arm; tourniquets are not applied to the neck!!
If no tourniquet is at hand, a so-called improvised twist-tourniquet can be used, made from available materials (fig. ): strips of cloth, handkerchiefs, scarves, etc., and a pen, pencil, or marker for making the twisting stick.
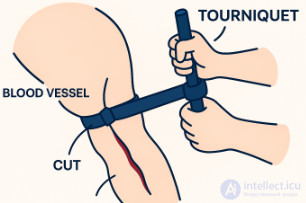
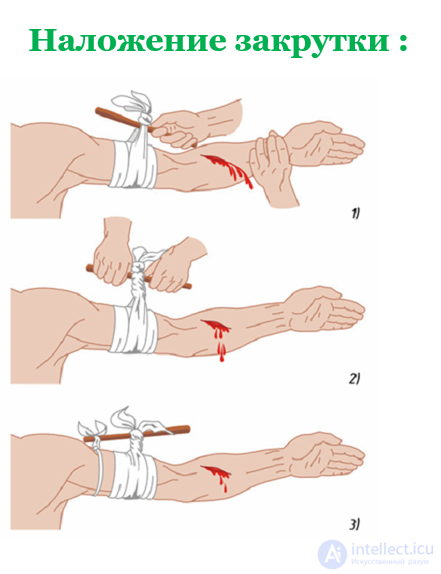
It is not recommended to use electrical or telephone cables, various wires, thin cords, or ropes to make an improvised tourniquet, as they excessively constrict and injure the neurovascular bundles of the limbs.
Tourniquets are very traumatic devices. At a normal blood pressure of 120/80 mmHg, the pressure of an Esmarch tourniquet on the vessels is 1000 mmHg, and the pressure of a windlass tourniquet is 600 mmHg. An incorrectly
applied tourniquet can cause paresis of the limb (a reduction in muscle strength with a limitation in the range of voluntary movement)
To stop a nosebleed, it is necessary to:
- ensure the casualty has access to fresh air, and loosen clothing around the neck;
- sit the casualty down with the head tilted slightly forward;
- apply a cold compress to the nose and the bridge of the nose;
- pinch both sides of the nose against the septum, and breathe through the mouth;
- spit out any blood that gets into the mouth;
In the neck region there are major vessels such as the carotid
artery and the jugular vein (fig. )
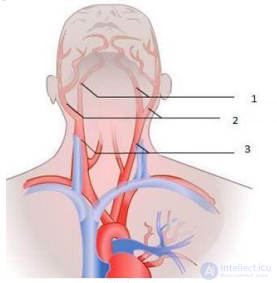
1. Internal carotid artery
2. External carotid artery
3. Common carotid artery
When the above-mentioned vessels are damaged, significant and intense
bleeding occurs, which within minutes can lead to a fatal outcome.
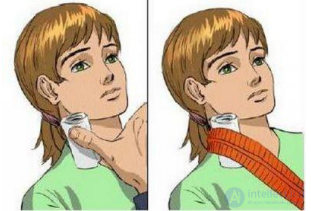
A tourniquet must never be applied around the neck!!!
If the rescuer has diagnosed bleeding into the chest or abdominal cavity,
then a cold compress must be applied to the site of the injury on such a casualty,
they must not be given anything to eat or drink, and the casualty should be placed on their back or in a
semi-sitting position, and transported to hospital immediately.
4.5 Providing self-aid with one hand in cases of bleeding
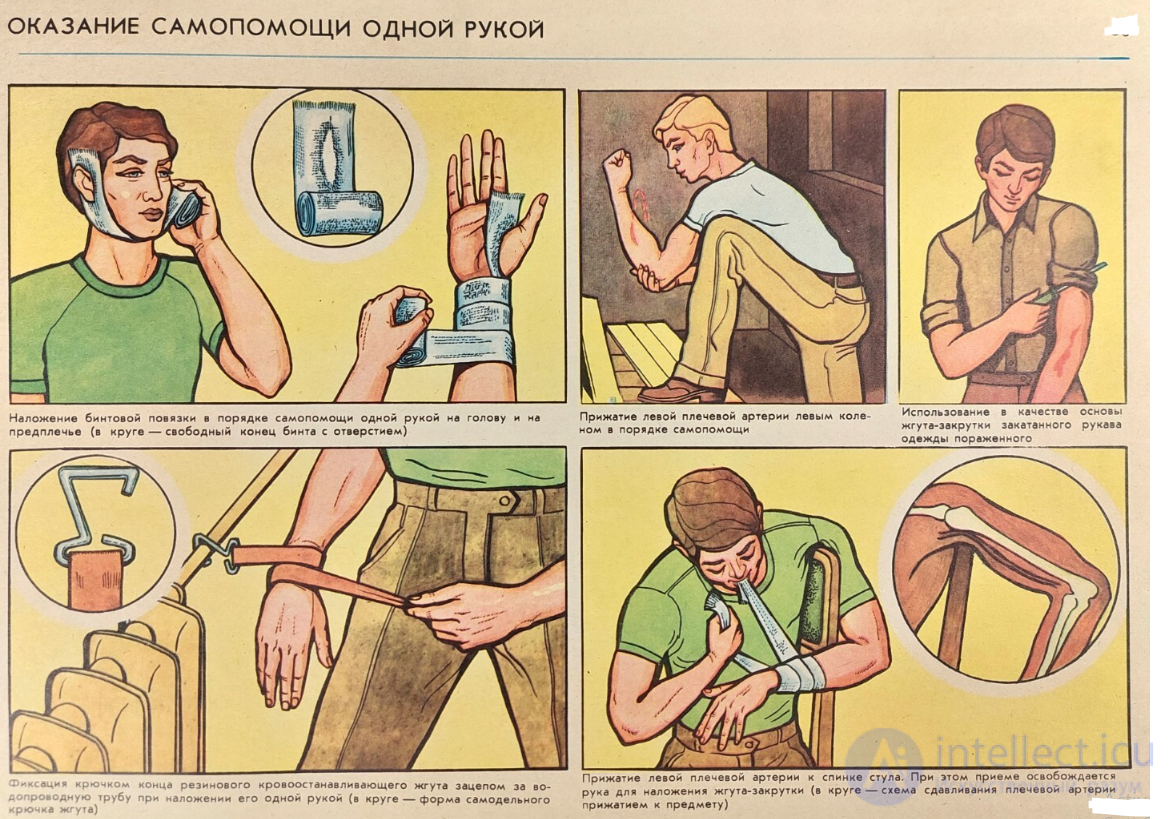
TECHNIQUE FOR PROVIDING SELF-AID WITH ONE HAND
Providing first aid to oneself is difficult, and it is even harder to do so with one, uninjured hand. At the same time, as the tragic experience of the American nuclear bombing of the peaceful Japanese cities of Hiroshima and Nagasaki showed, the ability to provide timely and correct self-aid, including with one hand, is vitally necessary, especially in the central zones of a nuclear disaster area. This is why attention must be focused on developing and improving the technique of one-handed self-aid and on teaching it to the entire population.
Experience in practical training in medical self-aid has shown that, above all, one must master techniques that substitute for the missing hand when providing aid, for example gripping with the teeth. This technique makes it possible to hold the free end of a bandage in place when applying a bandage dressing, and also to hold one end of a triangular bandage when applying a tourniquet (twist-tourniquet), and to hold the ribbed rim of a syringe-tube in place while
preparing it for use. However, gripping with the teeth cannot always be used (for example, while wearing a gas mask, or when providing aid in an area contaminated with bacterial agents and radioactive substances, etc.), and in a number of cases this cannot be done for hygienic reasons.
It is more convenient to hook one of the ends of the tourniquet, or the free end of the bandage, onto items of clothing: the bandage onto a hook or button; the hook of a rubber haemostatic tourniquet onto a buttonhole, button, belt, the lace-hole of a boot, etc. Experience has shown that this is much easier if a hole 8—10 cm long is prepared in advance on the free end of the bandage, and the size of the tourniquet's hook is tripled and given a shape convenient for hooking.
It is also possible to fix one of the ends of the tourniquet or bandage to objects surrounding the casualty. For example, hooking the hook of a rubber haemostatic tourniquet onto a door handle, a water pipe, the crossbar of a bed frame, a metal mesh, and so on.
Sometimes the free end of the bandage can be secured by tucking it under clothing that fits tightly to the body (a cuff, trouser belt, collar, etc.). In a number of cases, it is possible to clamp the end of the bandage between parts of the body (for example, clamping the free end of the bandage between the legs, or in the armpit, popliteal, or elbow fold, etc.), or by pressing it with the body against a nearby object. Reliable fixation of one end of a rubber haemostatic tourniquet applied with one hand can be achieved by looping it around the foot (in the manner of a «stirrup») or the thigh of the uninjured lower limb.
The technique of medical self-aid also includes methods for performing with one hand those actions that are normally performed with both hands. Thus, one must be able, with the uninjured hand, to prepare and apply a medicinal product from a tube, to open an individual civil-defence first-aid kit, to open the cases contained in it, and so on. It is important to develop the ability to tie a triangular-bandage knot with one hand (when applying a twist-tourniquet made from a triangular bandage), a knot from the ends of a bandage, or
from a cord (string) when securing the twisted stick of a twist-tourniquet, as well as the ability to carry out, with one hand, partial sanitary treatment in the event of skin contamination with chemical warfare agents, bacterial agents, and radioactive substances, and partial special treatment (degassing, disinfection, decontamination)
Guided by the requirements of the didactic principle of «accessibility of training» and the rule that follows from it - to proceed in training «from the simple to the complex» - it is advisable to establish the following sequence for mastering the technique of first aid. First, learn the technique of mutual aid from an unharmed person to a casualty,
then - mutual aid between casualties, first using both hands, then - one hand. And, finally, move on to studying methods performed in the course of self-aid, first with both hands, then with one hand. Such is the sequence for mastering methods of first aid during initial training. However, most trainees under the civil-defence programme have, as a rule, over a number of years practically studied methods of aid provided by the unharmed to the «injured», and so with this category of trainees one can move straight on to studying the technique of mutual aid among the «injured» themselves and self-aid. Moreover, if the method of simultaneous group work by trainees under the guidance of a medical worker is applied, one can proceed immediately to studying methods of one-handed self-aid and train the maximum number of trainees in the minimum time. In this case, all trainees without exception work throughout the lesson under the direct supervision of the instructor.
When teaching the technique of one-handed self-aid, the following sequence is advisable: first one must learn to confidently handle the necessary first-aid item
(bandage, triangular bandage, tourniquet, etc.) with one dominant hand (the right hand for a right-hander, the left for a left-hander), and then with the non-dominant hand; then one should master
the general technique of one-handed self-aid, i.e. the methods that substitute for the second hand missing from the work, and, finally, the specific technique of self-aid for various
injuries.
Training in methods of applying protective and immobilising dressings should be carried out in order of increasing difficulty: from the most accessible to the less accessible site of application - first on the upper limb - the hand, forearm, upper arm; then - on the lower limb - the thigh, knee, lower leg, foot; then - on the neck, head, shoulder girdle, torso, and gluteal region, working first with both
hands, then with the dominant hand, and then with the non-dominant hand.
One should first learn to apply a tourniquet to the most accessible site (the forearm) with the dominant hand, and then with the non-dominant hand, gradually moving on to less accessible sites (upper arm, thigh, lower leg).
The most accessible site for using a syringe-tube in the course of self-aid is the anterolateral surface of the upper arm and the anterior surface of the thigh.
Rules for applying bandage dressings.
• Lay or seat the patient when applying a bandage dressing.
Monocular bandage (dressing applied to one eye).
Application technique:
1. Seat the patient facing you, reassure them, explain the course of the upcoming manipulation.
2. Bandage the left eye from left to right, the right eye — from right to left.
3. Take the start of the bandage in the left hand, the head of the bandage — in the right.
4. Apply the bandage to the frontal part of the head.
5. Make a securing turn of the bandage around the frontal and occipital region of the head.
6. Lower the bandage from the occiput under the earlobe across the cheek upward, covering the affected eye with this pass.
7. Make a securing turn of the bandage around the frontal and occipital region of the head.
8. Alternate passes of the bandage over the eye and around the head. Bandaging is finished with circular passes around the head.
9. Secure the dressing by cutting the end of the bandage and tying it in a knot (on the side opposite the injured eye).
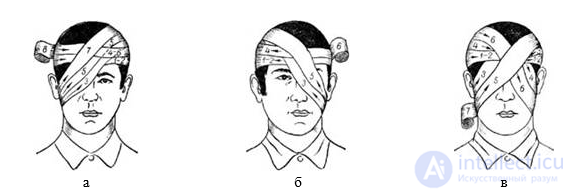
Fig. 6. Eye dressings:
a – monocular dressing on the right eye; b – monocular dressing on the left eye; c – binocular dressing on both eyes
Circular bandage. It is the most durable, since in it all turns of the bandage lie one on top of the other. It is used for dressing limbs in the area of the shin, forearm, and also on the forehead, neck, abdomen.
It is a fixing bandage, consisting of several turns laid one on top of another. It serves as a component element of any bandage dressing.
A circular bandage is applied so that the circular turns of the bandage completely cover each other. This dressing is used to protect small areas of the body not exceeding the width of the bandage in size.
Spiral bandage - ascending and descending. It begins the same way as a circular bandage. Then, after two or three circular turns, the bandage is led slightly obliquely, covering two-thirds of the previous pass. There is an ascending dressing, when the turns of the bandage go from bottom to top, and a descending one — from top to bottom. When bandaging the shin or forearm, when the thickness of the limb is uneven, the dressing is applied with folds, and the folds must be on one side and along one line. When applying the first one - bandage from bottom to top, the second one - from top to bottom. Applied to the forearm, shin, hand, chest.
1. Characterize arterial bleeding:
2. For which type of bleeding is a tourniquet used?
3. Which type of bleeding is difficult to diagnose?
4. Haematoma – is:
5. Is a tourniquet used to stop bleeding on the neck?
1. What methods of temporarily stopping bleeding do you know?
2. Indicate the pressure points of vessels for stopping bleeding.
3. What issued and improvised means are used for applying dressings?
4. Demonstrate the technique of applying one of the types of dressings.
5. List the types of dressings.

Comments