Lecture
In this lesson, we will consolidate what is really important. How to display blog content? Also, you will add a few more invisible blocks or divs to separate the content from the post titles that we did last time.
( Note: The last lesson is very, very important. If you haven't fully understood what I told you, you need to re-read the lesson and ask me questions until everything is clear.)
To continue today's lesson, turn on Denwer , open the “T utorial” folder , open your browser and go to http: // wordpress / , and also open the index.php file in the editor.
Type <? php the_ content (); ?> under the post title code .
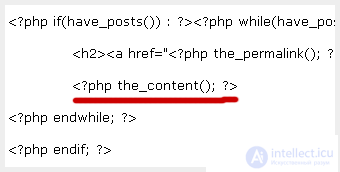
Save the text file and refresh the browser window, you should see some text under the posts headers.
What happened now and why does everything look that way?
We used the WordPress function the_ content () to trigger blog entries (content). Now your content looks like one solid line of text going right to the end of the window area. This is because you have not yet formatted the text. Remember the style.css file? later we use this file to control how everything looks.
Last time I asked you to make several test posts so that you can see what the list of several entries looks like. If you have not done so already, do it now, and then return to the first page. You should see several entries under each other.
Happened? Then move on ...
Return to the browser, click on View and select Page Source or Source . A window will open with the source code.
Notice the difference between the index.php file and the source code? All text, pictures and stuff, everything in this window is called by the the_ content () function. Good for you, yes? Without special support for creating blogs, in particular, the WordPress template system in this lesson, you would have to encode all these texts and pictures yourself.
Also, pay attention to the xhtml opening and closing P tags, which I circled in red. They are not in your index.php file, but they are present in the window or notepad of the source codes you just opened.
Tags P - how and why?
Why - when you type your notes, every time you skip a line, it's a paragraph. You need to show it somehow, right? Each paragraph is located inside a set of tags P. With their help, you separate paragraphs from each other.
How simple! The WordPress template system creates P tags for you.
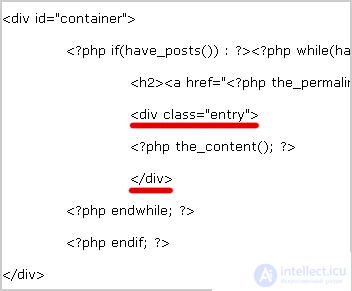
Put an invisible block (DIV) around the_content () and assign it a class = "entry" , like this:
< div class = " entry">
</ div>
You should have the following:
Save everything and refresh the page in the browser. If you go back to View> Page Source, you will see that class tags = ”entry” DIV appear around each of your posts.
Why?
The first reason is that now you can tell where the headings of the posts end and the actual posts begin.
The second reason: this is done for styling using the style file . css. If you want, you can stylize the recording without affecting anything else.
What is the difference between id and class?
Up to this point, to call the invisible div block, you used id. Remember id = " header" ? So what's the difference? ID is unique and class is not! If you look at the source code, you will see that there is only one id = ” header” and one id = ” container” , but there are several class = ” entry” .
Can a header and container be classes, not id? Of course.
Remember: ID must NOT be repeated on the page. For example, you cannot have two id = " header" on one page. When you want to use something over and over, like blog entries, use class .
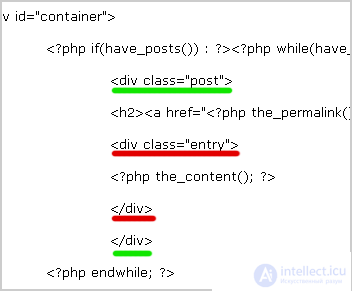
Place the DIV around the post headers and the posts themselves. Call it class = ”post”
<div class = "post">
</ div>
(Names for classes and id can be any. For example, you can call DIV after a favorite meal, but post and entry are easy to remember, isn't it?)
You should now have:
Here is an organized version:
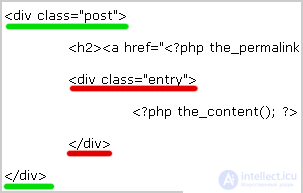
I used the tab key instead of spaces to indent the source index.php . Why organize code? Unlike my screenshots, there are no red and green underlines in your codes. And you need to track the code. Indented, it will be easier to tell which </ div> one or another invisible block is closing.
Save and refresh the browser window to see the changes in the source code.
Why add another div surrounding the post title and the post itself?
You added a div class = ” entry” to separate the post title from the entry itself. This tag exists to distinguish one from another.
That's all. There is a lot of information to understand, so be sure to ask questions if you do not understand something.
If you notice any errors or inconsistencies in my lessons, please let me know so that I can immediately fix it. By the way, how do you like my lessons? What are your comments? Maybe I should be more detailed? Are the “classes” too long?

Comments