Lecture
Extensions in OpenCart 2.x (up to version 2.3) are new features that allow you to create modules with the ability to safely modify template files , system files and third-party modules.
Previously, the installation of modules in OpenCart to version 2.x was done by simply copying the directories with the module files to the CMS . It is desirable that the module files do not replace already existing system files.
For creating the module for OpenCart to version 2.x you need to make 6 files :
This is an ideal case, because these controller and view files are named module and therefore they do not replace files of other modules .
But sometimes, it is necessary when the module has to change the functionality in the already existing template files , and even the system files of the OpenCart engine. Previously, you had to create files in the module that replaced the files in the CMS , you cannot call this process safe , because we climbed not into our bell tower. These replacements could adversely affect the operation of the system , you had to be very careful. In the event of a crash, in order to roll back, it was necessary to copy the replaced files back , which is not convenient.
This moment in OpenCart 2.x was thought out, as a result, the installation system of OCMOD modules was developed, the modules were called extensions .
The extension in OpenCart 2.x is PHP , SQL and XML files in a zip archive, named module_name.ocmod.zip.
The extension consists of:
The presence of the full set of the above files in the extension is not necessary, i.e. It is not necessary to have PHP, SQL and XML files in the module. Consider two extreme options, which may consist of the extension:
Inside the directory, we will create 6 files as in the article “Create a module in OpenCart for 1.x”, but with amendments for OpenCart 2.x.
1. Language file: catalog \ language \ russian \ module \ mymodul.php
one 2 | <? php $ _ ['heading_title'] = 'Module heading'; |
In this file, we describe variables with data (usually text) that we will use in our module.
2. Controller: catalog \ controller \ module \ mymodul.php
one 2 3 four five 6 7 eight 9 ten eleven 12 13 14 15 sixteen 17 18 nineteen 20 21 22 | <? php class ControllerModulemymodul extends Controller { public function index () { $ this-> load-> language ('module / mymodul'); // connect any language file $ data ['heading_title'] = $ this-> language-> get ('heading_title'); // declare the variable heading_title with the data from the language file $ data ['content'] = "Your Content"; // data can be set immediately in the controller $ this-> load-> model ('catalog / product'); // connect any model from opencart $ data ['product_info'] = $ this-> model_catalog_product-> getProduct (42); // use the method of the connected model, for example getProduct (42) - product information id 42 // standard procedure for OpenCart controllers, select the module presentation file for data output if (file_exists (DIR_TEMPLATE. $ this-> config-> get ('config_template'). '/template/module/mymodul.tpl')) { return $ this-> load-> view ($ this-> config-> get ('config_template'). '/template/module/mymodul.tpl', $ data); } else { return $ this-> load-> view ('default / template / module / mymodul.tpl', $ data); } } }?> |
The first thing you should pay attention to is the name of the class “ ControllerModulemymodul ”, the first part of the “ ControllerModule ” is standard, the second “ mymodul ” is the name of your module . In each file you need to stick to the same name.
In the controller, using the $ data ['name'] array, variables are declared that will be visible in the module's presentation file. As a rule, these are data (text) obtained from a language file or data obtained from models .
If we want to get data from a language file , first, we need to connect it using the method
one | $ this-> load-> language ('directory / file'); |
Where
Also in the controller of the module, you can immediately set any data using
one | $ data ['name'] = "my string" |
But it is not recommended, because It is desirable to store the data in the database or in language files , and not in controllers.
In our module controller, we can use any OpenCart model . For this, you need to connect the model using the method:
one | $ this-> load-> model ('directory / model'); |
Where
Next, you can use the methods of the connected model.
one | $ results = $ this-> model_directory_model-> model_ method (parameters); |
PS In order to find out what methods the model has, you will have to look at the model file.
In the example, the getProduct method returns an array of information with information on the product, the method argument is the id product number . Under id 42, in a newly installed OpenCart , there should be an “ Apple Cinema 30 ″ ” monitor.
3. View file: catalog \ view \ theme \ default \ template \ module \ mymodul.tpl module
one 2 3 four five | <? php echo $ heading_title; ?> <br> <? php echo $ content; ?> <br> <? php echo $ product_info ['name']; ?> |
These are the minimal representation file options, I just output all the variables that I declared in the controller . In your case, there should be html code with php .
4. Module language file for admin panel: admin \ language \ russian \ module \ mymodul.php
one 2 3 four five 6 7 eight | <? php // The name of the module, so it will be visible on the tab “modules” in the control panel and inside the module settings $ _ ['heading_title'] = 'My module'; // Text inside module settings $ _ ['text_module'] = 'Modules'; $ _ ['text_edit'] = 'Module Settings'; $ _ ['entry_status'] = 'Status'; |
I think there is nothing to comment, these text data will be visible in the module view for the admin panel.
5. Module controller for the admin panel: admin \ controller \ module \ mymodul.php
one 2 3 four five 6 7 eight 9 ten eleven 12 13 14 15 sixteen 17 18 nineteen 20 21 22 23 24 25 26 27 28 29 thirty 31 32 33 34 35 36 37 38 39 40 41 42 43 44 45 46 47 48 49 50 51 52 53 54 55 56 57 58 59 60 61 62 63 64 65 66 67 68 69 70 71 72 | <? php class ControllerModulemymodul extends Controller { private $ error = array (); public function index () { $ this-> load-> language ('module / mymodul'); // connect our language file $ this-> load-> model ('setting / setting'); // connect the model setting, it allows you to save the module settings in the database if (($ this-> request-> server ['REQUEST_METHOD'] == 'POST') && $ this-> validate ()) {// if we clicked "Save" in the panel, we save the current settings $ this-> model_setting_setting-> editSetting ('mymodul', $ this-> request-> post); $ this-> response-> redirect ($ this-> url-> link ('extension / module', 'token ='. $ this-> session-> data ['token'], 'SSL')); } // your variables $ data ['heading_title'] = $ this-> language-> get ('heading_title'); $ data ['text_edit'] = $ this-> language-> get ('text_edit'); $ data ['text_enabled'] = $ this-> language-> get ('text_enabled'); $ data ['text_disabled'] = $ this-> language-> get ('text_disabled'); $ data ['entry_status'] = $ this-> language-> get ('entry_status'); // if the validate method returns a warning, pass it to the view if (isset ($ this-> error ['warning'])) { $ data ['error_warning'] = $ this-> error ['warning']; } else { $ data ['error_warning'] = ''; } // next is the formation of an array of breadcrumbs (bread crumbs) $ data ['breadcrumbs'] = array (); $ data ['breadcrumbs'] [] = array ( 'text' => $ this-> language-> get ('text_home'), 'href' => $ this-> url-> link ('common / dashboard', 'token ='. $ this-> session-> data ['token'], 'SSL') ); $ data ['breadcrumbs'] [] = array ( 'text' => $ this-> language-> get ('text_module'), 'href' => $ this-> url-> link ('extension / module', 'token ='. $ this-> session-> data ['token'], 'SSL') ); $ data ['breadcrumbs'] [] = array ( 'text' => $ this-> language-> get ('heading_title'), 'href' => $ this-> url-> link ('module / category', 'token ='. $ this-> session-> data ['token'], 'SSL') ); // links to the form and the "cancel" button $ data ['action'] = $ this-> url-> link ('module / mymodul', 'token ='. $ this-> session-> data ['token'], 'SSL'); $ data ['cancel'] = $ this-> url-> link ('extension / module', 'token ='. $ this-> session-> data ['token'], 'SSL'); // variable with module status if (isset ($ this-> request-> post ['mymodul_status'])) { $ data ['mymodul_status'] = $ this-> request-> post ['mymodul_status']; } else { $ data ['mymodul_status'] = $ this-> config-> get ('mymodul_status'); } // links to the header, column_left, footer controllers, otherwise we will not be able to display the header, footer and left menu in the view file $ data ['header'] = $ this-> load-> controller ('common / header'); $ data ['column_left'] = $ this-> load-> controller ('common / column_left'); $ data ['footer'] = $ this-> load-> controller ('common / footer'); // use the mymodul.tpl file as the module view file for the admin panel $ this-> response-> setOutput ($ this-> load-> view ('module / mymodul.tpl', $ data)); } // required method in the controller, it is launched to check whether the user is allowed to change the settings of this module protected function validate () { if (! $ this-> user-> hasPermission ('modify', 'module / category')) { $ this-> error ['warning'] = $ this-> language-> get ('error_permission'); } return! $ this-> error; } } |
As a donor, I took the category module admin admin controller - admin \ controller \ module \ category.php , the only thing I replaced:
Class name
one | class ControllerModuleCategory extends Controller { |
on
one | class ControllerModulemymodul extends Controller { |
Language file name
one | $ this-> load-> language ('module / category'); |
on
one | $ this-> load-> language ('module / mymodul'); |
Module name in the module settings editing method
one | $ this-> model_setting_setting-> editSetting ('category', $ this-> request-> post); |
on
one | $ this-> model_setting_setting-> editSetting ('mymodul', $ this-> request-> post); |
The name of the presentation of this module for the admin panel
one | $ this-> response-> setOutput ($ this-> load-> view ('module / category.tpl', $ data)); |
on
one | $ this-> response-> setOutput ($ this-> load-> view ('module / mymodul.tpl', $ data)); |
Module name in the definition of the 'action' variable
one | $ data ['action'] = $ this-> url-> link ('module / category', 'token ='. $ this-> session-> data ['token'], 'SSL'); |
on
one | $ data ['action'] = $ this-> url-> link ('module / mymodul', 'token ='. $ this-> session-> data ['token'], 'SSL'); |
Parameter name in the POST / GET message receive
one 2 3 four five 6 7 eight 9 | if (isset ($ this-> request-> post ['category_status'])) { $ data ['category_status'] = $ this-> request-> post ['category_status']; } else { $ data ['category_status'] = $ this-> config-> get ('category_status'); } |
on
one 2 3 four five 6 7 eight 9 | if (isset ($ this-> request-> post ['mymodul_status'])) { $ data ['mymodul_status'] = $ this-> request-> post ['mymodul_status']; } else { $ data ['mymodul_status'] = $ this-> config-> get ('mymodul_status'); } |
Module name in the validate () method
one | if (! $ this-> user-> hasPermission ('modify', 'module / category')) { |
on
one | if (! $ this-> user-> hasPermission ('modify', 'module / mymodul')) { |
The module controller for the control panel is the hardest part. It consists of two methods:
The index () method takes POST data from the module presentation file in the admin panel (in the module settings), the code before the comment “// your variables” is responsible for this, it is mandatory for all controllers.
After the comment “ // your variables ”, the variables are declared.
You can add your variables.
The text is taken from the language file " module / mymodul ", which was connected earlier.
These variables are used in the module presentation file in the admin panel, here I gave the minimum that is needed.
Next, there is a check whether the user is allowed to change the settings of this module (check if there is a “warning” variable), if not, create the $ data ['error_warning'] variable with the error text. This code snippet is required.
After that, an array of “ breadcrumbs ” is formed, in other words, it is “bread crumbs” for the presentation file.

At the end of the index () method, select the view file for outputting $ data .
The index () method calls the validate () method, it serves to check whether the user is allowed to change the settings of this module, it is mandatory.
6. The module view file for the admin panel: admin \ view \ template \ module \ mymodul.tpl
The donor was the category module (admin \ view \ template \ module \ category.tpl), the only thing I did:
Replaced in the tag <button>
on
Replaced in the <form> tag
on
Replaced in the tag <select>
on
I want to note that the combination of the module controller for the admin panel (point 5) and the module view for the admin panel (point 6) in this case provides the minimum configuration page for the module. in this case there will be a choice of the status " Enabled " or " Disabled ".
For additional fields - options, you need to look at the controllers and views of other modules, do everything according to the model.
Place the 6 created files above in the appropriate directories (as if they were located in the OpenCart system), then put these directories in the “ upload ” directory, archive it in a zip format with the name “ mymodule.ocmod.zip ”
Next, go to the administration panel, then " Install Extensions ", click download and select our zip file .
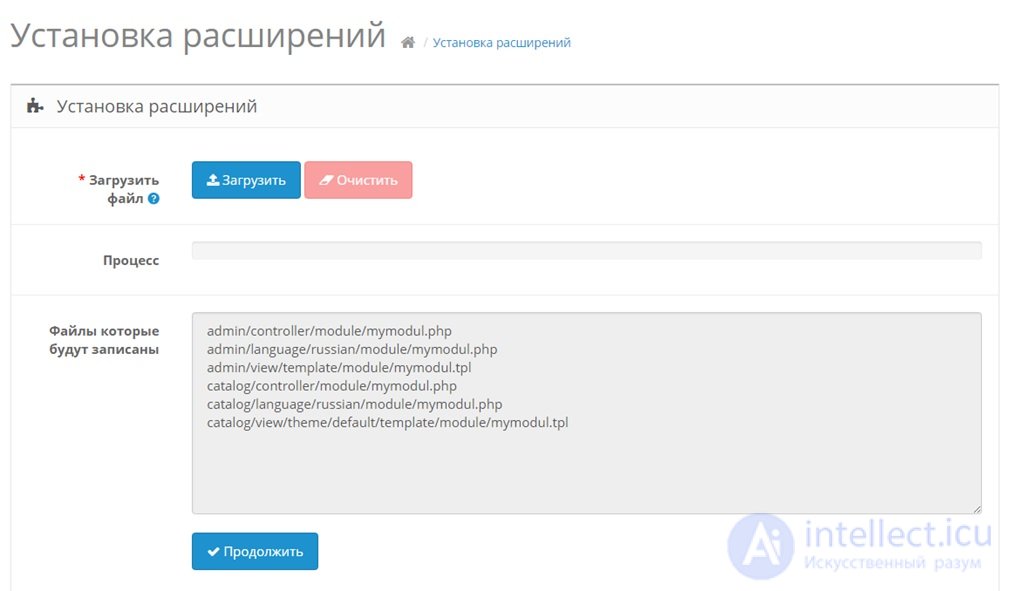
The system will show us which files will be uploaded. Click " continue ".
Now, if you go to the " Modules " tab, we will see our module " My Module ".
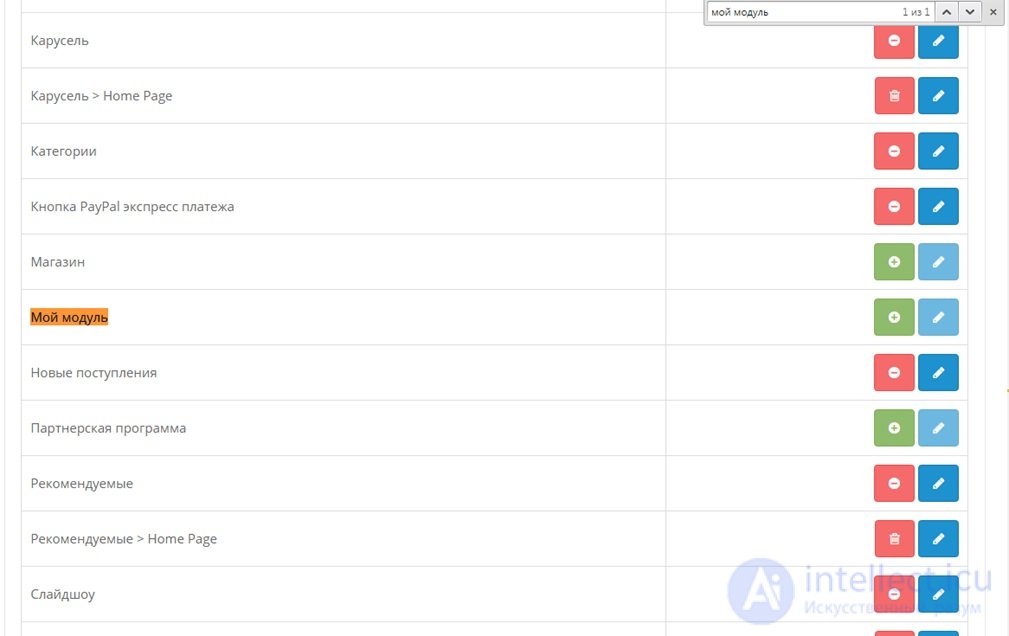
The $ _ ['heading_title'] parameter of the language file “ admin \ language \ russian \ module \ mymodul.php ” is responsible for the module name in the control panel.
Then, as usual, we activate the module, go to its settings and change the status to “ Enabled ”.
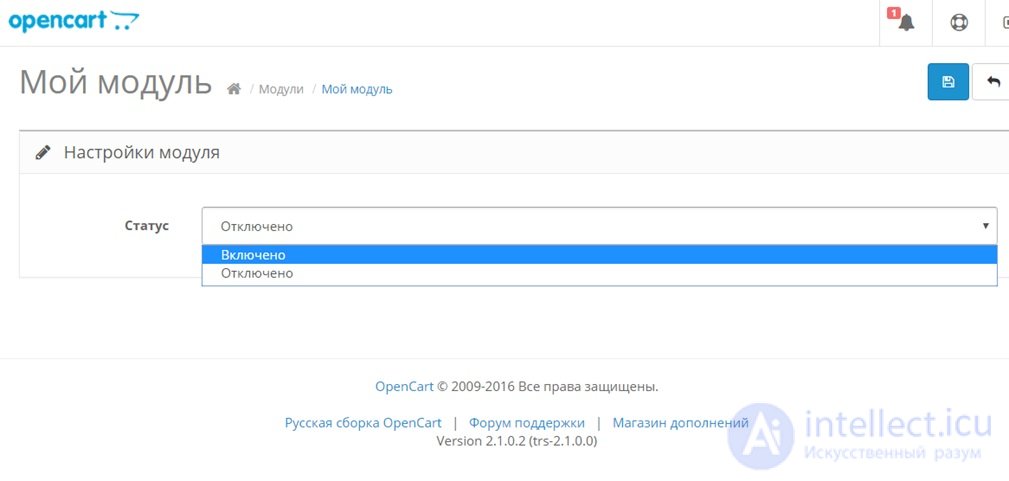
I repeat, the module should have at least the “ status ” option; this is how we let the system know whether to use our module or not . If desired, you can add more options, but in this case, you will have to edit the view file.
admin \ view \ template \ module \ mymodul.tpl
and controller
admin \ controller \ module \ mymodul.php
Act also, by analogy with other modules.
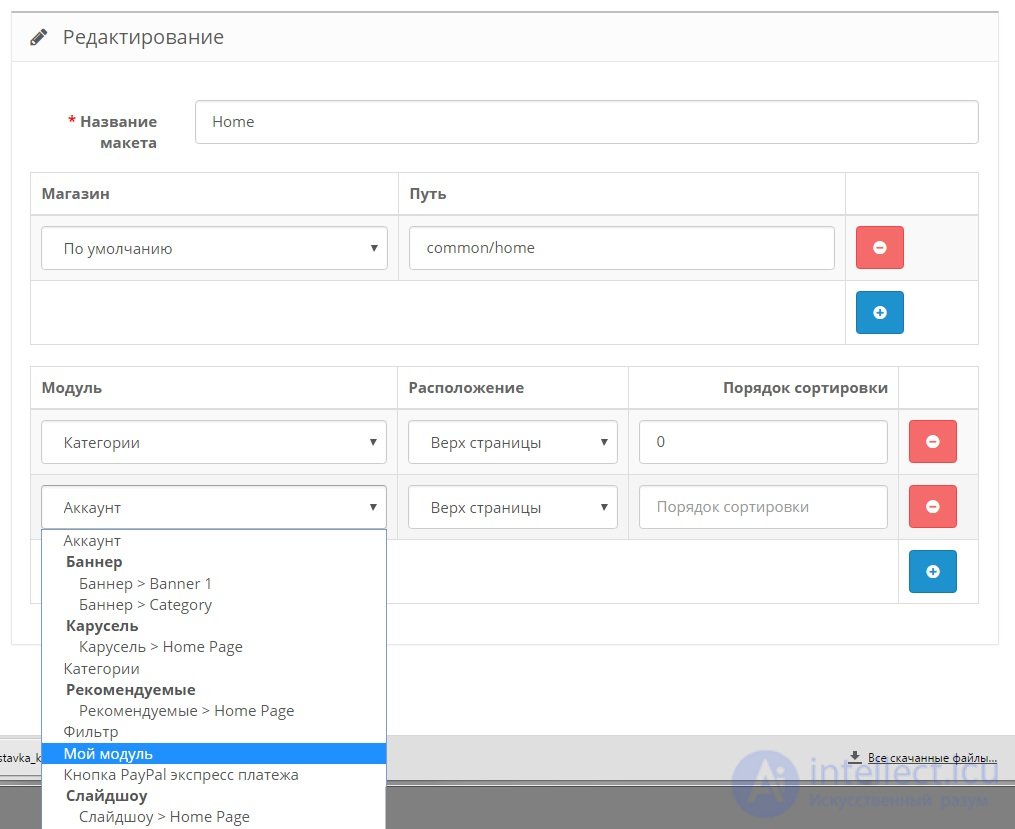
Next you need to choose for which layout (up to version 2.x it was called “schemes”) to apply this module . Go to the " Layouts ", choose as an example the layout of the home page " Home " -> " Edit ", click " Add ", select " My Module ", click " Save ".
Now, if we go to the main page, we should see something like the following:
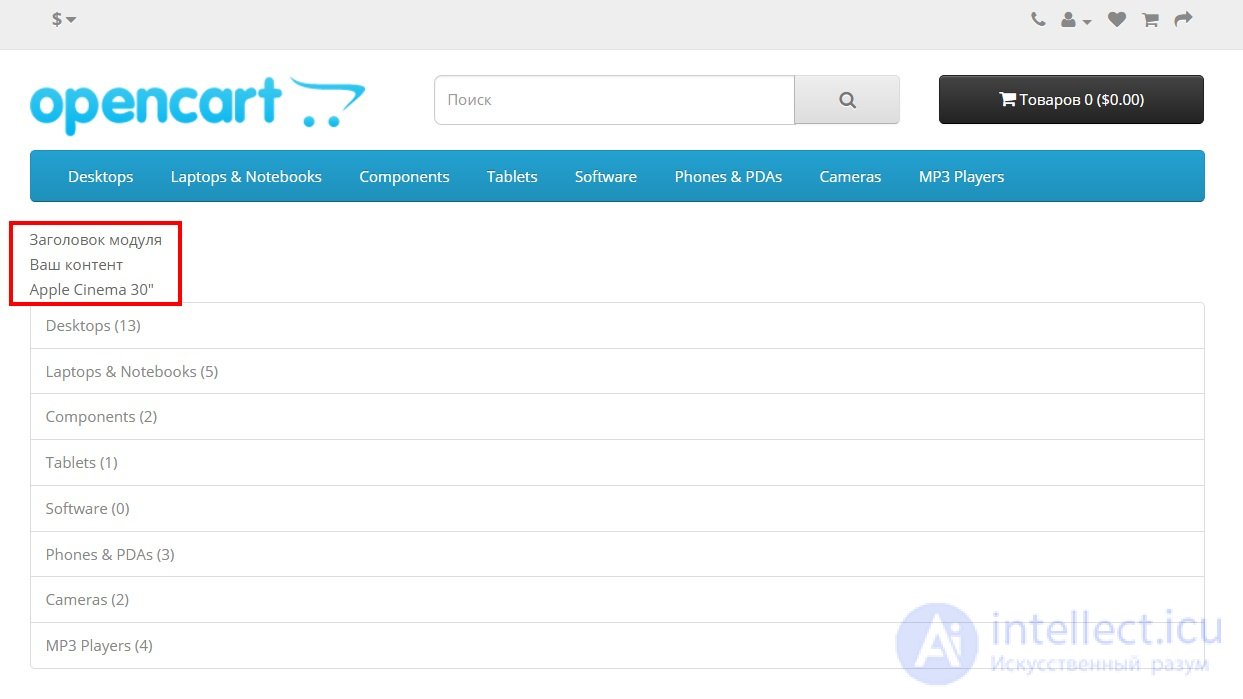
On the main one, in a red frame, I circled, something that led out our module . The module is working.
The file " module_name.ocmod.xml " is called the " modifier ", according to it, it creates virtual copies of files that require changes . Approximately it is written in Russian translation in official documentation. In other words, in this file it is written that “ on the fly ” you need to add or remove in the selected files , i.e. changes will be virtual , files will remain unchanged .
This solves the problem that I identified at the beginning of the article, that sometimes you have to edit the system files and to roll back, you must copy the original files back . In the case of the use of " modifiers ", to roll back, we simply disable it.
The file " module_name.ocmod.xml " has the following structure:
  <? xml version = "1.0" encoding = "utf-8"?>
 <modification>
     <name> Modification Default </ name>
     <code> mymodule </ code>
     <version> 1.0 </ version>
     <author> OpenCart Ltd </ author>
     <link> http://www.opencart.com </ link>
     <file path = "catalog / controller / common / home.php">
         <operation>
             <search trim = "true | false" index = "1"> <! [CDATA [
             $ data ['column_left'] = $ this-> load-> controller ('common / column_left');
             ]]> </ search>
             <add position = "replace" offset = "1"> <! [CDATA [
             test123
             ]]> </ add>
         </ operation>
     </ file>
 </ modification>
Tags name , code , version , author , link are informational , I will not focus on them.
The file tag and all its contents are important to us. The path attribute indicates the path to the file being modified, it is also possible to use masks and multiple selection of several files at once (see the glob php function, modifiers use this function). There may be several file tags.
The operation tag according to the documentation has no attributes.
Tag search , says that you need to find in the above file. The trim attribute (true | false) indicates whether spaces are removed , index is the number of the position found (for example, there are three lines for this search, so index is the choice with which one we are working). The regex attribute (true | false) tells whether regular expressions will be used in the search.
In the body of <! [CDATA [...]]> we indicate that we need to find , usually this is a code fragment.
The add tag says what to do with the found string , the position attribute describes:
The trim attribute indicates whether to remove spaces , offset allows you to go to a specified number of lines relative to the found line. The value may be negative.
In the body of <! [CDATA [...]]> we prescribe what we want to replace the found string (or what we want to insert before or after the found string).
Let's create a trial modifier - mymodul2.ocmod.xml file. His task is very simple, the module " categories " displays a list of categories with the number of positions in brackets.
We want the module to no longer display the number of positions in categories (i.e., without parentheses). For this you need, in the module controller (catalog / controller / module / category.php) 58 line :
'name' => $ category ['name']. ($ this-> config-> get ('config_product_count')? '('. $ this-> model_catalog_product-> getTotalProducts ($ filter_data). ')': ''),
replaced by
'name' => $ category ['name'],
The file " mymodul2.ocmod.xml " fill the following contents:
'name' => $ category ['name'], <? xml version = "1.0" encoding = "utf-8"?>
<modification>
<name> Categories without quantity </ name>
<code> mymodule </ code>
<version> 1.0 </ version>
<author> s-engineer </ author>
<link> s-engineer.ru </ link>
<file path = "catalog / controller / module / category.php">
<operation>
<search> <! [CDATA [
'name' => $ category ['name']. ($ this-> config-> get ('config_product_count')? '('. $ this-> model_catalog_product-> getTotalProducts ($ filter_data). ')': ''),
]]> </ search>
<add position = "replace"> <! [CDATA [
'name' => $ category ['name'],
]]> </ add>
</ operation>
</ file>
</ modification>
To install the modifier , as usual we go into the “ installation of extensions ”, click “ download ” and select our xml file . Now our modifier is set , if we go into “modifiers”, then in the list we will see our modifier with the name “ Categories without quantity ”.
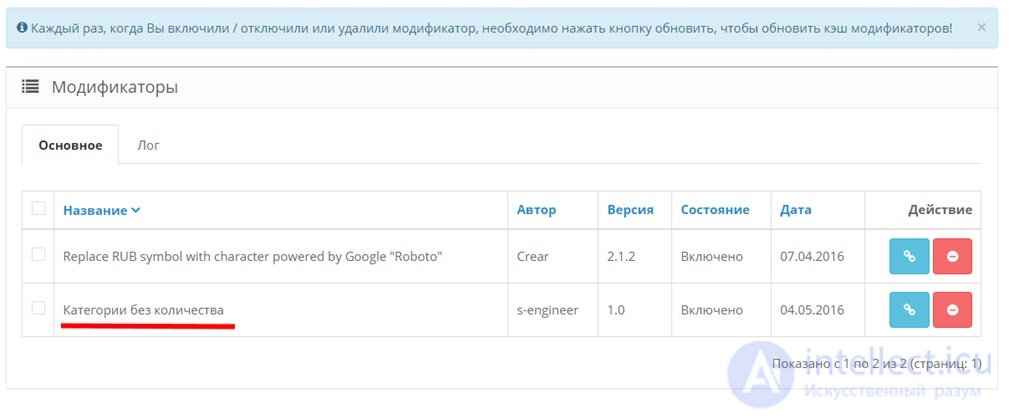
The modifier is enabled , but to start it , you need to update the cache , to do this, click the " Refresh " button (every time you turn on / off modifiers, you must update the cache.).
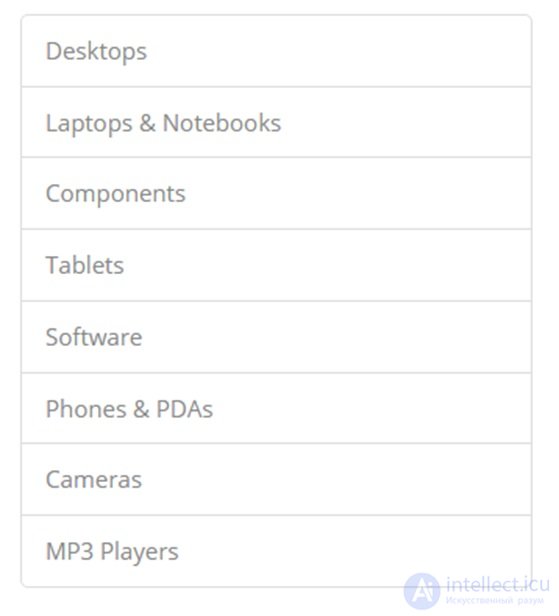
Now the module "categories" displays a list of categories without the number of titles .
If we need to return as it was before , disable the modifier and click " Update ".
For debugging, I think you want to see what the modified file looks like. In the system / storage / modification directory there are directories with files, this is the result of modifiers . Our file is located at system / storage / modification / catalog / controller / module / category.php . If we look at it, then on line 58 we will see:
Those. the modifier worked as we intended.
Now that we have considered the two extreme versions of the module , it will not be difficult to create “mixed” modules, where there is an upload folder and an install.xml file. If you want your module to use its tables in the database or its columns in already created tables, then you can enrich it using the install.sql file. It contains a SQL query that will be executed when the module is installed .
About install.php I can say that it starts up when the module is installed , I cannot give an example of application, because did not use it in practice.
At the end of the index () method, select the view file for outputting $ data .
The index () method calls the validate () method, it serves to check whether the user is allowed to change the settings of this module, it is mandatory.
6. The module view file for the admin panel: admin \ view \ template \ module \ mymodul.tpl
The donor was the category module (admin \ view \ template \ module \ category.tpl), the only thing I did:
Replaced in the tag <button>
on
Replaced in <form> tag
on
Replaced in the tag <select>
on
I want to note that the combination of the module controller for the admin panel (point 5) and the module view for the admin panel (point 6) in this case provides the minimum configuration page for the module. in this case there will be a choice of the status " Enabled " or " Disabled ".
For additional fields - options, you need to look at the controllers and views of other modules, do everything according to the model.
Place the 6 created files above in the appropriate directories (as if they were located in the OpenCart system), then put these directories in the “ upload ” directory, archive it in a zip format with the name “ mymodule.ocmod.zip ”
Next, go to the administration panel, then " Install Extensions ", click download and select our zip file .
The system will show us which files will be uploaded. Click " continue ".
Now, if you go to the " Modules " tab, we will see our module " My Module ".
The $ _ ['heading_title'] parameter of the language file “ admin \ language \ russian \ module \ mymodul.php ” is responsible for the module name in the control panel.
Then, as usual, we activate the module, go to its settings and change the status to “ Enabled ”.
I repeat, the module should have at least the “ status ” option; this is how we let the system know whether to use our module or not . If desired, you can add more options, but in this case, you will have to edit the view file.
and controller
Act also, by analogy with other modules.
Next you need to choose for which layout (up to version 2.x it was called “schemes”) to apply this module . Go to the " Layouts ", choose as an example the layout of the home page " Home " -> " Edit ", click " Add ", select " My Module ", click " Save ".
Now, if we go to the main page, we should see something like the following:
On the main one, in a red frame, I circled, something that led out our module . The module is working.
Download mymodule.ocmod.zip
The file " module_name.ocmod.xml " is called the " modifier ", according to it, it creates virtual copies of files that require changes . Approximately it is written in Russian translation in official documentation. In other words, in this file it is written that “ on the fly ” you need to add or remove in the selected files , i.e. changes will be virtual , files will remain unchanged .
This solves the problem that I identified at the beginning of the article, that sometimes you have to edit the system files and to roll back, you must copy the original files back . In the case of the use of " modifiers ", to roll back, we simply disable it.
The file " module_name.ocmod.xml " has the following structure:
Tags name , code , version , author , link are informational , I will not focus on them.
The file tag and all its contents are important to us. The path attribute indicates the path to the file being modified, it is also possible to use masks and multiple selection of several files at once (see the glob php function, modifiers use this function). There may be several file tags.
The operation tag according to the documentation has no attributes.
Tag search , says that you need to find in the above file. The trim attribute (true | false) indicates whether spaces are removed , index is the number of the position found (for example, there are three lines for this search, so index is the choice with which one we are working). The regex attribute (true | false) tells whether regular expressions will be used in the search.
In the body of <! [CDATA [...]]> we indicate that we need to find , usually this is a code fragment.
The add tag says what to do with the found string , the position attribute describes:
The trim attribute indicates whether to remove spaces , offset allows you to go to a specified number of lines relative to the found line. The value may be negative.
In the body of <! [CDATA [...]]> we prescribe what we want to replace the found string (or what we want to insert before or after the found string).
Let's create a trial modifier - mymodul2.ocmod.xml file. His task is very simple, the module " categories " displays a list of categories with the number of positions in brackets.
We want the module to no longer display the number of positions in categories (i.e., without parentheses). For this you need, in the module controller (catalog / controller / module / category.php) 58 line :
replaced by
The file " mymodul2.ocmod.xml " fill the following contents:
To install the modifier , as usual we go into the “ installation of extensions ”, click “ download ” and select our xml file . Now our modifier is set , if we go into “modifiers”, then in the list we will see our modifier with the name “ Categories without quantity ”.
The modifier is enabled , but to start it , you need to update the cache , to do this, click the " Refresh " button (every time you turn on / off modifiers, you must update the cache.).
Now the module "categories" displays a list of categories without the number of titles .
If we need to return as it was before , disable the modifier and click " Update ".
For debugging, I think you want to see what the modified file looks like. In the system / storage / modification directory there are directories with files, this is the result of modifiers . Our file is located at system / storage / modification / catalog / controller / module / category.php . If we look at it, then on line 58 we will see:
Those. the modifier worked as we intended.
Download mymodul2.ocmod.xml (pr.kn.myshki save as)
Now that we have considered the two extreme versions of the module , it will not be difficult to create “mixed” modules, where there is an upload folder and an install.xml file. If you want your module to use its tables in the database or its columns in already created tables, then you can enrich it using the install.sql file. It contains a SQL query that will be executed when the module is installed .
About install.php I can say that it starts up when the module is installed , I cannot give an example of application, because did not use it in practice.

Comments