Lecture
The cycle brings up posts on your blog. This is the most important set of PHP codes. By this time, you already know what needs to be done before you begin this lesson. Get started. Do it first, and then we will do a brief overview of what you have learned by now.
So, you already know:
At this point, you should have Denwer open, the Tutorial folder, the page
http: // wordpress / and the index.php file in the editor.
What should be in your index.php file:
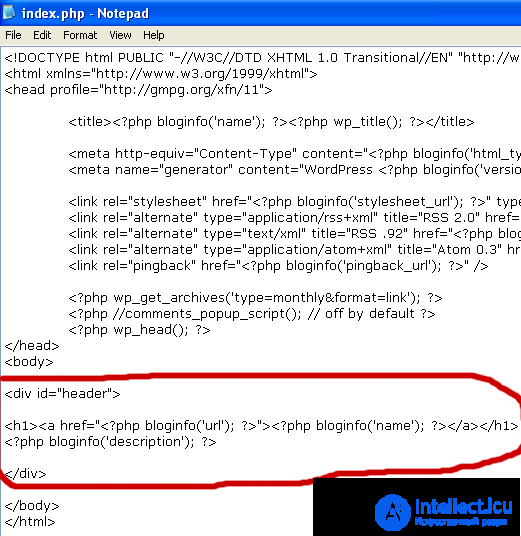
Remember to remember the codes well, print everything, do not use "copy-paste"!
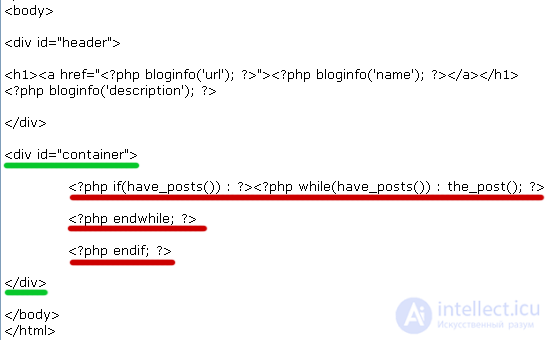
Add a DIV (invisible block) under the header zone. Give it a “container” for the ID, like this:
<div id = "container">
</ div>
What is this div tag for? In order to separate your content from everything that comes after it, for example from the sidebar or footer.
Add the following codes between the DIV tags. Try to print everything exactly as you see on the screen. If there are errors, type again.
one 2 3 four | <?php if (have_posts()) : ?> <?php while (have_posts()) : the_post(); ?> (have_posts()) : the_post(); ?> <?php endwhile ; ?> ; ?> <?php endif ; ?> ; ?> |
From now on, you will recognize the code, instead of understanding every single code. What you just typed in WordPress is called a loop. Before I explain in words what this means, you should get the following:
Please note that I have indented every line inside the content box. This is done to properly organize the code in order to facilitate its “readability”. It is not enough just to type the code, you need to be able to organize it, so that later you can immediately know what is and where each of the code sets belongs to. To indent, use the Tab key instead of spaces.
Note : not all code sets require two parts to open and close. Some may close themselves, which is explained by have_posts () and the_post (); . Because the_post () code ; is outside of if () and while () , it needs its own semicolon to close.
In previous lessons you learned how to call up a blog header using bloginfo ('name') . Now you will learn how to call post headers within the Cycle.
Type <? Php the_title (); ?> after the_post (); ?> and before <? php endwhile; ?>
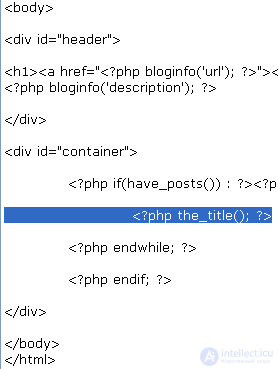
Save the index.php file, refresh the browser window. You should see Hello World under the blog description. By default, your blog has only one post. For example, I have several posts in the test blog, so I have a few headlines. Due to the fact that the headers that I used are the same, and at this stage are not yet organized, it looks like one solid line from the words Hello World .
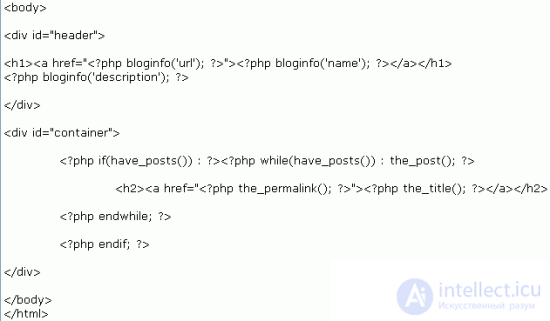
turn post titles into heading links. Remember how you turned the blog header into a link? It’s the same here - add <a href="#"> and </a> around <? Php the_title (); ?>
Save the index.php file and refresh the browser. Now your headlines have become links, but they will not lead anywhere. To bind each post link to the desired post, you need to replace the # sign with the_permalink () .
one | <a href= "<?php the_permalink(); ?>" ><?php the_title(); ?></a> ><?php the_title(); ?></a> |
the_permalink () is a PHP function that calls the address, or location, of each post. Save and refresh the window. If you have only one Hello World header, move the cursor to this link, look in the status bar at the bottom of the browser, http: // wordpress / # is not written there anymore.
If you have more than one link, you will see that each link is linked to different posts or web pages. But the links to our headlines are still in one line. To separate them, add the <h2> and </ h2> tags around the link codes.
one | <h2><a href= "<?php the_permalink(); ?>" ><?php the_title(); ?></a></h2> ><?php the_title(); ?></a></h2> |
Remember the H1 we used for the blog header? This is the name of your webpage. H2 is used for subheadings. Now that each of your links to post headers are subtitled, they've got their own line. Save the index.php file and refresh the browser window to see the changes.
This is the end of the lesson. Now you should have something like this :
Note: Try a few test posts to test your topic. Go to http: //wordpress/wp-login.php, log in, click on the Write tab, make a post, then do it a few more times. You can call them Hello World , as I did, or you can give your own names.

Comments