Lecture
If this is your first time here, I advise you to start the “WordPress Theme Creation” course first. In the last lesson, I showed you how to install a local Apache server and MySQL database, install WordPress and your new theme, and introduced you to PHP. Today we will continue to look at PHP and learn how to call the title of your website or blog.
I advise you to dial the code manually. If you copy and paste codes that I give you, don’t remember how to do it yourself. But the main thing is that you memorize what you learn - this is the essence of any training course. Ready?
Turn on Denwer. Then open the folder with your theme. I remind you that it is in home / wordpress / www / wp-content / themes / tutorial . There you should see two files that you created in the last lesson: index.php and style.css .

The content of these files must match the files index.txt and style.txt, respectively.
- open a new browser window. Go to http: // wordpress /. You should see a blank page, because yesterday you installed a blank topic;
- go back to the theme folder and open the index.php file in the editor;
You should now have a theme folder, a browser, and an index.php file (open in the editor).
In the index.php file opened in the editor type:
<? php bloginfo (' name'); ?> between the tags < body> and </ body> . Save the file.
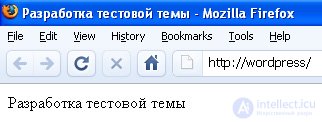
Refresh your browser window. You should see your blog header. My title is “Development of a test theme”.
What happened?
You have added a PHP code line to your index.php file in the <body> area of your page. This line generated information about your blog, the so-called bloginfo (). In particular, the line caused the title of your blog. The name that you set as the title on the settings page.
<? php - the beginning of PHP
bloginfo ('name') - to call information about the blog, in particular, its title
; - end of bloginfo operator
?> - end of PHP code
Every time you change something in the index.php file, save it and then refresh the web page so that the changes are displayed.
To convert a block header to a text link, you need an XHTML tag. Go back to the file index.php .
Add <a href = ”#”> and </ a> to the same line. The newly created line of code will look like this:
<a href="#"> <? php bloginfo ('name'); ?> </a>
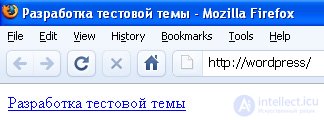
Return to the browser, refresh the window and you will see that the title of your blog has become a link .
Now this is a link, but it will not lead anywhere. Since this is the title of your blog, I think you would like it to link to the first page, right? To do this, paste:
<? php bloginfo (' url'); ?> in quotes after href =
Save the file, it should look like this:
< a href = "<? php bloginfo (' url'); ?> "> <? php bloginfo (' name'); ?> </ a>
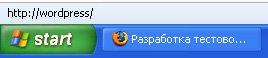
Return to the browser again and refresh the page. Now, when you hover over the link, the status bar displays http: // wordpress /:
Now, when you click on this link, you will be taken to the first page of your blog. For now, you will see the same page, but the difference is what address the link will be given - # or http : // wordpress / - is obvious :)
What happened now?
You have converted the title of your site into a link to the first page of your blog, or the so-called home page.
bloginfo (' url') - call bloginfo, in particular the address, or URL, of the first page of the blog.
<a> is an XHTML tag for opening a link.
</ a> is the closing tag for the link. If this tag is not there, your web page will not know where the link ends, and the rest of the web page will be one continuous link. Remember rule number 1 ? Open everything that you open.
href is short for hypertext reference / hypertext link. All that is between the “href =” attributes of the attribute is the value of the parameter.
In the words, code:
< a href = "<? php bloginfo (' url'); ?> "> <? php bloginfo (' name'); ?> </ a>
means: I start the link, the link value is the URL of my blog; I use the php bloginfo (' url') function to call its address; the title (anchor) of the link is the title of my blog; I use the PHP function bloginfo (' name') to call up the title of my blog; close link.
Today I introduced you to the functionality of the header template, this is where I finish my lesson. This is enough so that you do not overload yourself with information.
If you have any questions, feel free to ask them in the comments.

Comments
To leave a comment
Content Management Systems (CMS)
Terms: Content Management Systems (CMS)