
Lecture
Message queues in distributed system architecture are often used when breaking a large system down into components, since they are a simple yet scalable tool that lets you make independent systems "get along" and teach
them to work together.
Their job includes providing the ability for various subsystems to exchange messages while ensuring routing, scaling, and guaranteed delivery.
A message queue makes it possible to execute parts of a program asynchronously. This allows you to:
The queuing system principle can be implemented in MySQL and PHP, but simplicity and the availability of ready-made solutions let you do it faster.
For PHP there are various task queue management systems available.
Supervisor — a simple yet fairly powerful tool for process control. With the right configuration, it can ensure uninterrupted operation of your web service.
Supervisor — a client/server system that a user (administrator) can use to control connected processes on UNIX-type systems. The tool creates processes as sub-processes under its own name, so it has full control over them.
There is also support for automatically restarting a task when an error occurs, and for running a single queue with several workers for faster queue processing.
Supervisor – a client/server system that a user (administrator) can use to control connected processes on UNIX-type systems.
The tool creates processes as sub-processes under its own name, so it has full control over them. A diagram of how the Supervisor management system works is shown in Fig. 2.
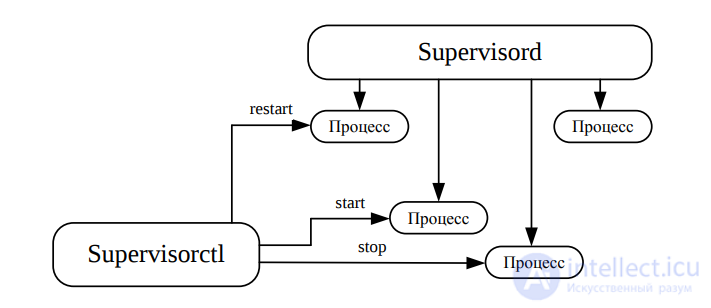
Fig. 2. Supervisor operation diagram
Supervisor consists of a server part called supervisord, which creates and manages all processes, and a system/web interface supervisorctl for managing and monitoring supervisord. Supervisor also includes a user web interface supervisorctl, which is enabled via the configuration file. To do this, you need to edit the [inet_http_server] section, entering the correct username and password.
Supervisor consists of a server part called supervisord, which creates and manages all processes, and a system/web interface supervisorctl for managing and monitoring supervisord.
Installing supervisord on Debian is extremely simple. You need to run the command:
apt-get install supervisor
# Installing supervisor requires root privileges
After installation, supervisor needs to be configured and have the programs/processes it will manage added to it. The default configuration file is located at /etc/supervisor/supervisord.conf (for Ubuntu, Debian) or /etc/supervisord.conf for other systems (FreeBSD, etc.).
To add a new process (worker), add code like this to the file:
[program:worker]
command=/usr/bin/php   /var/www/site/public_html/artisan queue:work
stdout_logfile=/var/log/worker.log
autostart=true
autorestart=true
user=www-data
stopsignal=KILL
numprocs=1
example of running 10 threads simultaneously to process the queue
[program:laravel-worker]
process_name=%(program_name)s_%(process_num)02d
command=php /var/www/app/artisan queue:work database --sleep=3 --tries=3
autostart=true
autorestart=true
user=username
numprocs=10
redirect_stderr=true
stderr_events_enabled=true
stderr_logfile=/var/www/app/storage/logs/worker.error.log
stdout_logfile=/var/www/app/storage/logs/worker.log
# Creating a worker to manage the PHP process
.
If you need to run several instances of the same process at once, the configuration will look like this:
[program:worker]
command=/usr/bin/php   /var/www/site/public_html/artisan queue:work
process_name=%(program_name)s_%(process_num)02d
numprocs=10
stdout_logfile=/var/log/worker.log
autostart=true
autorestart=true
user=www-data
stopsignal=KILL
# Creating 10 copies of the process
In this case a line is added: process_name=%(program_name)s_%(process_num)02d, which sets the names of all copies of the process, in our case worker_00, worker_01, and so on.
After adding new processes/workers, don't forget to reload supervisor:
/etc/init.d/supervisor restart
# Restarting the supervisor
Supervisor also includes a user web interface supervisorctl, which is enabled via the configuration file. To do this, you need to edit the [inet_http_server] section, entering the correct username and password there:
[inet_http_server]
port=127.0.0.1:9001
;username=some_user_name
;password=some_password
# Enabling the supervisorctl web console on socket 9001
Now all available processes can be managed through the browser. Remember that after changing the config, supervisor and/or supervisorctl need to be reloaded.
Supervisor has a built-in event monitoring mechanism that lets the system notify you about errors:
[eventlistener:memmon]
command=memmon -a 200MB -m error@intellect.icu
events=TICK_60
# If a process consumes more than 200 MB of memory, memmon restarts it and sends a notification by email; check runs every 60 seconds
Using events and a custom Python script, you can check literally any aspect of the process you need.
Now you can use supervisorctl to manage the program.
Reread the configs:
worker: available
Add it to supervisord:
worker: added process group
Check the status:
worker RUNNING pid 32284, uptime 0:00:40
Stop it:
worker: stopped
Remove it:
worker: removed process group
Cron – a task scheduler that automatically runs certain jobs at a specified interval [14]. It's handy for running, for example, a script that clears the script cache or sends notifications to registered site users.
You can edit the crontab file using the control panel interface, or using the special tool with the same name – crontab. The configuration file consists of lines. Each line describes a program that will be run on schedule.
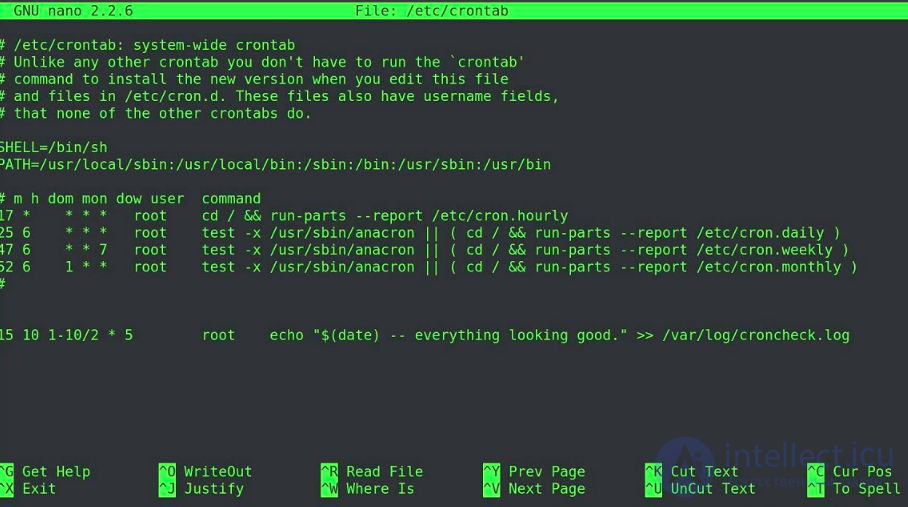
Each line has six fields.
The fields have the following meaning:
1) minutes (0–59);
2) hours (0–23);
3) day of month (1–31);
4) month of year (1–12);
5) day of week (0–6);
6) the program that will be run.
A comparison of popular task queue management systems is given in Table 2 [16].
Redis — a fairly popular tool that supports a large number of different data types and ways of working with them out of the box. In many projects it's used as a caching layer, but its capabilities are much broader. At ManyChat, we love Redis and actively use it in our product to solve a huge number of tasks. I'll walk through some interesting use cases for this in-memory key-value database using examples. I hope you'll find them useful and be able to apply something in your own projects.
Redis can be used for:
Using the data structures available in Redis, we can easily implement standard FIFO or LIFO queues. For this we use the List structure and the methods for working with it. Working with queues consists of two main actions: pushing a task onto the queue, and taking a task off the queue. We can push tasks onto the queue from any part of the system. Pulling a task off the queue and processing it is usually handled by a dedicated process called a consumer.
So, to push our task onto the queue, it's enough to use the following method:
This way we append some $payload to the end of the list named $queueName, which can represent JSON for initializing whatever business logic we need (for example, data for a money transaction, data for initiating a user notification email, etc.). If a list named $queueName doesn't yet exist in our storage, it will be created automatically, and the first element to go into it will be $payload.
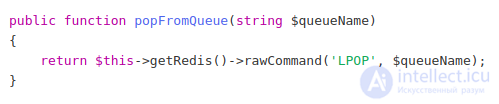
On the consumer side we need to ensure tasks are pulled from the queue, which is implemented with a simple read command on the list. To implement a FIFO queue, we read from the opposite side from where we write (in our case we wrote using RPUSH), meaning we'll read using LPOP:
To implement a LIFO queue, we'll need to read the list from the same side we write to it, meaning using RPOP.
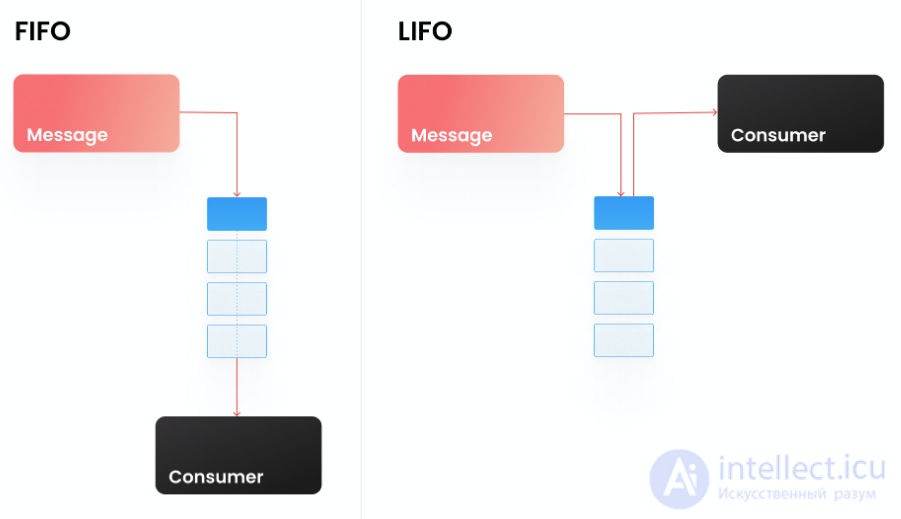
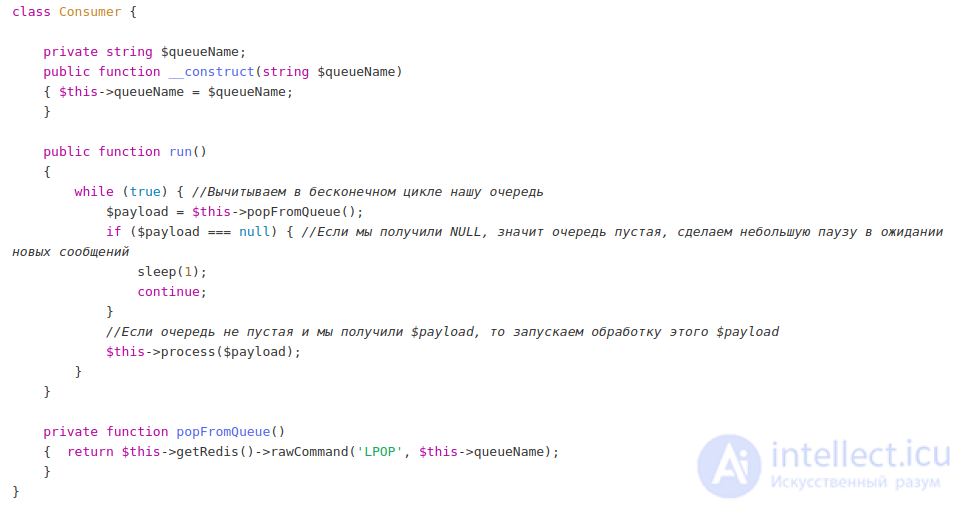
This way we read one message at a time off the queue. If the list doesn't exist (it's empty), we'll get NULL. A basic consumer skeleton might look like this:
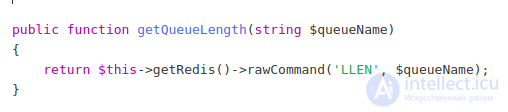
To get information about the queue depth (how many values are stored in our list), we can use the following command:
We looked at a basic implementation of simple queues, but Redis lets you build more complex queues. For example, suppose we want to know when our site's users were last active. We don't need this down to the second — an accuracy of 3 minutes is acceptable. We could update the user's last_visit field on every request from that user to our backend. But what if there's a large number of these users online — 10,000 or 100,000? And what if we also have an SPA that sends a lot of asynchronous requests? If we update the field in the database on every single one of those requests, we'll end up hammering our DB with a huge number of pointless queries. This problem can be solved in various ways; one option is to build a kind of delayed queue in which we collapse identical tasks into one within a given time window. This is where a structure like Sorted SET comes to our aid. It's a weighted set, where each element has its own weight (score). What if we use the timestamp of when the element was added to this sorted set as the score? Then we could build a queue that lets us defer certain events for a specific amount of time. To do this, we use the following function:
In this scheme, the ID of a user who visits the site will land in the $queueName queue and stay there for 180 seconds. All other requests within that time window will also be sent to this queue, but they won't be added to it, since that user's ID already exists in the queue and won't be duplicated (the 'NX' parameter takes care of that). This way we filter out all the unnecessary load, and each user will generate no more than one request every 3 minutes to update the last_visit field.
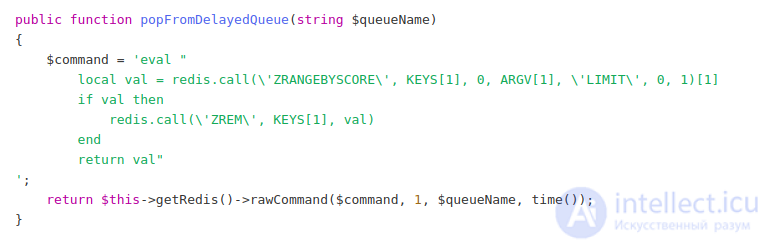
Now the question arises of how to read this queue. While the LPOP and RPOP methods for a list read a value and remove it from the list atomically (meaning the same value can't be picked up by multiple consumers), a sorted set has no such method out of the box. We can only read and remove an element using two sequential commands. But we can execute these commands atomically using a simple LUA script!
In this LUA script we try to get the first value with a score in the range from 0 to the current timestamp into the variable val using the ZRANGEBYSCORE command; if we managed to get this value, we remove it from the sorted set with the ZREM command and return the value val itself. All of these operations are performed atomically. This way we can drain our queue in the consumer, similarly to the queue example built on the LIST structure.
I've described a few basic queue patterns implemented in our system. Right now, in production, we have more complex queue-building mechanisms — linear, composite, sharded. And Redis lets you do all of this with a bit of ingenuity and ready-made, solidly working data structures out of the box, without complicated programming.
First of all, I divide records by the number of chunks (for example, 5 chunks.
It will split millions of items into several chunks of about a hundred thousand items each).
Then you can dispatch the command into the queues, which I create instantly for the chunks, and run the queue worker for that queue only once, using the --once parameter. To make this clearer, here's the code
$chunkId = 0;
foreach($chunks as $chunk){
    // Adding chunk to queue
    Artisan::queue('process:items',[
        'items' => $chunk,
    ])->onQueue('processChunk'.$chunkId);

    // Executing queue worker only once
    exec('php artisan queue:work --queue=processChunk'.$chunkId.' --once > storage/logs/process.log &');

    $chunkId++;
}
Table 2. Comparison of popular task queue management systems
| System | Requires installation |
Start of execution – |
auto restart |
accumulation of commands in the queue |
management of the number of parallel threads |
Configuration complexity |
| Cron | no | no | no | no | no | 2 |
| Supervisor | yes | yes | yes | no | yes | 3 |
|
yes | yes | no | yes | ? | 5 |



Comments