You get a bonus - 1 coin for daily activity. Now you have 1 coin

Configuring Linux Networking from the Command Line and GUI

Lecture


Basic networking concepts (Ethernet, IP address, subnets, broadcast packet transmission)

Most modern local networks use the Ethernet protocol, where data is split into small blocks called frames and transmitted on the wire one frame at a time. Data speeds vary from 10 Mb/s for older Ethernet cards to 100 Gb/s in the newest cards (with the most common rate currently growing from 100 Mb/s to 10 Gb/s). The most widely used cables are called 10BASE-T, 100BASE-T, 1000BASE-T, 10GBASE-T and 40GBASE-T, depending on the throughput they can reliably provide (the T stands for “twisted pair”); those cables end in an RJ45 connector. There are other cable types, used mostly for speeds of 10 Gb/s and above.
An IP address is a number used to identify a network interface on a computer, on a local network, or on the Internet. Currently, the most widely used version of the protocol is IP (IPv4). An IP number is encoded in 32 bits, and is usually represented as 4 blocks of up to 3-digit numbers separated by dots (for example, 192.168.0.1); the value of each block falls in the range from 0 to 255 (inclusive, corresponding to 8-bit encoding). The next version of the protocol, IPv6, extends the address space to 128 bits, and the addresses themselves are usually represented as a sequence of hexadecimal numbers separated into groups by colons (for example, 2001:0db8:11bb:0002:0000:0000:0000:0020, or 2001:db7:13bb:2::20 for short).
A subnet mask (netmask) is defined in binary code, and it splits the IP address into two parts - one identifies the address on the outer network (for example, the Internet), and the other part identifies the machine's address on the internal (local) network. In the example given here, a static IPv4 address is configured, and the subnet mask, 255.255.255.0 (24 "1"s followed by 8 "0"s in binary representation, that is 11111111111111111111111100000000), indicates that the first 24 bits of the static IP address correspond to the address on the outer network (for example, the Internet, or, in a larger network, the supernet - that is, a network of a higher rank), and the other 8 bits are specific to this machine. In IPv6, for readability, only the number of “1”s is expressed; the netmask for an IPv6 network can thus be 64.
In the IP address shown above, the host number is 0. The range of network IPv4 addresses in a given network is often written syntactically as a.b.c.d/e, where a.b.c.d is the network address and e is the number of bits covering the network part of the IP address. An example network can thus be written as: 192.168.0.0/24. IPv6 uses similar syntax: 2001:db2:12bb:4::/64.
A router is a device that connects several networks to one another. All traffic passing through the router is directed to the appropriate network. To do this, the router analyzes incoming packets and forwards them according to the IP address of their final destination. A router is often known as a gateway; in this configuration, it acts as a machine that helps you get beyond your local network (toward a wider network, such as the Internet).
A special broadcast address (xxx.xxx.xxx.255) establishes direct communication with all stations on the network. It is almost never “routed”; its function on the network is to broadcast datagrams to the computers on that network. Consequently, this means that data packets addressed to this special broadcast address never pass through a router (broadcast addresses only function within the network).
This chapter deals with IPv4 addresses, since they are the most commonly used today. We cover the specifics of the IPv6 protocol in Section 10.6, «IPv6», but the underlying principles remain the same.
The network is automatically configured during the initial installation. If Network Manager gets installed (which is generally the case for full desktop installations), then it might be that no configuration is actually required (for example, if you rely on DHCP on a wired connection and have no specific requirements). If a configuration is required (for example, for a WiFi interface), then it will create the appropriate file in /etc/NetworkManager/system-connections/.

NOTE NetworkManager

If Network Manager is particularly recommended in roaming setups (see Section 8.2.5, «Automatic network configuration for mobile users»), it is also perfectly usable as the default network management tool. You can create “System connections” that are used as soon as the computer boots either manually with a .ini-like file in /etc/NetworkManager/system-connections/ or through a graphical tool (nm-connection-editor). If you were using ifupdown, just remember to deactivate the entries in /etc/network/interfaces that you want Network Manager to handle.
→ https://wiki.gnome.org/Projects/NetworkManager/SystemSettings
→ https://developer.gnome.org/NetworkManager/1.14/ref-settings.html
If Network Manager is not installed, then the installer will configure ifupdown by creating the /etc/network/interfaces file. A line starting with auto gives a list of interfaces to be automatically configured on boot by the networking service. When there are many interfaces, it is good practice to keep the configuration in different files inside /etc/network/interfaces.d/.
In a server context, ifupdown is thus the network configuration tool that you usually get. That is why we will cover it in the next sections.

1. The Ethernet Interface

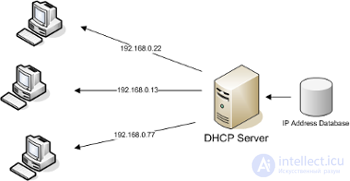
If the computer has an Ethernet card, the IP network associated with it needs to be configured by choosing one of two methods. The simplest method is dynamic configuration with DHCP, which requires setting up a DHCP server on the local network. This is also where you can define your computer's name, which will match the hostname in the example below. A running DHCP server broadcasts network configuration information to all computers on the local network.

Example 1. DHCP configuration

auto enp0s31f6
iface enp0s33f6 inet dhcp
  hostname arrakis

IN PRACTICE Names of network interfaces
Configuring Linux Networking from the Command Line and GUI

Network interface names

By default, the kernel assigns network interfaces generic names, such as eth0 (for wired Ethernet) or wlan0 (for WiFi). The number in these names is just a simple incremental counter representing the order in which the interfaces were detected. On modern hardware this order can change with every reboot, so the default names are unreliable.
Fortunately, systemd and udev can rename interfaces as soon as they appear. The default naming policy is defined by /lib/systemd/network/99-default.link (see systemd.link(5) for an explanation of the NamePolicy entry in this file). In practice, names are often based on the device's physical location (as you might guess from where they're connected), and you'll see names starting with en for wired Ethernet and wlWiFi. In the example above, the rest of the name abbreviates the PCI bus number ( p) ( 0), slot number ( s31), function number ( f6).
Obviously, you can override this policy and/or extend it in order to configure the names of some specific interfaces. You can find the names of network interfaces in the output of ip addr(or as file names under /sys/class/net/).
In some cases you may need to disable predictable network device naming as described above. Besides changing the default udev rule, you can also boot the system using the kernel parameters net.ifnames=0and biosdevname=0.
In the case of choosing a “static” network configuration, you need to set fixed values. This includes, at a minimum, the IP address and subnet mask; sometimes you also need to specify the network and broadcast addresses. The router connecting to the outside world will be designated as the gateway.

Example 2. Configuring a static IP address

auto enp0s31f6
iface enp0s31f6 inet static
  address 192.168.1.3/24
  broadcast 192.168.1.255
  network 192.168.1.0
  gateway 192.168.1.1

NOTE Configuring multiple addresses

You can not only associate several interfaces with a single physically installed network card, but also assign several IP addresses to a single interface. Also remember that an IP address can correspond to any number of names via DNS, and that a name can likewise be mapped to any number of numbered IP addresses.
As you've probably already guessed, network configuration can be quite complex, but those options are usually only used in very specific cases. The examples given here are typical of ordinary configurations.

2. Wireless interface

Getting wireless network cards to work can be a bit trickier. First of all, they often require installing proprietary firmware, which isn't installed in Debian by default. Also, wireless networks rely on cryptography to restrict access to authorized users only, which implies storing some secret key in the network configuration. Let's look at these topics one by one.

2.1. Installing the Required Firmware

First you must enable the non-free repository in the APT sources.list file: see , «Contents of the sources.list File» for more information about this file. Many firmwares are proprietary, which is why they live in this repository. You can try skipping this step if you like, but if the required firmware isn't found at the next step, try again after enabling the non-free section.
Next you need to install the appropriate firmware-* packages. If you don't know which package you need, you can install the isenkram package and run its isenkram-autoinstall-firmware command. Packages are often named after the hardware vendor or the corresponding kernel module: firmware-iwlwifi for Intel wireless cards, firmware-atheros for Qualcomm Atheros, firmware-ralink for Ralink, and so on. A reboot is then recommended, because the kernel driver usually looks for firmware files only on the first boot and not afterward.

2.2. Wireless-related entries in/etc/network/interfaces

ifupdown can manage wireless interfaces, but it needs help from the wpasupplicant package, which provides the necessary integration between ifupdown andwpa_supplicantthe command used to configure wireless interfaces (when using WPA/WPA2 encryption). The usual/etc/network/interfacesentry must be extended with two additional parameters to specify the name of the wireless network (also known as its SSID) and the pre-shared key (PSK).

Example 3. DHCP Configuration for a Wireless Interface

auto wlp4s0
iface wlp4s0 inet dhcp
  wpa-ssid Falcot
  wpa-psk ccb290fd4fe6b11935cbae12345e050edd98ad12345b98ce0151668f8f53c01b
you're using an unencrypted wireless connection, you must include it and there's no entry needed. For more information about the possible configuration options, see .. wpa_passphrase SSID passphrasewpa-key-mgmt NONEwpa-psk/usr/share/doc/wpasupplicant/README.Debian.gz
At this point you should consider restricting read permissions on /etc/network/interfacesto the root user only, since the file contains a private key that not all users should have access to.

WEP encryption

Using the outdated WEP encryption protocol is possible with the wireless-tools package . See Instructions /usr/share/doc/wireless-tools/README.Debian .
.

3. Connecting via PPP over a PSTN modem

When using the point-to-point protocol (PPP), a persistent connection is established using an intermittent signaling method; this is the most common solution for a connection based on a telephone modem (“PSTN modem”, in this case the connection runs over the public switched telephone network).
Configuring Linux Networking from the Command Line and GUI
To connect to a provider over a telephone modem, you need to obtain an account (a login name) from the provider, which also includes a phone number, full name, password, and sometimes you need to specify which authentication protocol to use. Connections of this kind are configured using the pppconfig tool, found in the Debian package of the same name. By default, it sets up a connection named provider (for example, named after your Internet provider). If you're not sure which authentication protocol to use, choose PAP: it's used by most Internet service providers.
After configuration, it becomes possible to connect using the pon command (giving it the connection name as a parameter when the default value of provider doesn't fit). You can disconnect this connection with the poff command. Both of these commands can be run by the administrator (root), or by any other user who is a member of the dip group.

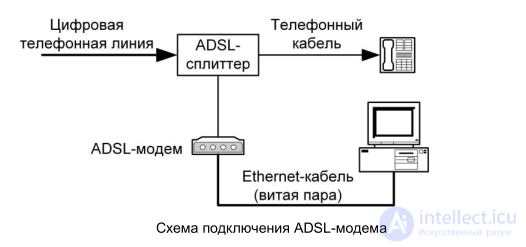
4. Connecting via an ADSL modem

The generic name “ADSL modem” covers a large group of devices with very different capabilities. Modems that can easily be used with Linux include an Ethernet interface (not just a USB interface). This trend (modems with a built-in Ethernet interface) is becoming increasingly popular. Most Internet providers offering ADSL access give users a long-term loan of, or rent out, an Ethernet “box”. Depending on the type of modem, the configuration parameters can vary widely.
Configuring Linux Networking from the Command Line and GUI

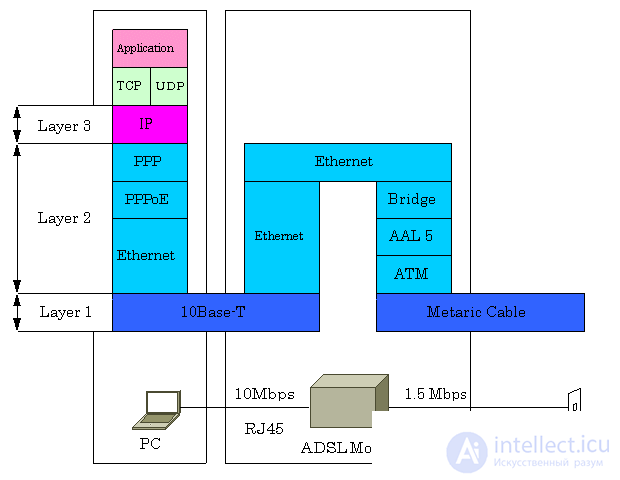
4.1. Modems supporting the PPPoE protocol

Some Ethernet modems work with the PPPoE protocol (Point-to-Point Protocol over Ethernet - the "point-to-point over Internet" protocol). The pppoeconf tool (from the package of the same name) configures such a connection. To do this, it modifies the provider settings file /etc/ppp/peers/dsl-provider and writes the login credentials into the files /etc/ppp/pap-secrets and /etc/ppp/chap-secrets. We recommend accepting all the changes the tool proposes.
Configuring Linux Networking from the Command Line and GUI
Once the configuration is complete, you can open the ADSL connection with the command pon dsl-provider, or close it with poff dsl-provider.

TIP Add the ppp command to autostart (boot)

A PPP connection over ADSL is, by definition, unstable. Since it is usually not billed by time, the user is tempted to keep it open all the time. However, there are also a few downsides to this approach. The standard solution for this is to use the init system.
With systemd, adding an automatically restarting task for the ADSL connection is a simple matter of creating a “unit file” such as /etc/systemd/system/adsl-connection.service, with contents such as the following:
[Unit]
Description=ADSL connection

[Service]
Type=forking
ExecStart=/usr/sbin/pppd call dsl-provider
Restart=always

[Install]
WantedBy=multi-user.target
As soon as this unit file is created, it needs to be enabled with the command systemctl enable adsl-connection. This service can be started manually with the command systemctl start adsl-connection; it will also be started automatically at system boot.
On systems that don't use systemd (including Wheezy and earlier versions of Debian), the standard SystemV init system works differently. On such systems, all you need to do is add a line similar to the following to the end of the /etc/inittab file; if the connection drops, init will reconnect it.
adsl:2345:respawn:/usr/sbin/pppd call dsl-provider
For ADSL connections that perform a daily automatic disconnect, this approach shortens the length of the interruption.

4.2. Modems that support PPTP

PPTP (Point-to-Point Tunneling Protocol) was created by Microsoft. Its use originated with ADSL, but it was very quickly replaced by PPPoE. If you are forced to use this protocol, see , “PPTP”.

4.3. Modems that support DHCP

When the modem is connected to the computer with an Ethernet cable (a crossover cable), you typically configure the network connection on the computer using DHCP, while the modem works as a gateway and takes care of routing (that is, it manages network traffic between the computer and the Internet).

Crossover cable for a direct Ethernet connection

Computer network cards expect to receive data on specific wires (conductors) in the cable, and they send the same kind of data on others. When connecting a computer to a local network, you usually connect the network card to a hub or switch with a cable (straight-through or crossover). However, if you want to connect two computers directly to each other (without a hub or switch), you need to route the signal sent by one card into the receiving part of the other card, and vice versa. This is exactly what a crossover cable is for, and that's the reason it's used.
Note that this distinction has become almost irrelevant over time, as modern network cards are able to detect the type of cable present and adapt accordingly, so it won't be unusual that both kinds of cable will work in a given location.
Most of the “ADSL routers” available for sale today can be used in the same way as the ADSL modems that Internet providers give to their subscribers.

5. Automatic network configuration for mobile users

Many Falcot engineers have a laptop that they also use at home for work purposes. The settings for the network connections they use differ depending on location. At home this might be a Wi-Fi radio link (secured with a WPA key), while at the office it's a wired network for better security and greater bandwidth.
To avoid manually connecting to and disconnecting from the interface of the relevant network, the administrators installed the network-manager package on the machines that handle routing. This software lets users quickly switch from one network to another using a small icon shown in the notification area of their graphical desktop. Clicking this icon shows all the available networks (both wired and wireless), and the user can then pick the network they want to connect to. The program remembers the network settings for the user's switching so that a connection is always maintained, and it automatically switches to the best available network if the connection drops.
To achieve this result, the program was split into two parts: a daemon process, run with administrator (root) privileges, that activates and configures the network interface, and a user interface process that controls it. PolicyKit handles the necessary authorization checks for controlling this program, and Debian configures PolicyKit so that members of the netdev group can add and modify Network Manager connections.
Network Manager can handle various types of connections (DHCP, manual configuration, local network), but only if the configuration is set by the program itself. That's why it will systematically ignore all network interfaces in /etc/network/interfaces and /etc/network/interfaces.d/ that it doesn't handle. Since Network Manager doesn't provide details when network connections aren't displayed, a simple approach is to remove from /etc/network/interfaces, in any configuration, all interfaces that Network Manager is supposed to manage.
Note that this program is installed by default if the “Desktop Environment” software bundle was selected during the initial system installation.

Graphical Configuration of the Internet Connection in Ubuntu

Many Ubuntu features depend quite heavily on the internet. Of course, you can use the system just fine without a connection to the World Wide Web, but then you'll have to spend a bit more time on certain operations. For example, on request Ubuntu automatically downloads, installs, and configures new applications through the Software Center's simple and clear interface. You simply choose the program you want from the list, and Ubuntu does all the further work of installing it for you. All the same things can be done manually too, but that requires far more steps.

In addition, Ubuntu automatically retrieves information from the internet about new program versions, available security updates, drivers, localization packages, and much more. So it's highly desirable for a computer running Ubuntu to get internet access at least occasionally. Although this isn't strictly necessary, since without updates it's unlikely anything will break, and new programs can be installed manually.

You're probably wondering why I've already started talking about the internet connection before installation even begins? The reason is that the Ubuntu LiveCD is too small to fit localization for every language in the world. So during installation the system will automatically try to download the necessary language packs, but only if you set up the internet connection right there in the LiveCD.

And finally, because of the extremely inadequate legislation in some countries, after installing Ubuntu you'll find various necessary programs missing — for example, codecs for some popular media formats1). So an internet connection will come in handy right after installation too.

I want to point out right away that having a working network connection during Ubuntu installation is absolutely not required! If you don't give the installer access to the World Wide Web, you'll simply end up with a system in English, and that's it. Later on you can easily install localization at any time — I'll even explain how to do that in a couple of articles. So feel free to go ahead and proceed straight to installing Ubuntu right now, and come back to reading this article later. However, since you'll most likely need to learn how to set up an internet connection sooner or later anyway, it's better to do it now if possible, and let Ubuntu handle all the work of downloading and installing the translations for you.

General information

In Ubuntu, the NetworkManager program is used to manage internet connections. It supports practically every existing connection type. But in this article I'll only describe the most common ones, since it's simply unrealistic to cover everything.

NetworkManager is a small icon in the notification area2) (top right of the screen); when not connected, it looks like this:

Configuring Linux Networking from the Command Line and GUI

After connecting to a wired network:

Configuring Linux Networking from the Command Line and GUI

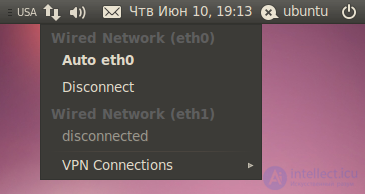
If you left-click the icon, a menu will appear with a list of available and active connections:
Configuring Linux Networking from the Command Line and GUI

By default, this menu only displays discovered wireless networks, plus any currently active connections (if at least one is established). You can activate any connection simply by selecting it from the list, or conversely interrupt any active connection by clicking «Disconnect» below its name.

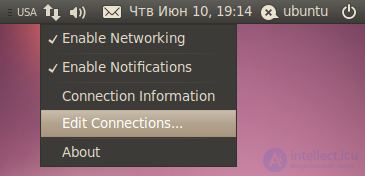
To configure connections, right-click the NetworkManager icon and select «Edit Connections…»:
Configuring Linux Networking from the Command Line and GUI

The connection editor window will open:
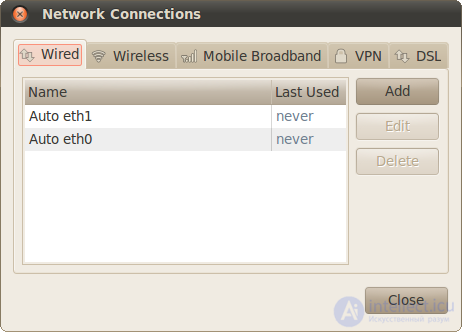
Configuring Linux Networking from the Command Line and GUI

You can also reach the connection editor via the menu System→Preferences→Network Connections, or Система→Параметры→Сетевые соединения in the Russian version of the system.

The main window of the network connection editor contains 5 tabs for configuring different connection types and lets you add new connections and manage existing ones.

  • Wired - regular connections over a cable.
  • Wireless - connections via a WiFi adapter.
  • Mobile Broadband - connections over GSM/3G networks using mobile phones as modems.
  • VPN - encrypted connections through VPN tunnels.
  • DSL - PPPoE and dial-up modem connections.

In principle, the settings for each specific type don't differ much, so I'll go over only the most common connections in detail - regular wired ones. I'll also say a bit about PPPoE and VPN connections, which are popular in Russia.

Direct Connection to the Network

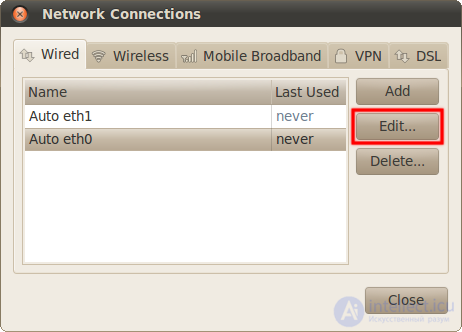
So, open the connection editor on the Wired tab:
Configuring Linux Networking from the Command Line and GUI

By default the list contains automatically created connections, one for each network adapter. It should be noted right away that network adapters, just like hard drive partitions, have well-defined names in Linux: eth0, eth1, and so on. As you can see, my computer has two network cards installed.

By default these connections are configured for the most common case, i.e. to obtain the IP address and DNS addresses automatically when the cable is plugged in. So if this is exactly the connection method you're using, you don't need to change anything at all - you should already have internet access.

Such connections are most often used when accessing the network through various routers and other network equipment.

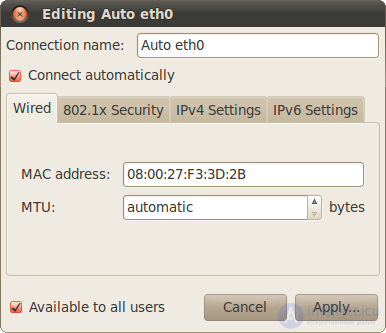
If any connection configuration is required, such as manually specifying an IP address, all you need to do is select the desired connection from the list and click the «Edit» button. The connection editing window will open:
Configuring Linux Networking from the Command Line and GUI

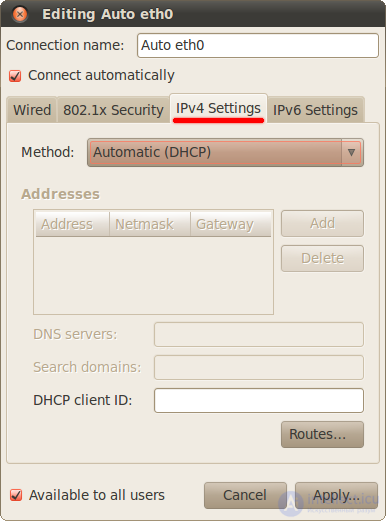
The first tab contains technical parameters that you usually don't need to change. To configure IP addresses, go to the «IPv4 Settings» tab.
Configuring Linux Networking from the Command Line and GUI

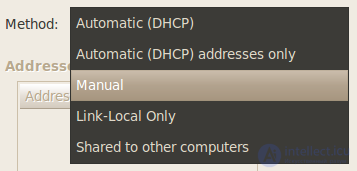
Here you can choose your connection method from the list; the most commonly used are «Automatic (DHCP)» and «Manual»:
Configuring Linux Networking from the Command Line and GUI

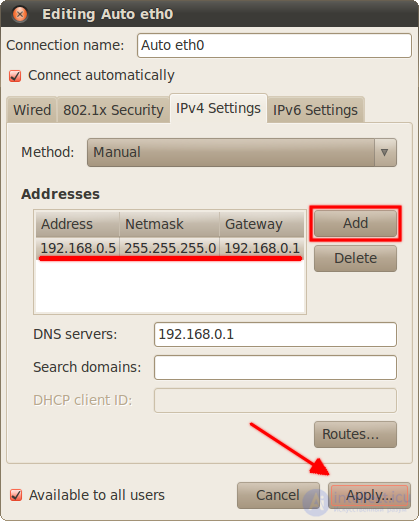
The first means automatically obtaining an IP and DNS, and it's selected by default. The second is manual configuration of these parameters. Selecting the second option unlocks the settings fields.

You can find out the required settings values from your provider or your system administrator. To enter an IP, click the «Add» button, a new empty row will appear in the list, and you enter your parameters into each field of that row. DNS addresses can be specified in one of the lower rows, separated by commas.
Configuring Linux Networking from the Command Line and GUI

Don't forget to click the «Apply…» button after entering all the necessary settings, to save them. Note that this button will remain disabled until you enter valid settings. By the way, when configuring the internet on an already-installed Ubuntu, you may be asked for your password in order to apply the settings, and only after entering it will you be able to use the modified connection. Keep this in mind and don't be alarmed.

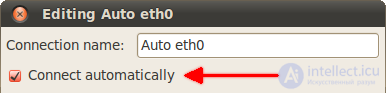
I'd like to immediately draw your attention to the «Connect automatically» toggle in the settings of any connection:
Configuring Linux Networking from the Command Line and GUI

If it's checked, Ubuntu will automatically activate this connection whenever possible. Let me explain using WiFi connections as an example. When you connect to any WiFi network, Ubuntu adds a new connection, saves it in the system, and makes it connect automatically. So every time your computer comes within range of that network, Ubuntu will try to establish a connection with it, without asking you anything. If you're not happy with this behavior, simply turn off auto-connect for the relevant connections in the list.

That's really all there is to it, and there's probably nothing more to say about network configuration in general. However, there are two specific types of connections worth mentioning. If you use one of them, read the relevant section below; otherwise, you can go straight on to the next article and confidently begin the installation.

Connecting Using PPPoE

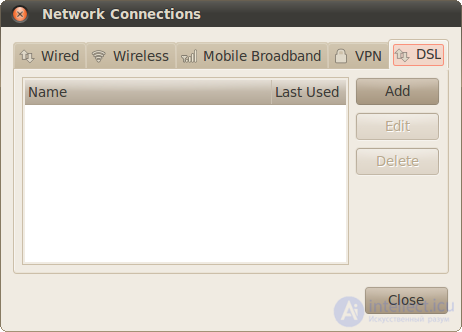
Actually, there'd be nothing to say here at all if it weren't for one annoying quirk. Generally speaking, you can set up a PPPoE connection on the DSL tab of the NetworkManager program:
Configuring Linux Networking from the Command Line and GUI

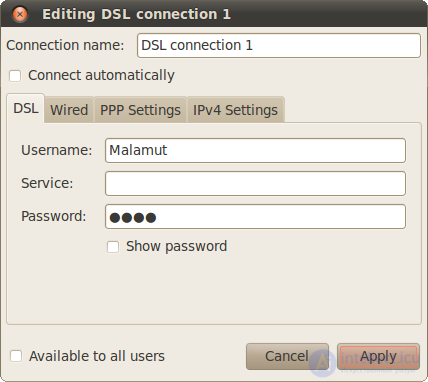
Simply click the «Add» button, enter your login and password in the window that appears, leave the other fields blank, and change the IPv4 parameters if needed:
Configuring Linux Networking from the Command Line and GUI

Don't forget to save the settings.

However, sometimes, for not entirely clear reasons, a connection created this way refuses to work. In that case you have to use the console utility pppoeconf.

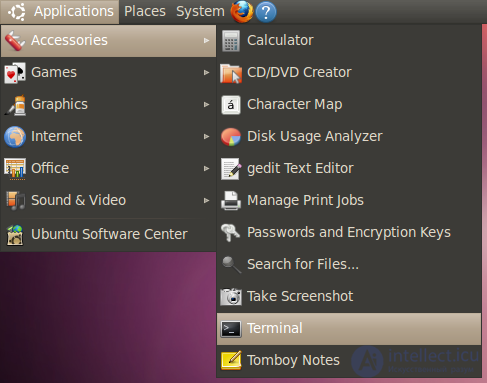
To launch it, open a terminal (menu Applications→Accessories→Terminal, or Приложения→Стандартные→Терминал in the Russian version of Ubuntu):
Configuring Linux Networking from the Command Line and GUI

In the window that appears, enter the command

sudo pppoeconf

The system will ask for your password (your Ubuntu password, not the PPPoE connection password!), enter it and press Enter. Note that the password isn't displayed at all as you type it - not as asterisks, not as dashes, nothing. This is normal and is how it's supposed to work.

You'll have to answer a few questions; usually there's nothing to change, and it's enough to just enter the login and password provided by your provider, after which the internet connection will be established. By the way, you won't need to enter this command again - all the settings will be saved automatically and restored after disconnecting or rebooting. That said, it's still better to configure the connection through NetworkManager, since in that case you'll have a simple, clear graphical management interface, which the pppoeconf utility lacks.

Connecting to the Internet Using a VPN

First off, let me say right away that in the CIS, VPN3) usually means PPTP4), even though in reality the latter is a subset of the former5). What's more, even PPPoE is also a type of VPN. But going forward I'll stick to the established terminology and use VPN to mean PPTP, so as not to confuse you, even though such a generalization is fundamentally incorrect.

That's not where the oddities with VPN end. For some unclear reason, VPN connections6) to the Internet are very popular among providers in the CIS, even though they're not used at all in the rest of the world7). Fortunately, for the sake of users in Russia and its neighbors, PPTP support has been included by default in Ubuntu starting with version 10.04.

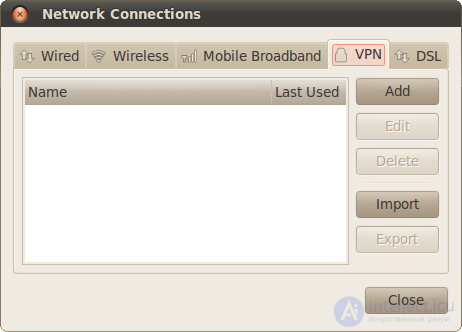
You can add a new VPN connection on the tab of the same name in the network configuration manager:
Configuring Linux Networking from the Command Line and GUI

Just click the «Add» button, and a VPN type selection window will appear; only one option is available in it - «Point-to-Point Tunneling Protocol (PPTP)». That's the one you need, so go ahead and click the «Create…» button, after which you'll land in the connection settings editor:
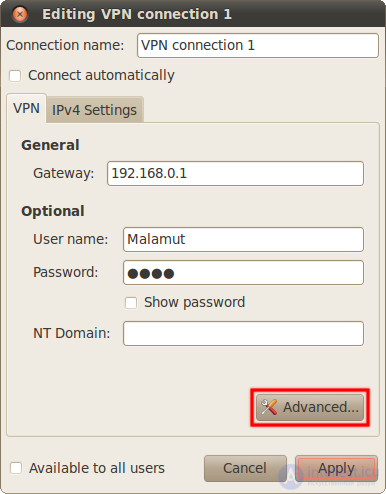
Configuring Linux Networking from the Command Line and GUI

Enter your login and password, and also set the necessary connection parameters by clicking the «Advanced…» button. You can find out about the settings from your provider. Often you can find instructions for connecting a Linux computer to the Internet on their website, in which case just follow them. If needed, contact your provider's technical support for the required connection settings8).

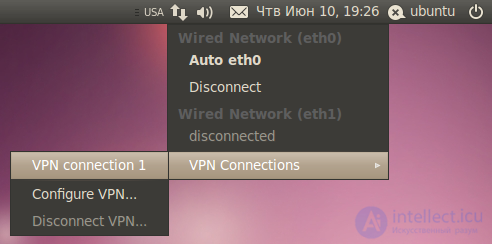
To activate the connection, look under the «VPN Connections» item in the connections list:
Configuring Linux Networking from the Command Line and GUI

I hope you've figured everything out and managed to get access to the Internet; if not, no worries, you can come back to this article at any time.

See also

  • [[b11179]]
  • Ethernet
  • IP address
  • DHCP
  • Wireless
  • Instructions
  • OSI

See also

Comments

To leave a comment

If you have any suggestion, idea, thanks or comment, feel free to write. We really value feedback and are glad to hear your opinion.
To reply

Lectures and tutorial on "LINUX operating system"

Terms: LINUX operating system