
Practice
Sometimes the error gmail.com: Temporary failure in name resolution appears
Sometimes, when you try to ping a website, update the system, or perform any task that requires an active Internet connection, you may get the « Temporary failure in name resolution » error message on your terminal.
For example, when you try to ping a website, you may run into the error shown below:
intellect.icu@pc: ~$ ping google.com
ping: gmail.com:  Temporary failure in name resolution
This is usually a name resolution error, indicating that your DNS server cannot resolve domain names into their corresponding IP addresses. This can become a serious problem, since you won't be able to update, upgrade, or even install any software packages on your Linux system.
In this article, we'll look at some of the causes of the « Temporary failure in name resolution» error and how to fix it.
  sudo apt update
Err:1 http://ppa.launchpad.net/ondrej/php/ubuntu focal InRelease  Temporary failure resolving 'ppa.launchpad.net'
Err:2 http://dl.google.com/linux/chrome-remote-desktop/deb stable InRelease  Temporary failure resolving 'dl.google.com'
Err:3 http://security.ubuntu.com/ubuntu focal-security InRelease  Temporary failure resolving 'security.ubuntu.com'
Err:4 http://ua.archive.ubuntu.com/ubuntu focal InRelease  Temporary failure resolving 'ua.archive.ubuntu.com'
Err:5 http://dl.google.com/linux/chrome/deb stable InRelease  Temporary failure resolving 'dl.google.com'
Err:6 http://ua.archive.ubuntu.com/ubuntu focal-updates InRelease  Temporary failure resolving 'ua.archive.ubuntu.com'
Err:7 http://ua.archive.ubuntu.com/ubuntu focal-backports InRelease  Temporary failure resolving 'ua.archive.ubuntu.com'
Reading package lists... Done
Building dependency tree
Reading state information... Done
140 packages can be upgraded. Run 'apt list --upgradable' to see them.
W: Failed to fetch http://ua.archive.ubuntu.com/ubuntu/dists/focal/InRelease  Temporary failure resolving 'ua.archive.ubuntu.com'
W: Failed to fetch http://ua.archive.ubuntu.com/ubuntu/dists/focal-updates/InRelease  Temporary failure resolving 'ua.archive.ubuntu.com'
W: Failed to fetch http://ua.archive.ubuntu.com/ubuntu/dists/focal-backports/InRelease  Temporary failure resolving 'ua.archive.ubuntu.com'
W: Failed to fetch http://security.ubuntu.com/ubuntu/dists/focal-security/InRelease  Temporary failure resolving 'security.ubuntu.com'
W: Failed to fetch http://dl.google.com/linux/chrome-remote-desktop/deb/dists/stable/InRelease  Temporary failure resolving 'dl.google.com'
W: Failed to fetch http://dl.google.com/linux/chrome/deb/dists/stable/InReleaseTemporary failure resolving 'dl.google.com'
W: Failed to fetch http://ppa.launchpad.net/ondrej/php/ubuntu/dists/focal/InRelease  Temporary failure resolving 'ppa.launchpad.net'
W: Some index files failed to download. They have been ignored, or old ones used     instead.
This /etc/resolv.conf file is the resolver configuration file on Linux systems. It contains DNS entries that help your Linux system resolve domain names into IP addresses.
If this file is missing, or exists but the name resolution error still occurs, create it and add Google's public DNS server, as shown
nameserver 8.8.8.8
Save the changes and restart the systemd-resolved service, as shown.
$ sudo systemctl restart systemd-resolved.service
It's also a good idea to check the resolver's status and make sure it's active and running properly:
$ sudo systemctl status systemd-resolved.service
Then try pinging any website, and the problem should be resolved.
intellect@ubuntu : ~ $ ping google.com
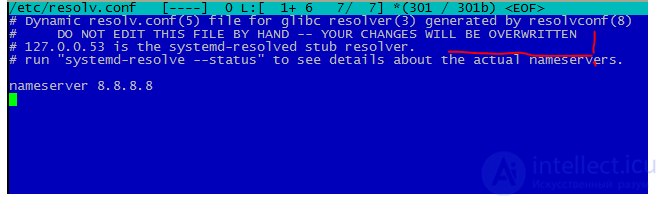
However, on Ubuntu 20 this file will most likely get overwritten and the DNS will be 127.0.0.53
If the first solution didn't help you, firewall restrictions may be preventing you from successfully making DNS queries. Check your firewall and make sure that port 53 (used for DNS - domain name resolution) and port 43 (used for whois lookups) are open. If the ports are blocked, open them as follows:
To open ports 53 and 43 on the UFW firewall, run the following commands:
$ sudo ufw allow 53 / tcp
$ sudo ufw allow 43 / tcp
$ sudo ufw reload
For Redhat-based systems such as CentOS, run the following commands:
$ sudo firewall-cmd --add-port = 53 / tcp --permanent
$ sudo firewall-cmd --add-port = 43 / tcp --permanent
$ sudo firewall-cmd --reload
We hope you now have an understanding of the « Temporary failure in name resolution » error and how to fix it by following a few simple steps. As always, we'd appreciate your feedback.
/etc/resolv.conf is the main configuration file for the DNS name resolver library. The resolver is a set of functions in the C library that provide access to the Internet Domain Name System ( DNS ). The functions are configured to check records in the /etc/hosts file or one or more DNS name servers, or to use the Network Information Service ( NIS ) host database.
On modern Linux systems using systemd (the system and service manager), DNS or name resolution services are provided to local applications through the systemd-resolved service. By default, this service has four different modes for handling domain name resolution and uses the systemd DNS stub file ( /run/systemd/resolve/stub-resolv.conf ) in its default operating mode.
The DNS stub file contains the local 127.0.0.53 stub as the only DNS server and redirects to the /etc/resolv.conf file, which used to be where the name servers used by the system were added.
If you run the following ls command on /etc/resolv.conf , you'll see that this file is a symbolic link to the /run/systemd/resolve/stub-resolv.conf file.
$ ls -l /etc/resolv.conf lrwxrwxrwx 1 root root 39 Feb 25 2059 /etc/resolv.conf -> ../run/systemd/resolve/stub-resolv.conf
Unfortunately, since /etc/resolv.conf is indirectly managed by the systemd-resolved service, and in some cases by the network service (via init scripts or NetworkManager ), any changes made manually by the user cannot be saved permanently, or only last for a while.
In this article we'll show you how to install and use the resolvconf program to set permanent DNS name servers in the /etc/resolv.conf file on Debian and Ubuntu Linux distributions.
The main reason may be that the system DNS settings are misconfigured, or that you prefer to use particular nameservers or your own. The following cat command shows the default nameserver in the /etc/resolv.conf file on my Ubuntu system.
$ cat /etc/resolv.conf
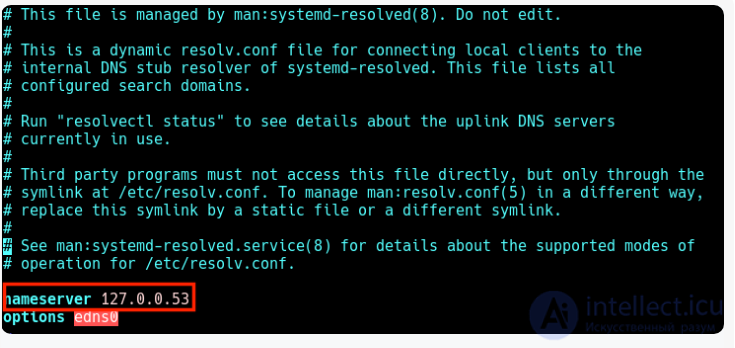
Checking the DNS servers
In this case, when local applications, such as the APT package manager, try to access fully qualified domain names ( fully qualified domain names ) on the local network, the result is an error « Temporary failure in name resolution », as shown in the following screenshot.

Fixing temporary failures
The same thing happens when you run the ping command.
$ ping google.com

Temporary failure in name resolution
So, when a user tries to manually configure nameservers, the changes either don't persist for long or get reverted after a reboot. To fix this problem, you can install and use the resolvconf utility to make the changes permanent.
To install the resolvconf package, as shown in the following section, you first need to manually set the following nameservers in the /etc/resolv.conf file so that you can access the FQDNs of the Ubuntu repository servers on the Internet.
#Public DNS from google USA

nameserver 8.8.4.4
nameserver 8.8.8.8

#Public DNS from freenom Netherlands
nameserver 80.80.80.80

#Public DNS Yandex Russia

nameserver 77.88.8.8
nameserver 77.88.8.88
nameserver 77.88.8.7
First update the system software packages, then install resolvconf from the official repositories by running the following commands.
$ sudo apt update
$ sudo apt install resolvconf
Once the resolvconf systemd installation is complete, it will automatically start and enable the resolvconf.service. To check whether it's running, run the following command.
$ sudo systemctl status resolvconf.service
If the service isn't starting or enabling automatically for some reason, you can start and enable it as follows.
$ sudo systemctl start resolvconf.service
$ sudo systemctl enable resolvconf.service
$ sudo systemctl status resolvconf.service
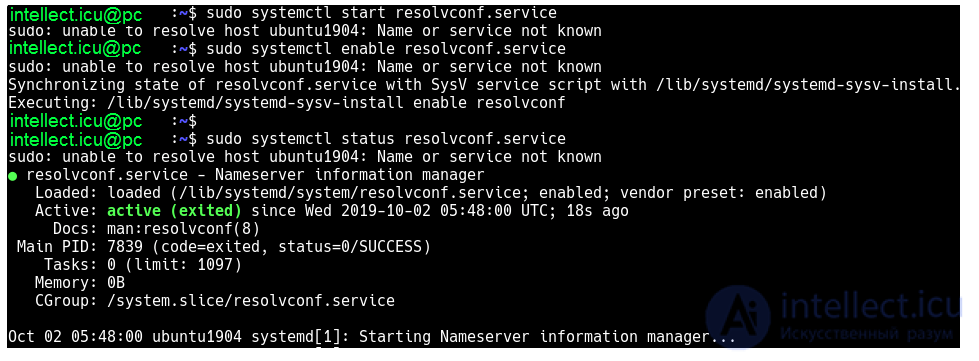
Checking the status of the Resolvconf service
Next, open the configuration file /etc/resolvconf/resolv.conf.d/head.
$ sudo nano /etc/resolvconf/resolv.conf.d/head
and add the following lines to it:
 nameserver 8.8.8.8
nameserver 8.8.4.4

Set persistent DNS nameservers in Resolvconf
Save the changes and restart the resolvconf service, or reboot the system.
$ sudo systemctl start resolvconf.service
Now, when you check the /etc/resolv.conf file, the nameserver entries should be stored there permanently. From now on you shouldn't run into any name resolution issues on your system.
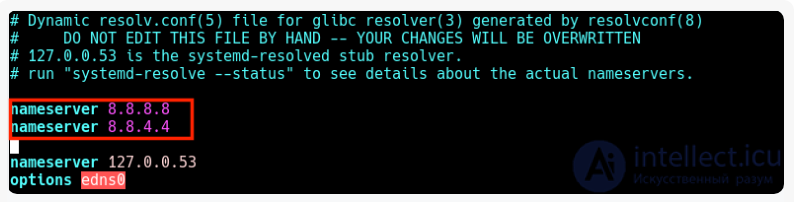
Persistent DNS servers
I hope this short article has helped you set up persistent DNS nameservers on your Ubuntu and Debian systems. If you have any questions or suggestions, share them with us in the comments section below.


Comments