
Lecture 44 min.
Not much time has passed since recordable CD drives first appeared, yet many users can already hardly manage without these devices. Floppy disks are gradually becoming a thing of the past, increasingly unable to cope with the growing volume of information that has to be transferred or kept in a safe place.
Given the relatively small difference in price between CD drives intended only for reading data and recordable CD drives, the popularity of recording devices among users is easy to explain. However, simply buying a recording drive and connecting it to a computer is not enough; you also have to master the programs that let you create backup copies or burn your own music, video, game or any other CDs, and, if you wish, a colorful autorun menu as well.
By reading this book you will learn the basics of working with the most popular programs for preparing a CD for burning, editing audio, writing information to a CD, and testing CDs and drives. In addition, you will learn to work with virtual CDs, which will help extend the service life of your drive, and to create CD autodetection menus that considerably surpass the menus recorded on factory-made CDs in both design and capabilities. You will also learn the history of the CD and become familiar with the design of CDs of various types.
Each chapter of this book is independent of the others, which will let you learn the programs in any order you like. Besides a description of the program, every chapter contains step-by-step instructions for performing the main operations, which makes absorbing the material considerably easier.
With the help of this book you will be able, without much difficulty, to process data of any type and write it to a CD.
From the Publisher
Send your comments, suggestions and questions to the e-mail address gurski@minsk.piter.com (Piter publishing house, computer editorial department).
We will be glad to hear your opinion!
On the publisher's website http://www.piter.com you will find detailed information about our books.
Chapter 1
Optical storage media
• The structure of the CD.
• The structure of the DVD.
• Rules for handling compact discs.
• The CD/DVD drive.
In the late 1970s Sony and Philips began jointly developing a single standard for optical storage media. Philips created the laser player, while Sony developed the technology for recording on optical storage media. At Sony's suggestion the disc size was set at 12 cm, since that capacity made it possible to record Beethoven's Ninth Symphony in its entirety. In 1982 a document called the Red Book published the standard for processing, recording and storing information on laser discs, together with the physical parameters of the disc.
Note.
There is a legend that the Red Book document was named after the cover it was kept in. All subsequent compact disc standards were named after books of different colors: Yellow Book, Orange Book, White Book, Blue Book, Green Book.
The Red Book standard defined the following parameters.
• The physical size of the disc.
• The structure of the disc and the organization of data.
Note.
All the data on a disc is divided into frames. Each frame consists of 192 bits for music, 388 bits of modulation and error-correction data and one control bit. 98 frames make up one sector. Sectors are combined into a track. A maximum of 99 tracks can be recorded on a disc.
• Recording of data in a single stream from the center to the periphery.
• Reading of data at a constant linear velocity (Constant Linear Velocity, CLV).
Note.
While information is being recorded and read, the rotational speed of the disc decreases as the laser beam moves from the center toward the periphery. This is necessary to make it possible to read and write the same amount of information in the same amount of time. Without CLV technology, playback of music, for example, would therefore suffer changes in tempo.
Because laser discs were relatively small compared with vinyl records, they came to be called compact discs, or CD (Compact Disk) for short. The first compact discs were intended for recording and playing back music (which is in fact what they were created for) and could store up to 74 minutes of high-quality stereo sound. The standard for such discs was named CD-DA (Compact Disk Digital Audio).
As the computer industry developed, a need arose for a technology that would allow not only digital audio but also all kinds of data to be stored on compact discs. Computer programs no longer fit on floppy disks, and the size of user files kept growing.
In 1984 a standard called the Yellow Book was published. Sony and Philips reorganized the structure of the compact disc and began using new error-correction codes – EDC (Error Detection and Correction) and ECC (Error Correction Code). The sector became the basic unit of data layout. One sector contains: 12 bytes for synchronization, 4 bytes for headers, 2048 bytes of user data and 288 bytes for error correction.
CAV (Constant Angular Velocity) technology was developed for reading computer data. CAV technology allows information to be read from a disc faster than CLV technology, because the data stream increases as the laser beam moves from the center to the periphery. Modern CD drives support both technologies.
Computer laser discs were named CD-ROM – Compact Disk ReadOnly Memory. By the end of the 1990s the CD drive had become a standard component of every computer, and the overwhelming majority of programs came to be distributed on compact discs.
The consumer market was expanding rapidly, production volumes were growing, and the largest manufacturers set about developing a technology that would let users record any information onto a compact disc themselves. In 1988 Tajyo Yuden released the world's first CD-R (Compact Disk Recordable). The greatest difficulty faced by the developers of recordable CD drives was finding materials with high reflectivity. Tajyo Yuden successfully solved this problem. The gold and cyanine alloy they used to manufacture such drives had a reflectivity of more than 70 %. The same company developed the method of applying an active organic layer to the disc surface, as well as the technology for dividing the disc into tracks.
The structure of the CD
A compact disc (Compact Disk, CD) is a disc 120 mm (4.75 inches) or 80 mm (3.1 inches) in diameter and 1.2 mm thick. The depth of a mark is 0.12 µm and its width 0.6 µm. The marks are laid out in a spiral running from the center to the periphery. The mark length is 0.9–3.3 µm and the distance between tracks is 1.6 µm. Compact discs consist of three to six layers.
To hold five-inch and three-inch discs, the tray of a CD drive has special recesses – of 5 and 3 inches respectively.
Note.
In speech, and in print as well, rounded values of the disc diameter are most often used: 5 instead of 4.75 inches, and 3 instead of 3.1.
A standard five-inch disc can hold 650–700 MB of information, 74–80 minutes of high-quality stereo sound with a sampling rate of 44.1 kHz and a quantization depth of 16 bits, or an enormous amount of audio in MP3 format.
About 180 MB of information fits on three-inch discs.
Discs called "business card" discs are sometimes encountered (Fig. 1.1). In appearance and size they resemble a business card, but in fact they are three-inch discs trimmed on two sides. From 10 to 80 MB can be written to such a compact disc, depending on how far the edges of the disc have been trimmed.
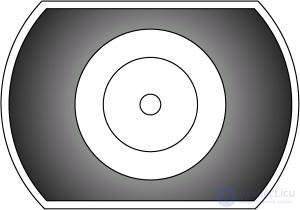
Fig. 1.1. A "business card" compact disc.
The base of a disc intended for industrial recording of information is transparent polycarbonate, onto which a thin layer of aluminum alloy is deposited; it is then covered with a protective layer of lacquer and printed with a graphic image (Fig. 1.2).
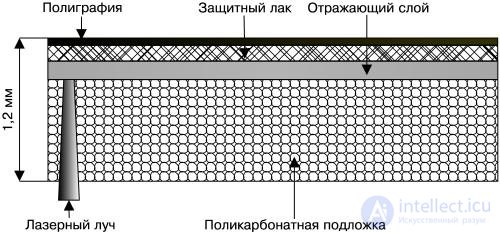
Fig. 1.2. The structure of a CD.
DVD, DVD-R, DVD-RW, CD, CD-R and CD-RW discs are produced by various companies: AMD, Amedia, Digitex, HP, Imation, MBI, Memorex, Philips, Smartbuy, Sony, TDK, Verbatim.
When buying compact discs you should pay attention to the following details.
• Runs of lacquer on the edges of a disc can cause additional vibration and, as a consequence, errors when reading and writing data.
• If additional layers of paint are missing, the disc is translucent, and you should not count on a long service life for such a product.
• If the disc is translucent, note how the reflective layer has been applied. When held up to the light, a compact disc should show no streaks; the reflective layer must be uniform across the whole surface.
• The polycarbonate base must be homogeneous, with no air bubbles.
• Most compact discs with games, movies or programs sold in stores are made by stamping.
Industrial recording of DVDs and CDs takes place in eight stages.
1. The data that has to be written to the compact disc is prepared.
2. A photoresist layer of a specific thickness is applied to the surface of a specially polished, high-precision glass disc. Using a computer-controlled laser beam, specific areas of the photosensitive layer are exposed.
3. After development in special solutions, small depressions called pits and raised areas called lands remain on the glass. The matrix, or stamper, obtained in this way is called the Glass Master.
4. A thin layer of nickel or silver is applied to the Glass Master using special reagents or vacuum deposition. This gives us the Metal Master.
5. A negative of the master disc is created. Depressions form where the raised areas were and, conversely, raised areas form where the depressions were.
6. A stamp is made from a high-strength material, with a hole drilled in its center.
7. The stamp is placed in a press machine and copies are produced.
8. An aluminum film intended to reflect the laser beam is applied to the copies. The thickness of the film is hundredths of a micrometer. The disc is coated with lacquer and printed with a graphic image.
CD-R (CD Recordable) has a more complex structure. One more layer is added to its surface, and it is this layer that is written to. The active, or recording, layer lies between the base and the reflective layer (Fig. 1.3).
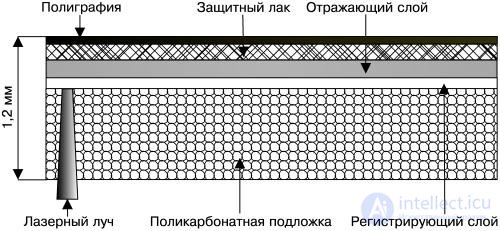
Fig. 1.3. The structure of a CD-R.
A blank CD-R has a spiral track (Pre-groove) that contains special marks and synchronization signals. During recording, this pre-formatting helps guide the laser along the required path. In addition, CD-burning programs themselves "read" certain parameters of the CD-R in use, which makes it easier for the user to configure these programs. The synchronization signals are recorded at reduced amplitude and are subsequently overwritten by the recorded signal.
During recording the laser beam moves along the spiral track and, at the moments when it is active, melts the additional layer. Under the action of the laser this layer changes its structure. This produces cells (pits) corresponding to the data being written to the compact disc. After this stage the structure of the disc's active layer can no longer be changed, and the data written to the disc cannot be deleted.
Note.
Pits are through holes in the additional layer.
The active layer is made of organic compounds: cyanine and its derivative phthalocyanine. Phthalocyanine is considered more reliable and longer-lived because it is less sensitive to sunlight. Even less sensitive to sunlight, however, are discs with a MetalAZO active layer, developed by Mitsubishi Chemical.
The requirements placed on the reflective layer of a CD-R are considerably higher than for stamped discs because of the recording layer. For this reason, more expensive materials are used to make the reflective layer – industrial-grade gold and silver – as well as complex alloys.
Depending on the combination of substances used in the recording and reflective layers, the working surface of a CD-R may be of various colors. In the past many discs had a golden working surface because gold was used.
Today silver is used for the reflective layer, since this material is cheaper and has a higher reflectivity. Most often the working surface is transparent, dark blue, or light green. The service life of such discs ranges from 10 to 100 years, depending on the material they are made of.
The CD-RW (Compact Disk Re-Writable) (Fig. 1.4) has, in addition to the layers described above, two more thermal protection layers. These additional layers allow the disc to be recorded more than 1000 times.
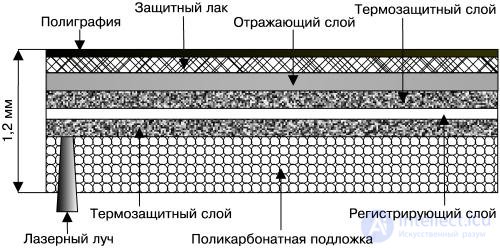
Fig. 1.4. Structure of a CD-RW.
During "burning" (recording the disc), the laser beam heats areas of the intermediate layer. As they subsequently cool, these areas change from a crystalline form into an amorphous one. If the information on a CD-RW has to be erased, the laser beam heats the intermediate layer less intensely and the amorphous areas crystallize.
DVD structure
In December 1995, ten companies united in the DVD Consortium officially announced the creation of a single unified standard – DVD. The abbreviation DVD at first stood for Digital Video Disc, but its meaning was later changed to Digital Versatile Disc. The disc was fully compatible with the Red Book and Yellow Book standards.
Externally a DVD is identical to a CD, but it can store 24 times more information, that is, up to 17 GB. This became possible thanks to changes in the physical characteristics of the disc and the use of new technologies. The track pitch was reduced to 0.74 µm, and the geometric dimensions of the pits to 0.4 µm for a single-layer disc and 0.44 µm for a dual-layer disc. The data area was enlarged and the physical size of the sectors reduced. A more efficient error correction code came into use – RSPC (Reed Solomon Product Code) – and more efficient bit modulation became possible.
DVD technology offers an enormous number of formats and four types of physical construction in two sizes. A disc of this standard may be either single-sided or double-sided. Each side may carry one or two working layers. Let us look at the main characteristics of the various DVD types.
• Disc size – 80 mm (3.1 inches).
– DVD-1 (Single-sided, single-layer) – a single-sided, single-layer disc. It can hold up to 1.36 GB of information (Fig. 1.5).
– DVD-2 (Single-sided, double-layer) – a single-sided, dual-layer disc. It holds up to 2.48 GB of information (Fig. 1.6).
– DVD-3 (Double-sided, double-layer) – a two-layer disc with one data layer on each side. Capacity – up to 2.74 GB of information (Fig. 1.7).
– DVD-4 (Double-sided, double-layer) – a disc with two data layers on each side. The capacity of such a disc is up to 4.95 GB (Fig. 1.8).
• Disc size – 120 mm (4.75 inches).
– DVD-5 (Single-sided, single-layer) – a single-sided, single-layer disc. It holds up to 4.7 GB of information.
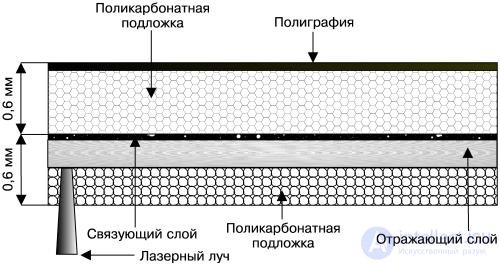
Fig. 1.5. Structure of the DVD-1 and DVD-5.
– DVD-9 (Single-sided, double-layer) – a single-sided, dual-layer disc. Capacity – up to 8.5 GB.
– DVD-10 (Double-sided, double-layer) – a two-layer disc with one data layer on each side. It holds up to 9.4 GB of information.
– DVD-18 (Double-sided, double-layer) – a two-layer disc with two data layers on each side. It can accommodate up to 17 GB of information.
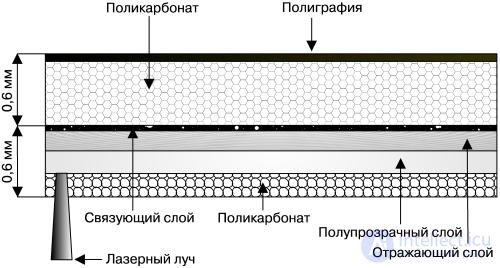
Fig. 1.6. Structure of the DVD-2 and DVD-9.
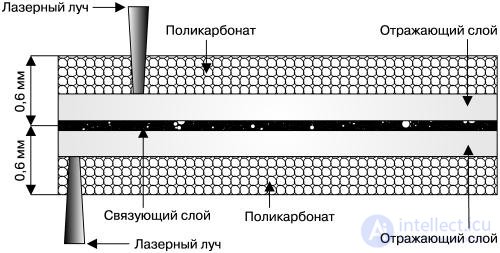
Fig. 1.7. Structure of the DVD-3 and DVD-10.
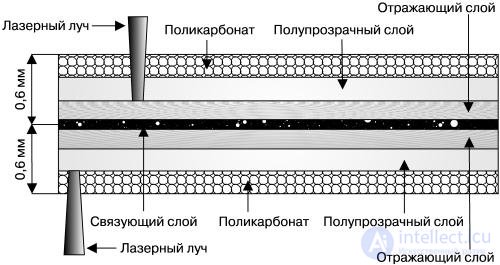
Fig. 1.8. Structure of the DVD-4 and DVD-18.
Note.
The number in the disc designation – DVD-1, DVD-4, DVD-10 and so on – is the rounded value of its capacity.
Recording a single-layer DVD is similar to recording a CD, but recording dual-layer discs differs substantially from the process described earlier.
Dual-layer discs of the DVD-2 and DVD-9 types have two working layers for recording information. These layers are separated by a special semi-transparent material. To perform its function, such a material must possess mutually exclusive properties: it must reflect the laser beam well when the outer layer is being read, and at the same time be as transparent as possible when the inner layer is being read. On commission from Philips and Sony, 3M created a material that meets these requirements: it has a reflectivity of 40% and the necessary transparency.
When information is read from such a disc, the laser beam first passes through the semi-transparent layer, focusing on the tracks of the inner layer. Having read all the information from the inner layer, the laser beam automatically changes its focus and reads the information from the semi-transparent layer. The buffer in a DVD drive and its ability to change focus quickly make it possible to feed data to the motherboard continuously.
When a dual-layer disc is manufactured, the first layer, based on polycarbonates, is stamped first. The semi-transparent material is then applied, and this in turn is covered with a film of photopolymer material. Ultraviolet radiation is used to harden the photopolymer, and the DVD is filled with polycarbonate, which serves as the disc's protective layer.
DVDs are 0.6 mm thick. For physical compatibility with CDs, a polycarbonate substrate 0.6 mm thick was additionally bonded to a DVD. In order not only to increase the thickness of a DVD to 1.2 mm but also to improve its functionality at the same time by doubling the capacity of the medium, Toshiba created the double-sided disc (the DVD-3 and DVD-10 types). To obtain a DVD-3 disc, it is enough to bond two DVD-1 discs together at their label sides; to obtain a DVD-10, two DVD-5 discs are joined. Thus, by bonding two discs 0.6 mm thick together, we obtain a single disc equal in thickness to a CD and able to store twice as much information.
To obtain discs of the DVD-4 type, two DVD-2 discs must be bonded together, and for the DVD-18, two DVD-9 discs respectively.
The principle of recording information on a DVD-R (Digital Versatile Disk Read-only – a write-once DVD) and reading it back is similar to recording and reading a CD-R. While a DVD is being recorded in special recorders, a high-power laser beam "burns" holes (pits) in the active layer. When the information is read, a laser beam of normal power passes freely through the resulting hole, is reflected from the metallized layer, and reaches the photodetector and then the microprocessor.
Phase Change Technology is used to record information on and read it from a DVD-RW (Digital Versatile Disk ReWritable). During recording, the laser beam moves along a spiral track. In periods of increased beam activity, the recording layer changes its structure, passing from the crystalline state into the amorphous one. When the information is read, the detector recognizes which kind of surface the laser beam was reflected from – crystalline or amorphous – and converts the data into a digital stream. Under the action of a laser beam of a certain power, the active (recording) layer returns to its original state and the disc can be rewritten many times.
A material capable of changing its structure repeatedly was developed by TDK and named AVIST (Advanced Versatile Information Storage Technology).
Note.
In the crystalline state the AVIST material has a reflectivity of 25–35%, but when it changes to the amorphous state it darkens and does not reflect the laser beam.
For DVD-ROM, VideoDVD, AudioDVD and so on, the UDF (Universal Disk Format) file system is used, developed by OSTA (Optical Storage Technology Association). This file system is a development of the CD-ROM file system (CDFS, or ISO 9660).
DVD technology was originally developed for recording and playing back films. A VideoDVD must provide the following capabilities:
• playback of films at least 133 minutes long;
• various ways of displaying widescreen video;
• up to 32 subtitle versions in different languages;
• surround sound;
• copy protection and regional coding;
• interactive viewing.
The data contained on a VideoDVD is divided into two types:
• navigation data;
• playback objects.
Playback objects are divided into video, audio and graphics.
Playing back digital video requires a digital stream with a rate of 167 Mbit/s. Consequently, a 4.7 GB disc could hold four minutes of digitized video. To store at least 133 minutes of high-quality picture, data compression is used. The video is encoded in the special MPEG-2 format developed by the MPEG (Moving Picture Experts Group).
While watching films you have probably noticed that the background against which the characters move usually remains unchanged. The point is that about 95% of the repeating background images can be discarded during digitization without any noticeable loss of quality, and this substantially reduces the size of the digital stream.
Sound is encoded and compressed using various technologies: Dolby Digital, MPEG-1 and MPEG-2. AudioDVD uses LPCM (Linear Pulse Code Modulation), which applies no compression. The LPCM format reproduces sound waves with the highest quality and accuracy (sampling rate – 48 or 96 kHz, quantization depth – 16, 20 or 24 bits), using from one to eight audio channels, and achieves a recording dynamic range of up to 120 dB. The digital data stream in this case may reach 6.144 Mbit/s.
Compression of the audio signal using Dolby Digital technology – AC-3 (Audio Cannels) – provides 5.1 sound (5 main audio channels and one low-frequency channel) with a range of 20–20,000 Hz. A special algorithm developed by Dolby, called Multichannel Perceptual Coding, is used to compress the sound. Human hearing, depending on sex and age, perceives sounds in different frequency ranges with differing sensitivity. In addition, there are certain frequencies and timbres that all people distinguish poorly. With Dolby Digital technology, some frequency ranges that the human ear perceives with difficulty are suppressed, which leads to a certain loss of data. As a result, however, the digital stream is considerably reduced; for six channels, for example, only 348 kbit/s is enough.
Compression of the audio signal using MPEG-1 and MPEG-2 technologies also involves data loss. The MPEG-1 format is intended only for mono or stereo sound. The MPEG-2 format can be multichannel and is able to provide surround sound in a 5.1 or 7.1 configuration.
Audio compression using the DTS technology (Digital Theater System – a digital theater with surround sound), developed in the USA, is an alternative to Dolby Digital. The sound quality is somewhat higher and sound effects are perceived as spatially more realistic, but the data stream in this case can reach 1536 kbit/s.
To control the distribution of discs and protect copyright, DVD manufacturers divided the world into six geographic regions and developed special pictograms and codes for each region. The use of such regional coding on both the discs themselves and the players for them made it impossible to play discs from one region on DVD drives from another region.
• Region 1 – the USA and Canada.
• Region 2 – Western Europe, Japan, South Africa, the Middle East.
• Region 3 – Southeast and East Asia, including Taiwan and Hong Kong.
• Region 4 – Latin America, South America, the Caribbean islands, Australia and New Zealand.
• Region 5 – the countries of the former Soviet Union, Africa (except South Africa), India, Pakistan, Mongolia and North Korea.
• Region 6 – China.
Today, DVD player manufacturers produce so-called "multi-region" devices that support most formats.
Rules for handling compact discs
A compact disc is a fairly sophisticated device that requires proper handling and care.
• Do not allow the working surface to become dirty. Hold the disc by its edges and do not touch the working surface with your hands. To remove dust that has accidentally settled on the disc and your fingerprints, use a soft, clean, dry cloth made of natural fabric with no abrasive properties. Do not press hard; wipe the disc from its center toward the edge. Do not use solvents such as acetone, gasoline, kerosene and so on to clean the working surface.
• Do not allow the working surface to be damaged. Do not drop, scratch or bend the disc.
• Store compact discs in their special plastic cases at room temperature and keep direct sunlight off their working surface.
• Do not write on the label side of a compact disc with ballpoint or fountain pens, or with hard pencils, because you may scratch the thin protective coating. Use soft pencils or felt-tip markers for this purpose, or make your notes on the case in which the disc is stored.
• To avoid shifting the center of gravity and increasing vibration while the compact disc spins in the drive, do not stick additional labels onto the disc.
CD/DVD drive
Compact disc drives may be internal or external. They can be connected via a SCSI device, and this connection method is the most efficient, reliable and highest in quality, for the following reasons:
• it allows you to work in the background during recording;
• the drive does not conflict with other devices;
• fewer computer resources are used;
• it does not require optimization of the operating system.
The drawbacks of such a connection are the following:
• cost;
• the need to buy an additional controller, to which between seven and fifteen different devices can be connected;
• more complicated installation.
External drives connected through the FireWire or USB buses work much more slowly than internal drives with an IDE interface, but they can be connected and disconnected while the computer is running, without turning the computer itself off and without restarting the operating system.
Note.
The throughput of USB 2.0 is 480 Mbit/s. When installing a compact disc drive under the Windows XP and Windows 2000 operating systems, no additional software is required. USB 2.0 allows up to 127 devices to be connected. A connected device is detected automatically. The software driver required for each peripheral device is loaded without user intervention.
Besides a SCSI connector, internal models can be connected to the IDE (ATAPI) connectors located on the motherboard using an 80-pin ribbon cable. The overwhelming majority of compact disc recording devices use the IDE interface, since it is present in all modern computers. Most modern motherboards allow four IDE devices to be connected using two ribbon cables. DVD or CD drives are connected in the same way as one of the hard disks, and the BIOS detects the type of connected equipment on its own. But if for some reason the BIOS does not detect one of the drives, this fault can be corrected using the BIOS Setup utility.
To access the BIOS CMOS Setup Utility, you must press the Delete key while the computer is booting. This should be done after the video BIOS has loaded and before Windows starts. If you have trouble judging the right moment to press the Delete key, you can start pressing and releasing it immediately after switching the computer on. If everything is done correctly, a blue screen with text in English will appear. Select the Standard CMOS Features item and press Enter.
Note.
To select the required menu item, you simply move the red rectangle onto the desired name and press Enter. You can move through the menu items left, up, down and right using the cursor keys: ←, →, ↑ and ↓. The Esc key is used to go back or cancel an action. If you press Esc several times (the number of presses depends on how deep into the BIOS you have gone), the dialog box Quit Without Saving (Y/N) appears on the screen – this short phrase means "exit the program without saving the changes made in it". This box gives the novice user an invaluable opportunity to leave the program, keeping the settings that were in place before entering BIOS Setup.
In the menu that opens, we are interested in four parameters:
• IDE Primary Master [ST310211A];
• IDE Primary Slave [None];
• IDE Secondary Master [TEAC CD-W552E];
• IDE Secondary Slave [NEC DV-5800].
Note.
The names given in square brackets will correspond to the devices in your own computer.
Two ribbon cables can be attached to the motherboard, and two devices can be connected to each of them. For example, to the first connector of the first cable (Primary Master) you can connect one hard disk (in our case this is [ST310211A]); to the second connector of the first cable (Primary Slave) you can connect another hard disk or nothing at all (in the case under consideration nothing is connected to this connector, which is why you see [None] in the square brackets).
To the first connector of the second cable, which is called Secondary Master, you can connect a compact disc drive (in the case under consideration this is [TEAC CD-W552E]). To the second connector of the second cable, which is called Secondary Slave, another CD or DVD drive is connected, or nothing at all (in our case this connector is occupied by [NEC DV-5800]).
Sometimes, to save money, a single ribbon cable is attached to the motherboard and a hard disk and a compact disc drive are connected to it, but in any case, if you connect two devices to one cable, one device will be the main one (Master) and the second the dependent one (Slave).
As a rule, the BIOS correctly detects the connected devices, and there is no need to change anything in the settings yourself. If, however, the system cannot detect a new device for some reason, you have to specify yourself which connector it is attached to. This is done using the Primary Master, Primary Slave, Secondary Master and Secondary Slave parameters.
The most common mistake made by novice users is incorrectly setting the jumper on the device itself. A jumper is a small metal clip inserted into the pins located on the rear panel of the CD or DVD drive. If two devices are connected to one ribbon cable, the position of the jumper must strictly separate their levels: one device is the Master and the other the Slave.
Select the Advanced BIOS Features parameter and press Enter. In the menu that opens, pay attention to four parameters that define the order in which devices are checked. The BIOS does not always set this order correctly.
First Boot Device (the device from which the operating system will be booted first) – [CDROM]. The available choices are:
• FloppyHDD-1USB-ZIP;
• LS120 HDD-2USB-CDROM;
• HDD-0HDD-3USB-HDD;
• SCSIZIP100LAN;
• CDROMUSB-FDDDisabled.
Second Boot Device (the device from which the operating system will be booted second) – [HDD-0]. The same devices are available for selection as in the First Boot Device parameter.
Third Boot Device (the device from which the operating system will be booted third) – [Floppy]. The same devices are available for selection as in the First Boot Device parameter.
Boot Other Device (booting the operating system from another device) – [Disabled]. For example, over a local network. The same devices are available.
While checking the computer before the operating system loads, the BIOS polls the compact disc drive, the hard disk and the floppy drive one after another, in exactly the order that you define. If the Windows XP operating system is installed on the computer, the First Boot Device parameter should be set to CDROM. If the computer starts booting from the hard disk by default, it will "hang". In that case it will be quite difficult to "cure" the operating system using a compact disc. The installation of Windows operating systems is automated, and all that is required of the user is to set the BIOS parameters so that the compact disc drive is detected before the hard disk. The BIOS will carry out the remaining steps entirely on its own, and the user need only agree with all the prompts. The square brackets in the example above show the devices for Windows XP.
If Windows 95 or 98 is installed on your computer, the First Boot Device parameter should be set to Floppy, since emergency booting in these operating systems is most often performed from a diskette. The Second Boot Device parameter should be given the value CDROM, otherwise you will have to install the operating system using the command line, which does not always lead to the desired results. For the Third Boot Device parameter you should select the hard disk.
Having configured the necessary parameters, press F10. As a result, the Save & Exit Setup (Y/N) window appears – this phrase means "exit the program, saving the settings that were made". We press the Y key (Yes) and then Enter. The computer will continue booting.
The processor clock speed and the amount of random access memory have a significant effect on how well a recording compact disc drive works. It is not recommended to work under Windows 2000 or XP with less than 128 MB of RAM; in that case errors will occur during recording, which will ruin the blanks. To avoid undesirable consequences, on low-performance computers you should close unused applications before burning discs.
How compact disc drives work
The operating scheme of a compact disc read-write device is quite simple.
1. The laser diode emits a low-power beam of light with a wavelength of 730–780 nm which, passing through the guide prism and the beam splitter, reaches the reflecting mirror.
Note.
During recording the power of the laser beam increases considerably, and when data is erased it decreases.
2. Obeying the commands of the microprocessor, the carriage with the reflecting mirror moves to the required track.
3. The laser beam is reflected off the disc, reaches the mirror, then the beam splitter and then the guide prism.
4. From the prism the beam reaches the photodetector, which sends signals to the microprocessor built into the CD drive, where the data is processed and passed over the ribbon cable to the motherboard.
CD drives are made by a variety of companies: Yamaha, Plextor, Hitachi, HP, Sony, Ricoh, Philips, Panasonic, TEAC, AOpen, Mitsumi and others. The price of CD and DVD drives depends on the quality of the model, the standing of the manufacturer, the features and the technical specifications. As an example, let us look at the specifications of several CD and DVD drives, as well as combo drives, and at their values.
• CD-ROM Samsung SC/H152 (OEM).
– Speed rating – 52x.
– Disc loading mechanism – tray.
– Buffer size – 128 KB.
– Data access time – 80 milliseconds.
– Supported formats: CD-ROM, Audio CD, Video CD, CD-i/FMW, CD-R, CD-RW, CD-Extra, Photo CD, Karaoke CD.
– Interface – IDE (ATAPI).
– Mean time between failures – 125 thousand hours.
• CD-ROM SONY CDU 415.
– Interface – SCSI.
– Disc loading mechanism – tray.
– Supported formats: CD-DA, CD Extra, CD-ROM (Mode1), CD-ROM XA (Mode 2 Form 1 & 2), CD-I (Mode 2 Form 1 & 2), CD-I Ready, CD Bridge, Photo CD (single and multisession), Video CD.
– Buffer size – 0.25 MB.
– Supported disc sizes – 8 and 12 cm in diameter.
– Mean time between failures – 100 thousand hours.
– Dimensions – 14.6 × 4.1 × 20.3 cm.
• Benq CB523B combo drive.
– Interface – E-IDE (ATAPI).
– Disc loading mechanism – tray.
– CD/CD-R read speed – up to 7800 KB/s (52x max CAV).
– DVD read speed – up to 2100 KB/s (16x max CAV).
– CD-R write speed – up to 7800 KB/s (52x max P-CAV).
– CD-RW write speed – up to 4800 KB/s (32x max P-CAV).
– Supported formats: CD-I, CD-ROM, Audio CD, Video CD, CD-R, CD-RW, Photo CD, Karaoke CD, Text CD, Enhanced CD, Bootable CD, Data CD, DVD-ROM, DVD-R, DVD-RW, DVD+R DVD+RW.
– Writing modes – TAO (Track at Once), DAO (Dick at Once), SAO (Session at Once), Multi-Session, Packet Writing, UDF.
– Data access time: CD – 120 milliseconds, DVD – 140 milliseconds.
– Data buffer size – 2048 KB; the Seamless Link buffer underrun protection technology is used.
– Supported disc sizes – 8 and 12 cm in diameter.
– Mounting orientation – vertical and horizontal.
– Mean time between failures – 125 thousand hours.
– Dimensions – 146 × 42 × 198 cm.
• Writemaster TS-H552.
– Interface – IDE (ATAPI).
– Disc loading mechanism – tray.
– CD/CD-R read speed – 48x max.
– CD-RW read speed – 32x max.
– DVD read speed – 16x max.
– Read speed for DVD-R, DVD+R DVD-RW, CD-RW, DVD+R DL – 16x max.
– CD-R write speed – 40x max.
– CD-RW write speed – 32x max.
– DVD+RW write speed – 4x max.
– DVD-RW write speed – 4x max
– DVD+R write speed – 16x max.
– DVD-R write speed – 12x max.
– DVD+R DL write speed – 2.4x max.
– Supported CD formats – CD-ROM, CD-ROM XA, CD-DA, Video CD, Photo CD, Text CD, CD-R, CD-RW.
– Supported DVD formats – DVD-ROM (Single/dual layer), Video DVD, DVD-ROM, DVD-R, DVD-RW, DVD+R, DVD+R DL, DVD+RW.
– Data access time: CD – 110 milliseconds, DVD – 130 milliseconds.
– Data buffer size – 2 MB.
– Supported disc sizes – 8 and 12 cm in diameter.
– Dimensions – 148.2 × 42 × 184 mm.
• NEC ND-3520A
– Interface – IDE (ATAPI, UDMA/33).
– Disc loading mechanism – tray.
– CD/CD-R read speed – 48x max.
– DVD read speed – 16x max.
– CD-R write speed – 24x max.
– CD-RW write speed – 6x max.
– DVD+RW write speed – 8x max.
– DVD+R/DVD-R write speed – 16x max.
– DVD+R/-R DL write speed – 4x max.
– Supported CD formats – CD-DA, CD-ROM, CD-ROM/XA, Photo CD, Video CD, CD Extra, Text CD, Bridge CD.
– Supported DVD formats – DVD single/dual layer, DVD-R/+R, DVD-RW/+RW, DVD+R9/-R9.
– Writing modes – TAO with Zero gap, DAO (Dick at Once), SAO (Session at Once), Multi-Session, Fixed and Variable Packet.
– Data access time: CD – 120 milliseconds, DVD – 140 milliseconds.
– Data buffer size – 2 MB.
– Supported disc sizes – 8 and 12 cm in diameter.
– Dimensions – 148 × 42 × 190 mm.
• ASUS CRW-5232AS-U. An external CD drive.
– Interface – USB 2.0 (USB 1.1).
– Disc loading mechanism – tray.
– CD-ROM read speed – up to 7800 KB/s (52x max CAV).
– CD-R write speed – up to 7800 KB/s (52x max P-CAV).
– CD-RW write speed – up to 4800 KB/s (32x max P-CAV).
– Digital audio extraction speed – 52x max.
– Supported formats: Audio CD, CD-ROM, CD-ROM/XA, Photo CD, CD Extra, Video CD, Text CD, Karaoke CD, I-Trax.
– Data buffer size – 2 MB.
– Supported disc sizes – 8 and 12 cm in diameter.
– Mounting orientation – vertical and horizontal.
– Dimensions – 156 × 50 × 226 mm.
CD drive specifications
Let us look at the parameters that determine how well a CD drive performs.
• The CD speed rating. Compact discs were originally developed for recording and storing music, and the data read rate was 153,600 bytes/s. When CD drives intended for computer data appeared, the speed increased, but it remained a multiple of 153,600 bytes/s. Read speeds continued to rise later on, yet they still stayed multiples of that original figure. On this basis the speeds of modern drives can be calculated: if your drive has a read speed of 52x, then multiplying 52 by 153,600 bytes/s gives 7,987,200 bytes/s. If your drive's write speed is 24x, that corresponds to 24 × 52 = 3,686,400 bytes/s.
Note.
To simplify the arithmetic, the speed of the first CD drive is often taken as 150 KB/s rather than 153,600 bytes/s.
Let us calculate the data read rate for DVD drives in the same way. Here the base speed should be taken as nine times the CD speed. Therefore 153,600 × 9 = 1,382,400 bytes/s, or roughly 1385 KB/s. Accordingly, the data read rate for a 16x DVD is 16 × 1,382,400 = 22,118,400 bytes/s. These simple calculations let you work out the data rate at any speed.
• The disc loading mechanism can be of several kinds.
– Tray. A sliding mechanism for loading discs.
– Caddy. The disc is first placed in a special cartridge, and then that cartridge is inserted into the drive's loading slot. This loading mechanism is more reliable but less convenient.
– Slot-in – roughly, an "entry slot." The disc is inserted directly into a slot in the drive. Loading a disc this way resembles inserting an ordinary floppy disk.
• Buffer size.
During writing, data of every kind must reach the recording device without interruption; if the process is interrupted, the blank disc is ruined. To ensure error-free operation, all modern drives have a dedicated set of chips into which the data to be written is placed in advance. This is the buffer. There are three types of buffer.
– A static buffer keeps in memory all the data arriving at the CD drive.
– A dynamic buffer increases the transfer rate of fragmented data and of small files.
– A read-ahead buffer – data is loaded into the buffer in advance and passed to the recording device as needed. The computer, as it were, anticipates which file will be needed for writing.
The larger the buffer, the better and more reliable the CD drive.
• Data access time. This is the delay between receiving a command to read data and the actual reading of the data. This parameter has a significant effect on writing heavily fragmented files, and also large numbers of small pieces of data located in different areas of the hard disk.
The drive's data sheet quotes the average data access time. On the inner tracks the delay will be greater, and on the outer ones smaller, than the figure given in the specifications. The shorter the data access time, the faster the CD drive works.
• CD drives may support the following CD formats.
– Audio CD, or CD-DA. Red Book – a format developed for recording music discs. Once written, such a disc can be played on a consumer CD player.
– CD-ROM. Yellow Book – a format developed for recording and storing computer data. Discs of this kind are produced on special equipment by stamping.
– Video CD – a format for recording and storing video data.
– CD-R – the CD drive can play back and write write-once discs.
– CD-RW – the drive plays back and writes rewritable discs.
– CD Extra – the CD drive can create discs able to hold both audio data and computer data.
– Photo CD – a format developed by Kodak. It is used for recording photo collections.
The DVD formats that CD drives may work with are as follows.
– DVD-ROM – a disc produced industrially by stamping.
– DVD-R – DVD-Recordable – a write-once disc; it differs from a factory-made DVD-ROM in having a special dye layer between the transparent substrate and the reflective surface. The holes (pits) in this layer are not stamped but burned out by a higher-power laser beam.
– DVD+R – similar to the DVD-R format. The DVD+R and DVD-R formats resemble each other and their technical specifications are the same. The only difference between them is that different organic compounds are used as their dyes. The existence of such similar formats is the result of competition among manufacturers.
– DVD-RW – rewritable discs. The format was developed by Pioneer.
– DVD+RW – the counterpart of the DVD-RW format. Developed by Sony and Philips.
• Mean time between failures. This is the period over which your CD drive should operate without interruption according to the MTBF standard. Once that time has elapsed, the drive's parts will have used up their service life, and the manufacturer cannot guarantee that the product will continue to work correctly and well. The longer a CD drive can keep working the better, but it cannot work forever.
The main enemies of reliable drive operation are vibration and heat. After stamping, the profile of a disc is usually a curved line with two characteristic bends, and only the central part is within specification. Even very expensive discs are not free of this defect. To extend the service life of a CD drive, it must be operated properly.
– Try not to produce large numbers of disc copies one after another. Consumer recording drives heat up considerably while writing, which can lead to premature wear of the mechanism. It is recommended that you make no more than two or three copies in a row, then let the drive rest for half an hour, after which you can make another two or three copies, and so on. During the break it is better to disconnect the computer from the mains.
– Do not use badly warped or scratched discs. Remember: a CD drive costs considerably more than a disc.
– If a CD drive becomes very dirty, the drive itself can scratch discs. In that case the scratches run along a circle.
To prevent drives from becoming heavily soiled, use the PMC Clean program.
Buy a drive-cleaning disc at a store. A small brush is mounted on the working side of such a disc. Put one drop of the special fluid supplied with it on the brush and insert the disc into the drive. Choose Start → My Computer. Double-click the drive icon to open the contents of the cleaning disc. Find the icon that launches the PMC Clean program and start it with a double click. Select the language in which the commands will be displayed. In the window that appears, click the START button, after which music begins to play and cleaning of the drive starts (Fig. 1.9). When cleaning is finished, click the TEST button to run the test program. Having reviewed the results, you can exit the drive-cleaning program by clicking the END button.
The second way of working with PMC Clean is to install the program on the hard disk and launch it from a shortcut that can be placed on the Desktop. As you will appreciate, the cleaning disc still has to be inserted into the drive. Once the program is installed, you can set it to start automatically. Then, for example, a week after the drive was cleaned, a window will appear on your computer screen after the operating system loads, reminding you that preventive maintenance is due.
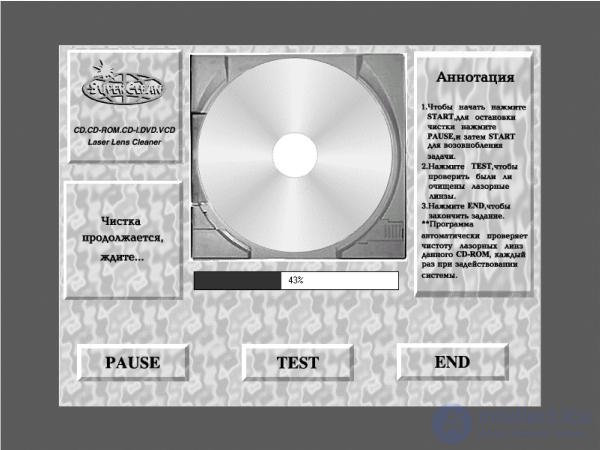
Fig. 1.9. Cleaning a CD drive.
Attention!
The drive-cleaning program should be run only when it is actually needed. Excessive zeal in this case can only do harm.
One more way to extend the service life of a CD drive is to install programs that let you create virtual CD drives and virtual compact discs.

Comments