
Lecture
Today, a large family of different robots has been developed and is widely used throughout the world, replacing people in physically demanding jobs that are hazardous to health. A structural-functional diagram of a robot interacting with the environment is shown in Fig. 1.
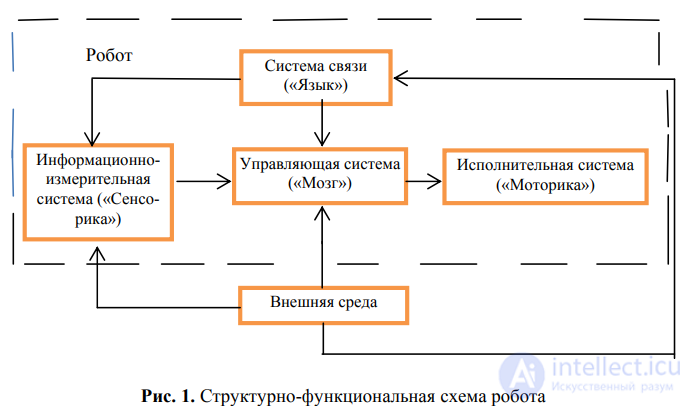
In general, a robot consists of 4 systems: the information-measurement system ("Sensing"), the control system ("Brain"), the executive system ("Actuation"), and the communication system with other robots, a human, or the robot's own internal systems ("Language").
The information-measurement system ("Sensing") – these are the robot's artificial sense organs, designed to perceive and convert information about the state of the external environment and of the robot itself for the needs of the control system (the "brain") of the robot.
The control system ("Brain") of the robot is designed, firstly, to generate the control law for the drives (motors) of the executive system's mechanisms, using feedback signals from the information-measurement system, and secondly, to enable the robot to communicate with a human in some language. The robot's intellectual capabilities are determined by its control system and information-measurement system
The executive system ("Actuation") of the robot serves to carry out the control signals (program) generated by the control system, and to act upon the environment. Examples of executive systems: manipulators (mechanical arms), pedipulators (mechanical legs), self-propelled carts,
3D tomographs, etc.
The robot's communication system is designed to organize the exchange of information between the robot's systems, and between the robot and a human or other robots, in a language they understand. The purpose of such an exchange is for the human to formulate tasks for the robot, to organize a dialogue between the human and the robot, to monitor the robot's operation, to diagnose faults, and to perform scheduled inspections of the robot. Information from the human to the robot usually arrives through a control panel or an input device (a set of keyboard commands, speech communication, video input, input via biopotentials, etc.).
Thus, a human can convey information to the robot either by entering it directly into the memory of the control system, or by acting on it through the robot's artificial sense organs.
Depending on how advanced their sensory system and control system are, robots are divided into four generations.
First-generation robots are program-controlled robots (program robots), designed to carry out a specific, rigidly pre-programmed sequence of operations determined by the technological process. First-generation robots are controlled according to a predefined program and operate under strictly defined, unchanging conditions. Retraining (changing the program) of first-
generation robots for new operations made these robots fairly universal and flexibly reconfigurable for different classes of tasks within the functional capabilities of the given robot.
Program-controlled robots are used to service machine tools, furnaces, presses, assembly conveyors and process lines, welding machines, casting machines, etc.
Second-generation robots are sensorized (adaptive) robots, which differ from program robots,
firstly, in having a considerably larger range of external sensors (optical, television, ranging, tactile, etc.) and internal sensors (sensors for the positions of the manipulator's links, force and torque sensors, etc.),
and secondly, in having a more complex control system. Thanks to their ability to perceive changes in the external environment, analyze sensory information, and adapt to existing operating conditions, second-generation robots are able to work with unoriented parts of arbitrary shape, perform assembly and installation operations, gather information about an unknown external environment, and so on.
Third-generation robots are intelligent, or "smart," robots, which differ from second-generation robots
in the complexity and sophistication of their control system, which includes elements of artificial intelligence. These robots are designed mainly to automate human intellectual activity (to solve intellectual tasks). A characteristic feature of intelligent robots is their ability to learn and adapt in the process of solving tasks of varying complexity.
Fourth-generation robots are cognitive, distributed, collective robots that possess emotions and surpass humans in the speed of information processing and reaction to the environment, capable of adapting to any changing conditions, of "embedding" themselves in living organisms, of having a control system as sophisticated
as the human brain and, in a sense, fantastically capable of creating others like themselves. This generation of robots includes virtual robots, which are created in space using special optical, light, and computer special effects
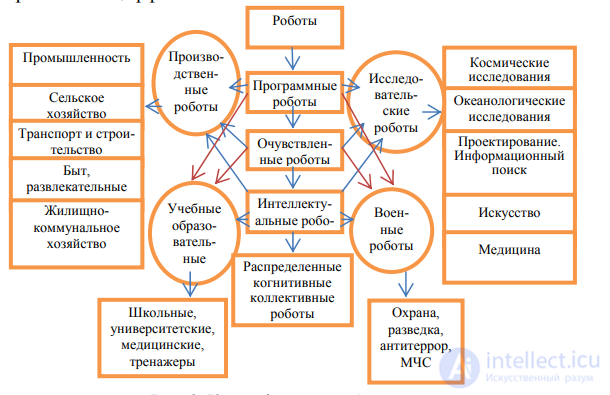
Fig. 2. Classification of robots
Depending on the robot's level of sophistication and its field of application, the four generations of robots are classified into four classes:
industrial, research, military, and educational [1, 5] (Fig. 2).
Let us look at this classification in more detail.
Industrial (production) robots are designed to perform heavy, monotonous, hazardous work that is dangerous to human health (manipulators in the nuclear industry, machining robots).
Industrial robots are mainly designed to automate all kinds of manual and transport operations in various branches of industry (assembling cars, household appliances, watches, painting bodies, preparing food products).
A distinction is made between robots for tilling soil and harvesting crops, as well as transport robots, construction and installation robots, and household robots
for cleaning premises, entertainment, and collecting waste within a city.
Research robots are used for searching, collecting, and processing information about objects under study (space and oceanographic research, Arctic exploration), designing complex objects, information search and analysis of materials, performing musical works, and diagnosing and
treating various diseases, and performing pathology operations in medicine.
Military robots provide security for facilities, reconnaissance of territories, and the destruction of terrorists and explosives, and also carry out tasks for the Ministry of Emergency Situations (firefighting, clearing rubble after accidents, chemical analysis of territories, transporting hazardous cargo).
Educational (training) robots are used to train personnel under school and university programs and professional-development courses, and also by means of training simulators and medical training robots (providing first aid to a person for various injuries, obstetric procedures, operating within a telemedicine system).
In addition, depending on the degree of automation, or the degree of human involvement in the control process, robots are divided into two classes:
biotechnical and autonomous (automatic). Biotechnical robots include remotely operated copying (teleoperated) robots,
exoskeletons controlled by a human from a control panel, and semi-automatic robots.
Copying (teleoperated) robots have a master device, for example a manipulator, fully identical to the slave device (with a reduced,
enlarged, or identical scale in geometric dimensions and forces), as well as display means for the human operator showing the robot's environment. The control system provides the desired motion set by the human operator, and it is fully reproduced, down to the scale factor, by the slave device .
Exoskeletons are anthropomorphic structures that are usually "worn" on a person's arms, legs, or torso and serve to reproduce (copy) their movements with a scale factor applied to forces. Another variety of robots with biotechnical control is robots controlled by a human from a control panel . Semi-automatic robots combine manual and automatic control.
Robots with autonomous or automatic control operate without human involvement, except for entering the work program (maintenance and repair). Later, in the 1980s, alongside robotics the term "mechatronics" appeared, implying the direct introduction of microelectronic devices into the control system and enabling the creation of efficient controllers. Later, the term "mechatronics" was substantially broadened, and this field
now also includes systems that are not robotic, for example: control systems for complexes of process
equipment, machining centers, systems for maintaining a set temperature in a room, territory security systems, medical diagnostic and therapeutic systems, and telemedicine systems. The operation of such systems involves performing a variety of measurements, for which they are equipped with appropriate sensor devices. Thus, it can be said that the creation of information-sensor systems is an independent field with very broad application in robotics and mechatronics [2, 3]. Below we give the definition of the term "mechatronics"
as applied to the modern, rapidly developing scientific-technical field of "Nanotechnology" [4
Nanomechatronics is a field of science and technology lying at the intersection
of nanomechanics, nanoelectronics, nanoinformatics, and nanoautomatics.
Nanomechatronics is a branch of mechatronics, nanotechnology, and cybernetics.
Nanomechatronics is the basis of microelectronics and microrobotics.
Nanomechatronics is based on the nanostructural integration
of mechanics, sensors for the state of the external environment and of the nano-object itself, energy sources, amplifiers, and actuating and computing devices.
Not eXactly C – Programming LEGO robots
LEGO Mindstorms. If you can imagine a robot, you can build it!
Generations of LEGO Mindstorms• The first Lego Mindstorms sets began shipping in 1998. They were built around the RCX brick.• The next version, Lego Mindstorms NXT, was released in 2006. It is based on the NXT brick.• Starting in mid-2009, a new version, Lego Mindstorm NXT 2.0, went on sale. New features: a color sensor and math with fractional numbers• 2013 – sales of LEGO Mindstorms EV3 begin: more powerful hardware, new sensors.
Programming• The NXT lets you program robots using USB or Bluetooth
PC-side program Commands to motors Data from sensors and encodersMS Robotics Developer Studio NI LabViewLEGO::NXT RobolabNXT-Python ScratchRWTH - Mindstorms NXT Toolbox for MATLAB
Program on the NXT Compiled executable fileNXT-G NI LabViewleJOS NXJ RobolabEnchanting RobotCNot Exactly C (NXC) NXT Byte Code (NBC)
Program on the phone RPC intermediary program RPC call resultsMINDroid – an OpenSource project from LEGOChatterbox – how to initiate communication from the NXT brick's sideBuilders: MIT App Inventor, CATROID
The Not eXactly C programming language• Not eXactly C (NXC) – a programming language specially invented for programming LEGO robots.• The NXC language is based on the popular C programming language, in which professional programs are written.• The NXC language is significantly simpler than its ancestor, which allows it to be learned very quickly – you can write your first programs for the robot already on your first day of getting acquainted with it.
The Not eXactly C programming language• Programming in NXC is available on: • Windows • Environments: Bricx Comand Center, RobotC Virtual World • Linux • Environments: nxcEditor, any text editor • Mac OS X• Official website: http://bricxcc.sourceforge.net/• The NXC compiler, like the BricxCC environment, can be used free of charge.
Programming environmentsBricx Command Center nxcEditor + nxcSimulator
Bricx Command Center• The basis of the BricxCC environment – a text editor with syntax highlighting (of the language's constructs)• The environment supports programming RCX and NXT bricks. Support for EV3 bricks is under development.
Bricx Command Center• Installing the BricxCC environment •
Download and install the official version: http://sourceforge.net/projects/bricxcc/files/bricxcc/ •
The developers are constantly adding new features to the program.
To get access to the very latest features, you can download a stable test build:
http://bricxcc.sourceforge.net/test_releases/
• The computer needs to see the NXT brick as a device,
so you need to install the Fantom Driver from LEGO: http://mindstorms.lego.com/en-us/support/files/Driver.aspx
Bricx Command Center If the brick is not connected at this step• Launching the programming environment can be skipped
Bricx Command Center• Connecting the NXT brick Choose the connection port: USB or BlueTooth
Bricx Command Center• The environment supports a large number of tools for working with the NXT brick
Bricx Command Center • Tools for retrieving data about the state of the NXT brick
Bricx Command Center• The file tools for working with files on the NXT brick let you copy files to the brick, read files from the brick, and delete them
Bricx Command Center • The special NeXT Screen tool lets you display, in a separate window, whatever is shown on the brick's screen.
Bricx Command Center• At any time you can get help on any language construct or function by pressing
The simplest program /* main part of the program */ task main() { //Print a string to the NXT brick's screen TextOut(0, LCD_LINE1, "Start"); }
The simplest program A multi-line comment: the opening part is /*, the closing part is */ /* main part of the program */ task main() { //Print a string to the NXT brick's screen TextOut(0, LCD_LINE1, "Start"); }
The simplest program Every program must contain, as /* main partat least, one of the program */ task. task main() { The main //Print a string to the NXT brick's screen task in the TextOut(0, LCD_LINE1, "Start"); program } is always called «main».
The simplest program Inside a task there is a block of commands. Each block of commands in a program is separated from another block by curly braces. /* main part of the program */ task main() { //Print a string to the NXT brick's screen TextOut(0, LCD_LINE1, "Start"); }
The simplest program You can use single-line comments. They start with //. /* main part of the program */ task main() { //Print a string to the NXT brick's screen TextOut(0, LCD_LINE1, "Start"); } Single-line comments are convenient for temporarily «hiding» part of the program: //TextOut(LCD_LINE1, "Start");
The simplest program /* main part of the program */ task main() { //Print a string to the NXT brick's screen TextOut(0, LCD_LINE1, "Start"); } Functions in the program are case-sensitive: “TextOut” is not the same as “textout”. Inside the parentheses are the parameters that configure the function's behavior. Each function in the program is separated from the others by a semicolon.
Compilation• All programs for the NXT brick are a special set of instructions - bytecode, which is executed by an interpreter that is part of the NXT firmware (the set of programs that start when the brick is powered on).• The NXC compiler converts the program's source code into bytecode understood by the NXT.• After compilation, the executable file must be copied to the NXT brick.
Compilation Just compile Compile the program. Used to and load Run check the program for the program for syntax errors. onto the NXT brick. on the NXT brick
Compilation• During compilation, an error may appear about using the wrong version of the NXT firmware.• You need to tell the compiler to automatically detect the firmware of the connected brick.• This can be done in the compiler settings.
Programming the motors• The most frequently used function of a robot is «Movement».• The whole robot can move: • movement of the cart• Parts of the robot can move: • movement of the manipulator (arm, gripper) • movement of a sensor
Programming the motors• Motor programming can be done using one of the following functions: RotateMotor(outputs, pwr, angle) – rotate the motor at a given power through a given angle RotateMotorEx(outputs, pwr, angle, turnpct, sync, stop) – similar to RotateMotor, but lets you control the power distribution between motors, synchronization, and the type of stop after the motion ends OnFwd(outputs, pwr) – turn the motors on to move forward at a given power and pass control to the next command OnRev(outputs, pwr) – the same, but moving backward OnFwdSync(outputs, pwr, turnpct) – similar to OnFwd, but lets you control the power distribution OnRevSync(outputs, pwr, turnpct) – the same, but moving backward Off(outputs) – brake the motors Coast(outputs) – cut power to the motors
Programming the motors • We control the amount of movement: RotateMotor(outputs, pwr, angle) BrakeWhich motors to rotate: Angle in degrees. motors OUT_A, OUT_B, OUT_C Power: Negative values – or simply OUT_BC, OUT_AC -100..100 turn in the opposite cut off OUT_AC direction power RotateMotorEx(outputs, pwr, angle, turnpct, sync, stop)Power distribution between two motors On/off when using «paired» synchronization of motors, e.g., A and B or B and C (-100..100) between motors • Example: RotateMotor(OUT_A, 100, 275); RotateMotorEx(OUT_BC, -75, 720, -100, true, true);
Programming the motors• By building a sequence of motor-control functions with the needed parameters, you can achieve a complex motion trajectory for the robot:
task main() { //Move forward RotateMotor(OUT_BC, 100, 720);
//Turn around its own axis
RotateMotorEx(OUT_BC, -75, 360, 100, true, true);
//Move backward
RotateMotor(OUT_BC, -80, 1800);
//Turn using a single motor
RotateMotor(OUT_C, 75, -180);
}
Programming the motors• Assignment 1. Moving with one motor.
• Program only one motor of the cart using the RotateMotor function
• Observe how the cart moves depending on which motor we control.
• Observe how the cart moves depending on which direction of motor rotation (forward or backward) we choose:
• Change the direction of motion by specifying a negative power and by specifying a negative angle value. Motor and direction Left motor, moving forward Right motor, moving forward Left motor, moving backward (negative power) Right motor, moving backward (negative angle)
Programming the motors• Assignment 2a. Moving with two motors.
• Write a program for the cart robot so that the robot drives forward and then backward, returning to the same spot • By changing the power applied to the motors, observe how this affects the robot's speed of movement
• What will be used to set backward motion? By controlling the power, or by controlling the direction of the rotation angle? Power 25% 50% 100% Remember that at different battery charge levels, the motors will rotate at different speeds for the same power value set in the program.
Programming the motors• Assignment 2b. Moving with two motors.
• Program the robot so that it travels 30 cm (a sheet of letter-size paper) – by how many rotations or degrees the cart's wheels need to turn.
Programming the motors• Assignment 2c. Moving with two motors.
• Study what happens if you program the robot to drive three wheel rotations (1080 degrees), while at the same time stopping the motors by hand – artificially creating a situation where the robot has run into an obstacle and the wheels cannot turn. The goal of the experiment is to show that program execution is blocked while waiting for the motors to finish turning. This is important to remember when the robot moves over a surface with obstacles or when performing turns.
Programming the motors• Assignment 2d. Moving with two motors. • Study how the power distribution between the two motors affects the cart's movement. turnpct 0 -25 -50 RotateMotorEx(OUT_BC, -75, 720, , true, true);
-100 25 50 100
Programming motors• Assignment 2e. Moving with two motors.
• Choose a power-distribution value between the two motors so that the robot moves along each of the indicated paths.
Programming motors• Assignment 3. Stopping.
• Write a program so that the cart drives forward at maximum speed (maximum power) for 4 motor rotations. After the motion ends, use motor braking. RotateMotorEx(OUT_BC, 100, 1420, 0, true, true );
• Modify the program to use cutting power to the motor as braking instead. RotateMotorEx(OUT_BC, 100, 1420, 0, true, false );
Programming motors• Complex trajectories.
• One of the difficulties in programming robot motion is determining the required number of motor rotations to travel a given distance.
• For example,
• How far do the motors need to turn for the robot to turn 90 degrees to the left? • Which way turns faster - turning 90 degrees with only one motor running, or using the maximum/minimum power-distribution value between the two motors?
• Determine experimentally how far the motors need to turn and what turning direction to set so that the robot travels a half-circle with a radius of 30 centimeters?
Programming motors• Assignment 4. Moving in a square.
• Write a program so that the robot moves along the sides of a square.
• How would we act if we moved in this way ourselves?
Programming motors• Assignment 5. Moving in a figure eight.
• Write a program so that the robot moves along a figure-eight path.
• One of the difficulties in this program is returning to the exact place where the robot started moving.
Programming motors• Turning on motors: OnFwd(outputs, pwr) OnRev(outputs, pwr) Power distribution between Which motors to spin: two motors when using OUT_A, OUT_B, OUT_C Power: "paired" OUT_BC, OUT_AC -100..100 motors, for example A and B, or B and OUT_AC C (-100..100) OnFwdSync(outputs, pwr, turnpct) OnRevSync(outputs, pwr, turnpct)• Example: OnFwd(OUT_BC, 60); OnRev(OUT_A, 100); OnFwdSync(OUT_BC, -75, -100);
Programming motors• Assignment 6. Turning on motors. • Study what happens: turn on the motors and end the program.
task main() {

OnFwd(OUT_BC, 100);

}
The goal of the experiment is to show that the motor-on functions do not in any way determine how long the motor stays on or how far the cart's wheels travel. It also shows that when the program ends, the motors do not stop explicitly – instead, power is cut from them and the motors continue moving by inertia.
Waiting• Sometimes it is necessary to insert a delay between two actions being executed.• Examples: • Wait for a person to react to an action • Wait for the sensors to be ready to work • Wait for the cart to travel some distance
Waiting• In the NXC language, a delay between two commands can be added using the function: Wait(milliseconds) How many milliseconds to wait• Special constants to simplify specifying delays:
SEC_1, SEC_2, ..., SEC_10, SEC_ MIN_1 - seconds 15, SEC_20, SEC_30 - seconds

• Example: Wait(1); //Wait 1 millisecond Wait(500);

//Wait half a second Wait(10000);

//Wait 10 seconds Wait(SEC_10);

//Wait 10 seconds Wait(SEC_2*5);

//Wait 10 seconds
Programming motors• Stopping motors: Off(outputs) Coast(outputs) Which motors to stop: OUT_A, OUT_B, OUT_C OUT_BC, OUT_AC, OUT_AC OUT_ABC• Example: Off(OUT_A);
//Brake motor A Coast(OUT_BC);

//Cut power to motors B and C Off(OUT_BC);

//Brake motors B and C
Programming motors• Assignment 7. Another square movement. • Write a program so that the robot moves along the sides of a square. But use the motor on/off functions and time delays to determine how far the robot travels and how far it turns. • Do the motors need to be stopped before turning? • What will happen if, throughout the whole program, the motor power is now changed to double?
Programming motors• Assignment 8. Locking the wheels. • Study what happens if you program the robot to drive for 5 seconds while at the same time holding the motors still by hand - artificially creating a situation where the robot has run into an obstacle and the wheels cannot turn. The goal of the experiment is to show that even though the wheels are locked and cannot move, the program will continue executing after the 5 seconds have elapsed.
Working with the screen• The programming environment provides the ability to output text and graphical information to the NXT brick's graphical screen
Working with the screen• The screen has a resolution of 100x64 dots – or you could say it has 100 columns of 64 rows each. x = 99 y = 63 Y coordinate rows x = 11 y=4 x=0 y=0 X coordinate columns
Working with the screen• In addition to graphical information, the screen can display 8 lines of text with 16 characters each• Only Latin characters and digits are supported line 1 line 2 Size of one line 3 character cell 6 x 8 dots line 4 line 5 line 6 line 7 line 8
Working with the screen• Outputting text and numbers to the screen: TextOut(x, y, str) – output a string starting at the given coordinates NumOut(x, y, value) – output a number• To simplify positioning output on the screen at the needed lines, you can use special constants: LCD_LINE1 – the topmost line, the line at the very top of the screen LCD_LINE2 – the second line from the top . . . LCD_LINE8 – the last line, the line at the very bottom of the screen• The whole screen can be cleared: ClearScreen() TextOut(56, 0, "Hello");• Example: NumOut(10, LCD_LINE2, 314159); TextOut(6*8, LCD_LINE3, "Robot");
Working with the screen• Assignment 9. Displaying text while the program is running. • Modify the figure-eight movement program so that the robot prints the corresponding direction of movement or direction of turn on the screen: • “Forward” – straight • “Left” – left • “Right” – right • Each new line of text must be printed on a new line.
Playing sounds• The NXT brick has a built-in speaker through which you can play a sound of a given frequency or sound files in a special format.
Playing sounds• Playing a sound: PlayTone(frequency, duration) – play a sound of a given frequency (frequency, in hertz) and a given duration (duration, in milliseconds) PlayToneEx(frequency, duration, volume, loop) – similar to PlayTone, but allows you to set the volume (volume, 0..4) and whether the action repeats.• If you need to output a specific note you can use special constants: TONE_C4 – the note C of the fourth octave, TONE_D4 – the note D of the fourth octave TONE_E4 – the note E of the fourth octave, TONE_F4 – the note F of the fourth octave TONE_G4 – the note G of the fourth octave, TONE_A4 – the note A of the fourth octave TONE_B4 – the note B of the fourth octave PlayTone(440, 250);• Example: PlayTone(TONE_F4, 125); PlayToneEx(TONE_A4, 500, 4, false);
Playing sounds• Assignment 10. Sounds during program execution. • Modify the figure-eight movement program so that the robot plays sounds after completing the corresponding straight movement or turn. • The sound on a left turn should be different from the sound on a right turn.
What are sensors for?• The main function of a robot is movement or the movement of its parts (manipulators, grippers, legs, sensors)
What are sensors for?• A robot needs to change its behavior (movement) depending on external events.
What are sensors for?• External events reach the robot through sensors, from the robot's internal clock, from the operator, and also from other robots.
What is a state?• Changing the robot's state: • When programming robots, one often speaks of states. For example, the robot is in a state of motion or the robot is in a state of idleness. • To move to the next state, the robot must receive an instruction to do so through some event.
What is a state?• For example, while the robot was in a state of motion, a signal arrives from the touch sensor that there is an obstacle ahead, and the robot switches from the state of motion to the state of idleness. Signal from sensor Motion Stop
Waiting for events• Consequently, the robot will remain in its previous state until it receives a signal to move to the next state.• The robot must wait for a signal to occur – this process can be called «Waiting for an event»
Waiting for events• In the NXC language there is a special construct for waiting for some event: until(CONDITION) – the program does not proceed to executing the following commands until the given condition occurs.• The construct can be described with the phrase: «keep doing the previous action until ... happens»• CONDITION - most often a comparison of the current sensor readings with some reference value (a trigger point, a threshold, etc.). The comparison is done using the constructs: VALUE1 == VALUE2 – equalthe program does not proceed to executing the following commands until the given condition occurs.
Waiting for events• CONDITION - most often, a comparison of the current sensor readings with some reference value (a trigger point, a threshold, etc.). The comparison is done using the constructs: VALUE1 == VALUE2 – the condition is true if the values are equal VALUE1 != VALUE2 – the condition is true if the values are not equal VALUE1 < VALUE2 – the condition is true if the first value is less than the second VALUE1 > VALUE2 – the condition is true if the first value is greater than the second VALUE1 <= VALUE2 – the condition is true if the first value is less than or equal to the second (not greater than the second) VALUE1 >= VALUE2 – the condition is true if the first value is greater than or equal to the second (not less than the second)
Touch sensor• A touch sensor lets the robot sense contact and react to external stimuli• Using a touch sensor, the robot can pick up objects• A manipulator equipped with a touch sensor will let the robot know whether there is an object it can grasp• A touch sensor is essentially a button that can be in one of two states - Pressed and Released.
Touch sensor• Before working with any sensor in the NXC language, it must be initialized, that is, the program must be told which port a given sensor is connected to.• Initializing a touch sensor: SetSensorTouch(port) – from this point on, treat the given port as a touch sensor• The current value can then be obtained in the program by polling the function: Sensor(port) – if the sensor is pressed, the function will return 1; if it is released, the returned value will be 0.• port – the number of the port the sensor is connected to, specified using the constants: S1, S2, S3, S4 or IN_1, IN_2, IN_3, IN_4
Touch sensor• Example:task main() { SetSensorTouch(S1); //Do nothing until the sensor is released until(Sensor(S1) == 0); //Start moving forward OnFwd(OUT_BC, 100); //Move until the sensor is pressed until(Sensor(S1) == 1); //Stop Off(OUT_BC);}
Touch sensor• Assignment 11. The robot detects an obstacle. • On the robot, the touch sensor «looks» forward • The robot starts moving • As soon as contact with an obstacle is detected, the robot must stop. • Did the robot stop immediately after contact, or did it keep trying to move for a while longer? • What action in the program should be used to stop the robot immediately after a press is detected?
Touch sensor• Assignment 12. Starting the robot from a button. • Initially the robot stands still and should start moving only after the touch sensor is pressed. • The robot stops after colliding with an obstacle. • Why did the robot not move, with the program ending right away instead?
Touch sensor The program runs on the NXT brick faster than a person can interact with the robot. The person pressed the button task main() { SetSensorTouch(S1); The motors have only just started, and control until(Sensor(S1) == 1); passed to the next command OnFwd(OUT_BC, 100); Very, very fast! The person has not yetThousandths of a second managed to pull until(Sensor(S1) == 1); their hand back from the sensor Off(OUT_BC); The motors } stopped and the program ended
Touch sensor• A possible solution: task main() { The person pressed the SetSensorTouch(S1); button until(Sensor(S1) == 1); During this time, the button is released Wait(500); OnFwd(OUT_BC, 100); The motors start until(Sensor(S1) == 1); By this time the sensor Off(OUT_BC); is «released» and waits } for a touch signalDownsides of this approach: • The delay has to be tuned individually for each person • The motor starts with a noticeable delay after the press
Distance sensor • The distance sensor (ultrasonic sensor) allows the robot to measure the distance to an object and react to movement• The sensor measures distance by calculating the time it took the sound wave to return after reflecting off the object
Distance sensor• Initializing the distance sensor: SetSensorLowspeed(port) – from this point on, treat the given port as a distance sensor. The function's name includes «low-speed sensor» because this sensor is digital and works over the I2C bus, which does not allow polling the sensor too often.• Current sensor value: SensorUS(port) – distance in centimeters (6..255)
Distance sensor• Example:task main() { SetSensorLowspeed(S4); //Start rotating around its own axis OnFwdSync(OUT_BC, 50, -100); //Until an obstacle appears closer than 50 cm. until(SensorUS(S4) < 50); //Stop the motors Off(OUT_BC); //Start moving and drive for 3.5 seconds OnFwd(OUT_BC, 100); Wait(3500); Off(OUT_BC);}
Touch sensor• Assignment 13. The robot detects an obstacle. • The distance sensor on the robot «looks» forward • The robot moves until an obstacle appears closer than 20 cm. 20 cm.
Touch sensor• Assignment 14. Warrior robot. • The robot will need two sensors: distance and touch • The «Warrior» spins quickly in place • As soon as an object appears in its field of view closer than 50 cm, the robot starts moving toward that object and stops when it bumps into it
Touch sensor• Assignment 15. Parking. • The distance sensor looks to the side • The robot must find a parking space between two «cars» and pull into the space it finds 15 cm. ?? cm. 15 cm.
Light sensor • The light sensor (light sensor) allows the robot to distinguish the brightness of objects, the illumination of a room, and even to distinguish colors.• What the human eye sees• What the robot sees through the light sensor
Light sensor• Initializing the light sensor: SetSensorLight(port, active) – from this point on, treat the given port as a light sensor. Whether the LED is turned on or not is determined by the active parameter• The LED can also be turned on/off later using the functions: SetSensorType(port, SENSOR_TYPE_LIGHT_ACTIVE) – turn on SetSensorType(port, SENSOR_TYPE_LIGHT_INACTIVE) – turn off• But then, after the functions above, you must call ResetSensor(port) – the firmware will apply the new sensor configuration• Current sensor value: Sensor(port) – illumination as a percentage: the lower it is, the darker. If the LED is not on, it will show the ambient light level. If it is on, it will measure the reflected light.
Light sensor• Example:task main() { SetSensorLight(S3, true); //Start moving OnFwd(OUT_BC, 80); //Drive forward until we reach a dark section until(Sensor(S3) < 40); //Continue moving (this command is not required) OnFwd(OUT_BC, 80); //Until we reach a light section until(Sensor(S3) > 50); //Stop the motors Off(OUT_BC);}
Light sensor• Assignment 16a. Display sensor readings. • The NXT brick's screen should display the current ambient light value (LED off). • How can we avoid restarting the program every time we try to measure a new light level?
Repeating identical events• Sometimes a program needs to repeat several identical operations one after another several times: 1 2 4 3
Repeating identical events• Loops are used in programs to repeat identical actions. For example, while(CONDITION) { loop body } – repeat the commands that make up the loop body while CONDITION (the loop's continuation condition) is true. Actions that need to be repeated severalwhile(Sensor(S1 == 0)) { times are placed inside the loop. They RotateMotor(OUT_BC, 100, 1800); make up the loop body. RotateMotor(OUT_B, 50, 720);} As soon as the last command in the loop body finishes executing, the program checks CONDITION again and returns to the first command in the loop body if it is true.
Repeating identical events• Quite often you need to repeat part of a program indefinitely, until the whole program is interrupted.• Infinite loop – in it, the loop's continuation condition is always true. while(true) { TextOut(0, LCD_LINE1, "Light Sensor:"); NumOut(20, LCD_LINE2, Sensor(S3)); Wait(500); ClearScreen(); }
Light sensor• Assignment 16b. Display sensor readings. • The NXT brick's screen should display the current reflected-light value (LED on).
Light sensor• Assignment 17a. Black-and-white movement. • Let the robot drive to a dark area on the field and stop. • What will we measure: ambient22% light or reflected light? • How do we determine that the robot has driven onto the 54% dark area? The amount of light returned to the sensor over the dark area depends on the ambient lighting, on the sensor's height, and on the color of the illuminating LED. Therefore, never use a borderline measured value in the condition that triggers the event. Usually the midpoint between the readings on the dark and light areas is chosen. 22% 38% 54%
Light sensor• Assignment 17b. Black-and-white movement. • Let the robot drive to the dark area and then drive back onto the light one • Once this works, add a loop to the program - let the robot move back and forth, alternating between the dark and light areas.
Light sensor• Assignment 17c. Moving along a line. • Let the robot move alternately onto the dark and light areas, but now the movement should be carried out alternately by one wheel and then the other. • Now try placing the robot on a narrow black line.
Motor rotation-angle sensor• In each motor there is a built-in rotation-angle sensor (encoder) on the axle, which allows movement to be controlled with high precision – down to 1 degree.• Encoders are used automatically in most programs when a certain amount of movement is specified, or in order to make the robot move in a straight line (both wheels must turn by the same number of degrees per unit of time).
Motor rotation-angle sensor • By default, the rotation sensor's readings accumulate from the moment the robot starts. That is, at any moment you can find out how far the robot has traveled from the starting zone. Moving the motor forward increases this number, and moving the motor backward decreases it. • This behavior can be changed by resetting the sensor's readings - accumulation will then occur from the moment the reset happened. Program start Reset Reading measurement 3 rotationsDefault behavior, 5 rotations Number of rotationsNumber of motor rotations of the motor after reset 2 rotationsafter start
Motor rotation-angle sensor• The motor rotation-angle sensor (encoder) does not require initialization.• Get the sensor's current value: MotorRotationCount(output) – the number of degrees the corresponding motor has turned. It only makes sense to specify a single motor. The motor is specified with one of the constants: OUT_A, OUT_B, OUT_C• Reset the rotation-angle sensor: ResetAllTachoCounts(output)
Motor rotation-angle sensor• Example:task main () { RotateMotor(OUT_BC, 80, 720); //Output the encoder values NumOut(0, LCD_LINE1, MotorRotationCount(OUT_C)); NumOut(0, LCD_LINE2, MotorRotationCount(OUT_B)); //Reset the encoder values only on motor C ResetAllTachoCounts(OUT_C); RotateMotor(OUT_BC, 80, 720); //Output the new encoder values. One will be //roughly twice the other. NumOut(0, LCD_LINE4, MotorRotationCount(OUT_C)); NumOut(0, LCD_LINE5, MotorRotationCount(OUT_B));}
Motor rotation-angle sensor• Assignment 18. The disobedient robot. • The robot is standing at an unknown distance from a black line. • After the program starts, the robot must drive to the black line and stop. • The robot must then drive back exactly the same distance so that it ends up at the same place from which it started moving. ?
Competition!• Task 19. Kegelring. • The robot will need a distance sensor and a light sensor • The robot’s task is to detect 8 pins inside the ring (objects detectable by the distance sensor) and push them out past the black line bounding the ring • The robot itself must not leave the ring’s boundary for more than 5 seconds.
Decision making• While carrying out a task, the robot may face a choice of which state to move into.• A similar choice faces the knight at the crossroads.• The choice may depend on sensor readings, the robot’s internal clock, or information received from other robots.
Decision making• For example, having detected a red ball, the robot must carry it to the basket, and leave a blue one in place. Turn on motors Determine the ball color for the gripper Turn on motors to turn around
Decision making• One can also talk about causes and the actions that these causes trigger. Became Raise quietly the curtain Give Became sound loudly signal causes actions
Decision making• In the NXC language, the following construct is used to analyze a cause and choose the corresponding action: if (CONDITION) { actions A and B } else { actions C and D } – if CONDITION is true, actions A and B are executed, otherwise, if CONDITION is false, actions C and D are executed.• A shortened form can be used when no action needs to be taken if the condition is false: if (CONDITION) { actions A and B }
Decision making• A decision point is where the program branches.• Depending on the decision, the program can take either one branch or the other RotateMotor(OUT_BC, 60, 720); • After executing if (Sensor(S1)<40) { the actions inside //If the sensor reads small values, one RotateMotor(OUT_A, 40, 90); branch or the other, the program } else { //If the sensor reads large values again TextOut(0, LCD_LINE1, "Error"); returns to PlayTone(TONE_C4, MS_250); } the "main flow". RotateMotor(OUT_BC, 60, -720);
Decision making• Constructs can be nested inside one another to make complex decisions:
if (Sensor(S1) < 40)

{

if (SensorUS(S4) > 25)

{

RotateMotor(OUT_B, 90, 360);

}

else

{

RotateMotor(OUT_C, 90, 360);

}

TextOut(0, LCD_LINE1, "Too bright");

}

else

{

TextOut(0, LCD_LINE1, "Error");

PlayTone(TONE_C4, MS_250);

}
Decision making• Task 20. Press the button! • After power-on, the brick must check whether the touch sensor is pressed. • Depending on whether it is pressed or not, display “Yes” or “No” on the screen • After displaying it on the screen – stop the program YES NO
Decision making• Task 21. Remote-controlled car • The touch sensor is mounted on a long wire • If the sensor is pressed – the robot cart stands still, if released – it drives • Modify the program so that when the sensor is pressed the robot spins around its own axis, and when released – it moves forward.
Decision making• Task 22. Morse code • Let the cart spin around its own axis • When the sensor is over a dark surface – a sound is produced, as soon as the surface becomes lighter – the sound stops L E G O
Decision making• Task 22. Unlucky crosswalk • The robot cart must cross black stripes – crosswalks – and produce a sound when crossing one. • As soon as an obstacle appears in front of the robot – it must stop • How can we make the robot stop running the loop after detecting a wall?
Exiting a loop by condition• A typical situation is when a loop must end due to some event, for some reason.• At the start of a loop you can set a condition that determines when the loop body should still execute: while (CONDITION) { loop body }.• The CONDITION is checked every time control passes from the last command in the loop body back to the first one. If the CONDITION is false, the loop ends.• After exiting the loop, the commands immediately following the closing brace are executed.
Exiting a loop by condition• Example:
while(SensorUS(S3) > 15)

{ if (Sensor(S3) > 40) { OnFwd(OUT_B); Coast(OUT_C);

} else

{ OnFwd(OUT_C); Coast(OUT_B); } }

//This point is reached once the distance

//becomes less than 15 cm. Off(OUT_BC);
Decision making• Task 23a. Restless curious robot • The robot must stay at the same distance from the hand (or another object) at all times – 25 cm. • If the hand moves away from the robot, the robot moves closer to it • If the hand approaches the robot, the robot backs away.
Decision making• Task 23b. Experienced curious robot • In the previous task, the robot was never at rest – it either drove forward or moved backward • The program needs to be changed so that the robot stays still when at a certain distance • The task must be done using nested conditions
if (SensorUS(S4) < 24)

{ OnFwd(OUT_BC, 60); }

else

{ 24 cm.

if (SensorUS(S4) < 26)

{ 26 cm. Off(OUT_BC); }

else { OnFwd(OUT_BC, -60);

}

}
Programming LEGO robots Your questions?

Comments