
Lecture
The error "connect() to unix:/run/php-fpm/www.sock failed (11: Resource temporarily unavailable) while connecting to upstream" occurs when Nginx cannot establish a connection to PHP-FPM through the Unix domain socket. This can be caused by several reasons. Here are some of them and ways to resolve the problem:
1. PHP-FPM is not running: Check that the PHP-FPM process is running and listening on the correct Unix domain socket. You can run the following command to check the status of PHP-FPM:
#bash
sudo systemctl status php-fpm
#bash
sudo systemctl start php-fpm
2. Incorrect path to the Unix domain socket: Make sure that the path to the Unix domain socket specified in the PHP-FPM settings matches the one that Nginx uses to connect. Check the PHP-FPM settings in the configuration file /etc/php/{PHP version}/fpm/pool.d/www.conf and make sure that the listen parameter points to the correct socket path.
3. Permission errors: Check the access permissions for the Unix domain socket. PHP-FPM usually runs with the permissions of the www-data user (or some other www-data user), and Nginx also runs under the same user. Make sure that both processes have access to the Unix domain socket.
4. Insufficient resources: The "Resource temporarily unavailable" error can be caused by a shortage of resources, such as file descriptors or processes. Make sure the system has not hit the limit on the number of open files or processes. You can check the current limit values using the ulimit -a command.
The default value is 128 = connections per each file socket. During a high-load or performance test, the following issue will appear in the Nginx log:
*1 connect() to
unix:/run/php/php8.0-fpm.sock failed (11: Resource temporarily unavailable)
Make sure that the operating system limits allow the value specified above to be used.
Run:
sysctl net.core.somaxconn
If it shows a value of 128, try increasing it.
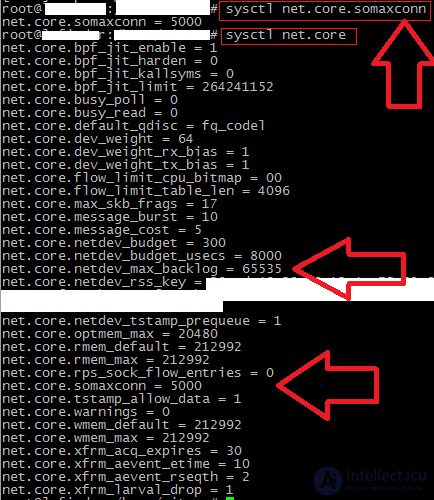
Changing the limits — in the /etc/sysctl.conf file, change or add these lines:
net.core.somaxconn = 5000
net.core.netdev_max_backlog = 65535
Apply the parameters
$ sudo sysctl -p
and restart the server.
If a reboot is not possible, restart php-fpm:
$ sudo service php8.0-fpm restart
and the nginx web server:
$ sudo service nginx restart
This may be a result of a DoS/DDoS attack
As an option, you can set different hosts (domains), different sockets, and different PHP instances for different domains.
or increase the number of connections per socket. or add DoS attack protection.
read more below about ways to fight this evil.
5. Port conflict: If you are using a TCP port instead of a Unix domain socket for communication between Nginx and PHP-FPM, make sure there is no port conflict. Make sure PHP-FPM is listening on the correct port and that the Nginx configuration specifies the correct address and port for connecting to PHP-FPM.
6. Network permission issues: If you have specific security settings or a proxy, make sure they are not blocking the connection between Nginx and PHP-FPM.
If the problem persists after checking the causes listed above, it is recommended to additionally examine the Nginx error logs (/var/log/nginx/error.log) and PHP-FPM logs (/var/log/php-fpm.log) for more detailed information about the error that occurred. This will help clarify the problem and find a specific solution for your configuration
To do this, in the nginx file, in the server section, add these IP addresses, for example
deny 93.91.115.16;
deny 45.152.188.241;

#or block everyone except your own IP

allow 1.1.1.1;
deny all;
You can easily get a list of all suspicious IPs from the logs using regular expressions (afterwards you need to allow the search bots or remove the restriction altogether).
#parse ip
grep -oE '(^| )((25[0-5]|2[0-4][0-9]|[0-1]?[0-9]?[0-9])(\.(25[0-5]|2[0-4][0-9]|[0-1]?[0-9]?[0-9])){3})($| )' /var/www/site.com/logs/nginxaccess.log | sort | uniq

#add deny and a semicolon
sed -i 's/^/deny /; s/$/;/' /var/www/site.com/logs/nginxaccess.log
We add this list via include in nginx, and restart
server {
   #return 401; -we can temporarily enable this

    server_name    intellect.icu;
    root           /var/www/intellect.icu/;
    index          index.php;

#    error_log /var/www/intellect.icu/logs/nginxerror.log; - temporarily disabled
    access_log /var/www/intellect.icu/logs/nginxaccess.log;

include /etc/nginx/blockips.conf;
...
If all the DoS attack requests are made from different IP addresses but to a single URL, for example the index, then you can try adding the serving of different pages for the main page and others. To configure Nginx so that it serves the static page index.html for the index request (a request to the root URL) and handles all other URLs through the index.php file, you can use two separate location blocks in the Nginx configuration. Here is how you can do it:
server {
    listen 80;
    server_name example.com;

    # Root directory of your website
    root /path/to/your/website;

    location = / {
        # Handling the index request
        index index.html;
        try_files $uri $uri/ /index.html;
    }

    location / {
        # Handling all other URLs through index.php
        index index.php;
        try_files $uri $uri/ /index.php$is_args$args;
    }

    location ~ \.php$ {
        # PHP file handling settings (FastCGI, PHP-FPM, etc.)
    }

    # Other server settings
}
To regulate the number of requests per unit of time, Nginx can use the ngx_http_limit_req module
You can also try to limit the request processing rate in nginx using the built-in ngx_http_limit_req module.
in the Nginx configuration file. This is usually the /etc/nginx/nginx.conf file, adde
   limit_req_zone $binary_remote_addr zone=limit_by_ip:10m rate=2r/m;
   limit_req_zone $request_uri zone=limit_by_url:10m rate=5r/s;
Next, in the server block to which you want to apply the restriction, add the following limit_req directive:
server {
    # ... Other nginx settings...

    location / {
        # Apply the restriction from the "limit_by_ip and limit_by_url" zones
        limit_req zone=limit_by_ip;
        limit_req zone=limit_by_url;
#if you need to apply burst or nodelay parameters
limit_req zone=limit_by_url burst=5 nodelay;
# Other request processing directives
}
# ... Other nginx settings...
}
In the example above, we created a limiting zone named "limit_by_ip" with a size of 10 MB. We set a limit of up to 2 requests per second (rate=2r/s) for each unique IP address ($binary_remote_addr). And a limiting zone named "limit_by_url" with a size of 10 MB with a limit of up to 5 requests per second (rate=5r/s) for each unique URL ($request_uri).
In doing so, NGINX will use the «leaky bucket» algorithm. For NGINX, 300r/m and 5r/s are equivalent: it will let through one request every 0.2 s. In this case, every 0.2 seconds NGINX will set a flag allowing a request to be accepted. When a request matching this zone arrives, NGINX clears the flag and processes the request. If another request arrives while the timer counting the time between packets has not yet fired, the request will be rejected with an HTTP status code of 503. If the time has elapsed and the flag is already set to the allowing value, no action will be taken.
Using the burst parameter, the blocking flag can take on values not just of true and false but greater than one. In this case it will have the value of the maximum number of requests that NGINX should let through within a single batch (burst). Thus this is no longer the «leaky bucket» algorithm, but the «token bucket» algorithm. The rate parameter defines the time interval between requests, but we are dealing not with a true/false type token, but with a counter from 0 to 1 + burst. The counter is incremented on each request within the calculated time interval (when the timer fires), reaching a maximum value of b+1. That is: burst is the number of requests, not the rate at which they are let through – that is, traffic shaping.
Thus, fighting denial-of-service (DoS) attacks is an important task for ensuring the reliable operation of a web server and protecting against the unavailability of a web resource for legitimate users. Here are several ways to fight DoS attacks:
Rate Limiting: Set a request rate limit for requests from specific IP addresses. This will help prevent excessive load on the server from the same IP and reduce the impact of a DoS attack.
Using a CDN: Use a Content Delivery Network (CDN) to distribute traffic and provide higher throughput. A CDN will help ease the load on your web server and reduce the impact of DoS attacks.
Traffic filtering: Use traffic filtering mechanisms to block or restrict access from IP addresses that are sending a suspiciously large number of requests.
Cloud solutions: Consider using cloud-based DDoS protection services, such as Cloudflare, AWS Shield, or Google Cloud Armor. These services provide distributed protection mechanisms that help detect and mitigate attacks.
Validating user data: Make sure your application or server thoroughly validates user data to prevent vulnerabilities from being exploited to launch DoS attacks.
Monitoring and attack detection: Deploy monitoring and attack detection systems that help identify suspicious behavior and anomalous traffic. This will help you respond to attacks in a timely manner and take action.
Fail2Ban planning: Use tools such as Fail2Ban to automatically block IP addresses that are making many failed authentication attempts or requests. This will help prevent password brute-force attacks and other DoS attacks.
Web server configuration: Properly configure the web server and its parameters to ensure better performance and resilience against DoS attacks.
Remember that protection against DoS attacks is a comprehensive process, and the effectiveness of each approach depends on the characteristics and configuration of your web server. It is recommended to apply several methods and update your security measures in order to stay protected against new threats.

Comments