
Practice
If you have Windows 10, there is a way to work in Linux without third-party virtualizers and without rebooting the system; for this you need to enable some components and install a few things.
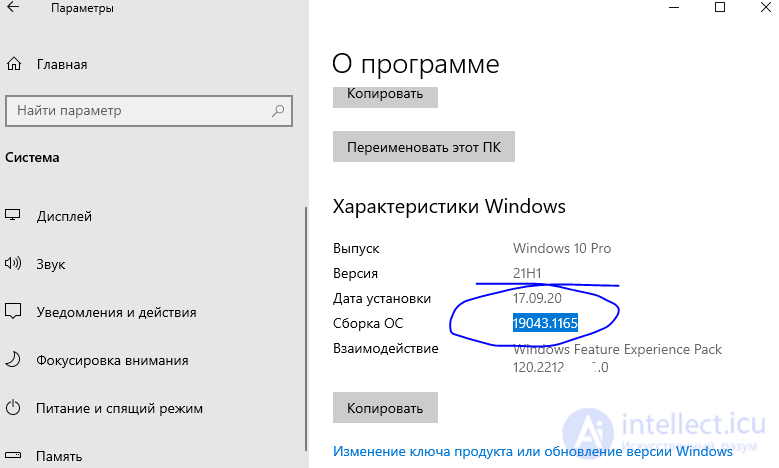
1) The build must be no lower than shown in the picture
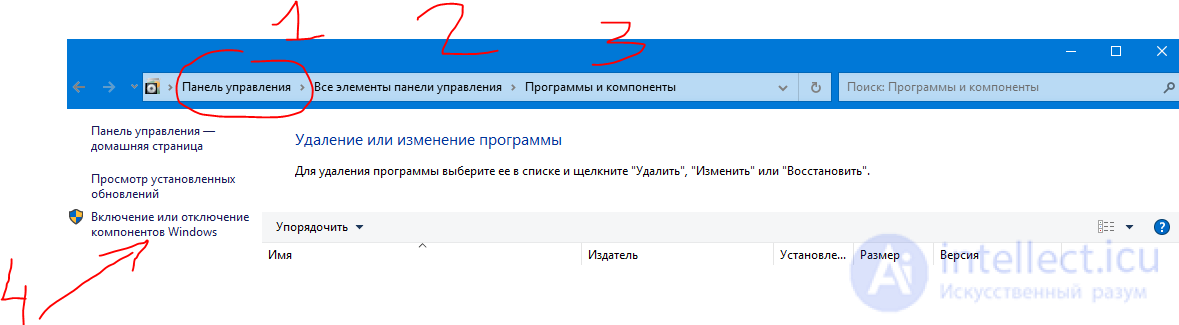
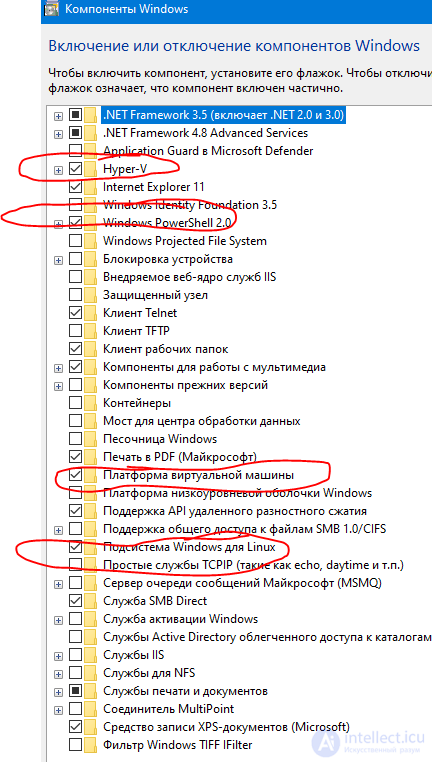
2) go to the Windows components section and install the ones highlighted in the picture below
Control Panel\All Control Panel Items\Programs and Features
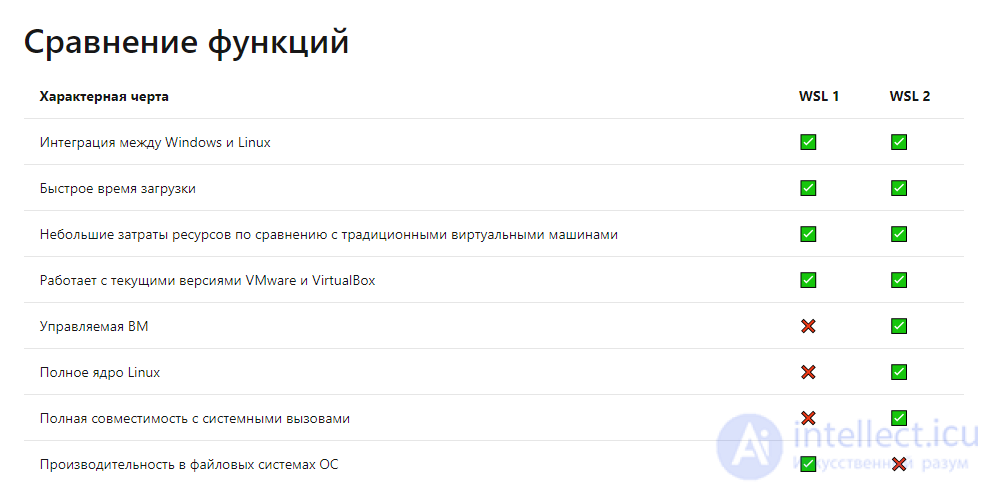
3) now, before installing Linux on Windows, you need to enable WSL 2 support
it implies full Linux support but with virtualization, slightly slower, but not critical
(this makes network configuration a bit more complicated, but you get full access to the capabilities of the other operating system)
to do this you need to launch PowerShell or just CMD
3.1 check the current version wsl --list --verbose (do this after installing the image)

3.2 Enable the virtual machine feature
Before installing WSL 2, you need to enable the additional Virtual Machine Platform feature. To use this feature, your machine will need virtualization capabilities.
Open PowerShell as administrator and run:
dism.exe /online /enable-feature /featurename:VirtualMachinePlatform /all /norestart

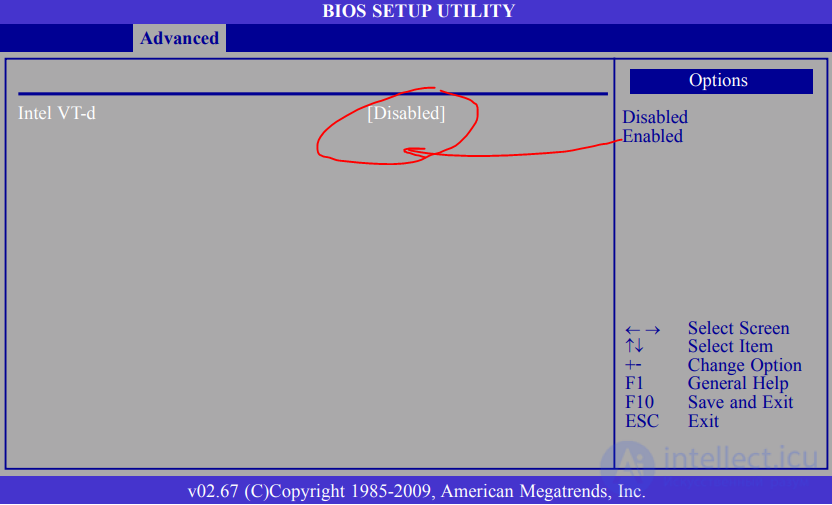
also your motherboard must support virtualization, and it must be enabled
Download the latest package:
https://wslstorestorage.blob.core.windows.net/wslblob/wsl_update_x64.msi
Note
If you are using an ARM64 machine, download the ARM64 package instead. If you're not sure what type of machine you have, open Command Prompt or PowerShell and enter the following command: systeminfo | find "System Type".
Open PowerShell and run this command to set WSL 2 as the default version when installing a new Linux distribution:
wsl --set-default-version 2
4.1 install the required distribution through the Microsoft Store
https://aka.ms/wslstore
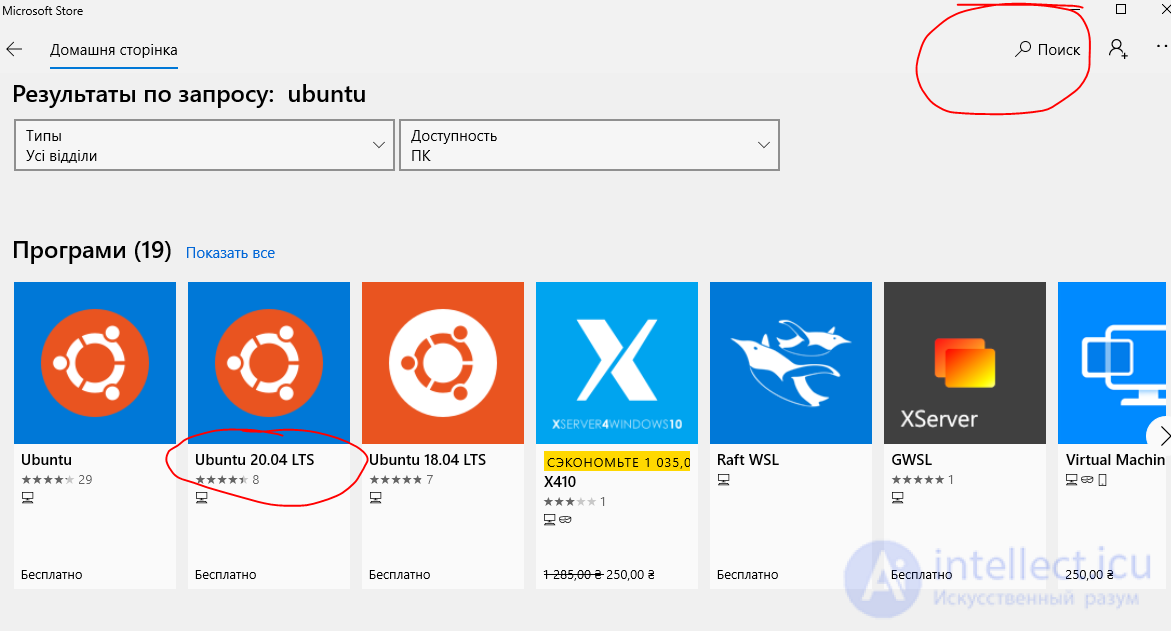
4.2 Then you will need to create a user account and password for your new Linux distribution.

CONGRATULATIONS! You have successfully installed and configured a Linux distribution, fully integrated with your Windows operating system!
5. now let's install docker and docker compose; if it was previously installed - remove it
sudo apt-get remove docker docker-engine docker.io containerd runc
sudo apt-get update
sudo apt-get install apt-transport-https ca-certificates curl gnupg lsb-release
echo "deb [arch=amd64 signed-by=/usr/share/keyrings/docker-archive-keyring.gpg] https://download.docker.com/linux/ubuntu \
$(lsb_release -cs) stable" | sudo tee /etc/apt/sources.list.d/docker.list > /dev/null
 sudo apt-get update
 sudo apt-get install docker-ce docker-ce-cli containerd.io
To install a specific version of Docker Engine, list the available versions in the repository, then select and install one:
a. List the versions available in your repo:
$ apt-cache madison docker-ce
sudo apt-get install docker-ce= docker-ce-cli= containerd.io
instead of 5:18.09.1~3-0~ubuntu-xenial use one of the versions obtained by the previous command
install docker-compose
sudo apt install docker-compose
docker-compose --version
5) additional docker settings
To create the docker group and add your user to it:
Create the docker group.
$ sudo groupadd docker
Add your user to the docker group.
$ sudo usermod -aG docker $USER
Log out and log back in to re-evaluate your group membership.
When testing on a virtual machine, you may need to restart the virtual machine for the changes to take effect.
On a Linux desktop environment such as X Windows, log out of your session completely, then log back in.
On Linux you can also run the following command to activate the changes to your groups:
$ newgrp docker
Verify that you can run docker commands without sudo.
$ docker run hello-world
This command downloads a test image and runs it in a container. When the container starts, it prints a message and exits.
If you initially ran Docker CLI commands using sudo before adding your user to the docker group, you might see the following error, which indicates that your ~/.docker/ directory was created with the wrong permissions because of the sudo commands.
WARNING: Error loading config file: /home/user/.docker/config.json -
stat /home/user/.docker/config.json: permission denied
To fix this problem, either remove the ~/.docker/ directory (it will be recreated automatically, but any custom settings will be lost), or change its owner and permissions using the following commands:
$ sudo chown "$USER":"$USER" /home/"$USER"/.docker -R
$ sudo chmod g+rwx "$HOME/.docker" -R
Most current Linux distributions (RHEL, CentOS, Fedora, Debian, Ubuntu 16.04 and higher) use systemd to manage which services start at boot. On Debian and Ubuntu, the Docker service is configured to start on boot by default. To automatically start Docker and Containerd on boot on other distributions, use the following commands:
$ sudo systemctl enable docker.service
$ sudo systemctl enable containerd.service
To disable this behavior, use disable instead.
$ sudo systemctl disable docker.service
$ sudo systemctl disable containerd.service
If running docker commands starts producing errors, check the service status and run
sudo service docker start.6) configure the network
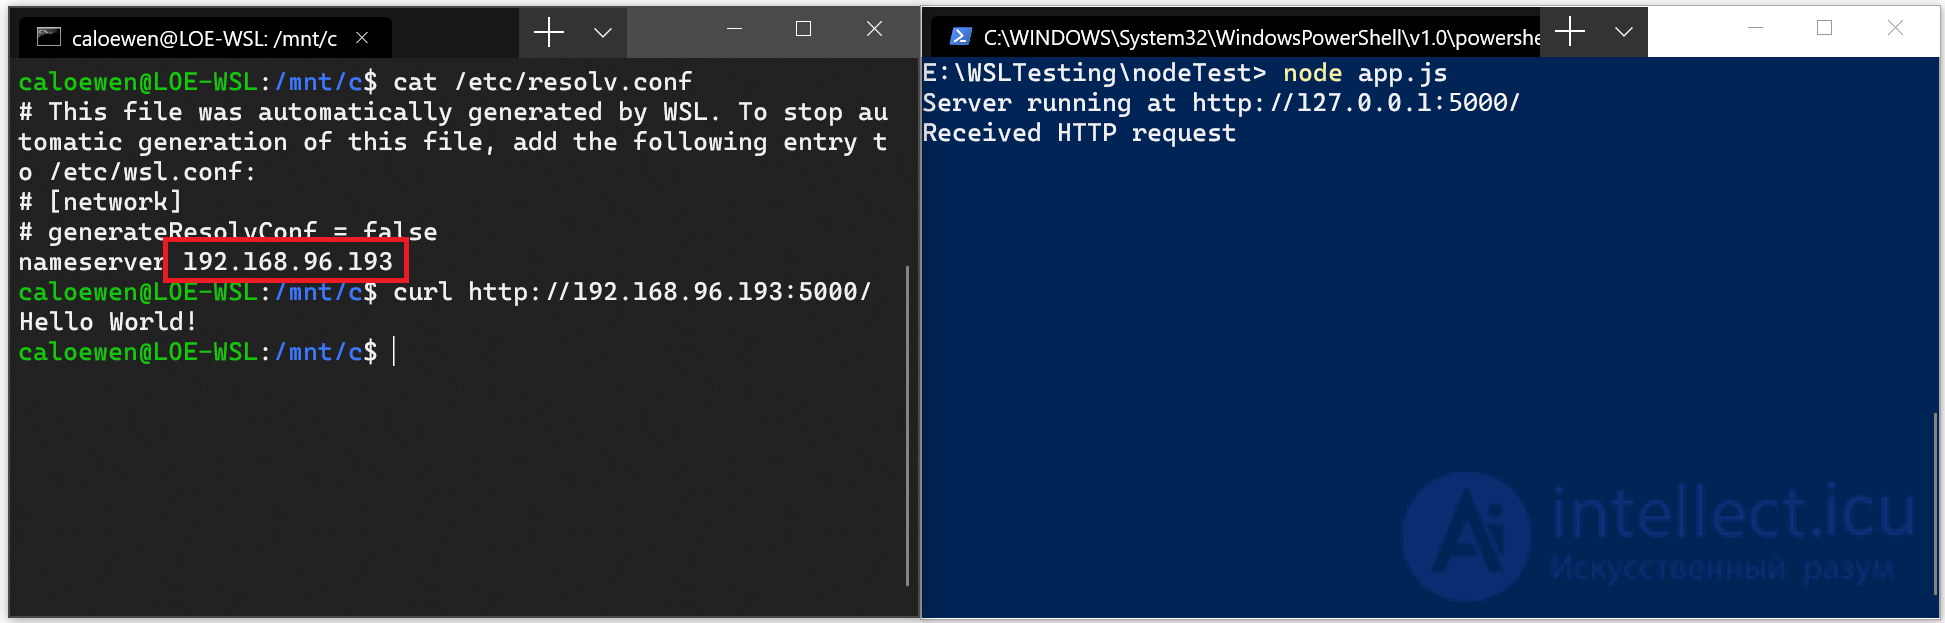
If you want to access a network application running on Windows (for example, an application running on a NodeJS or SQL server) from your Linux distribution (for example, Ubuntu), you need to use the IP address of your host machine. Although this is not a common scenario, you can follow these steps to make it work.
cat /etc/resolv.confnameserver.The picture below shows an example of this when connecting to a Node.js or PHP server running on Windows, via curl.
When using remote IP addresses to connect to your applications, they will be treated as connections from the local area network (LAN).
This means you'll need to make sure your application can accept connections on the local network.
For example, you might need to bind your application to 0.0.0.0 instead of 127.0.0.1.
In the example of a Python application using Flask, this can be done with the command: app.run(host='0.0.0.0').
Please be mindful of security when making these changes, since this will allow connections from your local network.
When using the WSL 1 distribution, if your computer was configured for access via your local network, then applications running in WSL could also be accessible on your local network.
This is not the default case in WSL 2. WSL 2 has a virtualized Ethernet adapter with its own unique IP address. Currently, to enable this workflow, you'll need to perform the same steps as for a regular virtual machine. (We are looking for ways to improve this experience.)
Here is an example PowerShell command for adding a port proxy that listens on port 4001 on the host and connects it to port 4001 on the WSL 2 virtual machine with IP address 192.168.101.101.
netsh interface portproxy add v4tov4 listenport=4001 listenaddress=0.0.0.0 connectport=4001 connectaddress=192.168.101.101
WSL 2 distributions currently cannot reach IPv6-only addresses.
Make sure Docker Engine is installed correctly by running the hello-world image.
$ sudo docker run hello-world
wsl2 + nginx ERR_CONNECTION_REFUSED
create a .wslconfig file in the folder c:\Users\{You_User}\
restart the computer
also after the restart, separately restart
from Windows
wsl --shutdown
If you need to access a site generated on the wsl2 virtual machine
c:\Windows\System32\drivers\etc\hosts
add
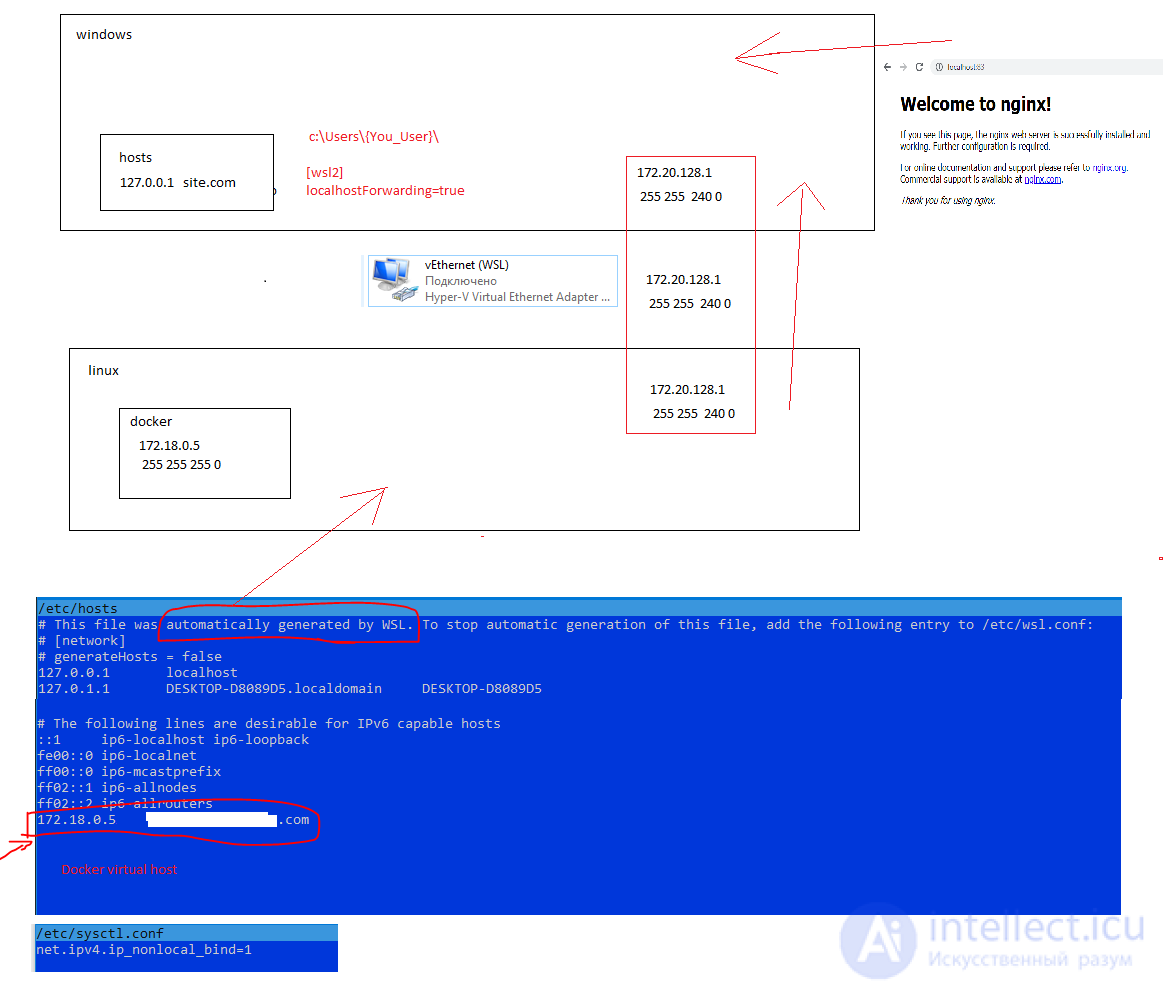
Also don't forget to restart the system after each stage
That's all, if something doesn't work out or you have useful advice, write in the comments below
I spent a week on the setup and finding the necessary information

Comments