Lecture
Clearly, learning PHP (and not just PHP) should be supported by practice.
This means that you should be able to run scripts on your computer.
To do this, you must install and configure the minimum set of LAMP.
Now we will talk about installing Apache2.4 and PHP 7.0 on Linux Ubunutu
1. So, first install Apache 2.4.
Update your system by entering the following commands:
$ sudo apt update
$ sudo apt upgrade
then,
apt-get -y install apache2
check
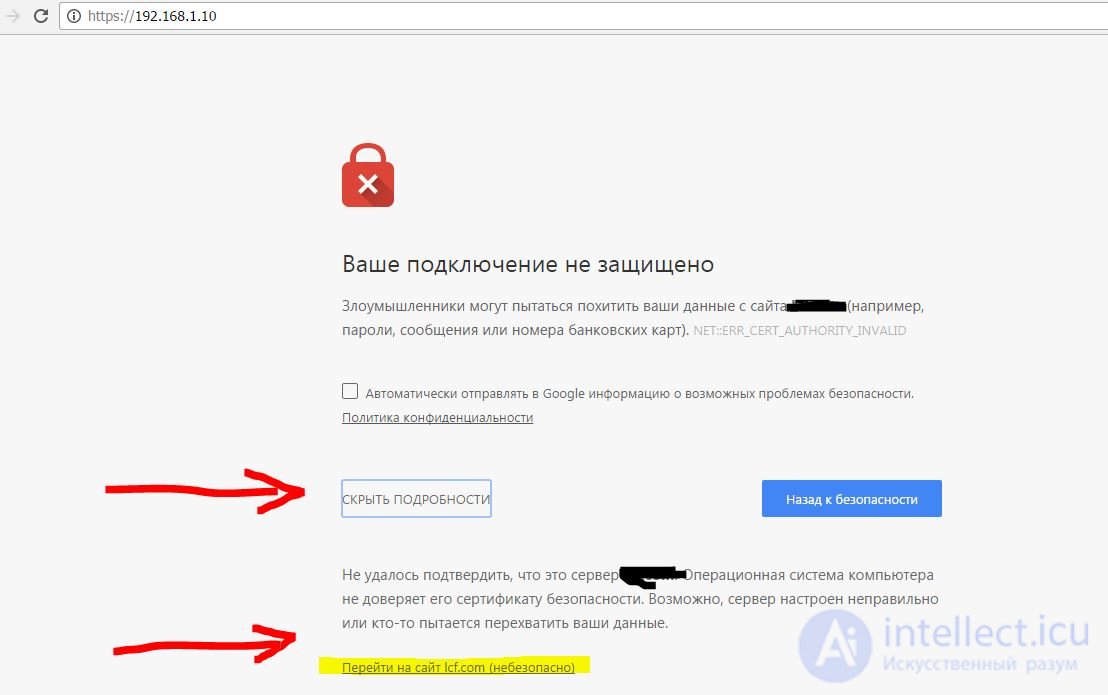
Enter http://192.168.1.10 in the address bar of the browser - where Un is the local Un on which you install Apache
at the same time such picture should

SSL / TLS is a security protocol for encrypting a connection between a web browser and a server. Run the following commands on the server to enable https: // support.
a2enmod ssl
a2ensite default-ssl
which allows the ssl module and adds symbolic links to / etc. / apache2 / sites with support folder in the /etc/apache2/sites-available/default-ssl.conf file to include it in the active Apache configuration. After that, restart Apache to enable the new configuration:
systemctl restart apache2
After that, the SSL connection will be available at https://192.168.1.10 in a web browser.
2. Install PHP.
1) apt install php7.0
then
2) Install all the necessary modules
apt-cache search php7.0
apt-get -y install php7.0-mysql php7.0-curl php7.0-gd php7.0-intl php-pear php-imagick php7.0-imap php7.0-mcrypt php-memcache php7.0-pspell php7.0-recode php7.0-sqlite3 php7.0-tidy php7.0-xmlrpc php7.0-xsl php7.0-mbstring php-gettext
3) Then we configure the interaction of Apache with PHP
3.1) if you want PHP to work as an Apache module, then
apt install libapache2-mod-php7.0. Everything else can be skipped before restarting Apache (3.6)
3.2) if as FAST CGI - then
apt install php7.0-fpm (installation of the FastCGI php module)
apt install libapache2-mod-fastcgi
3.3 choice of multiprocessing module (MPM - Multi-Processing Module)
3.3.1 apt install apache2-mpm-worker (for linux)
3.3.2 (or apt-get install apache2-mpm-prefork) (for linux)
3.4 Inclusion of the necessary modules through apache config files
 a2enmod rewrite
 a2enmod actions alias
a2enmod proxy_fcgi (a is better) or a2enmod actions fastcgi (b)
3.5 Configuring FastCGI
3.5.1 if PHP + Apache interact through FastCGI (and the proxy_fcgi module is installed) (or better)
then copy the config file from the available
File: /etc/apache2/conf-available/php7.0-fpm.conf
in the involved
/etc/apache2/conf-enambled/php7.0-fpm.conf
approximate configuration holding
 # Redirect to local php-fpm if mod_php is not available


 # Enable http authorization headers

 SetEnvIfNoCase ^ Authorization $ "(. +)" HTTP_AUTHORIZATION = $ 1
SetHandler "proxy: unix: /run/php/php7.0-fpm.sock | fcgi: // localhost"
# Deny access to raw php sources by default
# To re-enable your files
# only in specific virtual host or directory
Require all denied
# Deny access to files without filename (eg '.php')
Require all denied
 3.5.2 if php + apache interact via fastcgi
 (and the fastcgi module is installed) (b)
config file - in a specific version you need to specify it
DocumentRoot "/ etc / apache24 / php70"
ServerName mysqrver.localhost
FcgidInitialEnv PHPRC "/ etc / php70"
FcgidInitialEnv PATH "/ etc / php70; and other necessary folders;"
AddHandler fcgid-script .php
FcgidWrapper "/ etc / php70 / php-cgi" .php
"
systemctl restart apache2
If php is not as an apache module, then php must also be restarted separately.
service php7.0-fpm restart
run nano /var/www/html/info.php enter and save to file
  phpinfo ();
 ?>
 change the rights and the owner to access the file

 chown www-data: www-data /var/www/html/info.php

 Now the config is available at http://192.168.1.10/info.php
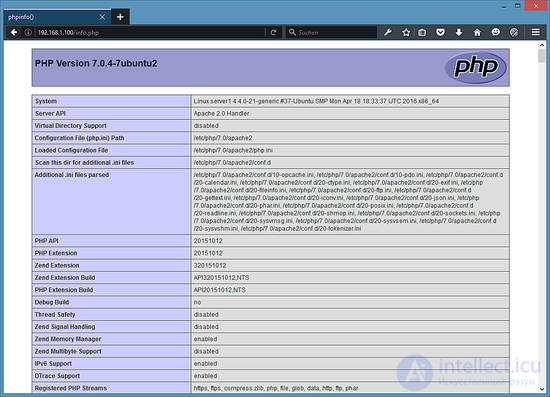
if the Server API is FPM / FastCGI, then you have FastCGI installed
if Apache 2.0 Handler, then probably the interpreter is installed as a module
3. Installing a MySQL or (MariaDB) database
3.1 Install MariaDB
In the terminal, enter the command: s
apt-get -y install mariadb-server mariadb-client
Now we set the root password for MariaDB.
mysql_secure_installation
You will be asked to answer these questions:
Enter current password for root (enter for none): <- press ENTER
Set root password? [Y / n] <- y
New password: <- Enter your new MariaDB root password here
Re-enter new password: <- Repeat password
Remove anonymous users? [Y / n] <- y
Disallow root login remotely? [Y / n] <- y
Reload privilege tables now? [Y / n] <- y
Check login to MariaDB with "MySQL command"
mysql -u root -p
If you want other computers on your local network to see your mysql server,
run the sudo gedit /etc/mysql/my.cnf command. The MariaDB Mysql configuration file opens.
It should find the string bind-address = 127.0.0.1 and replace
in it 127,0,0,1 to the IP address of this computer. To do this, the computer must have a permanent
IP address. Contact your network administrator or read about this.
about configuring DHCP for your home router.
if you need to allow access from any SP then install 0.0.0.0
also if there is a SQLSTATE error [42000]: Syntax error or access violation: 1055 this is incompatible with sql_mode = only_full_group_by
then you need to enable the old mode for groupings violating the SQL standard sql_mode = ""
also if you need to enable event eventler event_scheduler = 1
in the end, all the settings look like this
[mysqld]
user = mysql
pid-file = /var/run/mysqld/mysqld.pid
socket = /var/run/mysqld/mysqld.sock
port = 3306
basedir = / usr
datadir = / var / lib / mysql
tmpdir = / tmp
lc-messages-dir = / usr / share / mysql
skip-external-locking
bind-address = 0.0.0.0
key_buffer_size = 16M
max_allowed_packet = 16M
thread_stack = 192K
thread_cache_size = 8
myisam-recover-options = BACKUP
max_connections = 20000
sql_mode = '' # to disable the hard check mode of the SQL Group BY standard
SQLSTATE [42000]: Syntax error or access violation: UNDEREDGE # 36 of the list of categories for the non-aggregated column 'database.blk.id'; this is incompatible with sql_mode = only_full_group_by
transaction-isolation = READ-UNCOMMITTED
event_scheduler = 1
slow_query_log = 1
slow_query_log_file = /var/www/slow_sql.log
long_query_time = 5
if you need to change the root password then
log in mysql -u root -p
change password SET PASSWORD = PASSWORD ('xxxxxxxx');
1. in order to give access to the root from the outside, you must save the user root @%
2. and give him full rights to all databases
REVOKE ALL PRIVILEGES ON *. * FROM 'root' @ '%'; GRANT ALL PRIVILEGES ON *. * TO 'root' @ '%' REQUIRE NONE WITH GRANT OPTION
(but not strongly recommended for security reasons)
3.2 If you want to install Mysql 5.7 on Ubuntu 16.04, then
Enter the command:
$ sudo apt install mysql-server mysql-client
You need to enter the password for the MySQL root user
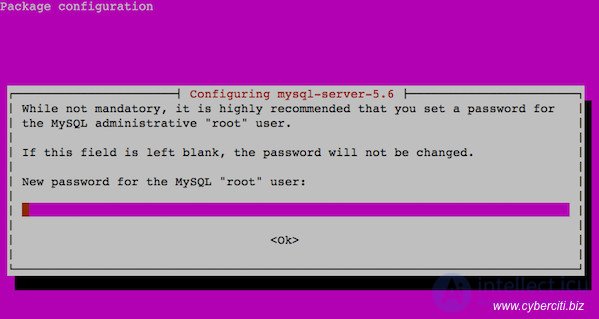
(be attentive to the settings - if you don’t know the loan, they’d better not use this utility)
need to run the following command:
$ sudo mysql_secure_installation
3.3 During installation, mysql may ask for a password for the root user, and then the data entry into the terminal will begin with the line mysql>. If this happens, skip the following two steps.
3.4. Run the mysql -u root command in the terminal and you will be prompted to enter the root password. If you did not specify it during installation, just press enter.
3.5. Input in the terminal will now begin with the line mysql>. This means that the following commands are not executed by the operating system, but by the database.
Here you can execute commands such as SELECT and any others.
We should set a password for the root administrator using the command
mysql> SET PASSWORD FOR 'root' @ 'localhost' = PASSWORD ('your password');
3.7. Using root in your scripts is not worth it .. dangerous. What team to create a new user was perfectly told by the creators of mysql at this address.
Make sure that you are still sending commands to the database, not to the operating system.
if you need to allow access to the root user from any host (but this is not dangerous)
log in mysql -u root -p
CREATE USER 'root' @ '%' IDENTIFIED WITH mysql_native_password AS '***'; GRANT USAGE ON *. * TO 'root' @ '%' REQUIRE NONE;
also check the port and connect permission from any SP
bind-address = 0.0.0.0 in the config file
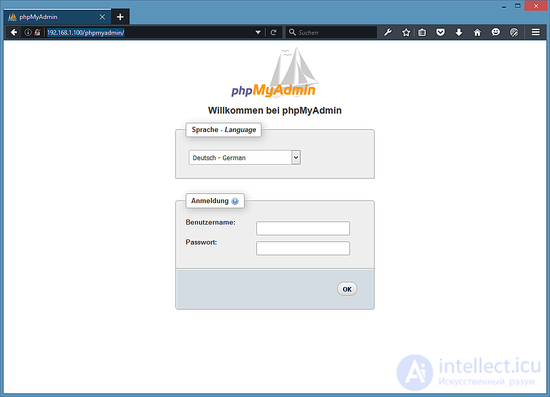
PhpMyAdmin is a web application with which you can manage your MySQL databases.
apt-get -y install phpmyadmin
You will see the following questions:
Web server to configure automatically: <- Select option: apache2
Configure database for phpmyadmin with dbconfig-common? <- yes
MySQL application password for phpmyadmin: <- Press enter, apt will create a random password automatically.
After that you can access phpMyAdmin through the browser at http://192.168.1.10/phpmyadmin/:
I never liked where you need to store your php scripts by default.
I always set up my home directory at / home / site_name / www /
This is not difficult and you can edit the configuration file.
Restart the web server: sudo /etc/init.d/apache2 restart
systemctl restart apache2
Please note that PHP Apache2 can interact in different ways.
PHP as an Apache module
PHP via FastCGI with Apache (or Nginx) or (Apache and Nginx)
at the same time, Apache can work in three modes: event, preworker, fork
and configs can be configured a2enmod fastcgi or a2enmod proxy_fcgi
if you need to install and configure FTP
1.1. install proftpd
apt-get -y install proftpd openssl
run proftpd: <- standalone
1.2. edit /etc/proftpd/proftpd.conf
[...]
DefaultRoot ~
ServerIdent on "FTP Server ready."
[...]
1.3. create an FTP user
useradd --shell / bin / false omftp (create and disable access to terminal via ssh)
mkdir / home / omftp (if needed)
chown omftp: omfyp / home / omftp /
or access only to the root of the site we give- (to the home folder)
usermod -d / var / www / site / omftp
passwd omftp
When creating a user for FTP (PROFTPD) it is necessary
in the ftp /etc/proftpd/proftpd.conf config
Order deny, allow
AllowUser omftp
The following config is also recommended.
UseIPv6 off
IdentLookups off
ServerName "Debian"
ServerType standalone
Deferwelcome off
MultilineRFC2228 on
DefaultServer on
ShowSymlinks on
TimeoutNoTransfer 600
TimeoutStalled 600
TimeoutIdle 1200
DisplayLogin welcome.msg
DisplayChdir .message true
ListOptions "-l"
DenyFilter \ *. * /
DefaultRoot ~
Port 21
PassivePorts pasportstart00000 pasportend00000
MasqueradeAddress ipse.rv.era
MaxInstances 300
Umask 022 022
If error 530 Login incorrect appears. and in logs
/var/log/auth.log.
The last lines say that:
USER setevoy (Login failed): Invalid shell: '/ bin / bash'
Add the line to the ProFTPD configuration file /usr/local/etc/proftpd.conf:
RequireValidShell off
1.4 restart ftp server
systemctl restart proftpd.service
that's all. but if you need to set up encryption, we set it up
2.1. setting encryption for proftpd
In order to use TLS, you must create an SSL certificate.
create a directory:
mkdir / etc / proftpd / ssl
After that, we can generate an SSL certificate as follows:
openssl req -new -x509 -days 365 -nodes -out /etc/proftpd/ssl/proftpd.cert.pem -keyout /etc/proftpd/ssl/proftpd.key.pem
Country Name (2 letter code) [AU]: <- Enter the Name of the country (for example, "DE").
State or Province Name (full name) [Some-State]: <- Enter the Name of the region or state.
Locality Name (eg, city) []: <- Enter the city.
Organization Name (eg, company) [Internet Widgits Pty Ltd]: <- Enter the name of the organization (for example, your company name). .
Organizational Unit Name (eg, section) []: <- Enter the Organizational Unit Name (for example, "IT - department").
Common Name (eg, YOUR name) []: <- Enter the fully qualified domain name of the system (for example, “server1.example.com”).
Email Address []: <- Enter your email address.
set protection on these files
chmod 600 /etc/proftpd/ssl/proftpd.*
2.2 enable TLS in ProFTPd
To enable TLS in ProFTPd, open /etc/proftpd/proftpd.conf ...
/etc/proftpd/proftpd.conf
... and uncomment /etc/proftpd/tls.conf line:
[...]
#
# This is used for FTPS connections
#
Include /etc/proftpd/tls.conf
[...]
Then open /etc/proftpd/tls.conf
TLSEngine on
TLSLog /var/log/proftpd/tls.log
TLSProtocol TLSv1.2
TLSCipherSuite AES128 + EECDH: AES128 + EDH
TLSOptions NoCertRequest AllowClientRenegotiations
TLSRSACertificateFile /etc/proftpd/ssl/proftpd.cert.pem
TLSRSACertificateKeyFile /etc/proftpd/ssl/proftpd.key.pem
TLSVerifyClient off
TLSRequired on
RequireValidShell no
If you are using TLSRequired on, then only TLS connections are allowed (this blocks any users with old FTP clients that do not have TLS support); commenting out this line or using TLSRequired from connections as TLS and not TLS is allowed, depending on what the FTP client supports.
Restart ProFTPd:
systemctl restart proftpd.service
That's all. Now you can try to connect using an FTP client; However, you must configure the FTP client to use TLS
If you have problems with TLS, you can look at the TLS log file /var/log/proftpd/tls.log.
1. Install the php-mail module (if it is not already installed):
sudo apt-get install php-mail
 $ sudo apt-get install sendmail

 $ sudo sendmailconfig
Answer the questions to be asked. The following are the main files that will be changed:
 /etc/mail.sendmail.conf
 /etc/cron.d/sendmail
 /etc/mail/sendmail.mc
2.2. If everything is in order, rule "php.ini"
nano /etc/php7/apache7/php.ini
We find the commented line "; sendmail_path =" (search in nano ctrl + w). Replace with the following line:
 sendmail_path = / usr / sbin / sendmail -t -i
 (php7 already has this option)
2.3. Restart Apache
sudo service apache2 restart
2.4. You can test sendmail using two commands:
 $ / usr / sbin / sendmail abc@gmail.com <"hi ... it is work."
 or
 $ sudo php -r "mail ('you_mail@mail.ru ',' Verification ',' Hi. Everything works. ');"
Within a minute, an email should be sent to the specified email address. If this does not happen, then you should see the send logs in the "/ var / log / syslog" directory. If the message “Connected time out” appears in the logs, it means either the firewall does not allow packets through port 25, or the Internet service provider. You can check this with the telnet command:
telnet smtp.mail.ru 25
If the result of the work of the team was also “Connected time out”, then figure out where port 25 is blocked. Sometimes it is blocked by the provider or hoster.
set the home_mailbox variable, Maildir / which will create a directory structure with this name in the user's home directory. The postconf command can be used to query or set configuration parameters. H
Next, we can set the location of the virtual_alias_maps table. This table displays arbitrary email accounts in Linux system accounts. We will create this table in / etc / postfix / virtual.
Open the virtual card file in a text editor:
 contact@site.com user1
 info@site.com user1
 apply card

 sudo postmap / etc / postfix / virtual
 and restart
 sudo systemctl restart postfix

 3.2 enabling shuffle for messages being pushed
in the /etc/postfix/main.cf file
smtp_use_tls = yes
smtp_tls_session_cache_database = btree: $ {data_directory} / smtp_scache # this line may already be
smtp_tls_mandatory_protocols =! SSLv2,! SSLv3
to test the work, you can send a letter and command line mail -s "some subject" myemail@email.com
OPENDKIM how to configure told in our other article
3.3 Testing work
status check sudo postfix status
if not running then run
sudo postfix start
check who is listening on port 25
netstat -anp | grep: 25 | grep LISTEN
Check sending letter and command line
echo "body of email" | mail -s "Test subject" emailto@email.com
Verify client connectivity to port 25
telnet 1.2.3.4 25
(1 2 3 4 - your server IP address)
apt-get --purge remove postfix
apt-get purge sendmail *
 8.1 installation script compressing and optimizing png
  apt-get install optipng

 compression of one photo (-o7 - maximum optimization)
 optipng -o7 tecmint.png

  recursive compression in all stacked folders
 find /var/www/site.site/public_html -name "* .png" -type f -exec optipng -o7 * .png {} {} \;

 8.2 installation for Linux
 (for Google it is preferable - it works slower but the reduction in file size while maintaining the quality remains the same)
wget http://static.jonof.id.au/dl/kenutils/pngout-20150319-linux.tar.gz && \
tar -xf pngout-20150319-linux.tar.gz && \
rm pngout-20150319-linux.tar.gz && \
cp pngout-20150319-linux / x86_64 / pngout / bin / pngout && \
rm -rf pngout-20150319-linux
 run for all subfolders
 cd /var/www/site.site/public_html
 find.  -name "* .png" -exec pngout {} \;


 8.3 installation script compressing and minimizing jpg
setting
 apt-get install libjpeg-progs
 compress one file
jpegtran -copy none -optimize -outfile min.image.jpg image.jpg
# save the optimized copy in min.image.jpg
To change the format on progressive, use the following command:
jpegtran -progressive -copy none -optimize -outfile min.pro.image.jpg image.jpg
recursive compression with nested folders
find /var/www/site.site/public_html -name "* .jpg" -type f -exec jpegtran -copy none -optimize -outfile {} {} \;
8.4 installing and using jpegoptim
apt-get install jpegoptim
jpegoptim * .jpg --strip-all
jpegoptim file.jpg --strip-all
all in current jpegoptim folder * .jpg --strip-all
recursively relative to the current find folder. -name "* .jpg" -type f -exec jpegoptim --strip-all {} {} \;
 9. If only Apache is installed, enable all sorts of compression


 we include additional modules if they are not already included
a2enmod expires
a2enmod headers
 create a file in the folder enabled config

 chashe.conf
 ==== file start ====
ExpiresActive On
ExpiresDefault "access 7 days"
ExpiresByType image / gif "access plus 1 year"
ExpiresByType image / jpeg "access plus 1 year"
ExpiresByType image / png "access plus 1 year"
ExpiresByType image / jpg "access plus 1 year"
ExpiresByType image / x-icon "access 1 year"
ExpiresByType application / x-shockwave-flash "access 1 year"
Header set Cache-Control "max-age = 259200, public"
AddOutputFilterByType DEFLATE application / json
==== end of file ====
run apache confinement check
apachectl configtest


Comments