
Lecture
Graphics optimisation absolutely has to be automated. It is easy to forget about, the recommendations change, and content itself can easily slip past the build pipeline. To automate it at build time, use imagemin or libvips. There are plenty of others too.
Most CDNs (for example, Akamai) and third-party solutions such as Cloudinary, imgix, Fastly Image Optimizer, Instart Logic SmartVision and ImageOptim API offer comprehensive automated image optimisation solutions.
You will spend more time reading articles and tuning configuration than their services cost (Cloudinary has a free tier). But if you still do not want to outsource the work, whether on cost grounds or because of the extra latency, then pick one of the open source options above. The Imageflow or Thumbor projects offer a self-hosted alternative.
At the very least, use ImageOptim. It shrinks file size significantly while preserving visual quality. There are versions for Windows and Linux.
A more thorough approach: run JPEG files through MozJPEG (for web content a quality of q=80 or lower is acceptable) and consider supporting Progressive JPEG. Run PNG files through pngquant, and SVG through SVGO. Explicitly specify metadata stripping (--strip for pngquant) to avoid file bloat. Instead of insanely huge animated GIFs, serve your users H.264 video (or WebM for Chrome, Firefox and Opera)! If you cannot afford that, then at least use Giflossy. When you can spare a couple of CPU cycles, you need a better quality image and you are willing to put up with long encoding times, then try Guetzli.
Some browsers advertise support for graphics formats via the Accept header. You can use this when choosing the format to serve: for example, the WebP format for Blink-based browsers such as Chrome, and a JPEG/PNG variant for other browsers.
Compression can always be improved. There are tools for generating and serving srcset. In Blink-based browsers, resource selection is automated with client-hints — and you will save bandwidth for users who have turned on the "data saver" option in their browser via the Save-Data.
The smaller the images, the better the experience for users — especially on mobile phones. In this article we will look at ways of compressing graphics with modern methods and minimal impact on quality.
Images make up a huge share of internet traffic. According to the HTTP Archive, 60% of a web page's weight is graphics in the JPEG, PNG and GIF formats. As of July 2017, images accounted for 1.7 MB of the average 3.0 MB web page.
Tammy Everts' experiment proved that adding images to a page or enlarging existing images raises the conversion rate (the percentage of visitors who become customers — translator's note). So images are not going anywhere — which is why it is important to invest in an effective strategy for compressing them.
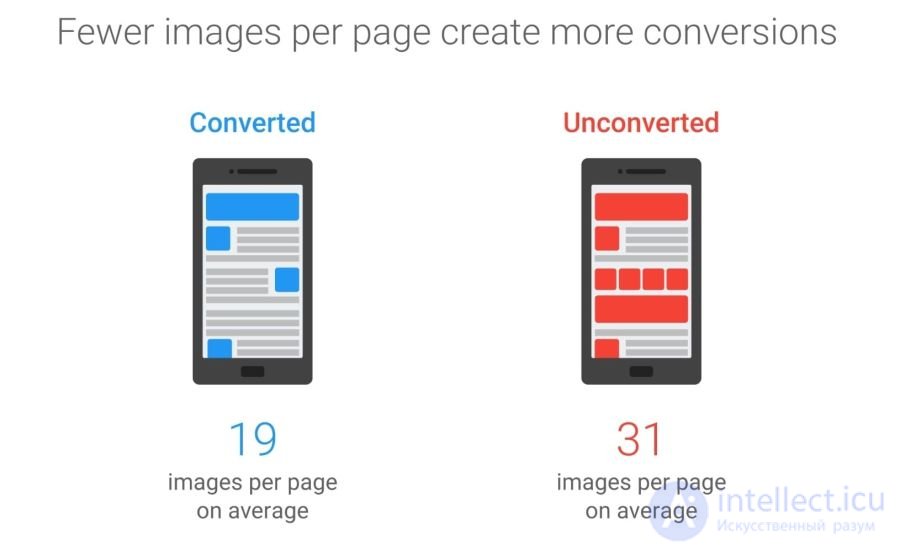
A 2016 Soasta/Google study showed that illustrations are the second-best predictor of conversion, and that high-performing pages have 38% fewer images
Image optimisation covers a range of measures. Which ones you pick depends on how much quality loss you consider acceptable.
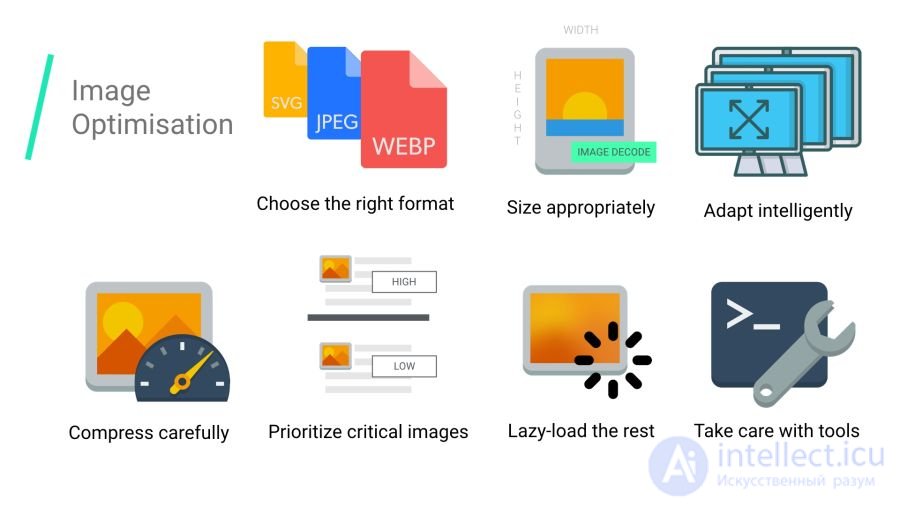
Optimisation: choose the right format, compress carefully and set loading priorities for different images
Typical optimisation includes compression, serving images sensibly based on size using / tags, and resizing.
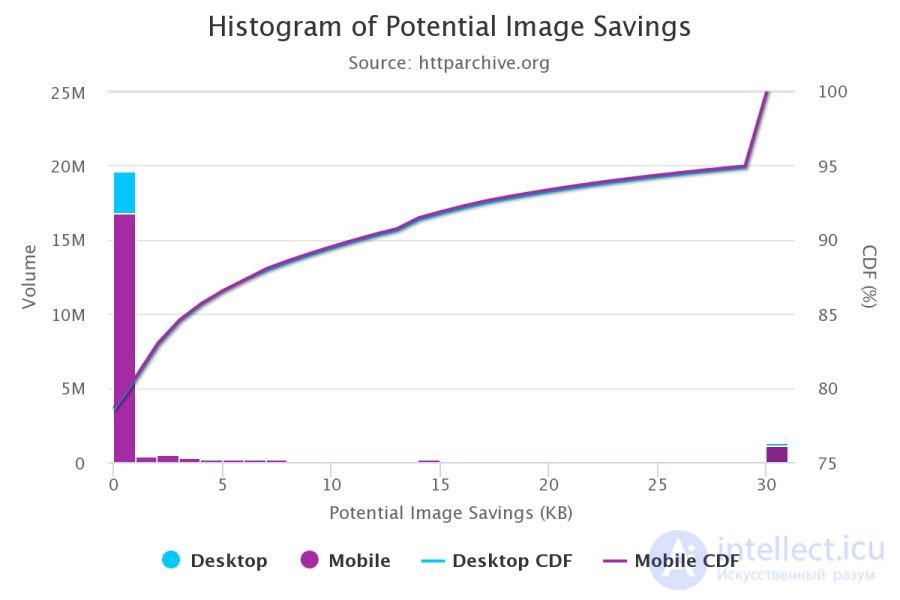
According to the HTTP Archive, at the 95th percentile (of the cumulative distribution function) every image can be reduced by 30 KB!
We still have a great many images that could be optimised.
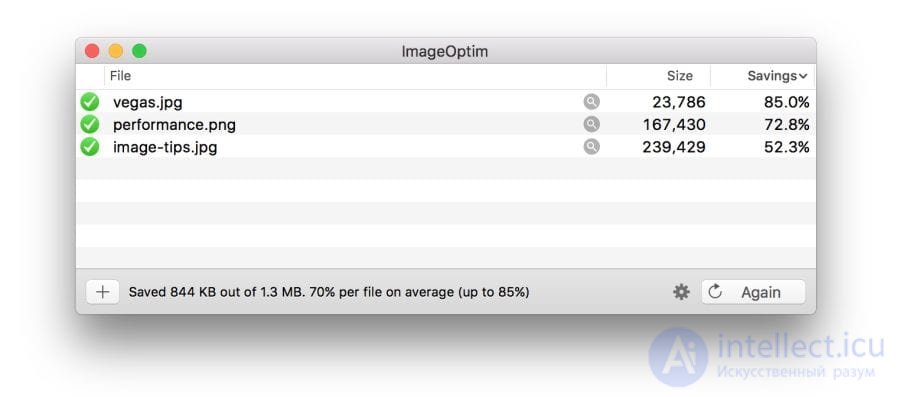
The free ImageOptim program reduces the size of graphics using modern compression methods and by stripping unnecessary EXIF metadata
If you are a designer, there is also the ImageOptim plugin for Sketch, which optimises assets on export. I have found that it saves a huge amount of time.
Audit your site with WebPageTest.org.
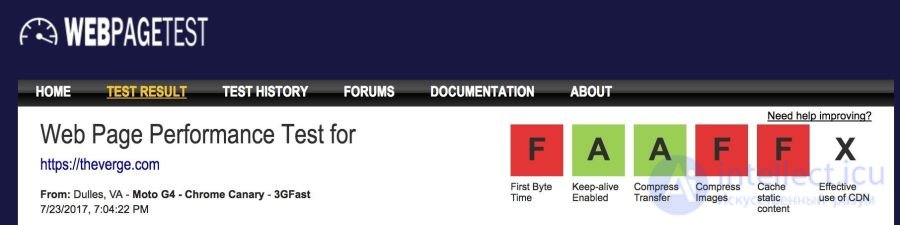
The Compress Images section of the WebPageTest report lists the images that could be compressed more efficiently, along with an estimate of the potential file size saving

The Lighthouse service also performs a performance audit, including a check on image optimisation. It shows which images could be compressed harder and which ones could be lazy-loaded.
As of Chrome 60 this service works in the audit panel of Chrome DevTools:
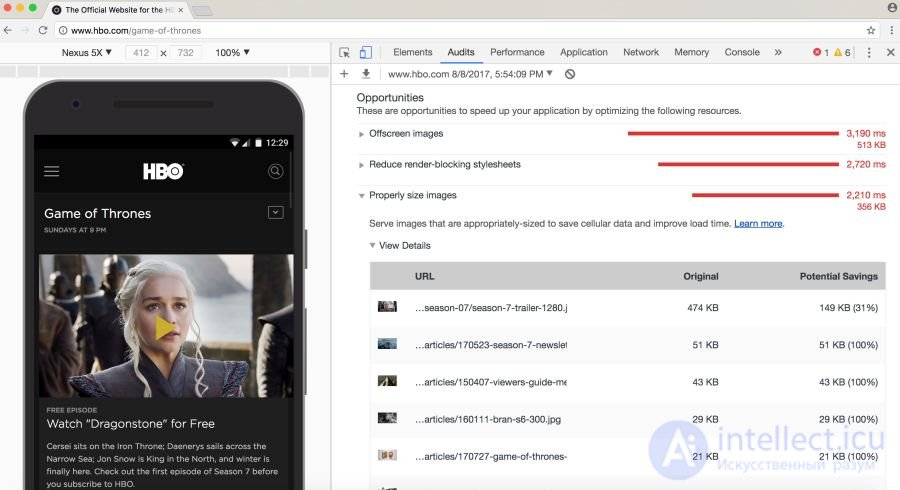
Lighthouse runs its audit with a focus on performance, best practices or progressive web app features (your choice)
You may be familiar with other audit tools, such as PageSpeed Insights and Website Speed Test from Cloudinary, which includes a detailed image audit.
As Ilya Grigorik noted in his excellent image optimisation guide, the "right format" combines the desired visual result with the functional requirements. Are you dealing with raster or vector graphics?
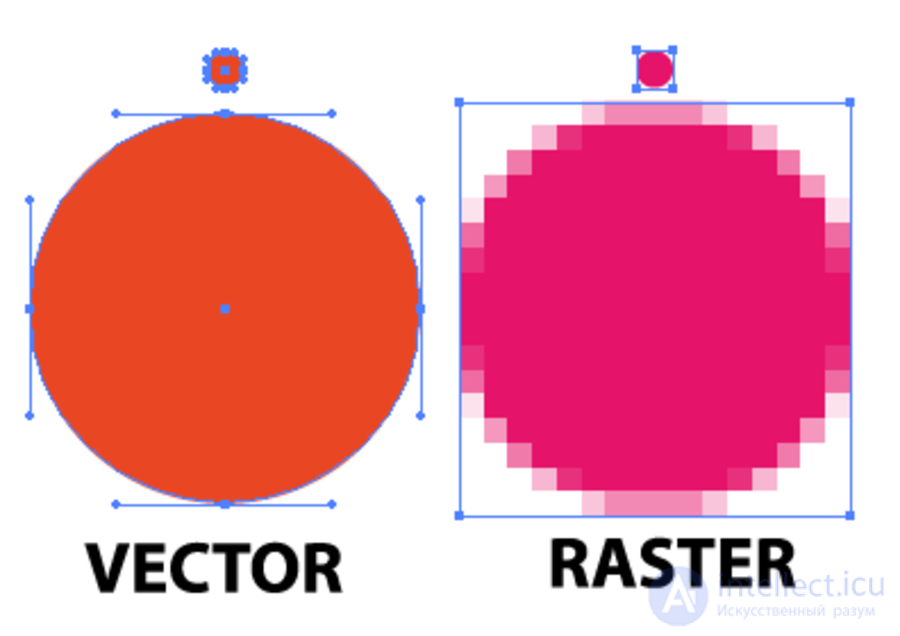
Raster graphics encode the value of every pixel on a rectangular grid of pixels. They are not resolution- or scale-independent. WebP and widely supported formats such as JPEG or PNG handle this kind of graphic well. Raster graphics are used where photorealism is required. Guetzli, MozJPEG and the other tools mentioned are suited to raster graphics.
Vector graphics use points, lines and polygons to represent images made of simple geometric shapes (logos, for example). They offer high resolution and scalability. Formats like SVG are a better fit for this case.
Choosing the wrong format will cost you dearly. Change format with care, after experimenting with the savings possible in the various formats.
In his talk, Jeremy Wagner covered the trade-offs that are worth taking into account when evaluating different formats during optimisation.
The JPEG is probably the world's most popular graphics format. As noted earlier, 45% of the images on the sites in the HTTP Archive are JPEGs. Your phone, your digital camera, your old webcam — they all normally support this codec. It is very old indeed, in use since as far back as 1992. Over that time an enormous amount of research has gone into improving JPEG compression.
JPEG is a lossy compression algorithm that discards "redundant" information to save space. The aim is to preserve as much visual fidelity as possible while minimising file size.
Formats like JPEG are best suited to photographs or images with a large number of colours. Most optimisation tools will let you choose an acceptable level of compression: stronger compression reduces file size, but it can introduce artefacts such as haloing or blockiness.
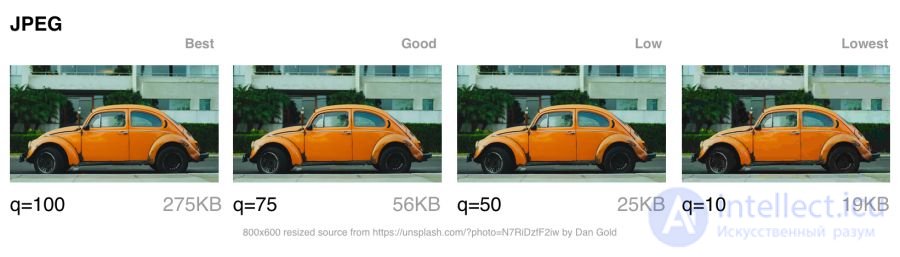
Visible JPEG compression artefacts grow as you move from the best quality to the worst. Note that image quality figures can differ considerably from one tool to another
When choosing a compression level you should consider what quality your images need:
Next let us talk about JPEG compression modes, which have a big effect on the result.
Note: we may sometimes overestimate the image quality that users actually need. Quality can be thought of as the deviation from the ideal original. It is a subjective measure.
The JPEG format has a number of different compression modes. Three are popular: baseline (sequential), progressive JPEG (PJPEG) and lossless compression.
Baseline JPEG (the default mode in most editors and optimisers) encodes and decodes relatively simply: top to bottom. When a baseline JPEG loads over a slow or unstable connection, the user first sees the top part of the picture. The lossless JPEG compression mode is similar to baseline, only with a lower compression ratio.
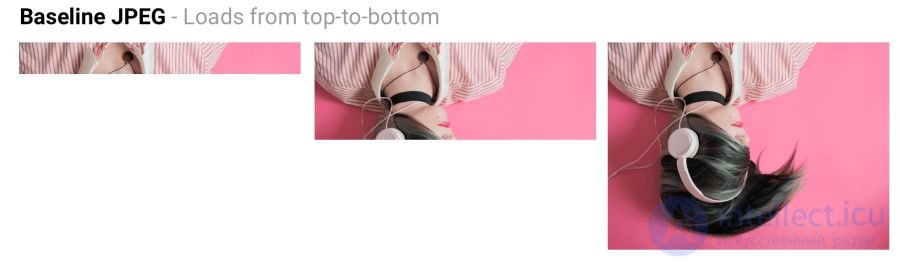
A baseline JPEG loads from top to bottom, whereas a progressive JPEG loads from blurry to sharp
A progressive JPEG splits the image into a series of passes. The first pass shows the picture blurred and at low quality, and subsequent passes gradually improve the quality. Each pass raises the level of detail. Eventually the full image is produced.
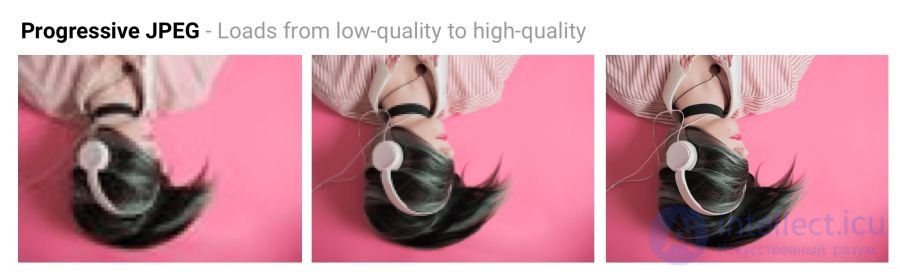
A baseline JPEG loads the image from top to bottom. A PJPEG first shows a blurry picture and then raises the resolution. Pat Meenan built an interactive tool for testing and studying progressive JPEG files
Lossless JPEG optimisation is achieved by stripping the EXIF headers left by digital cameras and editors, optimising the Huffman tables and rescanning the image. Tools such as jpegtran provide lossless compression by rearranging the compressed data without degrading image quality. jpegrescan, jpegoptim and mozjpeg (which we will look at shortly) also support lossless JPEG compression.
A PJPEG's ability to show a preview while loading improves performance — images feel to users as though they load faster than standard graphics do.
On slow 3G connections this lets you make out roughly what the picture is when only part of the file has arrived — and decide whether or not to wait for it to finish downloading. That can be more convenient than loading the image top to bottom, as baseline JPEG does.
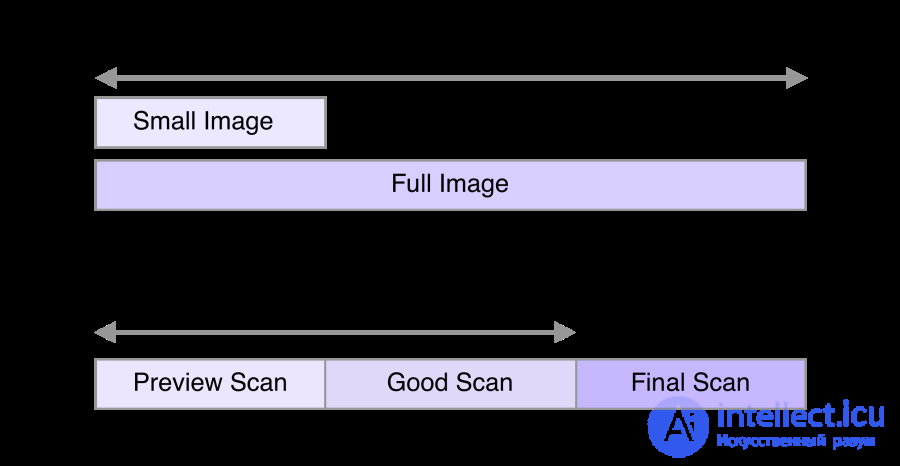
In 2015 Facebook switched to PJPEG (for its iOS app) and traffic dropped by 10%. They were able to show a good-quality image 15% faster than before by optimising perceived load time, as shown in the figure above
A PJPEG can reduce file size by 2−10% compared with a baseline/plain JPEG for images larger than 10 KB. The higher compression ratio comes from the fact that a separate Huffman table can be built for each pass. Modern JPEG encoders (for example libjpeg-turbo, MozJPEG and others) exploit PJPEG's flexibility to compress data better.
Note: why does PJPEG compress better? Because baseline JPEG blocks are encoded one at a time, whereas in a PJPEG the discrete cosine transform coefficients from several blocks can be encoded together, which leads to better compression.
Many other image-heavy sites, such as Pinterest, also use progressive JPEG in production.
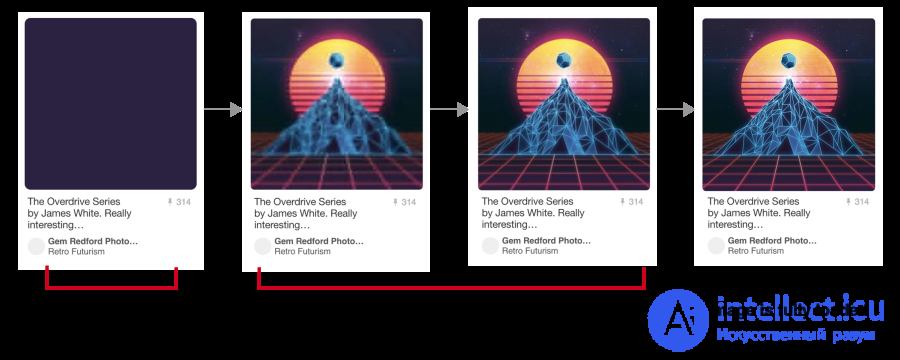
On Pinterest, images are encoded only as progressive JPEG. It is nicer for users when a picture appears gradually
Decoding a PJPEG is slower than decoding a baseline JPEG — sometimes three times slower. On desktop machines with powerful processors this matters less than it does on resource-constrained mobile devices. Rendering incomplete layers takes work, since you are effectively decoding the image several times. Those multiple passes eat CPU cycles.
Progressive JPEG images are also not always smaller in size. Encoding very small images progressively (preview thumbnails, for example) can make them larger. And for images like that, rendering in several passes makes little sense anyway.
So before settling on PJPEG it is worth experimenting to find the right balance between file size, network latency and CPU usage.
Note: mobile devices may support hardware decoding of PJPEG (and of all JPEGs). This does not reduce memory consumption, but it does lower the load on the processor. Not every Android smartphone has hardware acceleration, but high-end devices and iOS devices do.
Some users may regard progressive loading as a drawback, since it makes it hard to tell when the image has finished loading. Try to gauge how your own audience feels about it.
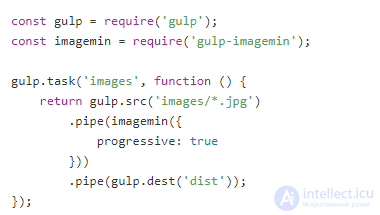
Tools and libraries like ImageMagick, libjpeg, jpegtran, jpeg-recompress and imagemin support progressive JPEG. If you already have an optimisation pipeline in place, chances are that changing the way JPEGs are encoded will not be a problem:
Most editors save as baseline JPEG by default.
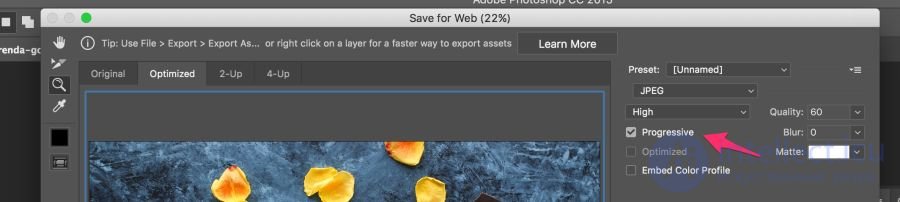
Most editors save as baseline JPEG by default, but you can change this in the settings. In Photoshop you need to choose File → Export → Save for Web, and specify the progressive JPEG format there. Sketch also supports exporting Progressive JPEG by ticking a checkbox in the JPG export menu
Our eyes are worse at noticing a loss of colour than a loss of brightness. Chroma subsampling is a form of compression that reduces colour accuracy in favour of brightness (luma). It reduces file size by up to 15−17% without noticeably affecting image quality. Subsampling also reduces memory usage.
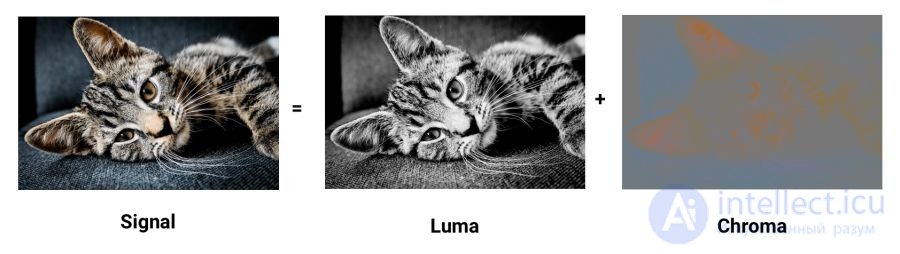
Contrast is responsible for sharpness in a picture, which is why luma matters so much. Black-and-white photographs have no colour, but thanks to brightness they look just as detailed as their colour counterparts. Chroma has less effect on visual perception.
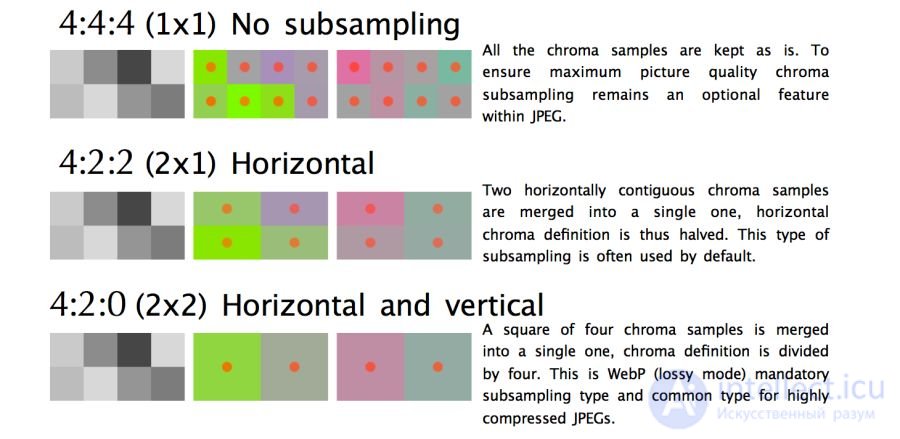
JPEG supports various types of subsampling: no subsampling, horizontal, horizontal+vertical. Here is an illustration from Frederic Kayser's article "JPEG for crabs"
When subsampling is discussed, a number of common examples are usually cited: 4:4:4, 4:2:2 and 4:2:0. What are they? Suppose subsampling has the form A:B:C. Here A is the number of pixels in a row, which for JPEG is normally 4, B is the number of colours in the first row, and C is the number of colours in the second.
4:4:4 there is no compression; colour and brightness are transmitted in full.4:2:2 sampling is halved horizontally and full vertically.4:2:0 colours from half the pixels of the first row are used.
Note: jpegtran and cjpeg support configuring luma and chroma separately via the-sampleflag (for example,-sample 2x1). Some general rules: subsampling (-sample 2x2) works great for photographs. It is better turned off (-sample 1x1) for screenshots, banners and buttons. Finally,2x1is for when you are not sure which option to use.
By reducing the number of pixels you can significantly reduce the size of the colour components, and ultimately the file size.
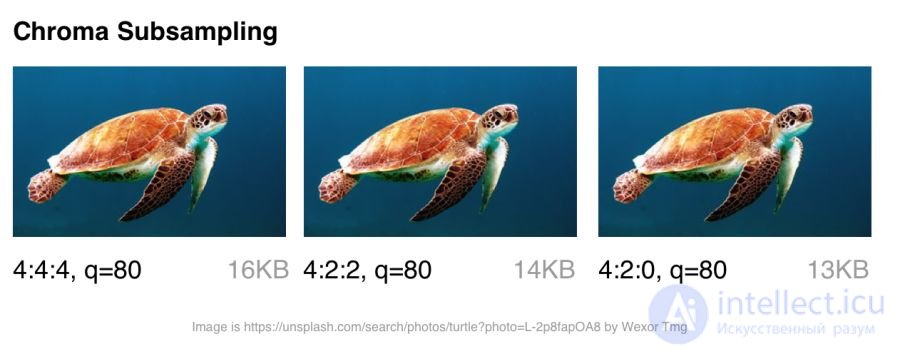
Chroma subsampling options for a JPEG at quality 80
Chroma subsampling is useful for most images, though there are clear exceptions: it is better not to use it where colour detail is as important as brightness (medical scans, for example).
Images containing type will suffer as well. Sharp edges are harder to compress with JPEG, since it was designed to handle photographic scenes with softer transitions better.
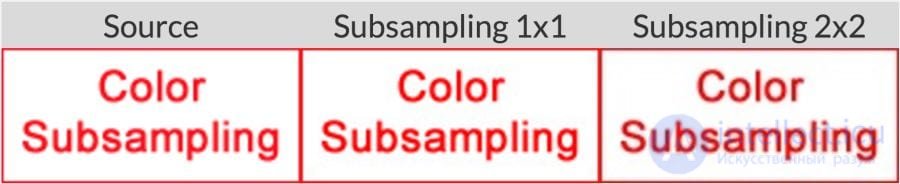
For working with text, the "Understanding JPEG" tutorial recommends sticking to 4:4:4 (1×1) subsampling
By the way: the JPEG specifications do not prescribe an exact chroma subsampling method, so different encoders/decoders go about it differently. MozJPEG and libjpeg-turbo use one method, while older versions of libjpeg use another that adds artefacts.
Note: Photoshop picks chroma subsampling automatically when you "save for web". If quality is set in the 51−100 range, no subsampling is used (4:4:4). When quality is lower, 4:2:0 is applied. This is one reason why file size drops sharply when you switch quality from 51 to 50.
Note: the term YCbCr often comes up in discussions of subsampling. It is a gamma-corrected model of the RGB colour space. Y is gamma-corrected brightness, Cb is the blue chroma component and Cr the red one. If you look at ExifData, you will see YCbCr next to the sampling levels.
For more information, see the article "Why aren't you using chroma subsampling?"
tl;dr: browser support varies wildly. If you want to use modern developments, you will often have to serve different formats to different browsers.
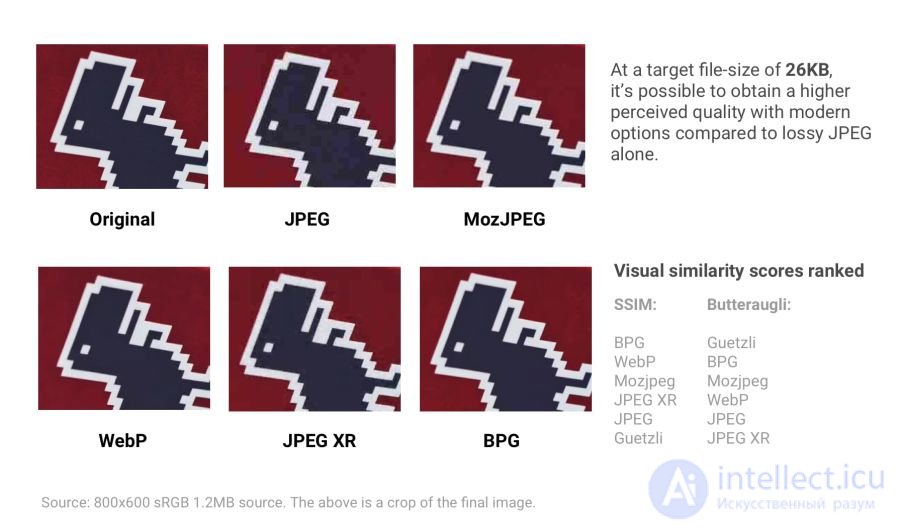
Various modern formats (and optimisers) showing compression quality at a target file size of 26 KB. Quality is compared using the SSIM (structural similarity) and Butteraugli tools, which we will look at in more detail later.
If you prefer to take in information visually, you can try one of these visual comparison tools for some of the formats listed above.
So, browser support varies wildly. To use any of the formats above, you will probably have to serve a different copy to each of your target browsers. We at Google see definite promise in WebP, so we will look at that format in more detail shortly.
You can also serve different formats (WebP or JPEG 2000, say) with the same .jpg extension (or any other), since the browser can pick the content-type to render regardless of the extension. This lets you set the content-type on the server side without changing the HTML document at all. Services like Instart Logic take this approach.
Next let us talk about situations where you cannot serve images in different formats: here JPEG optimisers.
Modern JPEG codecs try to reduce the size of JPEG files while preserving as much quality as possible and remaining compatible with existing browsers and applications. They remove the need to adopt new image formats and make changes across the ecosystem. Two such encoders are MozJPEG and Guetzli.
tl;dr: which optimising JPEG codec should you use?
Mozilla offers a modernised JPEG encoder — MozJPEG. According to its developers' claims, it reduces the size of JPEG files by up to 10%. Files compressed with MozJPEG open in every browser, and the supported features include progressive scan, trellis quantisation (dropping the details that compress worst) and several advanced quantisation table templates that help produce smoother High-DPI images (though this is possible with ImageMagick too, if you are willing to fight your way through a jungle of XML configuration).
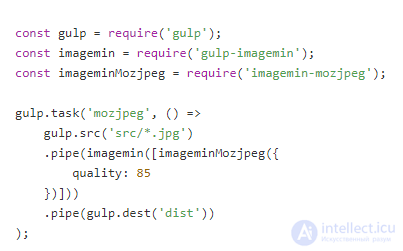
MozJPEG is supported in ImageOptim and there is a reasonably reliable configurable imagemin plugin for it. Here is an example implementation using Gulp:

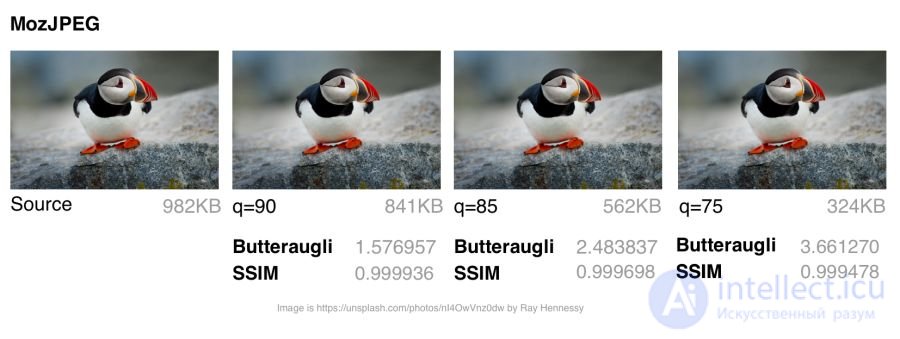
MozJPEG: a comparison of file sizes and visual similarity scores at different quality levels
To compute the SSIM (structural similarity to the original image) scores I used jpeg-compress from the jpeg-archive.
In my experience, MozJPEG is a good option for compressing images for the internet at high quality while simultaneously reducing file size. For small and medium-sized images, MozJPEG (at quality 80−85) shrinks files by 30−40% while keeping SSIM acceptable and improving on jpeg-turbo by 5−6%. It encodes more slowly than baseline JPEG, but the difference is not critical.
Note: if you want a tool that supports MozJPEG with extra configuration and some free image comparison utilities, take a look at jpeg-recompress. Jeremy Wagner, author of "Web Performance in Action", has used the program successfully in this configuration.
Guetzli — a promising but very slow perceptual JPEG encoder from Google. It tries to find the smallest JPEG that is perceptually indistinguishable from the original. The encoder runs a series of experiments, producing candidates for comparison, and takes into account the psychovisual error of each candidate. The candidate with the highest score is chosen as the final result.
To measure the difference between images, Guetzli uses Butteraugli — a model based on human perception (discussed below). Guetzli takes into account certain properties of human vision that other JPEG encoders ignore. For example, there is a relationship between the amount of visible green light and sensitivity to blue, so changes in blue next to green can be encoded less precisely.
Note: File size depends far more on the choice of encoding level than on the choice of codec. The difference between low and high quality levels in JPEG is much, much greater than the difference from switching codecs. It is very important to specify the minimum acceptable quality level. Be sure to keep an eye on this figure so that it doesn't end up being too high.
Guetzli claims a 20−30% difference in file size without lowering the Butteraugli score compared with other compressors. Guetzli's big drawback is its extreme slowness, so at present it is only suitable for static content. The README notes its large memory footprint: encoding takes around 1 minute and 200 MB of RAM per megapixel. On GitHub there is a good thread discussing real-world experience with Guetzli. The encoder is ideal for optimising images when building a static site, but less suitable for running on demand.
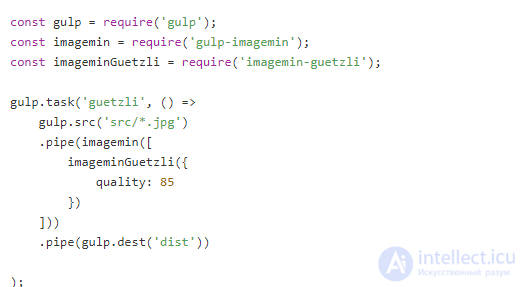
Tools like ImageOptim support Guetzli optimisation (in recent versions).
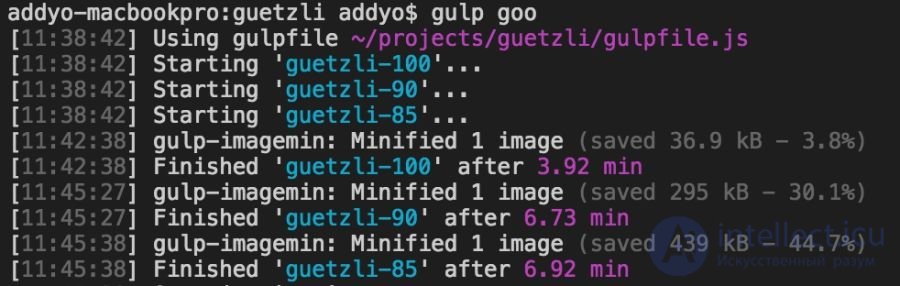
Guetzli encoding of 3000×3000 pixel images at various levels took almost seven minutes. This makes sense for archival storage of high-resolution photographs.
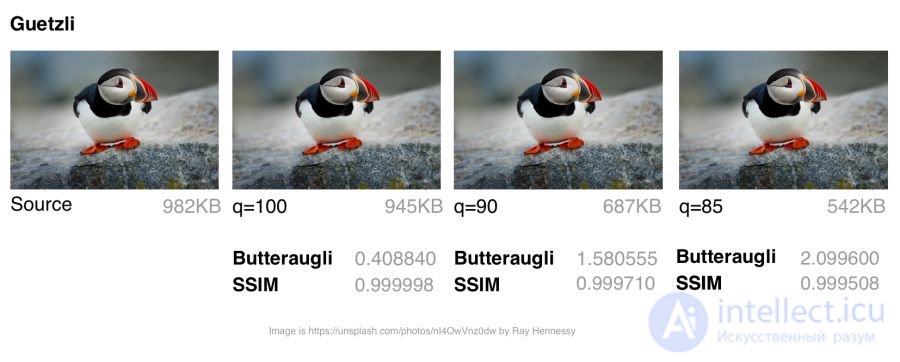
Guetzli: comparison of file sizes and visual similarity scores at different quality levels
Note: it is recommended to run Guetzli on high-quality images (for example, uncompressed source images, PNGs, or JPEGs at around 100% quality). It does have an effect on other images too (for example JPEGs at quality 84 or below), but the results are worse.
Guetzli takes a very (very) long time and will make your CPU fan spin up to full speed, but it is worth it. I have seen a number of cases where file size dropped by 40% while visual fidelity was preserved. That makes it an ideal choice for archiving photographs. There are some savings on small and medium-sized images too (in the 10−15 KB range), but they are not as significant. When compressing very small images, Guetzli can introduce "liquid-like" artefacts.
For a wider range of use cases you may be interested in a comparison of Guetzli with Cloudinary's automatic compression in Eric Portis's study.
Comparing different JPEG encoders is difficult: you have to assess both the quality and the fidelity of the compressed image, not just its size. As image compression expert Kornel Lesiński notes, benchmarking only one of the two aspects rather than both can lead to incorrect conclusions.
How do Guetzli and MozJPEG compare? Kornel's take:
There are a number of methods for determining the visual or perceptual similarity of compressed images to the original. Research often uses SSIM (structural similarity). Guetzli, however, is optimised for Butteraugli.
The Butteraugli system determines the point at which a person starts to notice a difference (psychovisual similarity) between two images. Butteraugli not only produces a score but also builds a spatial map of the level of difference. Whereas SSIM sums up all the errors, Butteraugli looks for the maximum ones.
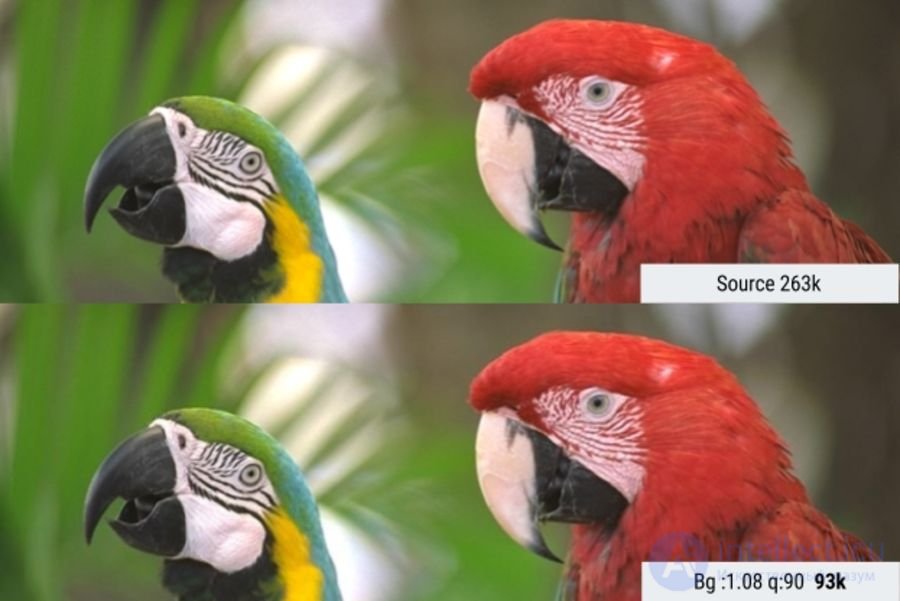
In this example Butteraugli looks for the minimum JPEG quality threshold at which the user will not notice a visual difference between the images. This made it possible to reduce the file size by 65%
In practice you define a level of visual quality, then run several image optimisation strategies, looking at the Butteraugli scores before choosing the result that strikes the best balance between file size and compression level.
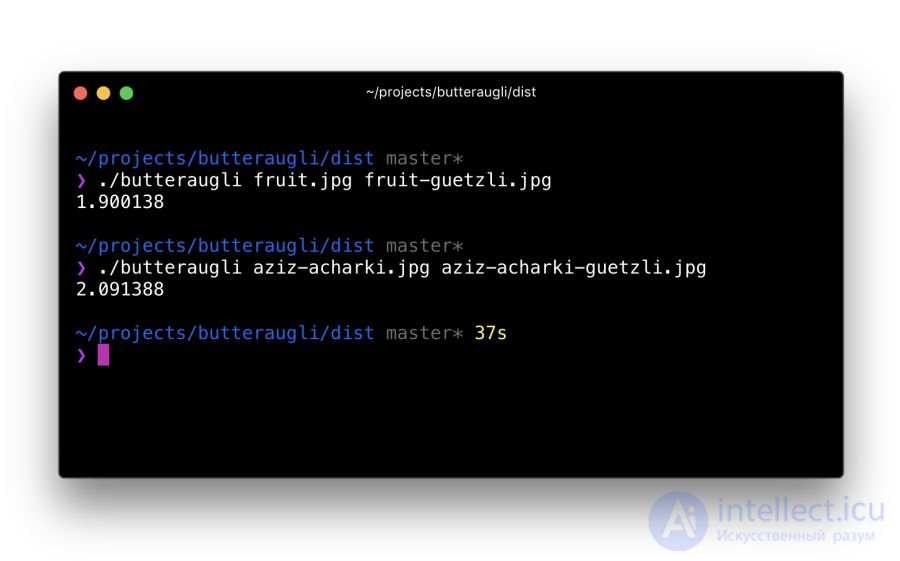
It took me about 30 minutes to set up Butteraugli locally after installing Bazel and building the C++ sources to compile correctly on a Mac. Using it is relatively simple: point it at two images to compare (the original and the compressed version) — and you get a score
One of Guetzli's developers says that Guetzli is better by the Butteraugli score, worse by SSIM, while MozJPEG is roughly equally good by both metrics. This is the strategy I use for optimising images. I run Butteraugli along with a Node module such as img-ssim to compare SSIM scores before/after Guetzli and MozJPEG.
As practice has shown, combining Guetzli and MozJPEG losslessly (jpegtran rather than cjpeg, so as not to throw away the work Guetzli has done) makes it possible to shrink the file by a further 10−15% (55% overall) with a very slight drop in the SSIM score. This needs checking and analysis, but other specialists such as Ariya Hidayat have tried it — and got the same promising result.
MozJPEG is a convenient encoder for beginners: it compresses files for the web comparatively quickly and delivers good image quality. Guetzli, on the other hand, is resource-hungry and works best on large, high-quality images: that is the option I would recommend to advanced and professional users.
WebP is the latest graphics format from Google, which aims to reduce file sizes with both lossless and lossy compression while delivering acceptable visual quality. It supports an alpha channel (transparency) and animation.
WebP keeps improving: over the past year it has gained a few percent in both lossless and lossy compression, become twice as fast at encoding, and its decoding speed has increased by 10%. WebP is not a universal tool, but its popularity is growing. Let's look at why.
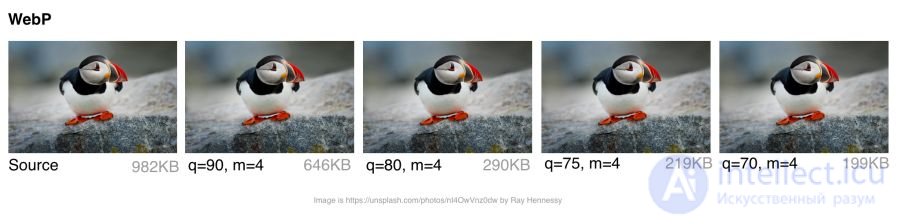
WebP: comparison of file sizes and visual similarity scores at different quality levels
The developers say that with lossy compression using the VP8 or VP9 codec, files shrink on average by 25−34% compared with JPEG.
In the low quality range (0−50) WebP has a big advantage over JPEG, since it blurs out ugly blocking artefacts. The medium quality setting (-m 4 -q 75) is the default balance between speed and file size. In the high quality range (80−99) WebP's advantages are minimal. WebP is recommended where speed matters more than quality.
WebP files with lossless compression are 26% smaller than PNG files. Load time is reduced by 3% compared with PNG. On the web, however, lossless compression is not normally used. That option is better suited to archival storage.
WebP has an 8-bit transparency channel with lossless compression that adds only 22% more bytes than PNG. It also supports lossy RGB transparency, a feature unique to WebP.
The WebP format supports EXIF photo metadata and XMP digital document metadata, and also carries an ICC colour profile.
продолжение следует...
Часть 1 Optimising graphics for the web
Часть 2 Who uses WebP in production? - Optimising graphics for the
Часть 3 Colour profiles - Optimising graphics for the web

Comments