
Lecture
The service worker lifecycle is its most complex part. If you don't know what it is trying to do and what the benefits are, it can feel like it is fighting you. But once you understand how it works, you can deliver smooth, unobtrusive updates to your users, combining the best of web and native patterns.
This is a deep dive, but the bullet points at the start of each section cover most of what you need to know.
The goal of the lifecycle is to:
That last one is very important. Without service workers, users can load one tab of your site and then open another. This can result in two versions of your site running at the same time. Sometimes that is fine, but if you are dealing with storage you can easily end up with two tabs that have completely different opinions about how the shared storage should be managed. This can lead to bugs or, worse, data loss.
Note: users actively dislike losing data. It causes them great sadness.
In brief:
install event is the first event a service worker receives, and it happens only once.installEvent.waitUntil()signals the duration and the success or failure of your installation.fetchand push until it has finished installing and become "active".clients.claim()can override this default and take control of uncontrolled pages.Take this HTML:
An image will appear here in 3 seconds:
It registers a service worker and, after 3 seconds, adds an image of a dog.
Here is its service worker sw.js:
self.addEventListener('install', event => {
  console.log('V1 installing…');

  // cache a cat SVG
  event.waitUntil(
    caches.open('static-v1').then(cache => cache.add('/cat.svg'))
  );
});

self.addEventListener('activate', event => {
  console.log('V1 now ready to handle fetches!');
});

self.addEventListener('fetch', event => {
  const url = new URL(event.request.url);

  // serve the cat SVG from the cache if the request is
  // same-origin and the path is '/dog.svg'
  if (url.origin == location.origin && url.pathname == '/dog.svg') {
    event.respondWith(caches.match('/cat.svg'));
  }
});
It caches an image of a cat and serves it for every request for /dog.svg. However, if you run the example above, you will see a dog on the first page load. Hit "Reload" and you will see a cat.
Note: cats are better than dogs. They just are .
A service worker registration's default scope ./is determined by the script's URL. This means that if you register a service worker at //example.com/foo/bar.jsit will have the default scope //example.com/foo/.
We call pages, workers and shared workers clients. Your service worker can only control clients that are within its scope. Once a client becomes "controlled", its fetches go through the service worker that is in scope. You can tell whether a client is controlled via navigator.serviceWorker.controllerwhich will be either null or a service worker instance.
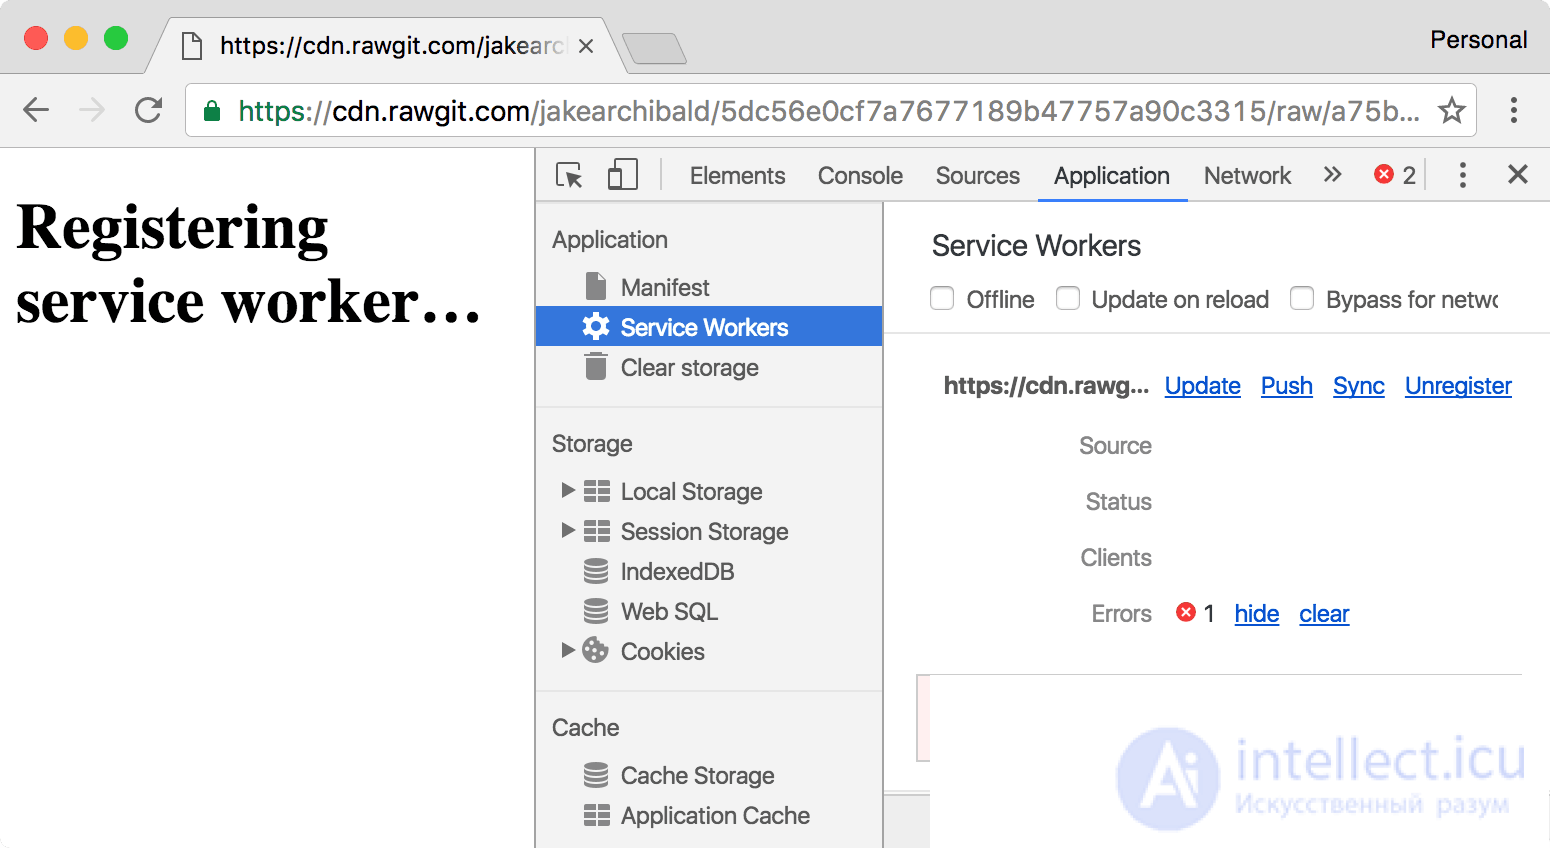
Your very first service worker downloads its files when you call .register(). If your script fails to download, fails to parse, or throws an error during its initial execution, the registration promise is rejected and the service worker is discarded.
The Chrome developer tools show the error in the console and in the Service Worker section of the Application tab:
The first event a service worker receives is install. It fires as soon as the worker executes and is called only once per service worker. If you change your service worker script, the browser considers it a different service worker and it gets its own installevent. I will cover updates in detail later.
This installevent is your chance to cache everything you need before you can start controlling clients. The promise you pass to event.waitUntil()tells the browser when the installation has finished and whether it succeeded.
If your promise rejects, it means the installation failed, and the browser discards the service worker. It will never control clients. This means we cannot rely on cat.svgbeing present in the cache in our fetchevents. That is a dependency.
As soon as your service worker is ready to control clients and handle functional events such as pushand sync, you get the activateevent. But this does not mean that the page that called .register()will be controlled.
On the first load of the demo, even though dog.svgis requested long after the service worker has activated, it does not handle the request and you still see the picture of the dog. The default here is consistency . If your page loads without a service worker, its subresources will not load with one either. If you load the demo a second time (in other words, refresh the page), it will be controlled. Both the page and the image will go through fetchevents, and you will see the cat instead.
You can take control of uncontrolled clients by calling clients.claim()in your service worker after it has activated.
Here is a variant of the demo above that calls clients.claim()in its activateevent. You should see the cat the first time. I say "should" because it depends on timing. You will only see the cat if the service worker activates and clients.claim()takes effect before the image tries to load.
If you use your service worker to load pages differently from how they load over the network, clients.claim()can be problematic, because your service worker ends up controlling some clients that were loaded without it.
Note. Note. I see a lot of people treat clients.claim()as boilerplate, but I rarely do it myself. It only really matters on the very first load, and thanks to progressive enhancement the page usually works fine without a service worker anyway.
In short:
pushand sync, if there has been no update check in the previous 24 hours..register() only if the service worker URL has changed. However, you should avoid changing the worker URL.importScripts(). You can override this default behaviour by setting the updateViaCacheoption when registering your service worker.installevent.waituntil the existing worker is controlling zero clients. (Note that clients overlap during a refresh.)self.skipWaiting()prevents the waiting, meaning the service worker activates as soon as it finishes installing.Let's say we changed our service worker script so that it responds with an image of a horse rather than a cat:
const expectedCaches = ['static-v2'];

self.addEventListener('install', event => {
  console.log('V2 installing…');

  // cache a horse SVG into a new cache, static-v2
  event.waitUntil(
    caches.open('static-v2').then(cache => cache.add('/horse.svg'))
  );
});

self.addEventListener('activate', event => {
  // delete any caches that aren't in expectedCaches
  // which will get rid of static-v1
  event.waitUntil(
    caches.keys().then(keys => Promise.all(
      keys.map(key => {
        if (!expectedCaches.includes(key)) {
          return caches.delete(key);
        }
      })
    )).then(() => {
      console.log('V2 now ready to handle fetches!');
    })
  );
});

self.addEventListener('fetch', event => {
  const url = new URL(event.request.url);

  // serve the horse SVG from the cache if the request is
  // same-origin and the path is '/dog.svg'
  if (url.origin == location.origin && url.pathname == '/dog.svg') {
    event.respondWith(caches.match('/horse.svg'));
  }
});
Note: Note: I have no strong feelings about horses.
Take a look at the demo of the above. You should still see the picture of the cat. Here is why…
Note that I changed the cache name from static-v1to static-v2. This means I can set up the new cache without overwriting the contents of the current one, which the old service worker is still using.
This pattern creates version-specific caches, similar to the assets a native app bundles with its executable. You can also have caches that are not tied to a version, such as avatars.
Once it installs successfully, the updated service worker postpones activating until the existing service worker is no longer controlling any clients. This state is called "waiting", and it is how the browser guarantees that only one version of your service worker is running at a time.
If you ran the updated demo, you should still see the picture of the cat, since the V2 worker has not activated yet. You can see the new service worker waiting in the Application tab of DevTools:
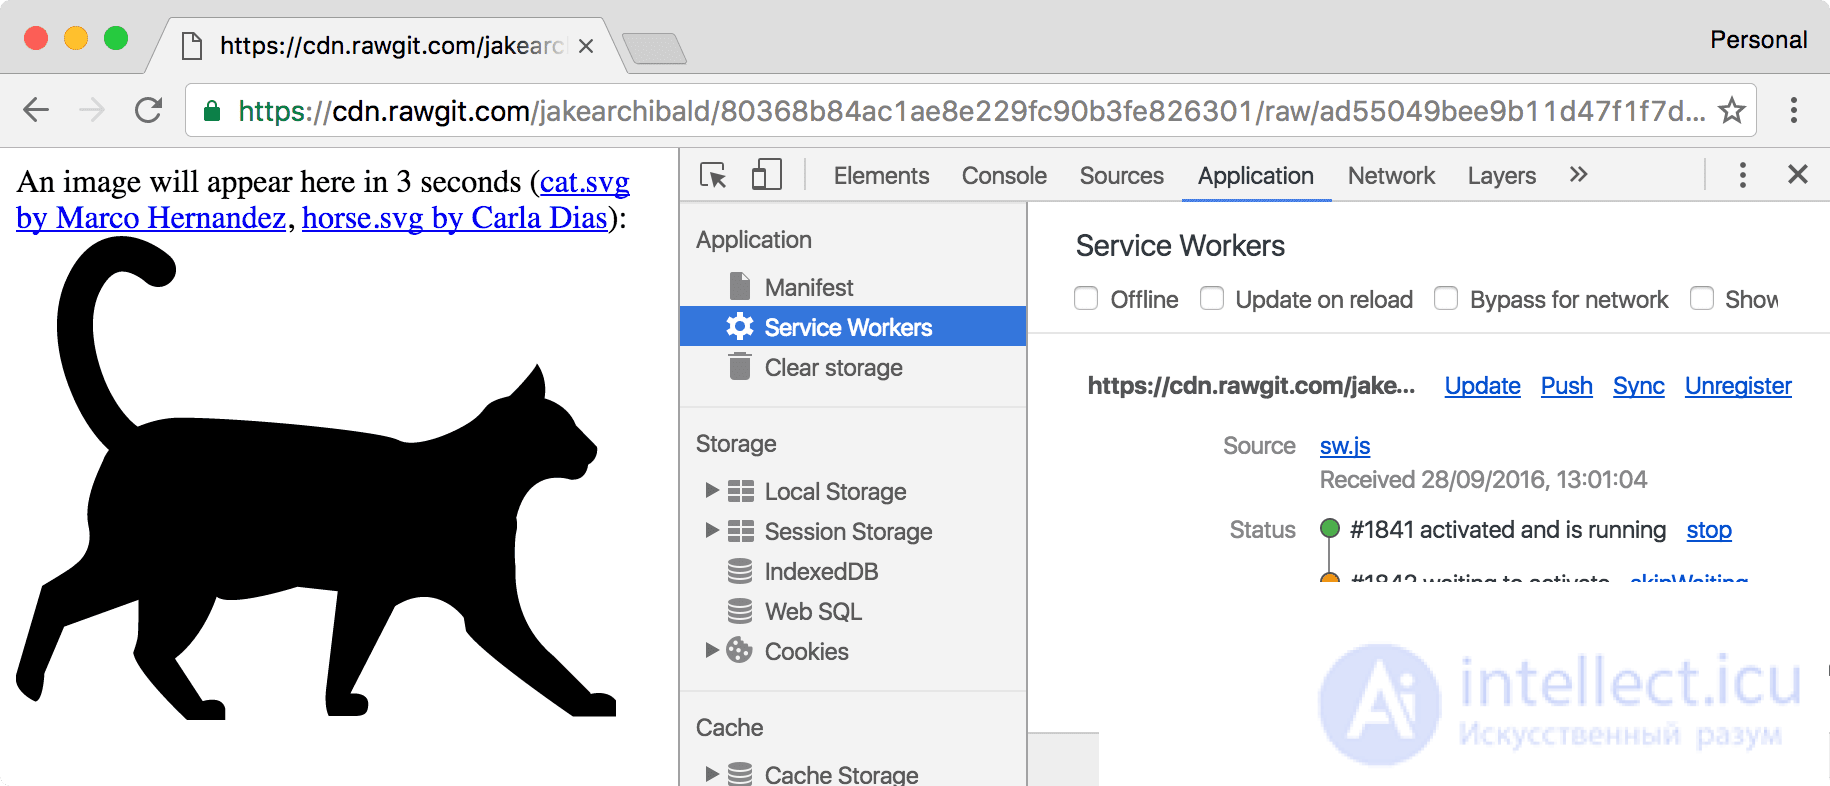
Even if you only have one tab open on the demo, refreshing the page is not enough for the new version to take over. This is down to how navigation works in the browser. During a navigation, the current page does not go away until the response headers have been received, and even then the current page may stay if the response has a Content-Disposition header. Because of this overlap, the current service worker is always controlling a client during a refresh.
To get the update, close or navigate away from all tabs using the current service worker. Then, when you navigate to the demo again, you should see the horse.
This pattern is similar to how Chrome updates. Chrome updates download in the background, but they are not applied until Chrome restarts. In the meantime, you can keep using the current version without any disruption. That said, it is a pain during development, but DevTools has ways to make it easier, which I will cover later in this article.
This fires once the old service worker is gone and your new service worker is able to control clients. It is the ideal time to do things you could not do while the old worker was still in use, such as migrating databases and clearing caches.
In the demo above I keep a list of caches I expect to be there, and in the activateevent I get rid of any others, which removes the old static-v1cache.
Warning: you may not be updating from the previous version. It could be a service worker that is many versions old.
If you pass it a promise, event.waitUntil()will buffer functional events ( fetch, and so on) until push, syncthe promise settles. So by the time your fetchevent fires, activation is fully complete.
Warning: the Cache Storage API is "origin storage" (like localStorage and IndexedDB). If you run several sites on the same origin (for example yourname.github.io/myapp), be careful not to delete the caches of the other sites. To avoid this, give your cache names a prefix that is unique to the current site, such as myapp-static-v1, and do not touch caches unless they start with myapp-.
The waiting phase means you only run one version of your site at a time, but if you do not need that feature you can activate the new service worker sooner by calling self.skipWaiting().
This makes your service worker kick out the currently active worker and activate itself as soon as it enters the waiting phase (or immediately, if it is already in the waiting phase). It does not make your worker skip installing, just waiting.
It does not matter when you call skipWaiting(), as long as it is during or before waiting. It is quite common to call it in the installevent:
self.addEventListener('install', event => {
  self.skipWaiting();

  event.waitUntil(
    // caching etc
  );
});
But you can also call it as a result of a postMessage()to the service worker. For example, you want to skipWaiting()as a result of a user interaction.
Here is a demo that usesskipWaiting() . You should see the picture of the cow without navigating away. As with clients.claim(), it is a race, so you will only see the cow if the new service worker downloads, installs and activates before the page tries to load the image.
Warning: skipWaiting() means your new service worker is likely to be controlling pages that were loaded with an older version. This means some of your page's fetches will have been handled by your old service worker, but your new service worker will handle the subsequent fetches. If that might break something, do not use skipWaiting().
As I mentioned earlier, the browser checks for updates automatically after navigations and functional events, but you can also trigger them manually:
navigator.serviceWorker.register('/sw.js').then(reg => {
  // sometime later…
  reg.update();
});
If you expect the user to use your site for a long time without reloading, you can call update()on an interval (every hour, for example).
If you have read my post on caching best practices, you might consider giving each version of your service worker a unique URL. Do not do this! It is usually bad practice for service workers: just update the script at its current location.
It can lead to a problem like this:
index.htmlregisters sw-v1.jsas the service worker.sw-v1.jscaches and serves index.htmlso it works offline-first.index.html so that it registers your new and shiny sw-v2.js.If you do the above, the user never gets sw-v2.js, because sw-v1.jsis serving the old version of index.htmlfrom its cache. You have put yourself in a position where you need to update your service worker in order to update your service worker. Ugh.
However, for the demo above I did change the service worker URL. That is so you can switch between the versions for the sake of the demo. I would not do this in production.
The service worker lifecycle is built with the user in mind, but during development it is a bit of a pain. Fortunately, there are a few tools that can help:
This is my favourite.
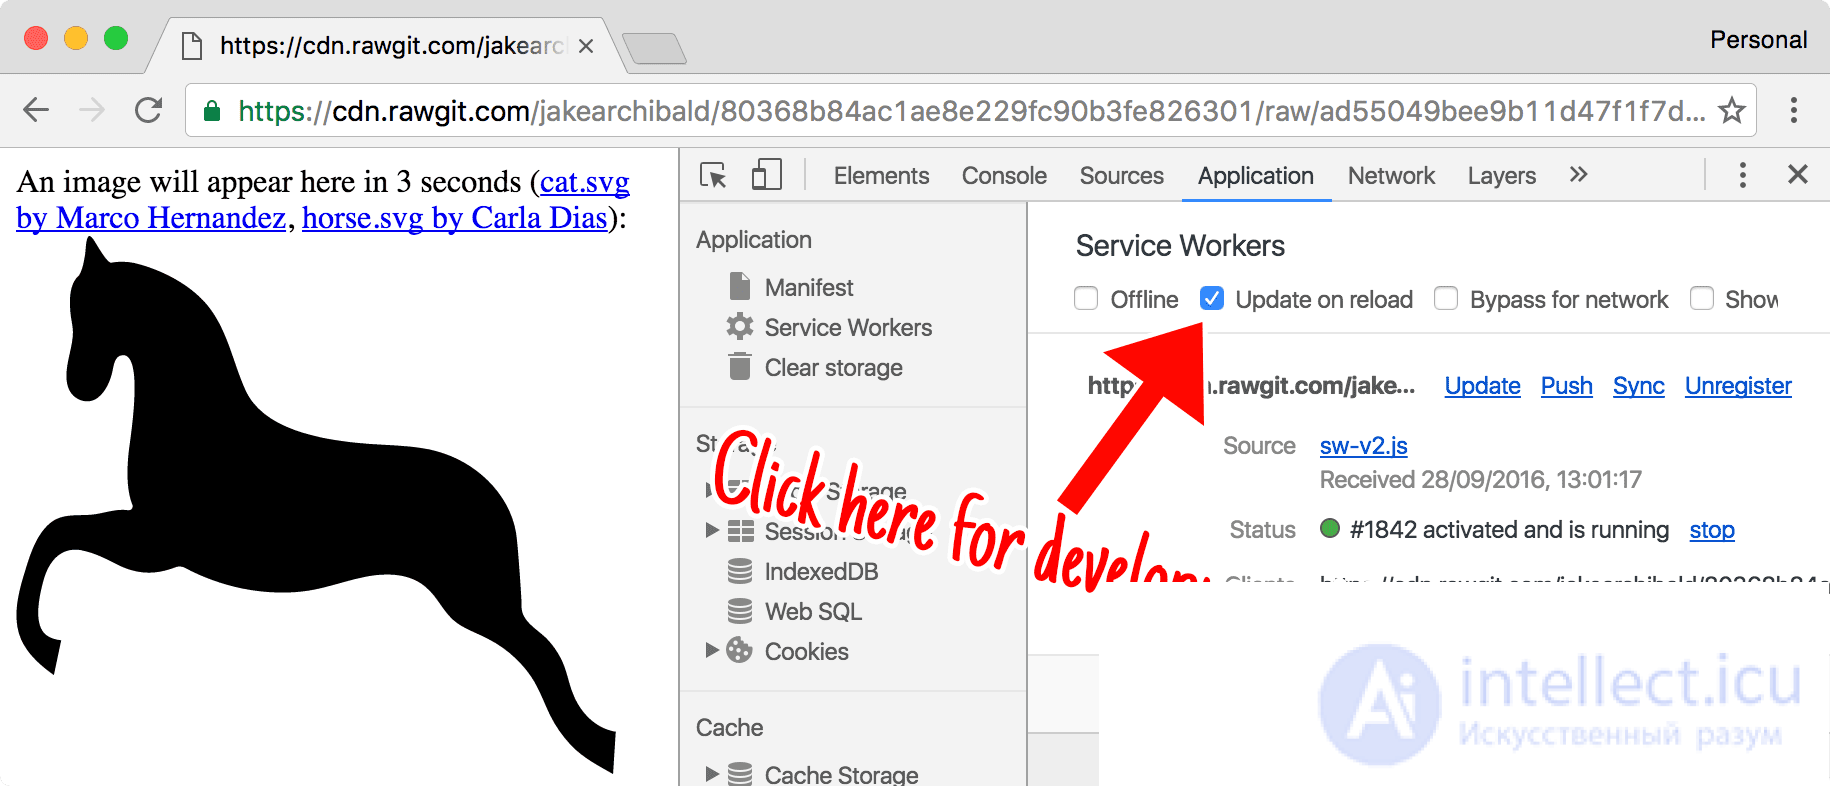
It changes the lifecycle to be more developer-friendly. Every navigation will:
installevent fires and your caches are updated.This means you get updates on every navigation (including a refresh) without having to reload twice or close the tab.
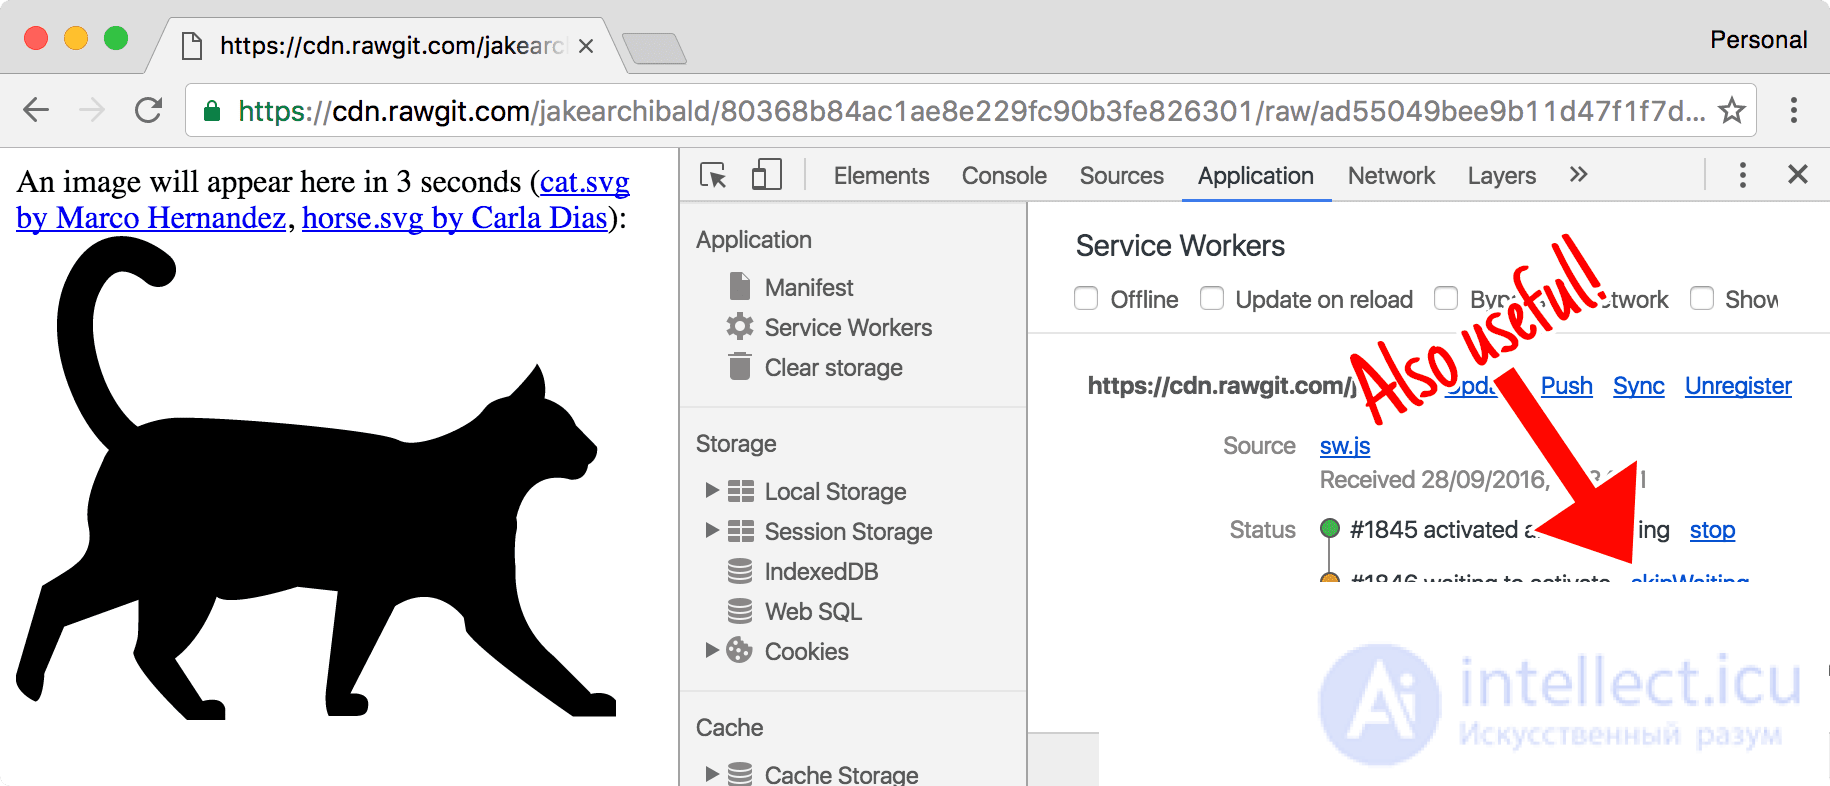
If you have a waiting worker, you can hit "skip waiting" in DevTools to promote it to active immediately.
If you force-reload the page (shift-reload), it bypasses the service worker entirely. It will be uncontrolled. This feature is in the spec, so it works in other service worker-supporting browsers.
Service worker was designed as part of the extensible web. The idea is that we, as browser developers, recognise that we are no better at web development than web developers. And so we should not provide narrow high-level APIs that solve a particular problem using patterns that we like, but should instead give you access to the browser internals and let you do it the way you want, in the way that works best for your users.
So, to enable as many patterns as possible, the whole update cycle can be observed:
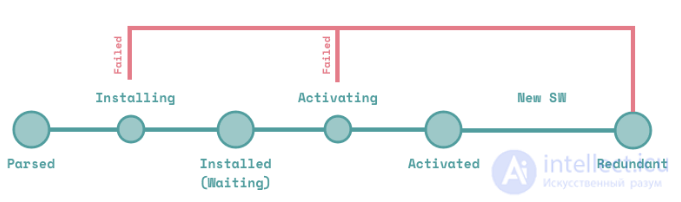
navigator.serviceWorker.register('/sw.js').then(reg => { reg.installing; // the installing worker, or undefined reg.waiting; // the waiting worker, or undefined reg.active; // the active worker, or undefined reg.addEventListener('updatefound', () => { // A wild service worker has appeared in reg.installing! const newWorker = reg.installing; newWorker.state;// "installing" - the install event has fired, but is not yet complete // "installed" - installation is complete // "activating" - the activate event has fired, but is not yet complete // "activated" - fully active // "redundant" - discarded. Either it failed to install, or the version was replaced by a newer one.newWorker.addEventListener('statechange', () => { // newWorker.state has changed }); }); }); navigator.serviceWorker.addEventListener('controllerchange', () => { // This fires when the service worker controlling this page // changes, eg a new worker has skipped waiting and become // the new active worker. });
As you can see, it pays to understand the service worker lifecycle — and with that understanding, service worker behaviour should feel more logical and less mysterious. This knowledge will give you more confidence when deploying and updating service workers.
Push Notification
In today's session we are going to learn how to use the little-known combination of Web Push + Service Workers (SW). I will talk about a way to retain your audience thanks to Web Push technology and about how it can be useful for site editorial teams and other online services.
You receive alerts in your email: you open your mail client and look at your incoming messages. In this case it is pull technology, that is, you go to the site and "pull" data from it when you need it.
With push notifications, by contrast, the resource pushes new data to you itself. And you get the very latest data straight away, because this technology has no fixed polling interval — the data arrives in real time. Pushes are not limited to delivering notifications. For instance, push technology can be used to synchronise data on update.
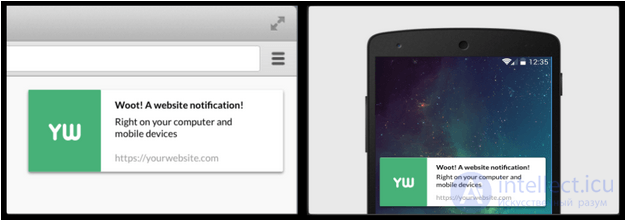
Push notifications are small pop-up windows. They can appear on any screen that has a notification area or the ability to display received data. Push notifications work even when the user has left the site. This means you can deliver messages about new material and new events in order to draw the user's attention back to your application.
Do not forget about browser support.
To write your own SW for working with Web Push you will need, as always:
All you have to do is include index.js in index.html, and that is where the sw.js file gets registered.
In server.js I will only specify the endpoint (the entry point into the server application's API) for registering push notifications.
// We use the web-push library to hide the implementation details of the communication
// between the application server and the push service.
// For more information
// see https://tools.ietf.org/html/draft-ietf-webpush-protocol
// and https://tools.ietf.org/html/draft-ietf-webpush-encryption.

var webPush = require('web-push');

// You can read more about GCM_API_KEY at
// https://developers.google.com/cloud-messaging/
webPush.setGCMAPIKey(process.env.GCM_API_KEY || null);
// In this example we will only look at routes in express.js
module.exports = function(app, route) {
  app.post(route + 'register', function(req, res) {
    res.sendStatus(201);
  });

  app.post(route + 'sendNotification', function(req, res) {
    setTimeout(function() {
      // To send a message with a payload, the subscription must have the 'auth' and 'p256dh' keys.
      webPush.sendNotification({
        endpoint: req.body.endpoint,
        TTL: req.body.ttl,
        keys: {
          p256dh: req.body.key,
          auth: req.body.authSecret
        }
      }, req.body.payload)
      .then(function() {
        res.sendStatus(201);
      })
      .catch(function(error) {
        res.sendStatus(500);
        console.log(error);
      });
    }, req.query.delay * 1000);
  });
};
In this article we will look at the different ways of sending push notifications and how they can be used. Let's get acquainted with magic outside Hogwarts together.
These simplest examples show how to send and receive strings, but data can be extracted from a push message in various formats: a string, an ArrayBuffer, a Blob or JSON.
How to use it
If all you need is push notifications, this example is for you. A message can deliver not only text, but also a payload — enriched data for the application. The code below demonstrates how you can deliver a payload to your application.
For the demonstration we use data from a text field, which will be sent to the server and then displayed as a push notification via the SW.
var endpoint;
var key;
var authSecret;

navigator.serviceWorker.register('service-worker.js')
.then(function(registration) {
  // Use the PushManager to get the user's subscription from the push service.
  return registration.pushManager.getSubscription()
  .then(function(subscription) {
    // If the subscription already exists, return it.
    if (subscription) {
      return subscription;
    }
    // Otherwise, subscribe the user.
    // userVisibleOnly is a flag indicating that the returned push subscription
    // will only be used for messages
    // whose effect is visible to the user.
    return registration.pushManager.subscribe({ userVisibleOnly: true });
  });
}).then(function(subscription) {
  // Get the public key for the user.
  var rawKey = subscription.getKey ? subscription.getKey('p256dh') : '';
  key = rawKey
      ? btoa(String.fromCharCode.apply(null, new Uint8Array(rawKey)))
      : '';
  var rawAuthSecret = subscription.getKey ? subscription.getKey('auth') : '';
  authSecret = rawAuthSecret
      ? btoa(String.fromCharCode.apply(null, new Uint8Array(rawAuthSecret)))
      : '';

  endpoint = subscription.endpoint;

  // Send the subscription details to the server using the Fetch API
  fetch('./register', {
    method: 'post',
    headers: {
      'Content-type': 'application/json'
    },
    body: JSON.stringify({
      endpoint: subscription.endpoint,
      key,
      authSecret,
    }),
  });
});

// For demonstrating the functionality.
// This code is not needed in production applications, since notifications are always generated on the server.
document.getElementById('doIt').onclick = function() {
  var payload = document.getElementById('notification-payload').value;
  var delay = document.getElementById('notification-delay').value;
  var ttl = document.getElementById('notification-ttl').value;

  fetch('./sendNotification', {
    method: 'post',
    headers: {
      'Content-type': 'application/json'
    },
    body: JSON.stringify({
      endpoint: endpoint,
      payload: payload,
      delay: delay,
      ttl: ttl,
      key: key,
      authSecret: authSecret
    }),
  });
};
// Register a function for the 'push' event
self.addEventListener('push', function(event) {
  var payload = event.data ? event.data.text() : 'Alohomora';

  event.waitUntil(
    // Show a notification with a title and a message body.
    self.registration.showNotification('My first spell', {
      body: payload,
    })
  );
});
Let's take the previous version further and add some special effects — from here on it all comes down to your wishes and imagination. The full Notification API will help us. The API provides an interface for showing "live" push notifications to the user, with a locale, a vibration pattern and an image.
How to use it
The example is similar to the one described above, but it lets you use the more advanced Notification API to choose an image, set the locale and the notification template — in other words, to make the notification unique.
// The key difference compared with Push Payload is precisely the use of
// the Notitfication API in the SW

self.addEventListener('push', function(event) {
  var payload = event.data
    // After all, this is a magical world with fantastic beasts, so
    // we are not adding try.. catch ¯\_(ツ)_/¯
    ? JSON.parse(event.data)
    : {
      name: 'Expecto patronum!',
      icon: 'buck.jpg',
      locale: 'en'
    };

  event.waitUntil(
    // Show a notification with a title and a message body.
    // Set the other parameters:
    // * language
    // * vibration pattern
    // * image
    // there are a great many parameters, which you can read about here
    // https://notifications.spec.whatwg.org/
    self.registration.showNotification('Summoning spell', {
      lang: payload.locale,
      body: payload.name,
      icon: payload.icon,
      vibrate: [500, 100, 500],
    })
  );
});
The following commands will demonstrate accumulating notifications and replacing the previous example with something more powerful. We use a tag on the notification so that old notifications are replaced by new ones. This lets you show users only the current information, or collapse several notifications into one.
How to use it
This approach suits applications that have chats or notifications about new content. The code below demonstrates how to manage the notification queue so that previous notifications can be discarded or merged into a single notification. This is useful as a fallback in case we have written a chat where messages can be edited. The client will not see a ton of notifications with corrections, just a single one.
var num = 1;

self.addEventListener('push', function(event) {
  event.waitUntil(
    // Show a notification with a title and a message body.
    // A number that increases for each notification received.
    // The tag field allows an old notification to be replaced by a new one
    // (a notification with the same tag as another will replace it)
    self.registration.showNotification('Attacking Spell', {
      body: ++num > 1 ? 'Bombarda Maxima' : 'Bombarda',
      tag: 'spell',
    })
  );
});
When the user clicks a notification generated from a push event, it will focus them on the application's tab, or even reopen it if it was closed.
How to use it
Below is the code for three use cases of notification delivery, depending on the state of the application.
It can tell whether you are on the page, or whether it needs to switch to an open tab or reopen a tab.
This approach will help you increase your application's conversion if you want to bring the user back. Just do not overdo it — users may not appreciate an application that demands too much attention.
The most classic use cases are:
In all of these cases, clicking the push will open our application for the client, or focus the already open tab.
self.addEventListener('install', function(event) {
  event.waitUntil(self.skipWaiting());
});

self.addEventListener('activate', function(event) {
  event.waitUntil(self.clients.claim());
});

self.addEventListener('push', function(event) {
  event.waitUntil(
    // Get the list of clients for the SW
    self.clients.matchAll().then(function(clientList) {
          // Check whether there is at least one focused client.
      var focused = clientList.some(function(client) {
        return client.focused;
      });

      var notificationMessage;
      if (focused) {
        notificationMessage = 'Imperio! You\'re still here, thanks!';
      } else if (clientList.length > 0) {
        notificationMessage = 'Imperio! You haven\'t closed the page, ' +
                              'click here to focus it!';
      } else {
        notificationMessage = 'Imperio! You have closed the page, ' +
                              'click here to re-open it!';
      }
      // Show a notification with the title "Unforgiveable Curses"
      // and a body that depends on the state of the SW's clients
      // (three different bodies:
      // * 1, the page is focused;
      // * 2, the page is still open, but not focused;
      // * 3, the page is closed).
      return self.registration.showNotification('Unforgiveable Curses', {
        body: notificationMessage,
      });
    })
  );
});

// Register a handler for the 'notificationclick' event.
self.addEventListener('notificationclick', function(event) {
  event.waitUntil(
    // Get the list of SW clients.
    self.clients.matchAll().then(function(clientList) {
      // If there is at least one client, focus it.
      if (clientList.length > 0) {
        return clientList[0].focus();
      }
      // Otherwise open a new page.
      return self.clients.openWindow('our/url/page');
    })
  );
});
It is time to take possession of our users' minds . Users call it "telepathy" or mind reading, but we will do it differently. Let's learn how to place our information and make them attach themselves to our application. This example shows how to use push notifications with subscription management, letting users subscribe to the application and stay in touch with it.
How to use it
Once the SW is registered, the client checks whether it is subscribed to the notification service. The button text is set accordingly.
After a successful subscription (index.js::pushManager.subscribe) the client sends a post request to the application server to register the subscription.
The server periodically sends a notification using the web-push library to all registered endpoints. If an endpoint is no longer registered (the subscription has expired or been cancelled), the current subscription is removed from the list of subscriptions.
After a successful unsubscribe (index.js::pushSubscription.unsubscribe) the client sends a post request to the application server to unregister the subscription. The server stops sending notifications. The SW also watches for pushsubscriptionchange events and resubscribes.
A subscription can be cancelled by the user outside the page, in the browser settings or the notification UI. In that case the backend will stop sending notifications, but the frontend will not know about it. For the magic to work, it is important to check periodically whether the registration with the notification service is still active.
// For simplicity we will use a button.
// In a production version it is better to use events.
var subscriptionButton = document.getElementById('subscriptionButton');

// Since the subscription object is needed in several places, let's create a method
// that returns a Promise.
function getSubscription() {
  return navigator.serviceWorker.ready
    .then(function(registration) {
      return registration.pushManager.getSubscription();
    });
}

if ('serviceWorker' in navigator) {
  navigator.serviceWorker.register('service-worker.js')
    .then(function() {
      console.log('SW registered');
      subscriptionButton.removeAttribute('disabled');
    });
  getSubscription()
    .then(function(subscription) {
      if (subscription) {
        console.log('Already invaded', subscription.endpoint);
        setUnsubscribeButton();
      } else {
        setSubscribeButton();
      }
    });
}

// Get the "registration" from the SW and create a new
// subscription using `registration.pushManager.subscribe`.
// Then register the new subscription by sending a POST request.
function subscribe() {
  navigator.serviceWorker.ready.then(function(registration) {
    return registration.pushManager.subscribe({ userVisibleOnly: true });
  }).then(function(subscription) {
    console.log('Legilimens!', subscription.endpoint);
    return fetch('register', {
      method: 'post',
      headers: {
        'Content-type': 'application/json'
      },
      body: JSON.stringify({
        endpoint: subscription.endpoint
      })
    });
  }).then(setUnsubscribeButton);
}

// Get the existing subscription from the SW,
// unsubscribe (`subscription.unsubscribe ()`) and
// unregister on the server with a POST request
// to stop push messages being sent.
function unsubscribe() {
  getSubscription().then(function(subscription) {
    return subscription.unsubscribe()
      .then(function() {
        console.log('Unsubscribed', subscription.endpoint);
        return fetch('unregister', {
          method: 'post',
          headers: {
продолжение следует...
Часть 1 The service worker lifecycle: using the cache and receiving push notifications
Часть 2 example Embedded fallback - The service worker lifecycle: using the

Comments