Lecture
Lecture questions:
1. Types of scales
2. Preferred numbers
and their meaning
3. The ratio between
qualimetric scales
4. Features of measurement
in qualimetry
1. Types of scales
Any measurement or quantification of something
or carried out using the appropriate scale.
The scale is an ordered series of marks corresponding to
the ratio of the successive values of the measured
lichin.
In qualimetry, a measurement scale is a means of adequately
cotton comparison and determination of numerical values from
individual properties and qualities of various objects. Almost use-
There are five types of qualimetric scales:
1) the scale of names;
2) the scale of the order;
3) scale of intervals;
4) scale of relationships;
5) the scale of absolute values.
1. Scale names. In cases where several
unknown sizes must be compared with one and
divide, which of them are equal to the size chosen for the base compared to
and which are not, then use the so-called scale
naming. On the scale of names classify sizes
on the basis of equivalence, identity, equality. Measurement
is to determine the sameness (equality) or different
of any size (inequality) of a size from a pre-determined
value.
Mathematical expression of the essence of measurement on a scale
titles can be written as:
Qi = or <> or ≠ Q j ,
where Q i is the size with which it is compared (base size);
Qj - j-th of compared sizes (j = 1, 2, 3, ... n);
n is the number of compared sizes.
When comparing and measuring sizes according to the scale of
The following conclusions can be drawn: fit - not fit;
fit - not fit; corresponds - does not correspond, etc.
Thus, for example, perform the calibration of
lei machines and other products at the enterprises-manufacturers
products, at the entrance control, as well as in some other cases.
2. Scale order. Order scale is consistent
a series of values giving a systematic view of
the simplest ratios of sizes of compared sizes
properties, attributes or qualities in the whole evaluated objects.
By pairwise comparison of all measured dimensions
establish which size is larger or smaller than another
better or worse than the other.
The established ratios of sizes are ranked in
a row of increase or decrease (decrease) of their values. Half
The ranked value resulting from the ranking is the scale
order of increasing or decreasing sequence.
Criteria for evaluation:
"The same or not"
"More or
less, which is better and which is worse.
Mathematical expression of the relations in pairs
available sizes are Q i = or ≠ or <> Q j
An example of the construction of scales of order may be.
Suppose there are five unknown sizes: Q 1, Q 2,
Q3, Q4, Q5. When pairwise matching is determined that:
1) Q 1 < Q 2 < Q 3 < Q 4 < Q 5 - the scale of increasing order;
2) Q 5> Q 4> Q 3> Q 2> Q 1 is a scale of decreasing order.
The ordinal number of the location Q in the order of
called rank
In order to increase the reliability and objectivity of measurements
rhenium ranking method is often introduced into the order scale
graded reference points, with the help of which
determined by the rank or also the dimensionless score measured
quantities. This scale is called the reference scale of order.
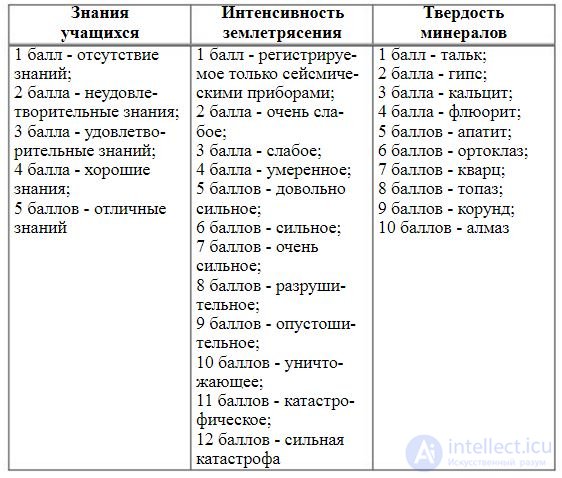
(tab. 1).
Table 1
Examples of reference scales of order and their measurements

The lack of measurements on scales of order can be considered
that the results obtained in the form of a ranked series are
less informative. In particular, with this measurement there is no
can determine how much more than one size
beyond the other, better or worse than the other. However advantage
measurements using order scales is that
with their help, instrumentally not measurable quantities yet
can be quantified (measured). Scale analysis
ka allows for some logical conclusions.
For example, if it is known that Q 1> Q 2, a Q 2> Q 3, then Q 1> Q 3.
3. Scale spacing. In many cases there is no possibility
measure the sizes themselves observable sizes but maybe
(or there is a need) to measure only the differences
between knowable size comparisons. In this case,
uses the so-called scale of intervals.
Differences are recorded on the measuring scale of intervals
comparable sizes. Mathematical Comparison
between two homogeneous sizes by their difference has
type: Δ Q i , j = Q i - Q j .
On the scale of intervals, determine such ratios of
measures like: equals (=), not equal (≠), greater than (>), less than (<), sum
(+) difference (-).
Examples of interval scales with one reference point are
There are calendar of calendar. In the christian calendar for
the zero point of reference is the year of birth of Christ ("9T
Christianity ”).
The classic example of measurements on the scale of intervals
with two reference points is to measure temperatures by
Celsius scale. Here, the reference dimensions are taken as
Freezing (melting ice) and boiling clean water. IN-
the interval between these temperatures is divided into 100 equal parts
tey One part, taken as a unit of temperature,
was called a degree. The Celsius scale is unlimited
travels outside the temperature range of 0 100 ° C, provided that
Any temperatures are measured by units equal to
1/100 part of the temperature range from freezing to boiling
water.
4. Scale of relations. In order to determine not only
by how much, but how many times one size is larger or smaller
other, or quantify the size of the size in official
units of measurement, it is necessary to use
be called a scale of relationships.
The relationship scale is the measuring scale on which
the numerical value of q i is counted. like a math
ratio of the measured size Q i . to another famous
size taken as a unit of measurement [ Q ].
In qualimetry it is considered that “any measurement on a scale
relationship involves comparing an unknown size with
the expression of the first through the second in a multiple or long
Mr. respect. " Mathematical record of measurement on a scale
relationship is:
Qi
qi = -----
[ Q ]
where i = 1, 2, 3, n is the number of the size being measured.
The scale of relations is a scale of intervals in which the
the zero element is divided - the origin, as well as the size (mass
headquarters) units of measurement [ Q ].
According to the scale of relations, such values of
matching sizes, like: equal (=), not equal (≠), greater than (>), less
(<), sum (+), size difference (-), multiplication (x), division (÷).
The scale of relationships is most appropriate for measurement.
most quality indicators, especially for such numerical
characteristics, as the geometric dimensions of objects, their
density, force, voltage, oscillation frequency and other.
5. Scale of absolute values. In many cases,
I measure the value of something. For example, directly
counted the number of defects in the product, the number of units
produced products how many students are present at
lectures, number of years lived, etc. etc. With such measurements
Absolute quantities are marked on the measuring scale.
actual values of the measured. Such a scale of absolute values
it has the same properties as the relationship scale,
with the only difference that the values indicated on this scale,
have absolute, not relative values.
2. Preferred numbers and their meaning
Usage based measuring scales
series of preferred numbers, usually metric
scales of intervals or absolute values, calculated,
for example, tolerance units of measured linear dimensions
or qualifications.
Preferred are the numbers most often used.
used in engineering, technology, science and other fields
activities of people. Preferred numbers are co
fight a certain set of interrelated numbers (a series of numbers),
which possess a systematizing property that allows
use them when choosing, assigning and measuring dimensions
various sizes. Most often, mathematical expressions are due
changing states have the form of a simple arithmetic (
neural) or geometric (non-linear) progression.
Since the decimal number counting system is accepted everywhere,
beginning with a unit, then the most convenient are geometric
cue progression including number 1 and having

multiple 10. International Organization for Standardization (ISO)
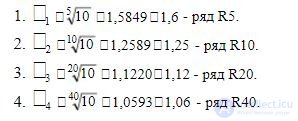
established (Recommendation P ISO 497) four major decade
number of preferred numbers with such denominators

In certain justified cases it is allowed to use
higher order series.
It should be noted that the established ISO series
significant numbers are based not only on the decimal system
accounts, but also on the principle of optimal ratios, which is
Alized, for example, in the "golden section". Under the "golden section
they understand the rectangle with sides a and b , which are correspondingly
rush among themselves as:

Based on the rule of the “golden section” in the 19th century, French
sky mechanical engineer Charles Renard proposed to unify
cable diameters (thickness) for balloons and sailing fleet
according to the law of geometric progression. Only many years later,
in the middle of the XX century, in order to ensure unity in the application
geometric progression for rationing geometric
parameters of technical products and their control of the accuracy of
The position of S. Renard was adopted and implemented through the requirements of
national (state) and international standards
Commodity products.
The series of preferred numbers are used to set
of the unified sizes of drills, cutters, reamers, countersinks
ditch and other tools, as well as sizes and tolerances
(deviations) of machine parts, products in general, technical
rammeters (properties) of products, percentage of defects in batches
products, voltages of electric current, but
minal values of the electromagnetic wavelengths of radio broadcasting
body ranges, etc.
Therefore, it is not by chance that the numbers of the nominal values of radio
broadcasting bands and carrying capacity of railway
P tanks have similar values, such as:
→ 80 m, 63 m, 49 m, 41 m, 31 m, 25 m, 19 m, 16 m, 12 m,
10 m;
P 80 t, 63 t, 50 t, 40 t, 32 t, 25 t, 20 t, 16 t, 12 t, 10 t.
Preferred numbers of geometric progressions are
are used, in particular, in qualimetry to establish great
the rank of the weight (significance) coefficients of individual indicators
quality lei, with the graduation of measures, with the division of the range
at intervals (formation of measurement scales), etc.
It is known that the nominal linear dimensions (diameters,
lengths, depths, distances between axes, etc.) of products, their parts
individual parts and connections as required
standards are set equal to the preferred number
Llamas of one or another row R. These nominal sizes are
base, in relation to which the tolerances are assigned
resolved deviations. Actual deviations must be in
tolerances, and this estimates the accuracy of the manufactured
products.
Graduation tolerances implemented in the form of a set of classes
or degrees of accuracy. The degree of accuracy is understood to be
Bathiness of tolerances corresponding to one relative
level of accuracy for a certain number of nominal
sizes. The degree of accuracy of the geometric dimensions (
tolerance value expressed in micrometers) for
The specified number of nominal sizes is called
qualification and denoted by the letters IT - short for words
ISO Tolerance (ISO tolerance).
Qualification is understood as a set of tolerances,
being measured by constant relative accuracy for all nominal
the size of the set range. In other words, qua
Litet - the characteristic of the accuracy of the product (for example
measures, details) defining the appropriate methods and means
processing and quality control processing. Unified system
tolerances and landings (ESAP), based on a system of tolerances
ISO, for sizes from 1 to 10 000 mm, 19 qualities are set.
Designations of a consistent series of qualifications, in order of
The tolerance for the nominal size is: IT01, ITO, IT1,
IT2, IT3 ... IT17.
3. The ratio between
qualimetric scales
Characteristics, parameters or quality characteristics
objects, measured on a scale of names or on a scale of
Rows are qualitative, i.e. not determined by their use.
muddy magnitude and the magnitude of the differences between them.
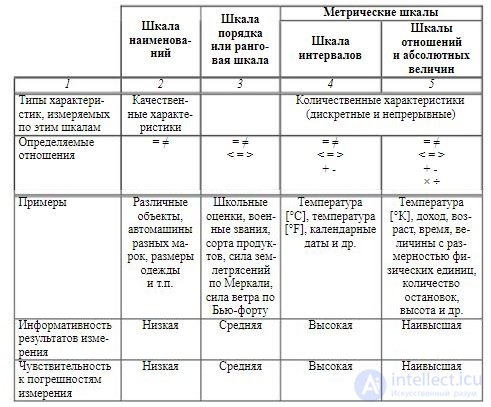
Qualimetric scales and types of characteristics measured by them
Quality marks are given in Table. 2
table 2
Qualimetric scales and types of quality characteristics

If according to the results of a comparative analysis (Table 2)
rank qualimetric scales by their functional
opportunities, we’ll probably get the next ordinal
a series of decreasing their significance (quality) (Fig. 2):

Fig. 2. Order of decreasing significance qualimetric scales
However, each of the qualimetric scales has its own
their field of application, and therefore they are often not
mozamenyaemy when solving a particular measurement problem
4. Features of measurement in qualimetry
Any measuring scale must have a corresponding
General gradation - division, intervals. This is necessary in order
that on the scale of measurements it was possible to fix the
measurement result and remove the count of the obtained value. Right-
fine scale gradation increases accuracy
measurements. When constructing measuring scales use
gradations of arithmetic or geometric progression, log
rhymic scale or scale of exponential distribution
as well as the scales of the probability distribution of the measured
quantities, such as scales of normal distribution,
Punch, Bernoulli or other grades convenient for measurements
Dation
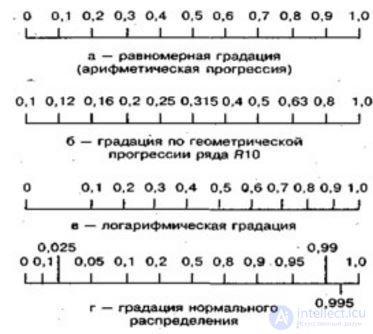
Since the quality level and many private (single) ha-
Characteristics (indicators) of quality have values in the range
from zero to one, some of these are most commonly used.
The scales used are given in fig. 3

Fig. 3. Types of gradation of measuring scales
To ensure the accuracy of measurements and evaluation in
It is recommended to use combinations of different types of
within the same scale, or change the frequency and scale of the
increasing it near the limit values of the measured
sizes (Fig. 4).

Fig. 4. Scale model with combined gradation
Thus, the choice of scale for measuring quality or
individual properties of objects, as well as its graduation depend on
the nature of the object, from the goals and objectives of the measurements, from the
methods and measuring instruments, from accuracy requirements and from other
specific conditions of qualimetric research.
Measurement - Acquisition by Means
the numerical value of the size characterizing one or
how many properties of an object (object, process, phenomenon) and satisfaction
meeting the requirement of uniformity of measurements.
The term “measurement” is often referred to as a tool procedure.
mental determination of absolute or specific values
(relative) numerical characteristics of individual properties.
Length, weight, time, etc. well defined numerically. But
comfort, intelligence and other properties do not possess sufficient
a certainty to be measured, and therefore
they are rated. Evaluation differs from measuring more
uncertainty of the result.
Determination of the values of the measured properties
mine is not instrumental, called evaluation.
All types of measurements are divided according to the methods of obtaining
results for groups: direct, indirect, cumulative and joint.
Straight lines are measurements, the result of which is semi-
directly from the experimental data. For example, measuring
air temperature with a thermometer, electric current
ka ammeter, time lapse stopwatch.
Indirect measurements are those in which the desired
the value is not directly measured, but its value is found
based on the known relationship between this value and
values obtained as a result of direct measurements. When-
measure is the determination of the volume of the body according to the results of its direct
linear measurements of linear dimensions. The result of indirect
measurement is, for example, the material strength:
σ p = Fmax / F
where Fmax is the breaking force;
Fo is the cross-sectional area of the sample before it is tested on
gap.
Aggregate measurements are measurements of several
native values in their various combinations, the values of which
determined by solving a system of relevant equations.
In this case, the required size value is obtained by comparing
the comparison of the measured values with the known. Example
is the determination of the masses of individual bodies when the mass is known
one of them.
Joint measurements - simultaneous measurements of two
or several non-uniform values, to establish the dependence
between them. For example, based on two simultaneous
measurements (temperature and size) determine the
linear expansion of solids. Also joint
measurements determine the rate of change of something.
Depending on the principles and means used
measures are divided into methods of direct assessment and
Toda comparison. The method of direct reference is called
the method by which the measured quantity is determined directly
without any additional actions and without calculating
leny, by counting or removing the indicator from the measuring
device (tool). The comparison method is a measurement method
the measured value is compared to the known
base or reference value, i.e. with measure. Results of measurement
rhenium is expressed in natural units or in
dimensional units.
The method of comparison with the measure is divided into the following:
1. The opposition method , or the null method, is
method of comparison of the measured value with the measure, in which the
the measured quantity is balanced by the corresponding dimensional
by size. An example of such a measurement method is to determine
body weight on a scale of arms or measurement of electrical
go resistance with a balancing bridge.
2. The difference method is also a method of comparison with a measure,
but at which the difference between the measured value is determined
known value, reproducible measure. With diff
partial measurement method, an incomplete
raising the measurand, and this is the difference
differential method from zero.
3. Нулевой метод - в этом случае разность доводят до нуля,
как, например, при балансировке измерительного моста.
4. Метод замещения - это метод сравнения с мерой, при
котором измеряемая величина Qx заменяется известной величи-
ной Qo . Величина Qo легко воспроизводима мерой [ Q ]. Измеряе-
мая величина соответствует известной величине, т.е. Qx = Qo .
Примером такого измерения является взвешивание тел на отта-
рированных (с указателем веса) пружинных весах. Здесь вес из-
меряемой массы замещает вес тарировочных (известных) грузов.
Измерения классифицируют по различным признакам:
по точности измерений, по числу измерений в серии, по отноше-
нию к изменению измеряемой величины, по назначению, по фор-
ме выражения результата измерений и т.д.
Равноточные измерения - измерения с равной точностью
определения измеряемой величины, выполняемые одинаковыми
по точности средствами в одних и тех же условиях.
Неравноточные измерения - это ряд измерений какого-
либо размера, выполненных различными по точности средствами
измерений и (или) в разных условиях.
Однократное измерение - измерение, выполненное один раз.
Многократное измерение - измерение одного и того же
размера, результат которого получают из нескольких последова-
тельных измерений, т.е. это измерение, состоящее из ряда одно-
кратных измерений.
Статическое измерение - это измерение, когда измеримая
величина принимается, в соответствии с условиями измерительной
задачи, за неизменную на протяжении времени измерения.
Динамическое измерение - определение изменяющейся с
течением времени величины размера. Такое изменение размера
измеряемой величины требует фиксации момента времени.
Физико-технические или технические измерения - измере-
ния при использовании единиц физических величин.
Социально-экономические измерения
- это определения
(оценивания) показателей, относящихся к социальным и эконо-
мическим субъектам и процессам.
Метрологические измерения - измерения с помощью этало-
нов и образцовых средств измерений, рабочих единиц физичес-
ких величин для передачи их размера технические средствам из-
мерений, а также поверочные измерения для определения
погрешностей измерительных средств.
Абсолютное или фундаментальное измерение - это прямое
измерение одной или нескольких физических размеров свойств
с использованием основных натуральных единиц измерений и
(или) значений физических констант.
Относительное измерение - измерение отношения изме-
ряемой величины к одноименной величине, играющей роль еди-
ницы измерения, или измерения изменяемой величины по от-
ношению к одноименной величине, принимаемой за исходную
(эталонную, базовую).
Несмотря на значительное количество различных методов из-
мерения очень важным является соблюдение принципа единства.
Под единством измерений понимается такое их осуществ-
ление, которое обеспечивает достоверность и сопоставимость
результатов однородных измерений, а значения измеряемых ве-
личин при этом выражаются в узаконенных и общепринятых
единицах. Вся общественная практика деятельности людей и
особенно их познавательный процесс требуют одинаковости,
единства сходных по сути измерений. Поэтому возникали раз-
личные единицы измерений - меры.
Первая международная Генеральная конференция по мерам
и весам (ГКМВ) состоялась в 1889 г. На этом форуме Россия по-
лучила два эталона метра из платино-иридиевого сплава. Length
1 метр на эталонах отмечалась штрихами.
Последний Закон «Об обеспечении единства измерений»
был принят в нашей стране 27 апреля 1993 г. Этот Закон Россий-
ской Федерации устанавливает правовые основы обеспечения
единства измерений в Российской Федерации, регулирует отно-
шения государственных органов управления Российской Федера-
ции с юридическими и физическими лицами по вопросам изго-
товления, выпуска, эксплуатации, ремонта, продажи и импорта
средств измерений и направлен на защиту прав и законных инте-
of citizens, the established legal order and the economy of Russia
the Russian Federation from the negative effects of inadequate
measurement results
Comments
To leave a comment
Qualimetry reliability and quality
Terms: Qualimetry reliability and quality