
Lecture
A PHP web framework is a set of classes that helps you develop web applications. Symfony is an open source MVC framework for fast, modern web application development. Symfony is a full-stack web framework. It contains a set of reusable PHP components. You can use any Symfony component in your applications regardless of the platform.
Symfony has an enormous number of features and an active community. It has flexible configuration using YAML, XML, or annotations. Symfony integrates with independent libraries and PHP modules. Symfony was mainly inspired by the Ruby on Rails, Django, and Spring web application frameworks. Symfony components are used in many open source projects, including Composer, Drupal, and phpBB.
The Symfony framework consists of several components, such as the HttpFoundation component, which understands HTTP and provides a good request and response object used by other components. Others are simply helper components, such as Validator, which helps validate data. The Kernel component is the heart of the system. The kernel is basically the “core class” that manages the environment and is responsible for handling the http request.
Symfony's well-organized structure, clean code, and good programming practices make web development easier. Symfony is very flexible and is used to build micro-sites as well as to handle enterprise applications with billions of connections.
Symfony is designed to optimize the development of web applications and extends its capabilities with every release.
Some of the characteristic features of the Symfony Framework are as follows:
Symfony offers developers great flexibility. It has excellent capabilities for debugging, code readability, and developing extensible applications.
Symfony is a full-stack web framework; it is a very efficient tool for building web applications. Numerous companies offer Symfony services to their clients.
Below are some of the advantages you get by using the Symfony Framework.
Micro-framework — Symfony can be used to develop a specific piece of functionality. You don't need to rebuild or install the entire framework.
Reduces development time.
A very mature template engine that delivers content to users quickly.
Compatibility and extensibility — Programmers can easily extend all the framework's classes.
Micro-framework — Symfony can be used to develop a specific piece of functionality. You don't need to rebuild or install the entire framework.
Reduces development time.
A very mature template engine that delivers content to users quickly.
Compatibility and extensibility — Programmers can easily extend all the framework's classes.
Symfony components can be used as part of other applications, such as Drupal, Laravel, phpBB, Behat, Doctrine, and Joomla.
Drupal 8 — Drupal is an open source PHP framework for content management. Drupal 8 uses Symfony's core layers and extends them to provide support for Drupal modules.
Thelia — Thelia is an e-commerce solution based on Symfony. Thelia was originally written in plain PHP code and MySQL, but it fell behind in building faster applications. To overcome this shortcoming, Thelia integrated with Symfony to develop customizable applications.
Dailymotion — Dailymotion is one of the largest independent video-entertainment sites in the world, based in France. As soon as they decided to move their open source environment to a larger community, Dailymotion's developers decided to use Symfony's component features for its flexibility.
Drupal 8 — Drupal is an open source PHP framework for content management. Drupal 8 uses Symfony's core layers and extends them to provide support for Drupal modules.
Thelia — Thelia is an e-commerce solution based on Symfony. Thelia was originally written in plain PHP code and MySQL, but it fell behind in building faster applications. To overcome this shortcoming, Thelia integrated with Symfony to develop customizable applications.
Dailymotion — Dailymotion is one of the largest independent video-entertainment sites in the world, based in France. As soon as they decided to move their open source environment to a larger community, Dailymotion's developers decided to use Symfony's component features for its flexibility.
This chapter explains how to install the Symfony Framework on your computer. Installing the Symfony framework is very simple and easy. You have two methods for creating applications in the Symfony environment. The first method is to use the Symfony Installer, an application for creating a project in the Symfony environment. The second method is a Composer-based installation. Let's look at each of these methods in detail in the following sections.
Before moving on to the installation, you need to meet the following system requirements.
For this tutorial, we will use PHP's built-in development web server.
The Symfony Installer is used to create web applications in the Symfony environment. Now let's set up the Symfony installer using the following command.
$ sudo mkdir -p /usr/local/bin
$ sudo curl -LsS https://symfony.com/installer -o /usr/local/bin/symfony
$ sudo chmod a+x /usr/local/bin/symfony
You have now installed the Symfony installer on your computer.
The following syntax is used to create a Symfony application in the latest version.
symfony new app_name
Here, app_name is the name of your new application. You can specify any name you want.
symfony new HelloWorld
After executing the above command, you will see the following response.
Downloading Symfony... 0 B/5.5 MiB ░░░░░░░░░░░ …………………………………………………………… …………………………………………………………… Preparing project...Symfony 3.2.7 was successfully installed. Now you can: * Change your current directory to /Users/../workspace/firstapp * Configure your application in app/config/parameters.yml file. * Run your application: 1. Execute the php bin/console server:run command. 2. Browse to the http://localhost:8000 URL. * Read the documentation at http://symfony.com/doc
This command creates a new directory named “firstapp/” that contains an empty project of the latest version of the Symfony framework.
If you need to install a specific version of Symfony, use the following command.
symfony new app_name 2.8
symfony new app_name 3.1
You can create Symfony applications using Composer. Hopefully, you have already installed Composer on your computer. If Composer is not installed, download and install it.
The following command is used to create a project using Composer.
$ composer create-project symfony/framework-standard-edition app_name
If you need to specify a particular version, you can specify it in the above command.
Go to the project directory and run the application using the following command.
cd HelloWorld
php bin/console server:run
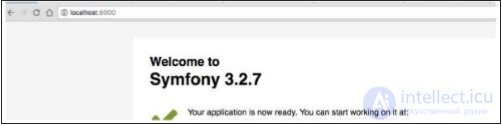
After executing the above command, open your browser and request the URL http://localhost:8000/. This gives the following result.
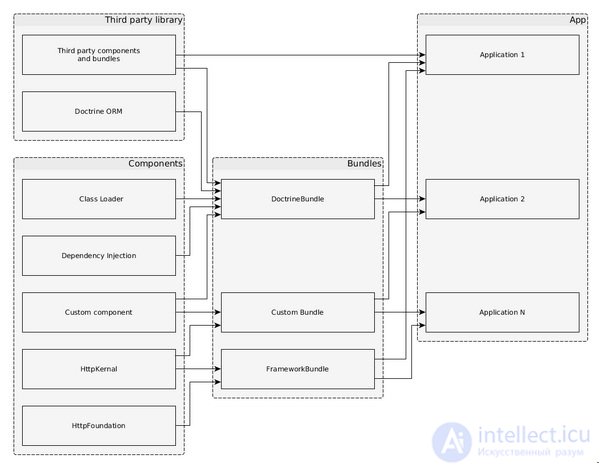
Symfony is a collection of high-quality components and bundles. Components are a set of classes that provide a single, well-defined piece of functionality. For example, the Cache component provides cache functionality that can be added to any application. Components are the building blocks of a Symfony application. Symfony has more than 30 high-quality components that are used in many PHP frameworks, such as Laravel, Silex, etc.
Bundles are similar to a plugin, but simpler to create and use. In fact, a Symfony application is itself a bundle made up of other bundles. Any number of Symfony components, as well as third-party components, can be used within a single bundle to provide features such as the web framework, database access, etc. Symfony's core web framework itself is a bundle named FrameworkBundle, and there is a bundle named FrameworkExtraBundle that provides more advanced options for writing a web application.
The relationship between components, bundles, and a Symfony application is shown in the following diagram.
Symfony is mainly designed to write quality web applications with relative ease. It provides various options for writing different types of web applications, from a simple website to advanced REST-based web services. Symfony provides the web framework in the form of separate bundles. Common bundles used in the Symfony web framework are:
The Symfony web framework is based on the Model-View-Controller (MVC) architecture. The Model represents the structure of our business entities. The View shows the model to the user in the best way depending on the situation. The Controller handles all requests from the user, does the actual work by interacting with the model, and finally provides the view with the data it needs to display to the user.
The Symfony web framework provides all the high-level functionality required for an enterprise-level application. Below is a simple workflow of a Symfony web application.
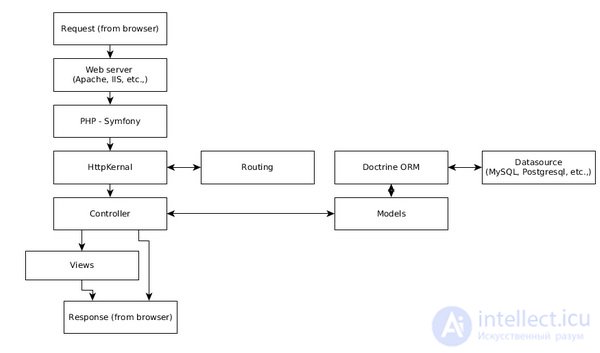
The workflow consists of the following steps.
Step 1. The user sends a request to the application through the browser, for example, http://www.symfonyexample.com/index.
Step 2 — The browser sends the request to a web server, say, an Apache web server.
Step 3 — The web server routes the request to the underlying PHP, which in turn forwards it to the Symfony web framework.
Step 4 — HttpKernel is the core component of the Symfony web framework. HttpKernel resolves the controller for the given request using the routing component and forwards the request to the target controller.
Step 5 — All the business logic takes place in the target controller.
Step 6 — The controller interacts with the model, which in turn interacts with the data source through the Doctrine ORM.
Step 7 — Once the controller finishes the process, it generates the response itself or through the View Engine and sends it back to the web server.
Step 8. Finally, the response is sent by the web server to the requesting browser.
As discussed earlier, Symfony components are a standalone PHP library that provides a specific feature that can be used in any PHP application. Useful new components are introduced in every Symfony release. Currently, the Symfony framework has more than 30 high-quality components. Let's learn about using Symfony components in this chapter.
Symfony components can be easily installed using the composer command. The following general command can be used to install any Symfony component.
cd /path/to/project/dir
composer require symfony/
Let's create a simple PHP application and try to install the Filesystem component.
Step 1 — Create a folder for the application, filesystem-example
cd /path/to/dev/folder
mdkir filesystem-example
cd filesystem-example
Step 2 — Install the Filesystem component using the following command.
composer require symfony/filesystem
Step 3 — Create a file main.php and enter the following code.
mkdir('./sample-dir');
      $fs->touch('./sample-dir/text.txt');
   } catch (IOExceptionInterface $e) {
      echo $e;
   }
?>
The first line is very important, as it loads all the required classes from all the components installed using the Composer command. The following lines use the Filesystem class.
Step 4 — Run the application using the following command, and it will create a new folder sample-dir and a file test.txt under it.
php main.php
Symfony provides components ranging from simple features, such as the filesystem, to advanced features, such as events, container technology, and dependency injection. Let's go through all the components one by one in the following sections.
The Filesystem component provides basic system commands related to files and directories, such as creating a file, creating a folder, checking whether a file exists, etc. The Filesystem component can be installed using the following command.
composer require symfony/filesystem
The Finder component provides fluent classes for finding files and directories along a given path. It provides an easy way to iterate over the files on a path. The Finder component can be installed using the following command.
composer require symfony/finder
The Console component provides various options for easily creating commands that can be executed in the terminal. Symfony makes extensive use of the Command component to provide various functionality, such as creating a new application, creating a bundle, etc. Even PHP's built-in web server can be started using the Symfony command, php bin/console server:run, as shown in the installation section. The Console component can be installed using the following command.
composer require symfony/console
Let's create a simple application, create a HelloCommand command using the Console component, and call it.
Step 1 — Create a project using the following command.
cd /path/to/project
composer require symfony/console
Step 2 — Create a file main.php and include the following code.
run();
?>
The Application class sets up the necessary functionality of a simple console application.
Step 3 — Run the application php main.php, which will give the following output.
Console Tool
Usage:
   command [options] [arguments]
Options:
   -h, --help            Display this help message
   -q, --quiet           Do not output any message
   -V, --version         Display this application version
         --ansi            Force ANSI output
         --no-ansi         Disable ANSI output
   -n, --no-interaction  Do not ask any interactive question
   -v|vv|vvv, --verbose  Increase the verbosity of messages: 1 for normal output,
      2 for more verbose output and 3 for debug
Available commands:
   help  Displays help for a command
   list  Lists commands
Step 4 — Create a class named HelloCommand that extends the Command class, in main.php itself.
use Symfony\Component\Console\Command\Command;
use Symfony\Component\Console\Input\InputInterface;
use Symfony\Component\Console\Output\OutputInterface;
use Symfony\Component\Console\Input\InputArgument;

class HelloCommand extends Command {
}
The application uses the following four classes available in the Command component.
Command — used to create a new command
InputInterface — used to set the user inputs
InputArgument — used to get the user-supplied data
OutputInterface — used to write output to the console
Command — used to create a new command
InputInterface — used to set the user inputs
InputArgument — used to get the user-supplied data
OutputInterface — used to write output to the console
Step 5 — Create the configure() function and set the name, description, and help text.
protected function configure() {
   $this
      ->setName('app:hello')
      ->setDescription('Sample command, hello')
      ->setHelp('This command is a sample command')
}
Step 6 — Create an input argument user for the command and set it as required.
protected function configure() {
   $this
      ->setName('app:hello')
      ->setDescription('Sample command, hello')
      ->setHelp('This command is a sample command')
      ->addArgument('name', InputArgument::REQUIRED, 'name of the user');
}
Step 7 — Create the execute() function with two arguments, InputArgument and OutputArgument.
protected function execute(InputInterface $input, OutputInterface $output) {
}
Step 8 — Use InputArgument to get the information entered by the user and print it to the console using OutputArgument.
protected function execute(InputInterface $input, OutputInterface $output) {
   $name = $input->getArgument('name');
   $output->writeln('Hello, ' . $name);
}
Step 9 — Register HelloCommand with the application using the add method of the Application class.
$app->add(new HelloCommand());
The complete application is as follows.
setName('app:hello')
            ->setDescription('Sample command, hello')
            ->setHelp('This command is a sample command')
            ->addArgument('name', InputArgument::REQUIRED, 'name of the user');
      }
      protected function execute(InputInterface $input, OutputInterface $output) {
         $name = $input->getArgument('name');
         $output->writeln('Hello, ' . $name);
      }
      $app = new Application();
      $app->add(new HelloCommand());
      $app->run();
   }
?>
Step 10 — Now run the application using the following command, and the result will be Hello, Jon, as expected.
php main.php app:hello Jon
Symfony ships with a pre-built binary called console in the bin directory of any Symfony web application, which can be used to invoke commands in the application.
The Process component provides options for running any system command in a subprocess in a safe and efficient way. The Process component can be installed using the following command.
composer require symfony/process
The ClassLoader component provides an implementation for the standard PSR-0 and PSR-4 class loaders. It can be used to autoload classes. It will be deprecated soon. The Composer-based class loader is preferred over this component. The ClassLoader component can be installed using the following command.
composer require symfony/class-loader
The PropertyAccess component provides various options for reading and writing object and array data using string notation. For example, a Product array with the key price can be accessed dynamically using the string [price].
$product = array(
   'name' => 'Cake'
   'price' => 10
);
var priceObj = $propertyAccesserObj->getValue($product, '[price]');
The PropertyAccess component can be installed using the following command.
composer require symfony/property-access
The PropertyInfo component is similar to the PropertyAccess component, however it works only with PHP objects and provides much more functionality.
class Product {
   private $name = 'Cake';
   private $price = 10;

   public function getName() {
      return $this->name;
   }
   public function getPrice() {
      return $this->price;
   }
}
$class = Product::class;
$properties = $propertyInfoObj->getProperties($class);
/*
   Example Result
   --------------
   array(2) {
        => string(4) "name"
        => string(5) "price"
   }
*/
The PropertyInfo component can be installed using the following command.
composer require symfony/property-info
The EventDispatcher component enables event-driven programming in PHP. It allows objects to communicate with each other by dispatching events and listening to them. We will learn to create events and listen to them in the “Events and Event Listeners” chapter.
The EventDispatcher component can be installed using the following command.
composer require symfony/event-dispatcher
The DependencyInjection component provides a simple and efficient mechanism for creating an object along with its dependency. As a project grows, it ends up with many classes with deep dependencies that must be handled correctly. Otherwise, the project will fail. DependencyInjection provides a simple and reliable container for handling dependency. We will learn about containers and the concept of dependency injection in the Service Container chapter.
The DependencyInjection component can be installed using the following command.
composer require symfony/dependency-injection
The Serializer component provides the ability to convert a PHP object into a specific format, such as XML, JSON, Binary, etc., and then allows converting it back into the original object without any loss of data.
The Serializer component can be installed using the following command.
composer require symfony/serializer
The Config component provides options for loading, parsing, reading, and validating configurations of type XML, YAML, PHP, and ini. It also provides various options for loading configuration details from a database. It is one of the important components, useful for configuring a web application in a clear and concise way. The Config component can be installed using the following command.
composer require symfony/config
The ExpressionLanguage component provides a complete expression engine. Expressions are single-line and are meant to return a value. The expression engine makes it easy to compile, parse, and get values from an expression. It allows one or more expressions to be used inside a configuration environment (file) by a non-PHP programmer, say a system administrator. The ExpressionLanguage component can be installed using the following command.
composer require symfony/expression-language
The OptionsResolver component provides a way to validate the option system used in our system. For example, database settings are placed into an array, dboption, with host, username, password, etc. as keys. You need to validate the entries before using it to connect to the database. OptionsResolver simplifies this task by providing a simple OptionsResolver class and a resolve method that resolves the database configuration and, if there are any validation issues, reports them.
$options = array( 'host' => '', 'username' => ' ', 'password' => ' ', ); $resolver = new OptionsResolver(); $resolver->setDefaults(array( 'host' => ' ', 'username' => ' ', 'password' => ' ', )); $resolved_options = $resolver->resolve($options);
The OptionsResolver component can be installed using the following command.
composer require symfony/options-resolver
The Dotenv component provides various options for parsing .env files and the variables defined in them, so that they are available via getenv(), $_ENV, or $_SERVER. The Dotenv component can be installed using the following command.
composer require symfony/dotenv
The Cache component provides an advanced PSR-6 implementation. It can be used to add caching to our web application. Since it follows PSR-6, it is easy to get started, and it can be easily used as a drop-in replacement for another PSR-6-based cache component. The Cache component can be installed using the following command.
composer require symfony/cache
The Intl component is a library replacement for the C Intl extension. The Intl component can be installed using the following command.
composer require symfony/intl
The Translation component provides various options for internationalizing our application. Usually, translation details for different languages are stored in a file, one file per language, and are loaded dynamically at application run time. There are different formats for writing the translation file. The Translation component provides various options for loading any type of format, such as plain PHP file, CSV, INI, JSON, Yaml, ICU resource file, etc. The Translation component can be installed using the following command.
composer require symfony/translation
The Workflow component provides advanced tools for handling a finite state machine. By providing this functionality in a simple and object-oriented way, the Workflow component makes it relatively easy to program in PHP. We will learn about this in detail in the Advanced Concept chapter.
The Workflow component can be installed using the following command.
composer require symfony/workflow
The Yaml component provides an option that parses the YAML file format and converts it into PHP arrays. It can also write a YAML file from a plain PHP array. The Yaml component can be installed using the following command.
composer require symfony/yaml
The Ldap component provides PHP classes for connecting to an LDAP or Active Directory server and authenticating a user against it. It provides the ability to connect to a Windows domain controller. The Ldap component can be installed using the following command.
composer require symfony/ldap
The Debug component provides various options for enabling debugging in a PHP environment. Usually, debugging PHP code is a difficult task, but the Debug component provides simple classes to simplify the debugging process and make it clean and structured. The Debug component can be installed using the following command.
composer require symfony/debug
The Stopwatch component provides the Stopwatch class for profiling our PHP code. A simple usage is as follows.
use Symfony\Component\Stopwatch\Stopwatch;
$stopwatch = new Stopwatch();
$stopwatch->start('somename');

// our code to profile
$profiled_data = $stopwatch->stop('somename');
echo $profiled_data->getPeriods()
The Stopwatch component can be installed using the following command.
composer require symfony/stopwatch
The VarDumper component provides a better dump() function. Simply include the VarDumper component and use the dump function to get enhanced functionality. The VarDumper component can be installed using the following command.
composer require symfony/var-dumper
The BrowserKit component provides an abstract client browser interface. It can be used for programmatically testing a web application. For example, it can request a form, fill in sample data, and submit it to find any issue in the form programmatically. The BrowserKit component can be installed using the following command.
composer require symfony/browser-kit
The PHPUnit Bridge component provides a lot of features for improving the PHPUnit testing environment. The PHPUnit Bridge component can be installed using the following command.
composer require symfony/phpunit-bridge
The Asset component provides common handling of assets in a web application. It generates URLs for resources such as CSS, HTML, JavaScript, and also performs versioning. We will discuss the Asset component in detail in the View Engine chapter. The Asset component can be installed using the following command.
composer require symfony/asset
The CssSelector component provides the ability to convert CSS-based selectors into an XPath expression. A web developer knows CSS-based Selector expressions better than XPath expressions, but the most efficient expression for finding an element in HTML and XML documents is an XPath expression.
CssSelector allows the developer to write the expression in CSS selectors, however, the component converts it into an XPath expression before executing it. Thus, the developer gets the benefit of the simplicity of CSS selectors and the efficiency of the XPath expression.
The CssSelector component can be installed using the following command.
composer require symfony/css-selector
The DomCrawler component provides various options for finding an element in an HTML and XML document using the DOM concept. It also provides the ability to use an XPath expression to find an element. The DomCrawler component can be used together with the CssSelector component to use CSS selectors instead of an XPath expression. The DomCrawler component can be installed using the following command.
composer require symfony/dom-crawler
The Form component makes it easy to create forms in a web application. We will study form programming in detail in the Form chapter. The Form component can be installed using the following command.
composer require symfony/form
The HttpFoundation component provides an object-oriented layer for the HTTP specification. By default, PHP exposes detailed HTTP requests and responses as array-based objects, such as $_GET, $_POST, $_FILES, $_SESSION, etc. An HTTP-based function, such as setting a cookie, can be performed using a simple setCookie() function. HttpFoundation provides all HTTP-related functionality in a small set of classes, such as Request, Response, RedirectResponse, etc. We will learn about these classes in the following chapters.
The HttpFoundation component can be installed using the following command.
composer require symfony/http-foundation
The HttpKernel component is the core component of the Symfony web setup. It provides all the functionality required for a web application — from taking in a Request object to sending out a Response object. The complete architecture of a Symfony web application is provided by HttpKernel, as described in the Symfony web framework architecture.
The HttpKernel component can be installed using the following command.
composer require symfony/http-kernel
The Routing component maps an HTTP request to a predefined set of configuration variables. Routing decides which part of our application should handle the request. We will learn more about routing in the “Routing” chapter.
The Routing component can be installed using the following command.
composer require symfony/filesystem
The Templating component provides the necessary infrastructure for building an efficient templating system. Symfony uses the Templating component to implement its View engine. We will learn more about the Templating component in the View Engine chapter.
The Templating component can be installed using the following command.
composer require symfony/templating
The Validator component provides an implementation of the JSR-303 bean validation specification. It can be used to validate a form in a web environment. We will learn more about Validator in the Validation chapter.
The Validator component can be installed using the following command.
composer require symfony/validator
The Security component provides a complete security system for our web application, whether it is basic HTTP authentication, HTTP digest authentication, interactive form-based authentication, X.509 certificate login, etc. It also provides a role-based authorization mechanism through a built-in ACL system. We will learn more about this in detail in the “Advanced Concept” chapter.
The Security component can be installed using the following command.
composer require symfony/security
In any application, objects tend to grow in number as the application grows. As the number of objects increases, the dependency between objects also increases. Object dependency must be handled correctly for a successful application.
As already discussed in the “Components” chapter, Symfony provides a simple and efficient DependencyInjection component for handling object dependency. A service container is a container of objects with the dependency between them correctly resolved. Let's learn how to use the DependencyInjection component in this chapter.
Let's create a Greeter class. The purpose of the Greeter class is to greet the user, as shown in the following example.
$greeter = new Greeter('Hi');
$greeter->greet('Jon'); // print "Hi, Jon"
The complete code of the Greeter class is as follows.
class Greeter {
   private $greetingText;

   public function __construct($greetingText) {
      $this->greetingText = $greetingText;
   }
   public function greet($name) {
      echo $this->greetingText . ", " . $name . "\r\n";
   }
}
Now let's add the Greeter class to the service container. Symfony provides ContainerBuilder for creating a new container. Once the container is created, the Greeter class can be registered with it using the container's register method.
use Symfony\Component\DependencyInjection\ContainerBuilder;
$container = new ContainerBuilder();
$container
   ->register('greeter', 'Greeter')
   ->addArgument('Hi');
Here, we used a static argument to specify the greeting text, Hi. Symfony also provides dynamic configuration of parameters. To use a dynamic parameter, we need to choose a name and enclose it between %, and the parameter can be set using the container's setParameter method.
$container = new ContainerBuilder();
$container
   ->register('greeter', 'Greeter')
   ->addArgument('%greeter.text%');
$container->setParameter('greeter.text', 'Hi');
We have registered the Greeter class with the correct configuration. Now we can ask the container to provide a correctly configured Greeter object using the container's get method.
$greeter = $container->get('greeter');
$greeter->greet('Jon'); // prints "Hi, Jon"
We have successfully registered the class, added it to the container, retrieved it from the container, and used it. Now let's create another class User that uses the Greeter class and see how to register it.
class User {
   private $greeter;
   public $name;
   public $age;

   public function setGreeter(\Greeter $greeter) {
      $this->greeter = $greeter;
   }
   public function greet() {
      $this->greeter->greet($this->name);
   }
}
The User class obtains the Greeter class using one of its setter methods, setGreeter. For this scenario, Symfony provides the addMethodCall method and the Reference class for referring to another class, as shown in the following code.
use Symfony\Component\DependencyInjection\Reference;
$container
   ->register('user', 'User')
   ->addMethodCall('setGreeter', array(new Reference('greeter')));
Finally, we have registered two classes, Greeter and User, having a close relationship between them. Now we can safely retrieve the User object with a correctly configured Greeter class from the container, as shown in the following code.
$container->setParameter('greeter.text', 'Hi');
$user = $container->get('user');
$user->name = "Jon";
$user->age = 20;
$user->greet(); // Prints "Hi, Jon"
We have seen how to configure an object in the container using plain PHP itself. Symfony provides other mechanisms as well. These are XML and YAML configuration files. Let's see how to configure the container using YAML. For this, install the symfony / config and symfony / yaml components along with the symfony / dependency -jection components.
cd /path/to/dir
mkdir dependency-injection-example
cd dependency-injection-example
composer require symfony/dependency-injection
composer require symfony/config
composer require symfony/yaml
The YAML configuration will be written in a separate file services.yml. The YAML configuration consists of two sections, parameters and services. The Parameters section defines all the required parameters. The Services section defines all the objects. The services section is further divided into several sections, namely: class, arguments, and calls. Class specifies the actual class. Arguments define the constructor arguments. Finally, calls define the setter methods. Another class can be referenced using the @ symbol, @greeter.
parameters:
   greeter.text: 'Hello'
services:
   greeter:
      class: Greeter
      arguments: ['%greeter.text%']
   user:
      class: User
      calls:
         - [setGreeter, ['@greeter']]
Now services.yml can be loaded and configured using FileLoader and YamlFileLoader, as shown in the following code.
use Symfony\Component\Config\FileLocator;
use Symfony\Component\DependencyInjection\Loader\YamlFileLoader;

$yamlContainer = new ContainerBuilder();
$loader = new YamlFileLoader($yamlContainer, new FileLocator(__DIR__));
$loader->load('services.yml');

$yamlUser = $yamlContainer->get('user');
$yamlUser->name = "Jon";
$yamlUser->age = 25;
$yamlUser->greet();
The complete code listing is as follows.
greetingText = $greetingText;
      }
      public function greet($name) {
         echo $this->greetingText . ", " . $name . "\r\n";
      }
   }
   class User {
      private $greeter;
      public $name;
      public $age;

      public function setGreeter(\Greeter $greeter) {
         $this->greeter = $greeter;
      }
      public function greet() {
         $this->greeter->greet($this->name);
      }
   }
   $container = new ContainerBuilder();
   $container
      ->register('greeter', 'Greeter')
      ->addArgument('%greeter.text%');
   $container
      ->register('user', 'User')
      ->addMethodCall('setGreeter', array(new Reference('greeter')));

   $container->setParameter('greeter.text', 'Hi');
   $greeter = $container->get('greeter');
   $greeter->greet('Jon');

   $user = $container->get('user');
   $user->name = "Jon";
   $user->age = 20;
   $user->greet();

   $yamlContainer = new ContainerBuilder();
   $loader = new YamlFileLoader($yamlContainer, new FileLocator(__DIR__));
   $loader->load('services.yml');

   $yamlHello = $yamlContainer->get('greeter');
   $yamlHello->greet('Jon');

   $yamlUser = $yamlContainer->get('user');
   $yamlUser->name = "Jon";
   $yamlUser->age = 25;
   $yamlUser->greet();
?>
parameters:
   greeter.text: 'Hello'
services:
   greeter:
      class: Greeter
      arguments: ['%greeter.text%']
   user:
      class: User
      calls:
         - [setGreeter, ['@greeter']]
The Symfony web framework makes extensive use of the dependency injection component. All the components are tied together by a centralized service container. The Symfony web framework provides the container throughout its controller via the container property. Through it, we can register any object, such as a logger, a mailer, etc.
$logger = $this->container->get('logger');
$logger->info('Hi');
To find an object registered in the container, use the following command.
cd /path/to/app
php bin/console debug:container
The welcome web application created in the installation chapter contains around 200+ objects.
Symfony provides event-driven programming through its EventDispatcher component. Any enterprise application needs event-driven programming to build a customizable application. Events are one of the primary tools objects use to interact with one another. Without events, objects cannot interact effectively.
The event-driven programming process can be summarized as follows: — an object, called the event source, asks a central dispatcher object to register an event, say, user.registered. One or more objects, called listeners, ask the central dispatcher object that they want to listen for a particular event, say, user.registered. At some point, the original Event object asks the central dispatcher object to dispatch the event, say, user.registered, along with an Event object carrying the necessary information. The central dispatcher informs all the listener objects about the event, say, user.registered, and its Event object.
In event-driven programming, we have four types of objects: the event source, the event listener, the event dispatcher, and the event itself.
Let us write a simple application to understand the concept.
Step 1 — Create a project, event-dispatcher-example .
cd /path/to/dir
mkdir event-dispatcher-example
cd event-dispatcher-example
composer require symfony/event-dispatcher
Step 2 — Create a User class.
class User {
   public $name;
   public $age;
}

$user = new User();
$user->name = "Jon";
$user->age = 25
Step 3 — Create the UserRegisteredEvent event.
use Symfony\Component\EventDispatcher\Event;
class UserRegisteredEvent extends Event {
const NAME = 'user.registered';
protected $user;
public function __construct(User $user) {
$this-
Here, UserRegisteredEvent has access to the User object. The name of the event is user.registered .
Step 4 — Create a listener, UserListener .
class UserListener {
public function onUserRegistrationAction(Event $event) {
$user = $event->getUser();
echo $user->name . "\r\n";
echo $user->age . "\r\n";
}
}
$listener = new UserListener();
Step 5 — Create the event dispatcher object.
use Symfony\Component\EventDispatcher\EventDispatcher;
$dispatcher = new EventDispatcher();
Step 6 — Connect the listener and the event using the dispatcher object and its addListener method.
$dispatcher
->addListener(
UserRegisteredEvent::NAME,
array($listener, 'onUserRegistrationAction'));
We can also add an anonymous function as an event listener, as shown in the following code.
$dispatcher
->addListener(
UserRegisteredEvent::NAME,
function(Event $event) {
$user = $event->getUser();
echo $user->name . "\r\n";
});
Step 7 — Finally, run/dispatch the event using the event dispatcher's dispatch method.
$dispatcher->dispatch(UserRegisteredEvent::NAME, $event);
The complete code listing is as follows.
main.php
user = $user;
}
public function getUser() {
return $this->user;
}
}
class UserListener {
public function onUserRegistrationAction(Event $event) {
$user = $event->getUser();
echo $user->name . "\r\n";
echo $user->age . "\r\n";
}
}
$user = new User();
$user->name = "Jon";
$user->age = 25;
$event = new UserRegisteredEvent($user);
$listener = new UserListener();
$dispatcher = new EventDispatcher();
$dispatcher
->addListener(
UserRegisteredEvent::NAME,
function(Event $event) {
$user = $event->getUser();
echo $user->name . "\r\n";
});
$dispatcher
->addListener(
UserRegisteredEvent::NAME, array($listener, 'onUserRegistrationAction'));
$dispatcher->dispatch(UserRegisteredEvent::NAME, $event);
?>
Result
Jon
Jon
25
The Symfony web framework has many events, and you can register a listener for these events and program it accordingly. One example of an event is kernel.exception, and the corresponding event is GetResponseForExceptionEvent , which contains the response object (the output of the web request). This is used to catch the exception and modify the response with generic error information, instead of showing the runtime error to the users.
Symfony — Expression
As we discussed earlier, the expression language is one of the distinguishing features of a Symfony application. The Symfony expression is mainly built for use in the configuration environment. This allows a non-programmer to configure the web application without much effort. Let us build a simple application to test the expression.
Step 1 — Create a project, expression-language-example .
cd /path/to/dir
mkdir expression-language-example
cd expression-language-example
composer require symfony/expression-language
Step 2 — Create the expression object.
use Symfony\Component\ExpressionLanguage\ExpressionLanguage;
$language = new ExpressionLanguage();
Step 3 — Test a simple expression.
echo "Evaluated Value: " . $language->evaluate('10 + 12') . "\r\n" ;
echo "Compiled Code: " . $language->compile('130 % 34') . "\r\n" ;
Step 4 — The Symfony expression is so powerful that it can also access a PHP object and its properties within the expression language.
class Product {
public $name;
public $price;
}
$product = new Product();
$product->name = 'Cake';
$product->price = 10;
echo "Product price is " . $language
->evaluate('product.price', array('product' => $product,)) . "\r\n";
echo "Is Product price higher than 5: " . $language
->evaluate('product.price > 5', array('product' => $product,)) . "\r\n";
Here, the expressions product.price and product.price> 5 traverse the price property of the $ product object and evaluate the result.
The complete code is as follows.
main.php
evaluate('10 + 12') . "\r\n" ;
echo "Compiled Code: " . $language->compile('130 % 34') . "\r\n" ;
class Product {
public $name;
public $price;
}
$product = new Product();
$product->name = 'Cake';
$product->price = 10;
echo "Product price is " . $language
->evaluate('product.price', array('product' => $product,)) . "\r\n";
echo "Is Product price higher than 5: " . $language
->evaluate('product.price > 5', array('product' => $product,)) . "\r\n";
?>
Result
Evaluated Value: 22
Compiled Code: (130 % 34)
Product price is 10
Is Product price higher than 5: 1
Symfony — Bundles
A Symfony bundle is a set of files and folders organized in a specific structure. Bundles are designed so that they can be reused across multiple applications. The core application itself is packaged as a bundle and is usually called AppBundle .
A bundle can be packaged specifically for an application, such as AdminBundle (the admin section), BlogBundle (the site blog), and so on. Such bundles cannot be shared across applications. Instead, we can model a specific part of the application, such as blogs, as a generic bundle, so that we can simply copy the bundle from one application to another application to reuse the blog functionality.
Bundle Structure
The basic structure of a bundle is as follows.
-
Controller — All the controllers should be placed here.
-
DependencyInjection — All the code and configuration related to dependency injection should be placed here.
-
Resources / config — Configurations related to the bundle are placed here.
-
Resources / view — The related view templates are placed here.
-
Resources / public — Stylesheets, JavaScript, images, etc. related to the bundle are placed here.
-
Tests — Files related to unit tests are placed here.
Controller — All the controllers should be placed here.
DependencyInjection — All the code and configuration related to dependency injection should be placed here.
Resources / config — Configurations related to the bundle are placed here.
Resources / view — The related view templates are placed here.
Resources / public — Stylesheets, JavaScript, images, etc. related to the bundle are placed here.
Tests — Files related to unit tests are placed here.
Creating a Bundle
Let us create a simple bundle, TutorialspointDemoBundle , in our HelloWorld application.
Step 1 — Choose a namespace. The bundle namespace should include the vendor name and the bundle name. In our case, this is Tutorialspoint \ DemoBundle .
Step 2 — Create an empty class, TutorialspointDemoBundle , extending the Bundle class, and place it in the src / Tutorialspoint / DemoBundle directory .
namespace Tutorialspoint\DemoBundle;
use Symfony\Component\HttpKernel\Bundle\Bundle;
class TutorialspointDemoBundle extends Bundle {
}
Step 3 — Register the class in the list of bundles supported by the application in the AppKernel class.
public function registerBundles() {
$bundles = array(
// ...
// register your bundle
new Tutorialspoint\DemoBundle\TutorialspointDemoBundle(),
);
return $bundles;
}
That is all it takes to create an empty bundle, and all the other concepts are the same as for the application. Symfony also provides the generate: bundle console command to simplify the process of creating a new bundle, which is as
продолжение следует...
Продолжение:
Часть 1 Symfony - an overview of its features with examples
Часть 2 Controller - Symfony - an overview of its features with
Часть 3 Validation Example - Symfony - an overview of its features
Часть 4 Step 1: Create the Project - Symfony - an overview

Comments