
Lecture
Angular — is everything after version two, and AngularJS — is everything before it. The architectural pattern that Angular offers is MV*/MVVM. There is no single consensus, but overall the architecture is very similar to ASP.NET Web Forms — there are components with nested components and cross-cutting functionality — a built-in IoC container for injecting services into components, and scope management. Handling of asynchronous operations is usually written with RxJS. However, it is also possible to use Angular together with the Redux state container.
To learn the basics I recommend the course “Angular 7 (formerly Angular 2) — The Complete Guide”. Also a decent guide to get started.
When working with the front end, you need to understand the nature of the tasks being solved programmatically. Interaction with the browser can be represented as a stream of events and reactions to them, as well as synchronization of different chains of events and their transformation. Reactive programming paradigms are used to solve such tasks. These paradigms are implemented in Reactive Extensions libraries for many programming languages. For JS this is RxJS. RxJS reference. On RxJS I can recommend a talk by my colleague.
From the point of view of the templating engine, Angular is quite reminiscent of the same Silverlight with data bindings.
Angular is a framework — that means a full set of development tools ships under its brand. This makes it a good choice for areas where packages that have not passed review are unacceptable — for example medicine with its specific legal requirements, or fintech
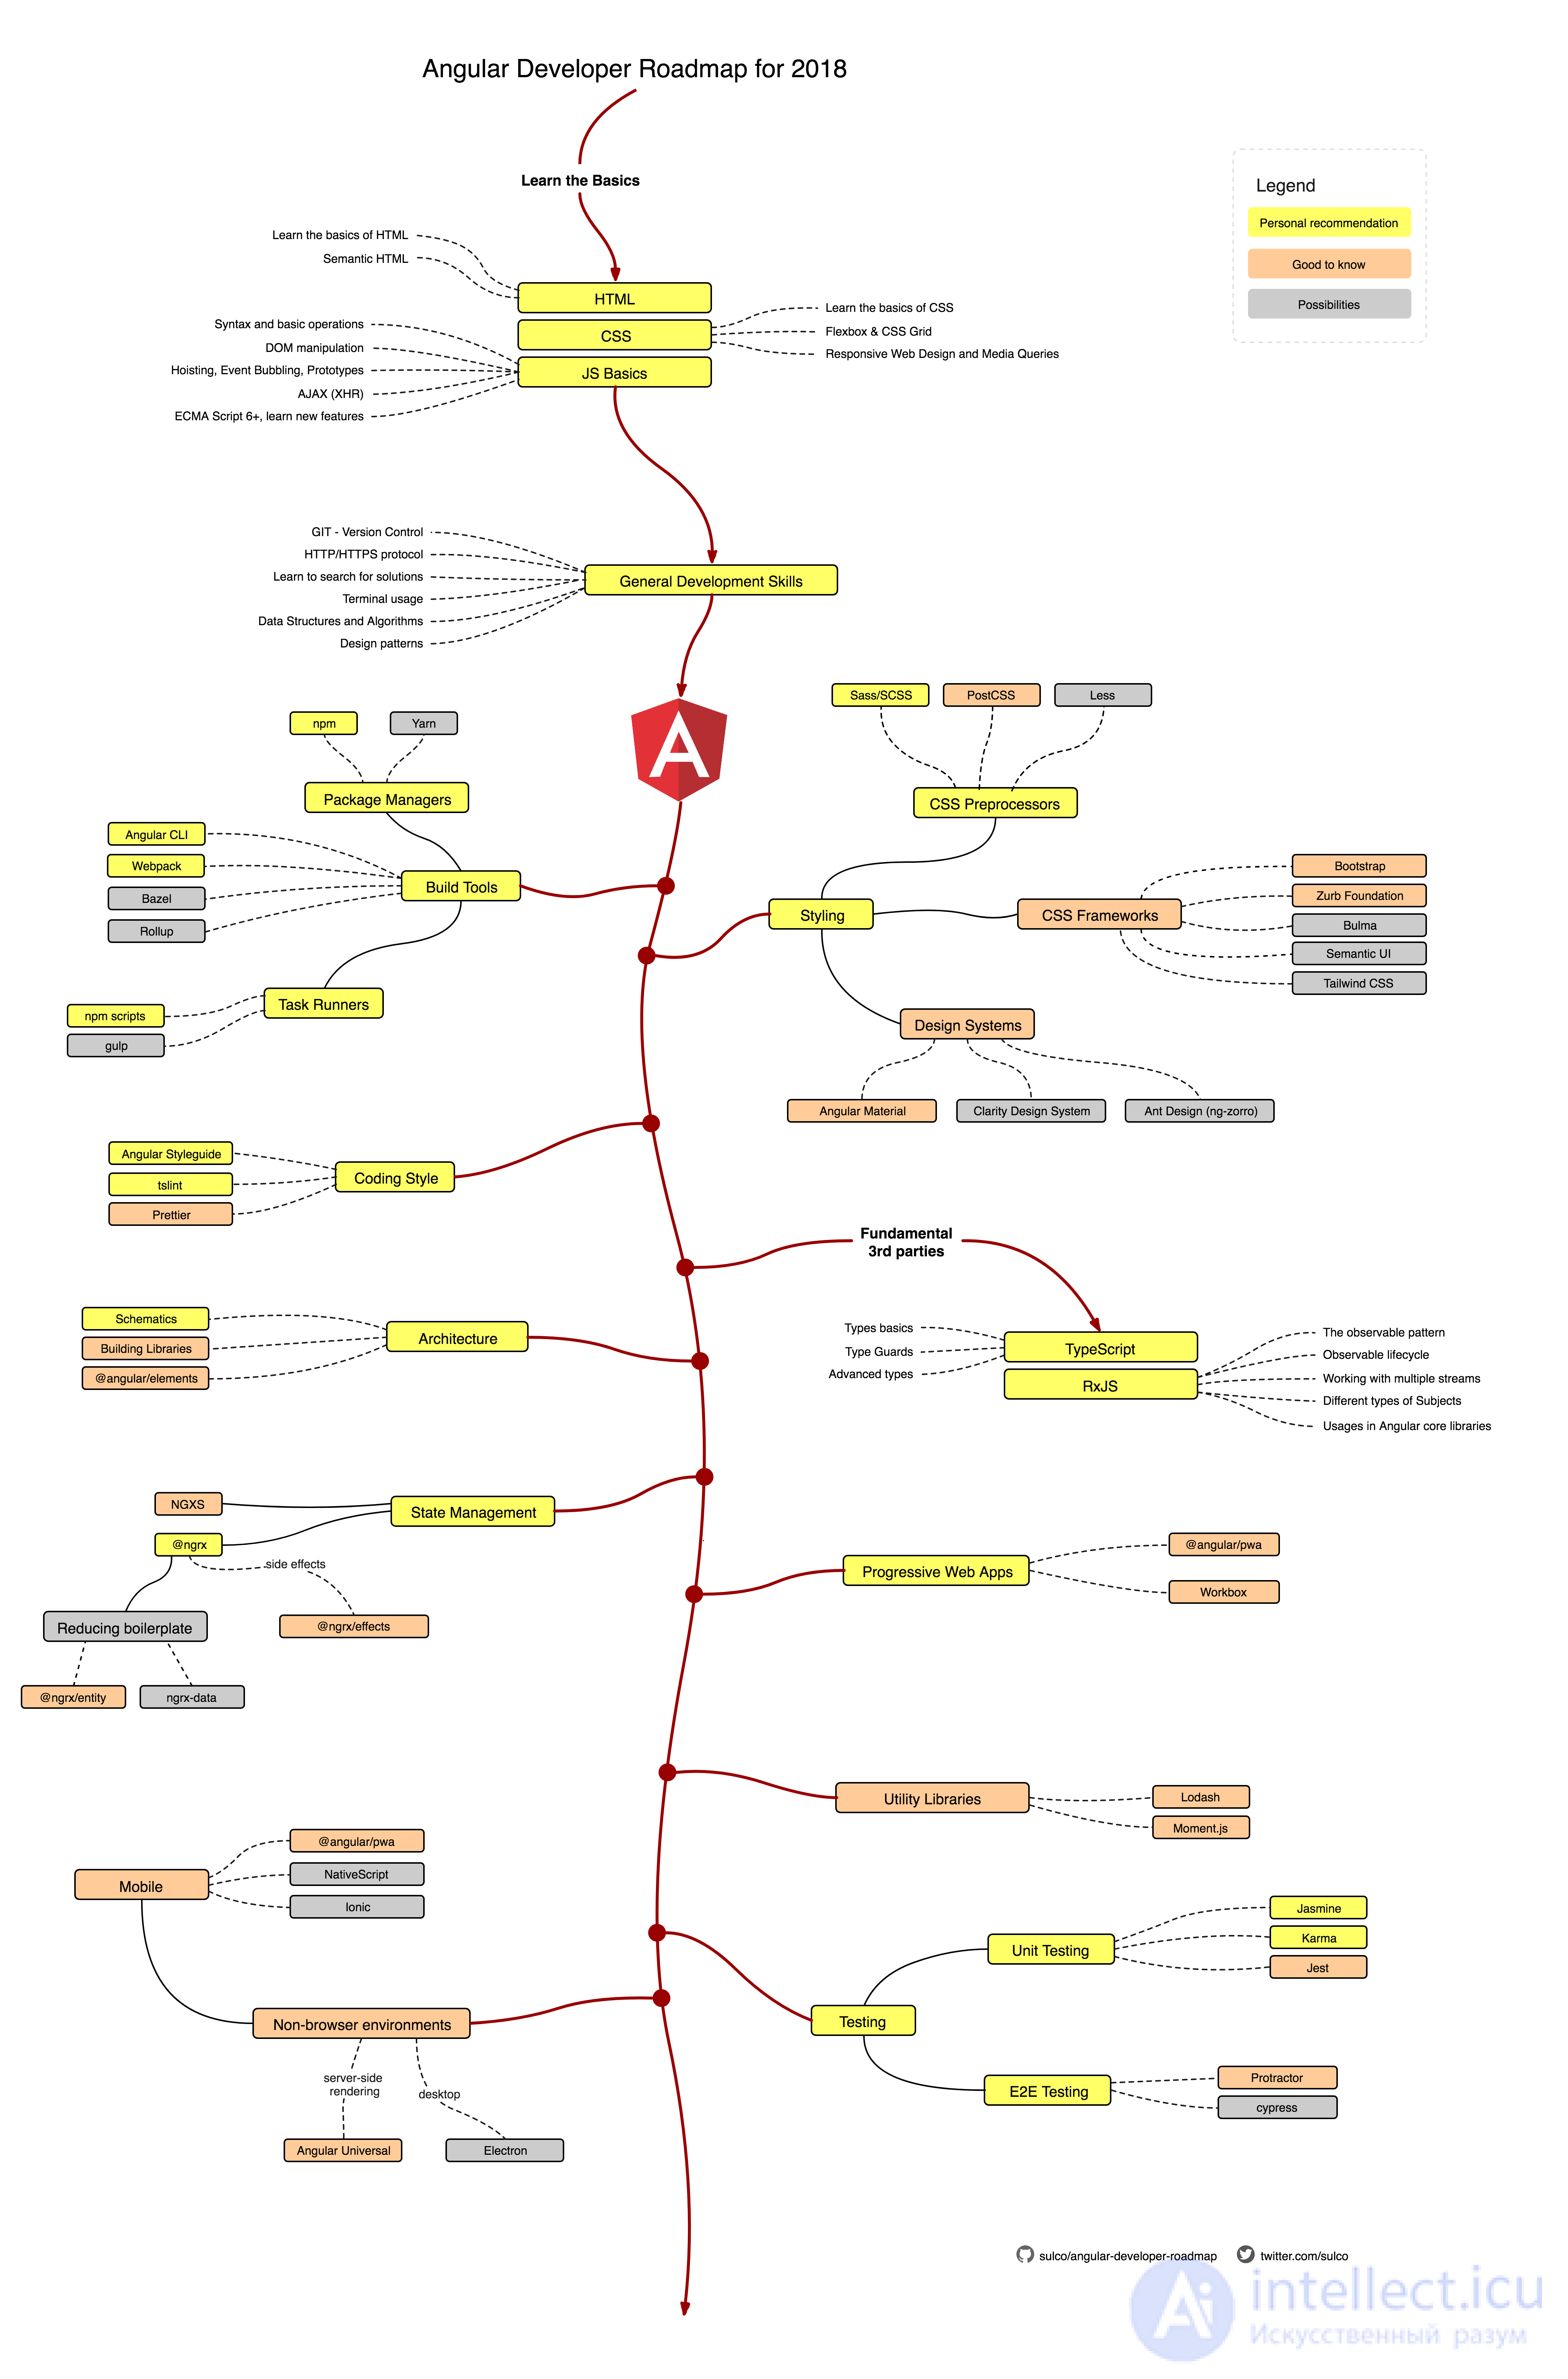
Angular is a framework from Google for building client-side applications. First and foremost it targets the development of SPA (Single Page Application) solutions, i.e. single-page applications. In this sense Angular is the successor of another framework, AngularJS. At the same time Angular is not a new version of AngularJS, but a fundamentally new framework.
Angular provides functionality such as two-way binding, allowing you to dynamically change data in one place in the interface when the model data changes elsewhere, templates, routing, and so on.
One of the key features of Angular is that it uses TypeScript as its programming language.
But we are not limited to the TypeScript language. If desired, we can write Angular applications using languages such as Dart or JavaScript. However, TypeScript is still the primary language for Angular.
Official repository of the framework on GitHub: https://github.com/angular/angular. There you can find the source files themselves, as well as some additional information.
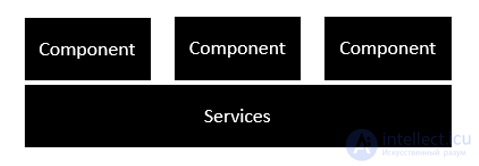
the screenshot below shows the architecture of Angular 2. Each application consists of components. Each component is a logical division of the application's functions. For this, it is necessary to build multi-level services that are used to share functionality between components.
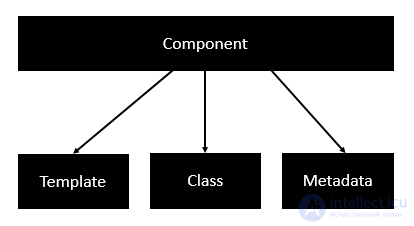
Below is the structure of a Component. A component consists of:
Classes — these are like classes in C ++ or Java, which contain properties and methods.
Metadata — used to decorate the class and extend its functionality.
Template — used to define the HTML view rendered by the application.
Below is an example of a component.
|
1 2 3 4 5 6 7 8 9 10 |
import { Component } from '@angular/core';
@Component ({ selector: 'my-app', templateUrl: 'app/app.component.html' })
export class AppComponent { appTitle: string = 'Welcome'; } |
Each application consists of modules. Every Angular 2 application must contain one root Angular module. The root Angular module can contain several components to separate functionality.
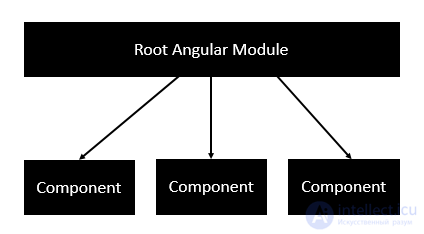
Below is an example of a root module.
|
1 2 3 4 5 6 7 8 9 10 |
import { NgModule } from '@angular/core'; import { BrowserModule } from '@angular/platform-browser'; import { AppComponent } from './app.component';
@NgModule ({ imports: [ BrowserModule ], declarations: [ AppComponent ], bootstrap: [ AppComponent ] }) export class AppModule { } |
Each application consists of feature modules, each module contains a separate feature of the application. An Angular feature module can contain several components to separate functionality.
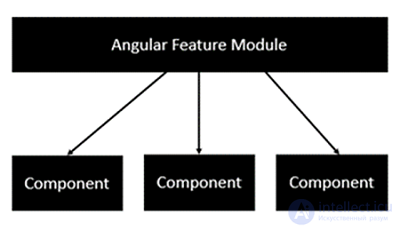
Source: https://www.tutorialspoint.com/
To work with Angular you need to install the Node.js server and the npm package manager if they are not already present on your machine. You can use the node.js installer for this. Along with the server it will also install npm. No special knowledge of NodeJS and npm is required for this.
After installing the necessary tools, let's create the simplest application. For this, let's define an application folder on the hard drive. Let it be called helloapp. In this folder let's create a new package.json file with the following contents:
{
  "name": "helloapp",
  "version": "1.0.0",
  "description": "First Angular 9 Project",
  "author": "Eugene Popov ",
  "scripts": {
    "dev": "webpack-dev-server --hot --open",
    "build": "webpack"
  },
  "dependencies": {
    "@angular/common": "~9.0.0",
    "@angular/compiler": "~9.0.0",
    "@angular/core": "~9.0.0",
    "@angular/forms": "~9.0.0",
    "@angular/platform-browser": "~9.0.0",
    "@angular/platform-browser-dynamic": "~9.0.0",
    "@angular/router": "~9.0.0",
    "rxjs": "^6.5.4",
    "zone.js": "^0.10.2"
  },
  "devDependencies": {
    "@angular-devkit/build-angular": "~0.900.1",
    "@angular/cli": "~9.0.1",
    "@angular/compiler-cli": "~9.0.0",
    "@types/node": "^12.11.1",
    "typescript": "~3.7.5"
  }
}
This file sets the packages and dependencies that will be used by the project. The dependencies section mainly defines the angular packages needed for the application to work. The devDependencies section lists only the packages that will be used for development. In particular, these are packages for working with the TypeScript language (since we will write the application code in TypeScript), as well as packages needed to bundle the application into a single file using the webpack bundler.
Next, let's open the command line (terminal) and navigate to the project folder using the cd command:
C:\WINDOWS\system32>cd C:\angular2\helloapp
Then let's run the npm install command, which will install all the necessary modules:
C:\angular2\helloapp>npm install
After running this command, a node_modules subfolder should appear in the project folder, containing all the dependencies and packages used.
Next, let's create a subfolder in the project folder called src — it will contain all the source files. And then inside the src folder let's create a subdirectory app.
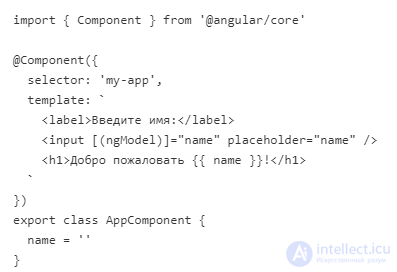
Components are the basic building blocks of an Angular application. Every Angular application has at least one component. So let's create a new file in the src/app folder called app.component.ts, in which we will define the following component code:
At the beginning of the file, an import directive is defined, which imports functionality from the @angular/core module, providing access to the @Component decorator function.
Next comes the @Component decorator function itself, which associates metadata with the AppComponent component class. In this function, first, the selector parameter is defined, or the css selector for the HTML element that will represent the component. Second, the template parameter is defined here, which specifies how the component should be rendered. In this template, two-way binding is set using the expressions [(ngModel)]="name" and {{name}} to a certain name model.
And at the end, the AppComponent component class is exported, in which the name model is defined — in this case it is an empty string.
An Angular application consists of modules. The modular structure makes it easy to load and use only the modules that are directly needed. And every application has at least one root module. So let's create a new file in the src/app folder called app.module.ts with the following contents:
import { NgModule } from '@angular/core'
import { BrowserModule } from '@angular/platform-browser'
import { FormsModule } from '@angular/forms'
import { AppComponent } from './app.component'
@NgModule({
  imports: [BrowserModule, FormsModule],
  declarations: [AppComponent],
  bootstrap: [AppComponent]
})
export class AppModule {}
This module, which in this case is called AppModule, will be the entry point into the application.
Using import directives, a number of modules we need are imported here. First of all, this is the NgModule module. The BrowserModule module is also required for working with the browser. Since our component uses an input element or a form element, we also connect the FormsModule module. And then the previously created component is imported.
Now we need to tell Angular how to run our application. For this, let's create a main.ts file in the src folder (one level above where the app.component.ts and app.module.ts files are located) with the following contents:
import { platformBrowserDynamic } from '@angular/platform-browser-dynamic'
import { AppModule } from './app/app.module'
const platform = platformBrowserDynamic()
platform.bootstrapModule(AppModule)
This code initializes the platform that runs the application, and then uses this platform to load the AppModule module.
Also, in the src folder, let's define one more file, which we'll call polyfills.ts, with the following code:
import 'zone.js/dist/zone' // zone is used by angular
This file defines polyfills — tools that are needed to support the Angular application in old browsers.
Next, let's define the main index.html page of the application in the src folder:
Hello Angular 9Loading...
And in the body element, an element is defined , in which the application will actually be loaded.
Since the TypeScript language is used to define the application code, let's also create a new tsconfig.json file in the root folder of the project:
{
  "compileOnSave": false,
  "compilerOptions": {
    "baseUrl": "./",
    "sourceMap": true,
    "declaration": false,
    "downlevelIteration": true,
    "experimentalDecorators": true,
    "module": "esnext",
    "moduleResolution": "node",
    "target": "es2015",
    "typeRoots": [
      "node_modules/@types"
    ],
    "lib": [
      "es2018",
      "dom"
    ]
  },
    "files": [
        "src/main.ts",
        "src/polyfills.ts"
    ],
    "include": [
        "src/**/*.d.ts"
    ]
}
This file defines the settings for the TypeScript compiler. The "compilerOptions" option sets the compilation parameters. And the "files" option defines the files to be compiled. In our case this is the application file - main.ts, which pulls in all the other application files, and the polyfills file polyfills.ts.
To compile the application we will use the Angular CLI, so we need to describe the CLI's behavior using the angular.json file. So, let's add a new angular.json file to the root folder of the project and define the following contents in it:
{
  "version": 1,
  "projects": {
    "helloapp": {
      "projectType": "application",
      "root": "",
      "sourceRoot": "src",
      "architect": {
        "build": {
          "builder": "@angular-devkit/build-angular:browser",
          "options": {
            "outputPath": "dist/helloapp",
            "index": "src/index.html",
            "main": "src/main.ts",
            "polyfills": "src/polyfills.ts",
            "tsConfig": "tsconfig.json",
            "aot": true
          }
        },
        "serve": {
          "builder": "@angular-devkit/build-angular:dev-server",
          "options": {
            "browserTarget": "helloapp:build"
          }
        }
      }
    }},
  "defaultProject": "helloapp"
}
Let's briefly go through the structure of the file. First, the version parameter is defined. It defines the version of the project configuration.
Next comes the projects section, which defines the settings for each project. In our case we have only one project, which is named after the project directory - helloapp.
The project defines the following options:
For each command, a builder parameter is set, which defines the tool for building the project. So, for the "build" command the value "@angular-devkit/build-angular:browser" is set - this builder uses the webpack package bundler for building. And for the "serve" command the value "@angular-devkit/build-angular:dev-server" is set - this builder starts a web server and deploys the compiled application on it.
The options parameter sets the file build parameters. For the "build" command the following options are defined here:
For the "serve" command only one option is specified - browserTarget, which contains a reference to the configuration for the build command - "helloapp:build". That is, in essence this command uses the same configuration as the build command.
The last option, defaultProject, points to the default project. In this case this is our only project.
If we use TypeScript to work with Angular and the Angular CLI for compilation, then these files package.json, tsconfig.json and angular.json will actually be present in every project. And they can be carried over from project to project with minimal changes. For example, in the angular.json file, instead of the project name "helloapp" there will be the corresponding project name. In the package.json file it will be possible to set some other package versions if the previous versions are outdated. It will be possible to change the project name, the version. It will be possible to adjust the TypeScript or Angular CLI settings, but overall the general organization will be the same.
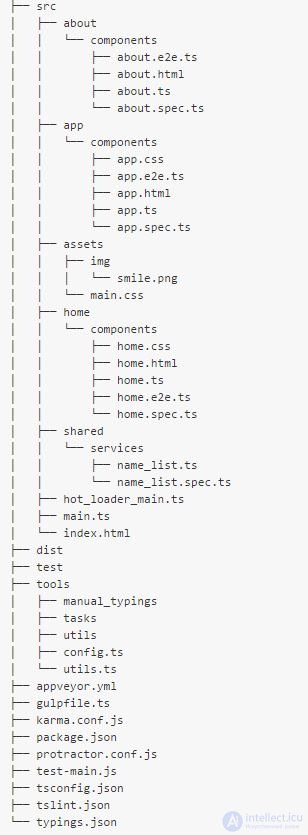
As a result we get the following project structure:
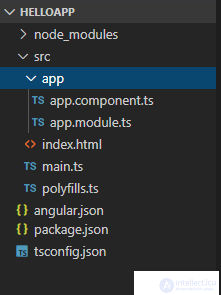
structuring the project by functionality is a practical method. It makes the project easily scalable and maintainable. And it makes each part of the project work fully autonomously
Source: https://angular.io/guide/quickstart
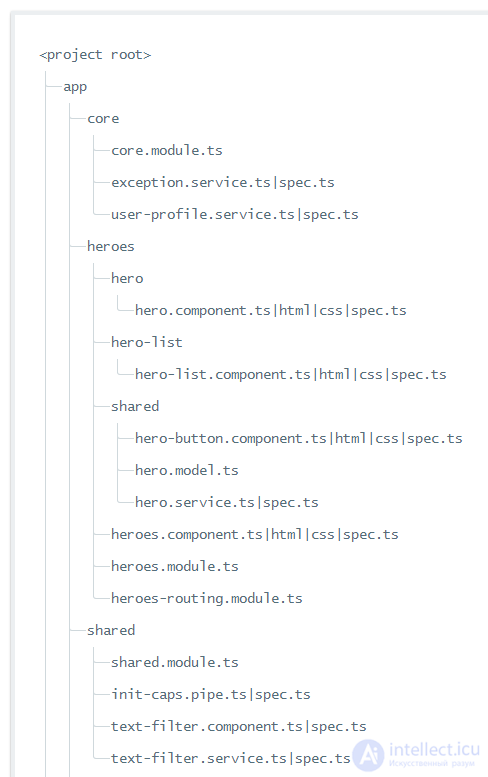
Folder structure:
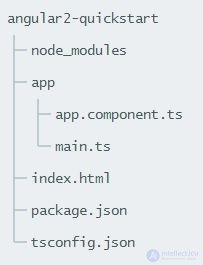
Source: https://www.ng-book.com/2/
method 2 is the most efficient, since all components, services, etc. must be stored in separate folders to make it easier to find files later. This is the most efficient method in a very complex application.
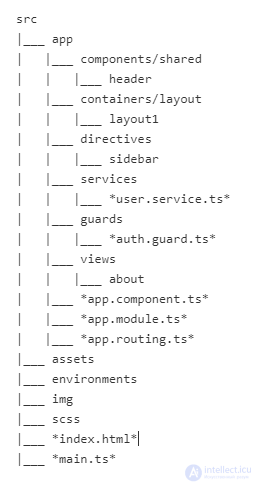
Folder structure:
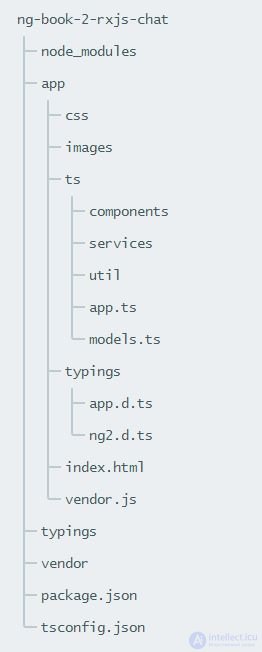
Source: https://github.com/mgechev/angular2-seed
Folder structure:
https://angular.io/guide/styleguide#overall-structural-guidelines
Link to the mrholek repository ( https://github.com/mrholek/CoreUI-Angular ).
This structure lets you keep your root project clean and structure components while avoiding unnecessary (sometimes useless) naming conventions of the official style guide.
In addition, this structure is useful for group imports when needed, and helps avoid dozens of import lines for a single file.
And now that everything is ready, we can run the project. For this, in the command line (terminal) let's navigate to the project folder using the cd command and then run the ng serve command:
C:\WINDOWS\system32>cd C:\angular\helloapp
C:\angular\helloapp>ng serve --open
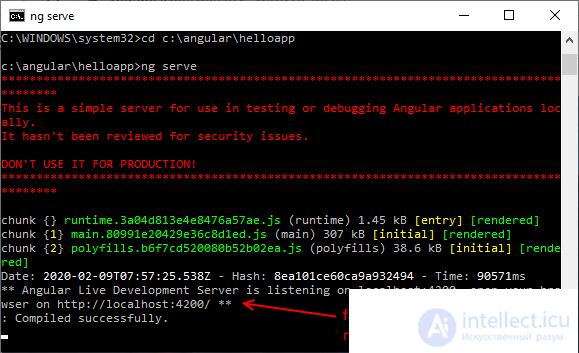
The console output will inform us which files of what size were created. In addition, we will be able to see the address at which the test web server is running - by default this is "http://localhost:4200/". If we pass the --open flag to the command, as in the case above, then the Angular CLI automatically opens a browser with the running application. And we can access the application:
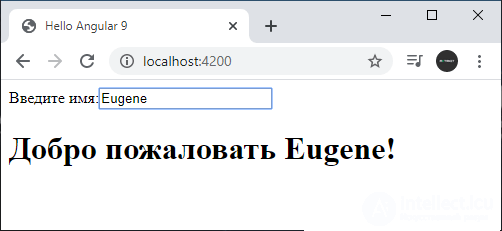
Let's enter some name into the text field, and it will immediately appear in the heading.
It's important to note that while the application is running, we can change the code, and the Angular CLI will almost instantly recompile and restart the application.
.
A component instance has a lifecycle that begins when Angular instantiates the component class and renders the component view along with its child views. The lifecycle continues with change detection, as Angular checks when data-bound properties change, and updates both the view and the component instance as needed. The lifecycle ends when Angular destroys the component instance and removes its rendered template from the DOM. Directives have a similar lifecycle, as Angular creates, updates, and destroys instances during execution.
Your application can use lifecycle hook methods to tap into key lifecycle events of a component or directive, in order to initialize new instances, trigger change detection when needed, respond to updates during change detection, and clean up before instances are removed.
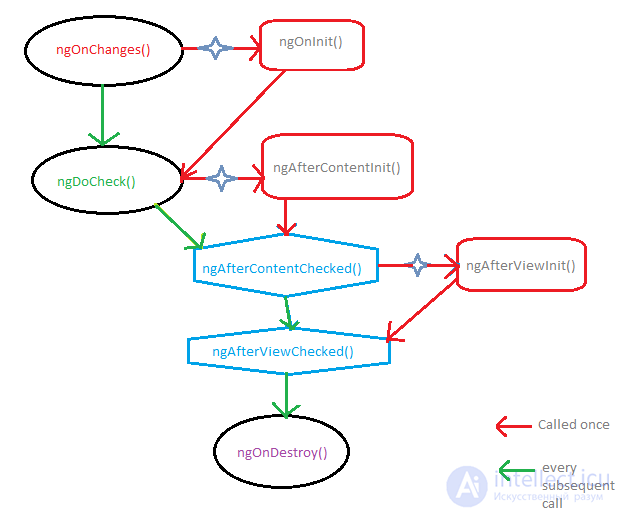
You can respond to events in the lifecycle of a component or directive by implementing one or more of the lifecycle hook interfaces in the Angular core library . Hooks give you the ability to act on a component or directive instance at the right moment, when Angular creates, updates, or destroys that instance.
Each interface defines a prototype for a single hook method, whose name is the interface name prefixed with ng. For example, the OnInit interface has a hook method named ngOnInit(). If you implement this method in your component or directive class, Angular calls it shortly after checking the input properties for that component or directive for the first time.
After your application creates an instance of a component or directive by calling its constructor, Angular calls the hook methods you have implemented at the appropriate point in that instance's lifecycle.
Angular executes hook methods in the following sequence. You can use them to perform the following operations.
| Hook method | Purpose | Timing |
|---|---|---|
| ngOnChanges() |
Respond when Angular sets or resets data-bound input properties. The method receives a SimpleChanges object of the current and previous property values. Note that this happens very frequently, so any operation performed here significantly affects performance. See details in the Using change detection hooks section of this document. |
Called before ngOnInit() and whenever one or more data-bound input properties change. Note: if your component has no inputs, or you use it without any inputs, the framework will not call ngOnChanges(). |
| ngOnInit() |
Initialize the directive or component after Angular first displays the data-bound properties and sets the input properties of the directive or component. See details in the “ Initializing a component or directive” section of this document. |
Called once, after the first ngOnChanges(). |
| ngDoCheck() |
Detect and act on changes that Angular can't or won't detect on its own. See details and example in the “ Defining custom change detection” section of this document. |
Called immediately after ngOnChanges() on every change detection run, and immediately after ngOnInit() on the first run. |
| ngAfterContentInit() |
Respond after Angular projects external content into the component's view, or into the view that contains the directive. See details and example in the “ Responding to content changes in this document”. |
Called once after the first ngDoCheck(). |
| ngAfterContentChecked() |
Respond after Angular checks the content projected into the directive or component. See details and example in the “ Responding to projected content changes” section of this document. |
Called after ngAfterContentInit() and every subsequent ngDoCheck(). |
| ngAfterViewInit() |
Respond after Angular initializes the component's views and child views, or the view that contains the directive. See details and example in the “Responding to view changes”, in this document. |
Called once after the first ngAfterContentChecked(). |
| ngAfterViewChecked() |
Respond after Angular checks the component's views and child views, or the view that contains the directive. |
Called after ngAfterViewInit() and every subsequent ngAfterContentChecked(). |
| ngOnDestroy() |
Cleanup just before Angular destroys the directive or component. Unsubscribe from Observables and detach event handlers to avoid memory leaks. For details see the “ Cleaning up on instance destruction” section of this document. |
Called immediately before Angular destroys the directive or component. |
The live example / download example demonstrates the use of lifecycle hooks through a series of exercises presented as components managed by the root AppComponent. In each case, the parent component serves as a test rig for the child component, which illustrates one or more lifecycle hook methods.
The following table lists the exercises with a brief description. The sample code is also used to illustrate specific tasks in the following sections.
| Component | Description |
|---|---|
| Peek-a-boo |
Demonstrates every lifecycle hook. Each hook method logs to the screen. |
| Spy |
Shows how you can use lifecycle hooks with a custom directive. The SpyDirective implements the ngOnInit() and ngOnDestroy() hooks, and uses them , to observe and report , when an element enters or leaves the current view. |
| OnChanges |
Demonstrates how Angular calls the ngOnChanges() hook every time one of the component's input properties changes, and shows how to interpret the changes object passed to the hook method. |
| DoCheck |
Implements the ngDoCheck() method with custom change detection. See how often Angular calls this hook, in the log. |
| AfterView |
Shows what Angular means by view . Demonstrates the ngAfterViewInit() and ngAfterViewChecked() hooks. |
| AfterContent |
Shows how to project external content into a component and how to distinguish projected content from the component's view's child elements. Demonstrates the ngAfterContentInit() and ngAfterContentChecked() hooks. |
| Counter |
Demonstrates a combination of a component and a directive, each with its own hooks. |

Comments