Lecture
In this lesson:
- use the ListView for single and multiple selection of items
It may be necessary to provide the user with the opportunity to select one or more items from the list. Let's see how this can be implemented.
Create a project:
Project name : P0431_SimpleListChoice
Build Target : Android 2.3.3
Application name : SimpleListChoice
Package name : ru.startandroid.develop.p0431simplelistchoice
Create Activity : MainActivity
Let's draw the main.xml screen:
    xmlns: android = "http://schemas.android.com/apk/res/android"
  android: layout_width = "fill_parent"
  android: layout_height = "fill_parent"
  android: orientation = "vertical">  android: id = "@ + id / btnChecked"
  android: layout_width = "wrap_content"
  android: layout_height = "wrap_content"
  android: text = "Get checked items">

    android: id = "@ + id / lvMain"
  android: layout_width = "match_parent"
  android: layout_height = "wrap_content">
The lvMain list and the btnChecked button, by pressing, to which we will output the items marked in the list to the log.
I propose to recall that we have resource files and we can use them. Let's find in our project a file with resources res / values / strings.xml and add an array of strings with names there. As a result, I got a file with the following contents:
   Hello World, MainActivity!
   SimpleListChoice

   Ivan
   Marya
   Peter
   Anton
   Dasha
   Boris
   Kostya
   Igor
   Anna
   Denis
   Vadim
   Olga
   Sergey
From this list we will get an array of names. This is more convenient and correct than listing all the elements of an array in java-code.
Code MainActivity.java :
package ru.startandroid.develop.p0431simplelistchoice;
import android.app.Activity;
import android.os.Bundle;
import android.util.Log;
import android.view.View;
import android.view.View.OnClickListener;
import android.widget.ArrayAdapter;
import android.widget.Button;
import android.widget.ListView;
public class MainActivity extends Activity implements OnClickListener {
final String LOG_TAG = "myLogs";
ListView lvMain;
String[] names;
/** Called when the activity is first created. */
public void onCreate(Bundle savedInstanceState) {
super.onCreate(savedInstanceState);
setContentView(R.layout.main);
lvMain = (ListView) findViewById(R.id.lvMain);
// устанавливаем режим выбора пунктов списка
lvMain.setChoiceMode(ListView.CHOICE_MODE_SINGLE);
// Создаем адаптер, используя массив из файла ресурсов
ArrayAdapter adapter = ArrayAdapter.createFromResource(
this, R.array.names,
android.R.layout.simple_list_item_single_choice);
lvMain.setAdapter(adapter);
Button btnChecked = (Button) findViewById(R.id.btnChecked);
btnChecked.setOnClickListener(this);
// получаем массив из файла ресурсов
names = getResources().getStringArray(R.array.names);
}
public void onClick(View arg0) {
// пишем в лог выделенный элемент
Log.d(LOG_TAG, "checked: " + names[lvMain.getCheckedItemPosition()]);
}
}
We set the selection mode for the list to CHOICE_MODE_SINGLE . This means that the list will store the position of the last clicked item and we can always request this information from it. Next, we create an adapter , but not through a regular constructor, but using the createFromResource method. The input parameters are almost the same as in the regular constructor, only instead of the data array, we specify an array of strings in the resources that we created a little earlier. We use the system simple_list_item_single_choice as a layout resource for the items. He just sharpened by such use.
Next we find the btnChecked button and assign Activity to it as a handler . And at the end we read our array of names from the resource file into an array of strings.
In the handler for pressing the button, we output the name from the array to the log . As an index, we use the position of the item in the list. The sequence of elements in the array and in the list are the same.
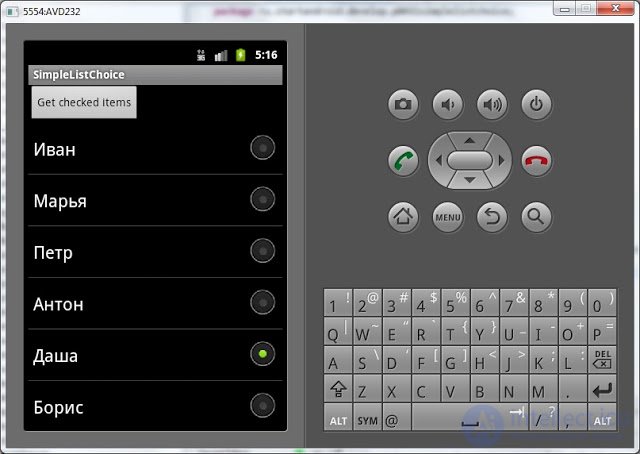
All save, run and see the list. Select a thread item:

Click the button Get checked items and look at the log:
checked: Dasha
That's right.
Now let's just change the program code and get a list with multiple selections.
// устанавливаем режим выбора пунктов списка
lvMain.setChoiceMode(ListView. CHOICE_MODE_MULTIPLE );
// Создаем адаптер, используя массив из файла ресурсов
ArrayAdapter adapter = ArrayAdapter.createFromResource(
this, R.array.names,
android.R.layout. simple_list_item_multiple_choice );
(replace only bold italic text)
We replaced CHOICE_MODE_SINGLE with CHOICE_MODE_MULTIPLE and now the list will store the positions of the selected items. We also replaced simple_list_item_single_choice with simple_list_item_multiple_choice - list items will now allow multiple selections.
We will rewrite the onClick method as follows:
public void onClick(View arg0) {
// пишем в лог выделенные элементы
Log.d(LOG_TAG, "checked: ");
SparseBooleanArray sbArray = lvMain.getCheckedItemPositions();
for (int i = 0; i < sbArray.size(); i++) {
int key = sbArray.keyAt(i);
if (sbArray.get(key))
Log.d(LOG_TAG, names[key]);
}
}
We get the positions of the selected items as a SparseBooleanArray object. It is a Map (int, boolean) . The key (int) is the position of the element, and the value (boolean) is the item selected in the list or not. Moreover, SparseBooleanArray does not store information about all the points, but only about those with which they carried out the action (they isolated and removed the selection). We iterate over its contents, we get the position of the item and, if the item is selected , then we output to the log a name from the array corresponding to the position of the item.
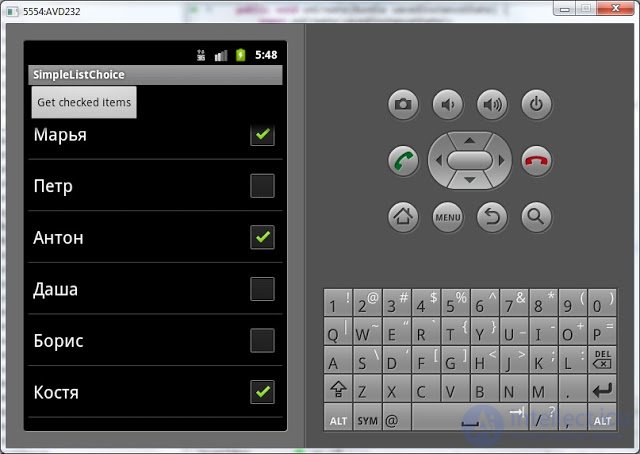
All save, run the application. Select several items:

Click the button Get checked items and look at the log:
checked:
Maria
Anton
Kostya
What we have allocated, then we list and returned.
As you can see, the difference between a regular list and a list with the ability to highlight items is only in different modes of ChoiceMode and in the use of different layout resources for list items.
By the way, here we again see why Context is needed when creating an adapter . Without it, the adapter could not get to the resource file . The adapter has no getResources method, and it uses the specified context that contains such a method.
In the next lesson:
- we consider ListView events: pressing - onItemClick, selection - onItemSelect, scrolling - onScroll
Здравствуйте.
Заметил такую штуку.
Компилятор постоянни ругался на слова и комментарии на Русском языке.
т.е. создать массив
String names = Иван , Марья , Петр , Антон , Даша , Борис , Костя , Игорь , Анна , Денис , Андрей ;
я не мог. при сохранении выдавалась ошибка:
Save could not be completed. Try File Save As... if the problem persists.
Reason:
Some characters cannot be mapped using Cp1252 character encoding.
Either change the encoding or remove the characters which are not supported by the Cp1252 character encoding.
Причина ясна нужно включить поддержку Русского языка. Подскажите где? )))
Самое интересное, что если хранить всё в файле ресурсов, то никаких ошибок не возникает и всё выводится на ура )
какую версию андроида используешь? и пробывал ли на разных? я всегда тестирую на 2.3.3 и 4.0.3 то бывают разные ошибки.
Метод ArrayAdapter. FromResource на выходе дает ArrayAdapter CharSequence . Поэтому приходится так объявлять переменную.
А когда сами создаем адаптер, просто используем знакомый всем String.
Хотя можно делать и так:
КОД: ВЫДЕЛИТЬ ВСЁ
ArrayAdapter CharSequence adapter = new ArrayAdapter CharSequence (this, android.R.layout.simple_list_item_1, names);
А в массив names можно сложить String, т.к. String наследует интерфейс CharSequence и адаптер запросто будет с ним работать.
Comments
To leave a comment
Mobile Programming (Android IOs)
Terms: Mobile Programming (Android IOs)