Lecture
In this lesson we:
- create menu items with ID
- group and sort menu items
In the last lesson, we looked at the simplest way to create a menu using the add (CharSequence title) method; we only submitted text to the input. Consider another implementation of this method - add (int groupId, int itemId, int order, CharSequence title). This method has 4 input parameters :
- groupId - identifier of the group of which the menu item is part
- itemId - menu item ID
- order - to set the sequence of displaying menu items
- title - the text to be displayed
To show how all these parameters are used, let's create an application. The screen will be TextView and CheckBox :
- TextView will display which menu item was selected.
- CheckBox will determine to show a regular menu or advanced. This will be implemented using menu groups.
Immediately I will clarify, the concepts of "ordinary" and "extended" are not Android concepts, but simply my names. Those. when the application is running and the user presses the menu button, he sees the "normal" menu. If he turns on the CheckBox, then the "extended" menu will be displayed, in which there are more items.
Create a project:
Project name : P0141_MenuAdv
Build Target : Android 2.3.3
Application name : MenuAdv
Package name : ru.startandroid.develop.menuadv
Create Activity : MainActivity
Open main.xml , assign an ID to an existing TextView , delete its text and create a CheckBox . Code:
<? xml version = "1.0" encoding = "utf-8"?>
<LinearLayout
xmlns: android = "http://schemas.android.com/apk/res/android"
android: orientation = "vertical"
android: layout_width = "fill_parent"
android: layout_height = "fill_parent">
<Checkbox
android: layout_width = "wrap_content"
android: layout_height = "wrap_content"
android: id = "@ + id / chbExtMenu"
android: text = "advanced menu">
</ Checkbox>
<Textview
android: layout_width = "fill_parent"
android: layout_height = "wrap_content"
android: id = "@ + id / textView">
</ TextView>
</ LinearLayout>
Open MainActivity.java and fill the MainActivity class with the following code:
public class MainActivity extends Activity {

 // Элементы экрана
 TextView tv;
 CheckBox chb;


 /** Called when the activity is first created. */
 @Override
 public void onCreate(Bundle savedInstanceState) {
 super.onCreate(savedInstanceState);
 setContentView(R.layout.main);
 // находим эдементы
 tv = (TextView) findViewById(R.id.textView);
 chb = (CheckBox) findViewById(R.id.chbExtMenu);

 }

 // создание меню
 @Override
 public boolean onCreateOptionsMenu(Menu menu) {
 // TODO Auto-generated method stub
 // добавляем пункты меню
 menu.add(0, 1, 0, "add");
 menu.add(0, 2, 0, "edit");
 menu.add(0, 3, 3, "delete");
 menu.add(1, 4, 1, "copy");
 menu.add(1, 5, 2, "paste");
 menu.add(1, 6, 4, "exit");

 return super.onCreateOptionsMenu(menu);
 }

 // обновление меню
 @Override
 public boolean onPrepareOptionsMenu(Menu menu) {
 // TODO Auto-generated method stub
 // пункты меню с ID группы = 1 видны, если в CheckBox стоит галка
 menu.setGroupVisible(1, chb.isChecked());
 return super.onPrepareOptionsMenu(menu);
 }

 // обработка нажатий
 @Override
 public boolean onOptionsItemSelected(MenuItem item) {
 // TODO Auto-generated method stub
 StringBuilder sb = new StringBuilder();

 // Выведем в TextView информацию о нажатом пункте меню
 sb.append("Item Menu");
 sb.append("\r\n groupId: " + String.valueOf(item.getGroupId()));
 sb.append("\r\n itemId: " + String.valueOf(item.getItemId()));
 sb.append("\r\n order: " + String.valueOf(item.getOrder()));
 sb.append("\r\n title: " + item.getTitle());
 tv.setText(sb.toString());

 return super.onOptionsItemSelected(item);
 }
 }
Do not forget to update the import (CTRL + SHIFT + O).
Let's disassemble the writing. We use the following methods :
onCreateOptionsMenu - called only on the first display of the menu. Creates a menu and is no longer used. Here we add items to the menu.
onPrepareOptionsMenu - called every time before displaying the menu. Here we make changes to the already created menu, if necessary.
onOptionsItemSelected - called when the menu item is clicked . Here we determine which menu item was clicked.
In the onCreateOptionsMenu method , we add 6 menu items. Pay attention to the parameters of the Add method.
The first parameter is the group ID . In the first three points, it is zero, in the remaining three points - 1. That is, The menu items copy , paste and exit are combined into a group with ID = 1 . Visually, this does not manifest in any way - they do not differ in color or anything else. Group ID we will use in the implementation of onPrepareOptionsMenu .
The second parameter is the menu item ID . The handler is used to determine which menu item was clicked. We will use it in onOptionsItemSelected .
The third parameter - determines the position of the menu item. This parameter is used to determine the order of items when the menu is displayed. Sorting by ascending is used , i.e. from a smaller order to a bigger one.
The fourth parameter is the text that will be displayed on the menu item. It's all clear.
The Menu object is passed to the onPrepareOptionsMenu method and we can work with it. In this example, we call setGroupVisible. This method allows you to hide / show menu items. The input is two parameters - the group ID and the boolean value. We write 1 as the group ID (the same group with ID = 1, which contains the copy, paste and exit items), and use the CheckBox state as the boolean parameter. If it is enabled, then menu items (from a group with ID = 1 ) will be displayed; if it is disabled, they will not be.
Save everything and run the application.
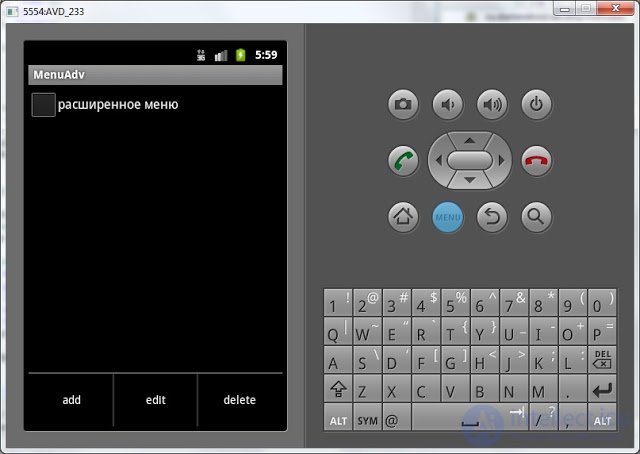
" Normal " menu:

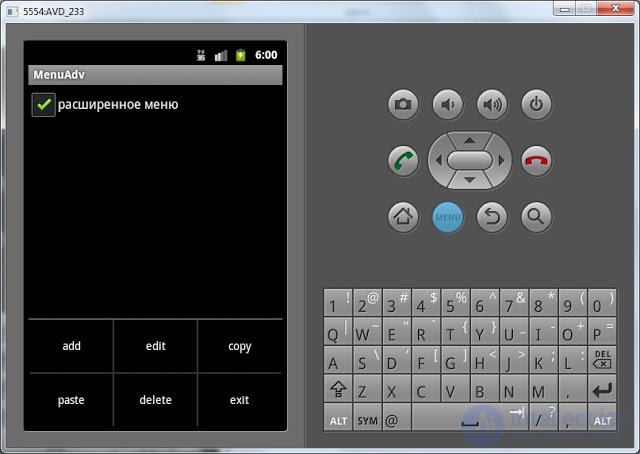
" Extended " menu

Depending on the state of the CheckBox in the menu, you can see 3 or 6 items.
Pay attention to the order of items. They are sorted by order in ascending order . If the order for several items is the same , then these items are placed in the order they were created in the onCreateOptionsMenu method.
When you click on any menu item, the onOptionsItemSelected method is triggered . In it, we display in the TextView information about the clicked item. You can verify this information so that we code when creating menu items. All parameters must match. For convenience, I made the order the same as in the add method: groupId , itemId , order , title .
Try adding a few more items to the menu to make them more than six . And notice how they appear.
To simplify the code, I used the numbers directly for group IDs and menu item IDs. In general, it is recommended to use constants, in the future I will use them.
There is another, more convenient and preferred way to create menus - using xml-files, similar to layout-files when creating a screen. To get the menus that we created programmatically in this lesson, you need to create a file mymenu.xml in the res / menu folder :
  <? xml version = "1.0" encoding = "utf-8"?>
  <menu
  xmlns: android = "http://schemas.android.com/apk/res/android">
  <item
  android: id = "@ + id / menu_add"
  android: title = "add">
  </ item>
  <item
  android: id = "@ + id / menu_edit"
  android: title = "edit">
  </ item>
  <item
  android: id = "@ + id / menu_delete"
  android: orderInCategory = "3"
  android: title = "delete">
  </ item>
  <group
  android: id = "@ + id / group1">
  <item
  android: id = "@ + id / menu_copy"
  android: orderInCategory = "1"
  android: title = "copy">
  </ item>
  <item
  android: id = "@ + id / menu_paste"
  android: orderInCategory = "2"
  android: title = "paste">
  </ item>
  <item
  android: id = "@ + id / menu_exit"
  android: orderInCategory = "4"
  android: title = "exit">
  </ item>
  </ group>
  </ menu>
item is a menu item, group is a group. In ID attributes, we use the same scheme as in the ID of the screen components, i.e. we write @ + id / <your_ID> and Eclipse will create these IDs in R.java itself. The orderInCategory attribute is the order of the items, and the title is the text.
In the onCreateOptionsMenu method , we no longer need to manually code the creation of each item, we simply associate the menu that is given to us by the input and our xml file.
public boolean onCreateOptionsMenu(Menu menu) {
 getMenuInflater().inflate(R.menu.mymenu, menu);
 return super.onCreateOptionsMenu(menu);
 }
Using the getMenuInflater method , we get the MenuInflater and call its inflate method. We transfer our file mymenu.xml from the res / menu folder and the menu object to the input. MenuInflater takes a menu object and fills it with items according to the file mymenu.xml.
If you want to hide the group, run the same setGroupVisible method and pass R.id.group1 there as the group ID.
Detailed attributes for the xml-file menu can be found here.
I recommend you to try and test both ways of creating menus. Software creation is more flexible, and xml cuts code.
In the next lesson:
- create context menu
Comments
To leave a comment
Mobile Programming (Android IOs)
Terms: Mobile Programming (Android IOs)