
Lecture
Redis can function not only as a traditional DBMS, but its structures and commands can also be used for messaging between microservices or processes. The ubiquitous use of Redis clients, the speed and efficiency of the server and protocol, as well as the built-in classic structures, allow you to create your own workflows and event mechanisms. In this chapter we will cover the following topics:
Lists in Redis – are ordered lists of strings, very similar to the linked lists you may be familiar with. Adding a value to a list (push) and removing a value from a list (pop) are very lightweight operations. As you can imagine, this is a very good structure for managing a queue: adding elements at the head and reading them from the tail (FIFO). Redis also provides additional capabilities that make this pattern more efficient, reliable, and easy to use.
Lists have a subset of commands that allow «blocking» behavior. The term «blocking» means a connection with only one client. In effect, these commands prevent the client from doing anything until some value appears in the list or until the timeout expires. This eliminates the need to poll Redis while waiting for a result. Since the client cannot do anything while waiting for a value, we will need two open clients to illustrate this:
| # | Client 1 | Client 2 |
|---|---|---|
| 1 |
[waits for a value] |
|
| 2 |
|
[client unblocked, ready to accept commands] |
| 3 |
[waits for a value] |
In this example, at step 1 we see that the blocked client returns nothing immediately, since it contains nothing. The last argument – is the timeout. Here 0 means wait forever. On the second line a value is placed into my-q, and the first client immediately exits the blocked state. On the third line BRPOP is called again (in an application you can do this in a loop), and the client again waits for the next value. Pressing «Ctrl + C» you can interrupt the block and exit the client.
Let's reverse the example and see how BRPOP works with a non-empty list:
| # | Client 1 | Client 2 |
|---|---|---|
| 1 |
|
|
| 2 |
|
|
| 3 |
|
|
| 4 |
|
|
| 5 |
|
|
| 6 |
|
|
| 7 |
[waits for a value] |
In steps 1-3 we place 3 values into the list and see that the response grows, indicating the number of elements in the list. Step 4, despite calling BRPOP, returns a value immediately. This is all because the blocking behavior occurs only when there are no values in the queue. We can see the same instant response in steps 5-6, because this is performed for each element in the queue. At step 7 BRPOP finds nothing in the queue and blocks the client until something is added.
Queues often represent some work that needs to be performed in another process (a worker). In this type of workload it is important that the work is not lost if the worker crashes for some reason during execution. Redis supports this type of queue. To do this, instead of BRPOP use the BRPOPLPUSH command. It waits for a value in one list, and as soon as it appears there, places it into another list. This is done atomically, so it is impossible for two workers to modify the same value. Let's see how it works:
| # | Client 1 | Client 2 |
|---|---|---|
| 1 |
|
|
| 2 | [If the result is not nil, process it somehow and go to step 4] | |
| 3 |
[return to step 1] |
|
| 4 |
[waits for a value] |
|
| 5 |
|
[client unblocked, ready to accept commands] |
| 6 | [process «hello»] | |
| 7 |
|
|
| 8 | [return to step 1] |
In steps 1-2 we do nothing, since worker-q is empty. If something is returned, then we process it and delete it, and again return to step 1 to check whether anything has landed in the queue. This way we first clear the worker queue and perform the existing work. At step 4 we wait until a value appears in my-q, and when it appears, it is atomically moved into worker-q. Then we process «hello» somehow, after which we delete it from worker-q and return to step 1. If the process dies at step 6, the value still remains in worker-q. After the process restarts, we will immediately delete anything that was not deleted at step 7.
This pattern greatly reduces the likelihood of losing work, but only if the worker dies between steps 2 and 3 or 5 and 6, which is unlikely, but it is best practice to account for this circumstance in the worker's logic.
Sometimes it is necessary to lock some resource in a system. This may be needed in order to apply important changes that cannot be resolved under concurrency conditions. The goals of locks:
Redis – is a good option for implementing locking, since it has a simple data model based on keys, and also each of its shards is single-threaded and quite fast. There is an excellent implementation of locking using Redis, called Redlock.
Redlock clients are available for almost every language, however, it is important to know how Redlock works in order to use it safely and effectively.
First, you need to understand that Redlock is designed to work on at least 3 machines with independent Redis instances. This eliminates a single point of failure in your locking mechanism, which could lead to a deadlock of all resources. Another point to understand is that, although the clocks on the machines do not have to be synchronized 100%, they must function identically – time moves at the same rate: one second on machine A is the same as one second on machine B.
Setting a lock object with Redlock begins with obtaining a timestamp with millisecond precision. You must also specify the lock time in advance. Then the lock object is set by setting (SET) a key with a random value (only if this key does not already exist) and setting a timeout on the key. This is repeated for each independent instance. If an instance is down, it is immediately skipped. If the lock object is successfully set on the majority of instances before the timeout expires, then it is considered acquired. The time to set or update the lock object – is the amount of time needed to reach the lock state, minus the preset lock time. In case of an error or timeout, unlock all instances and try again.
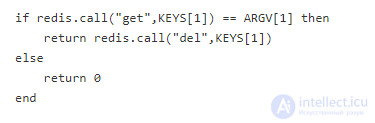
To release the lock object, it is better to use a Lua script that will check whether the expected random value is present across the set of keys. If it is present, then it can be deleted, otherwise it is better to leave the keys, since they may be newer lock objects.
The Redlock process provides good guarantees and no single point of failure, so you can be fully confident that individual lock objects will be distributed and no deadlocks will occur.
In addition to being a data store, Redis can be used as a «Pub/Sub» (publisher/subscriber) platform. In this pattern a publisher can publish messages to any number of subscribers of a channel. These are «fire and forget» messages, meaning that if a message is published but no subscriber exists, then the message vanishes with no possibility of recovery.
Having subscribed to a channel, the client is put into subscriber mode and can no longer invoke commands – it becomes read-only. The publisher has no such restrictions.
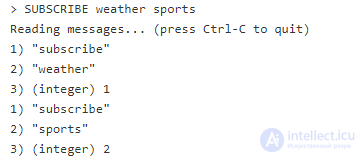
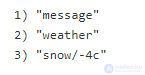
You can subscribe to more than one channel. Let's start by subscribing to two channels «weather» and «sports», using the SUBSCRIBE command:
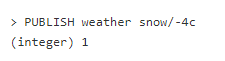
In a separate client (another terminal window, for example) we can publish messages to any of these channels using the PUBLISH command: 
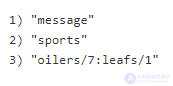
The first argument – is the channel name, the second – the message. The message can be anything, in this case it is an encoded score in a game. The command returns the number of clients to which the message will be delivered. In the subscriber client we immediately see the message:
The response contains three elements: an indication that this is a message, the subscription channel, and, of course, the message itself. Immediately after receiving it, the client returns to listening on the channel.
Returning to the publisher, we can publish another message:
In the subscriber we will see the same format, but with a different channel and message:
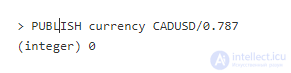
Let's publish a message to a channel where there are no subscribers:
Since no one is listening to the channel currency, the response will be 0. This message is gone, and clients that subsequently subscribe to this channel will not receive a notification about this message – it was sent and forgotten.
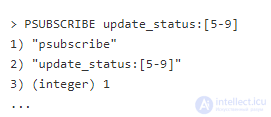
Besides subscribing to a single channel, Redis allows subscribing to channels by a pattern. A glob-style pattern is passed to the PSUBSCRIBE command:
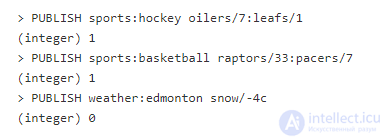
The client will receive messages from all channels starting with sports:. In another client let's run the following commands:
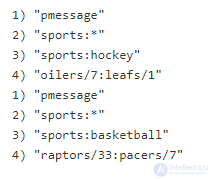
Note that the first two commands return 1, while the last returns 0. And even though we are not directly subscribed to sports:hockey or sports:basketball, the client receives the messages thanks to the pattern subscription. In the subscriber client window we can see that there are results there only for the channels matching the pattern.
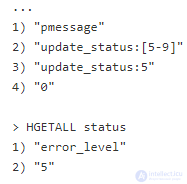
This output is slightly different from the output of the SUBSCRIBE command, since it contains the pattern itself, as well as the real channel name.
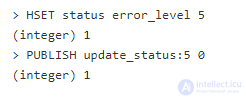
The Redis «Pub/Sub» messaging scheme can be extended to create interesting distributed events. Say we have a structure that is stored in a hash table, but we want to update clients only when a specific field exceeds a numeric value set by the subscriber. We will listen to channels by pattern and retrieve the hash into status. In this example we are interested in update_status with values 5-9.
To change the value of status/error_level, we will need two commands that can be executed sequentially or in a MULTI/EXEC block. The first command sets the level, and the second publishes a notification with the value encoded in the channel itself.
In the first window we see that the message has been received, and after this we can switch to the other client and call the HGETALL command:
We can also use this method to update a local variable of some long-running process. This can allow several instances of the same process to exchange data in real time.
Why is this pattern better than using «Pub/Sub»? When a process restarts, it can simply retrieve the entire state and start listening. Changes will be synchronized across any number of processes.
There are several patterns for storing structured data in Redis. In this chapter we will cover the following:
There are several options for storing data in JSON format in Redis. The most common form – is to serialize the object beforehand and save it under a special key:
It would seem to look simple, but this has some very serious drawbacks:
The first couple of points may be insignificant with small amounts of data, but the costs will increase as the data grows. However, the third point is the most critical.
Before Redis 4.0 the only method of working with JSON inside Redis was to use a Lua script with the cjson module. This partly solved the problem, although it still remained a bottleneck and created additional hassle with learning Lua. In addition, many applications simply retrieved the entire JSON string, deserialized it, worked with the data, serialized it back, and saved it again. This is an anti-pattern. There is a big risk of losing data this way.
| # | Application instance #1 | Application instance #2 |
|---|---|---|
| 1 |
|
|
| 2 | [deserialize, change the car's color and serialize again] |
|
| 3 |
[new value from instance #1] |
[deserialize, change the car's model and serialize again] |
| 4 |
[new value from instance #2] |
|
| 5 |
|
The result on line 5 will show only the changes of instance 2, and the color change by instance 1 will be lost.
Redis versions 4.0 and above have the ability to use modules. ReJSON – is a module that provides a special data type and commands for interacting with it directly. ReJSON stores data in binary format, which reduces the size of stored data, provides faster access to elements without spending time on de-/serialization.
To use ReJSON, you need to install it on the Redis server or enable it in Redis Enterprise.
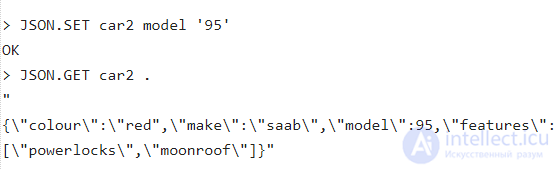
The previous example using ReJSON would look like this:
| # | Application instance #1 | Application instance #2 |
|---|---|---|
| 1 |
|
|
| 2 |
|
|
| 3 |
|
ReJSON provides a safer, faster, and more intuitive way of working with data in JSON format in Redis, especially in cases where atomic changes to nested elements are needed.
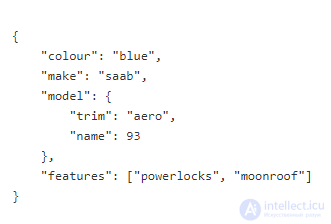
At first glance, the standard Redis data type «hash table» may seem very similar to a JSON object or another type. It is much simpler to make fields either a string or a number and not allow nested structures. However, by precomputing the «path» to each field, you can «flatten» the object and store it in a Redis hash table.
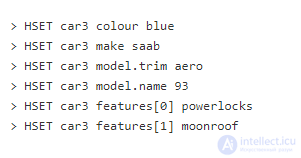
Using JSONPath (XPath for JSON), we can represent each element on a single level of the hash table:
For clarity the commands are given separately, but you can pass multiple parameters in HSET.
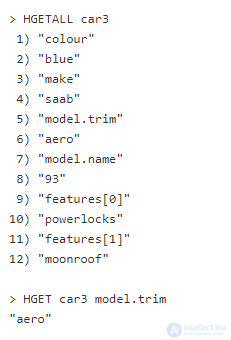
Now you can query the entire object or a single field of it:
And although this provides a fast and useful way of retrieving a stored object in Redis, it has its drawbacks:
This pattern largely coincides with ReJSON. If ReJSON is available, then in most cases it is better to use it. However, storing objects in the way described above has one advantage over ReJSON: integration with the Redis SORT command. However, this command is computationally complex and is a separate complicated topic beyond the scope of this pattern.
In the following, final part we will cover time series patterns, rate limiting patterns, Bloom filter patterns, counters, and the use of Lua in Redis.



Comments