Lecture
Not so much time has passed since the advent of CD-ROM recorders, but many users can hardly do without these devices. Diskettes are gradually becoming a thing of the past, increasingly not coping with the increasing amount of information that needs to be transferred or stored in a safe place.
Given the relatively small price difference between CD-ROM drives that are read-only and CD burners, it is easy to explain the popularity of recording devices among users. However, simply acquiring and connecting a recording drive to a computer is not enough, you should also master the programs with which you can create backup copies or record your own music, video, games or any other CDs, and if you like, a colorful menu of automatic loading.
After reading this book, you will learn the basics of working with the most popular programs designed to prepare a CD for recording, edit sound, write information to a CD, test CDs and drives. In addition, you will learn how to work with virtual CDs, which will help extend the service life of the drive, as well as create a menu of automatic disc detection, which is significantly superior in design and menu features recorded on factory CDs. You will also learn the history of creating a CD and familiarize yourself with the device of various types of compact discs.
Each chapter of this book is independent of the others, which will allow you, if you wish, to master programs in an arbitrary sequence. In addition to the program description, each chapter contains step-by-step instructions for performing the basic operations, which will greatly facilitate the process of mastering the material.
With this book, you can easily process and burn data of any type to a CD.
From the publisher
Send your comments, suggestions and questions by e-mail to gurski@minsk.piter.com (Peter publishing house, computer edition).
We will be glad to know your opinion!
On the publisher site http://www.piter.com you will find detailed information about our books.
Chapter 1
Optical media
• The structure of the CD.
• Build a DVD.
• Rules of operation of compact discs.
• CD / DVD drive.
In the late 1970s, Sony and Philips began to jointly develop a single standard for optical media. Philips has created a laser player, and Sony has developed a technology for recording on optical media. At the suggestion of Sony, the size of the disc was 12 cm, since this volume allowed the whole Beethoven Ninth Symphony to be recorded. In 1982, a document called the Red Book (Red Book) published a standard for processing, recording and storing information on laser discs, as well as the physical parameters of the disc.
Note.
There is a legend that the Red Book document (the Red Book) was called so because of the cover in which it was stored. All further CD standards have been given titles of books in different colors: Yellow Book, Orange Book, White Book, Blue Book, Green Book.
The following parameters have been defined in the Red Book standard.
• Physical disk size.
• Disk structure and data organization.
Note.
All data on the disk is divided into frames (frames). Each frame consists of 192 bits for music, 388 bits for modulation and error correction data, and one control bit. 98 frames make up one sector. Sectors are combined into a track. A maximum of 99 tracks can be recorded on a disc.
• Data recording in a single stream from the center to the periphery.
• Read data at a constant linear rate (Constant Linear Velocity, CLV).
Note.
During the recording and reading of information when the laser beam moves from the center to the periphery, the speed of rotation of the disk decreases. This is necessary to ensure that the same amount of information can be read and recorded at the same time. Therefore, without the use of CLV technology during playback, for example, musical works, there would be a change in the speed of performance.
Due to the relatively small size of laser discs compared to vinyl records, they were called compact discs, or CD for short. The first CDs were designed to record and play music (in fact, they were created for this purpose) and allowed to store up to 74 minutes of high-quality stereo sound. The standard of such disks was called CD-DA (Compact Disk Digital Audio - CD of digital audio).
With the development of the computer industry, there is a need for technology that allows storing not only digital sound but also various data on compact discs. Computer programs could not fit on floppy disks, and the volume of user files became more and more.
In 1984, a standard called the Yellow Book was published. Sony and Philips reorganized the CD structure and began to apply new error correction codes - EDC (Error Detection and Correction) and ECC (Error Correction Code). The main unit of data placement has become a sector. One sector contains: 12 bytes for synchronization, 4 bytes for headers, 2048 bytes for user data, and 288 bytes for error correction.
CAV (Constant Angular Velocity) technology has been developed for reading computer data. CAV technology allows you to read information from a disk faster than CLV technology, since as the laser beam moves from the center to the periphery, the data flow increases. Modern CD drives support both technologies.
Computer laser discs were called CD-ROM - Compact Disk ReadOnly Memory (literally - "read-only memory on CDs"). In the late 1990s, the CD-ROM drive became a standard component of any computer and the vast majority of software began to be distributed on CD-ROM.
The consumer market was rapidly expanding, production volumes were increasing, and the largest manufacturers started developing technology that allows the user to independently record any information on a CD. In 1988, Tajyo Yuden released the world's first CD-R (Compact Disk Recordable). The greatest difficulty faced by the developers of CD burners is the search for materials with high reflectivity. The company Tajyo Yuden successfully coped with the task. The alloy of gold and cyanine, which they used to manufacture such drives, had a reflectivity of over 70 %. The same company has developed a method of applying an active organic layer on the surface of a disk, as well as a technology for dividing a disk into tracks.
CD structure
A compact disk (CD) is a disk with a diameter of 120 mm (4.75 inches) or 80 mm (3.1 inches) and a thickness of 1.2 mm. The stroke depth is 0.12 μm, the width is 0.6 μm. Strokes are arranged in a spiral, from the center to the periphery. The length of the stroke is 0.9–3.3 μm, the distance between the tracks is 1.6 μm. Compact discs consist of three to six layers.
To accommodate the five- and three-inch discs in the CD-ROM tray, there are special grooves - respectively 5 and 3 inches.
Note.
In oral speech, as well as in print, most often used are the rounded values of the diameter of the disc: instead of 4.75 inches - 5, instead of 3.1 inches - 3.
A standard five-inch disc can contain 650–700 MB of information, 74–80 minutes of high-quality stereo sound with a sampling frequency of 44.1 kHz and a digitizing depth of 16 bits or a huge amount of MP3 audio.
On three-inch discs fit about 180 MB of information.
Sometimes there are discs called a “business card” (business card) (Fig. 1.1). In appearance and size, they resemble a business card, and in fact are three-inch discs, cut from both sides. On such a compact disc is written from 10 to 80 MB, depending on the degree of cutting the edges of the disc.
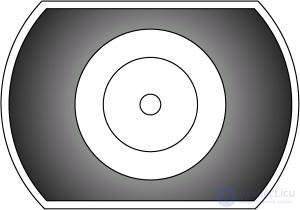
Fig. 1.1. CD "business card".
The basis of the disk, intended for recording information industrially, is a transparent polycarbonate, on which a thin layer of aluminum alloy is applied, then it is covered with a protective layer of varnish and a printing image is applied (Fig. 1.2).
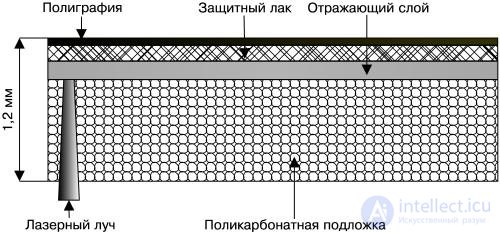
Fig. 1.2. CD structure.
DVDs, DVD-Rs, DVD-RWs, CDs, CD-Rs, and CD-RWs are manufactured by various companies: AMD, Amedia, Digitex, HP, Imation, MBI, Memorex, Philips, Smartbuy, Sony, TDK, Verbatim.
When buying a CD you should pay attention to the following details.
• The presence of lacquer drips on the edges of the disc may cause additional vibration and, as a result, errors in reading and writing data.
• In the absence of additional layers of paint the disc is translucent, do not hope for a long service life of such a product.
• If the disc is translucent, notice how the reflective layer is applied. When viewing the light on a compact disc, there should be no streaks, the reflective layer should be the same over the entire surface.
• The polycarbonate base should be uniform, without air bubbles.
• Most commercially available CDs with games, movies, or programs are stamped.
Burning DVD and CD in an industrial way takes place in eight stages.
1. Prepare the data you want to burn to a CD.
2. A photosensitive photoresistive layer of a certain thickness is applied to the surface of a highly polished glass processed with high precision. Using a laser beam controlled by a computer, illuminate certain areas of the photosensitive layer.
3. After developing in special solutions, small hollows remain on the glass, called pits, and convex places - lands. The matrix or stamper obtained in this way is called Glass Master (glass base).
4. Using special reagents or vacuum deposition, Glass Master applies a thin layer of nickel or silver. So we get the Metal Master (master disk).
5. Create a negative master disc. In place of the projections formed depressions, and vice versa, in the place of depressions protrusions are formed.
6. From a high-strength material create a stamp in the center of which a hole is drilled.
7. The stamp is placed in the press machine and make copies.
8. An aluminum film is applied to the copy to reflect the laser beam. Film thickness is hundredths of micrometers. The disc is coated with varnish and printed on it.
CD-R (CD Recordable - recordable CD) - has a more complex structure. On its surface is added another layer, on which the recording is made. The active, or recording, layer is located between the base and the reflecting layer (Fig. 1.3).
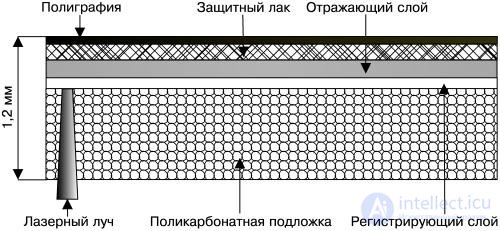
Fig. 1.3. CD-R structure.
A clean CD-R, or "blank", has a spiral track (Pre-groove), which contains special tags and synchronization signals. During recording, pre-marking helps the laser move along the desired trajectory. In addition, CD burners themselves “read” some of the parameters of the CD-R used, which makes it easy for the user to configure these programs. Synchronization signals are recorded with a reduced amplitude and subsequently overlapped by a recorded signal.
During recording, the laser beam moves along a spiral track and at the time of its activity it melts an additional layer. Under the influence of the laser, this layer changes its structure. In this way, cells (pits) are obtained that correspond to the data recorded on a CD. After this stage, the structure of the active disk layer cannot be changed, and the data recorded on the disk cannot be deleted.
Note.
Pitas are through holes in the extra layer.
The active layer is made from organic compounds: cyanine (Cyanine) and its derivative - phthalocyanine (Phtalocyanine). It is believed that phthalocyanine is more reliable and durable, as it is less sensitive to sunlight. But even less sensitive to sunlight discs with the active layer MetalAZO, developed by Mitsubishi Chemical.
The requirements for the CD-R reflective layer, compared to pressed discs, are quite high due to the presence of a recording layer. Therefore, for the manufacture of the reflective layer are used more expensive materials - industrial gold and silver, - as well as complex alloys.
The working surface of a CD-R, depending on the combination of substances used in the recording and reflecting layers, can be of different colors. Previously, many discs had a golden working surface due to the use of gold.
Currently, silver is used for the manufacture of the reflective layer, since this material is cheaper and has a higher reflectance. Most often, the working surface is transparent, dark blue or light green. The service life of such disks, depending on the material of manufacture, is from 10 to 100 years.
CD-RW (Compact Disk Re-Writable - rewritable CD) (Fig. 1.4) - has, in addition to the above described, two more thermal protective layers. The presence of additional layers allows you to write to such a disc more than 1000 times.
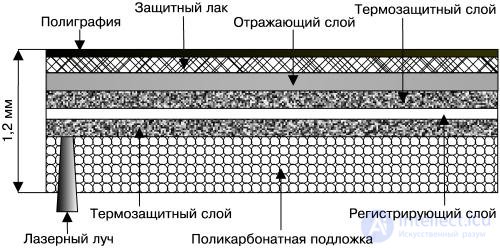
Fig. 1.4. CD-RW structure.
During the "burn" (recording disc) laser beam heats the areas of the intermediate layer. Upon subsequent cooling, these areas are transferred from the crystalline to the amorphous form. If information from a CD-RW needs to be erased, the laser beam heats the intermediate layer less intensively, and the amorphous regions crystallize.
DVD build
In December 1995, 10 companies united in the DVD Consortium Union, officially announced the creation of a single unified standard - DVD. The DVD abbreviation was first decoded as a Digital Video Disc, but subsequently its meaning was changed to Digital Versatile Disc. The disc was fully compatible with the Red Book (Red Book) and Yellow Book standards.
A DVD is externally identical to a CD, but it allows you to record information that is 24 times larger, that is, up to 17 GB. This was made possible by changing the physical characteristics of the disk and the use of new technologies. The distance between the tracks decreased to 0.74 microns, and the geometrical dimensions of the pit to 0.4 microns for a single-layer disk and 0.44 micron for a double-layer disk. The data area has increased, the physical sizes of the sectors have decreased. I found the use of a more efficient error correction code - RSPC (Reed Solomon Product Code), it became possible to more effective bit modulation.
DVD technology provides a huge number of formats and four types of design performance in two sizes. The disc of such a standard can be both one-sided and double-sided. On each side there can be one or two working layers. Consider the basic characteristics of DVDs of various types.
• The disc size is 80 mm (3.1 inches).
- DVD-1 (Single-sided, single-layer) - single-sided and single-layer disc. It may contain up to 1.36 GB of information (Fig. 1.5).
- DVD-2 (Single-sided, double-layer) - single-sided double-layer disc. Contains up to 2.48 GB of information (Fig. 1.6).
- DVD-3 (Double-sided, double-layer) - double-layer disc with one information layer on each side. Capacity - up to 2.74 GB of information (Fig. 1.7).
- DVD-4 (Double-sided, double-layer) - a disc with two information layers on each side. The capacity of such a disc is up to 4.95 GB (fig. 1.8).
• Disk size - 120 mm (4.75 inches).
- DVD-5 (Single-sided, single-layer) - single-sided single-layer disc. Contains up to 4.7 GB of information.
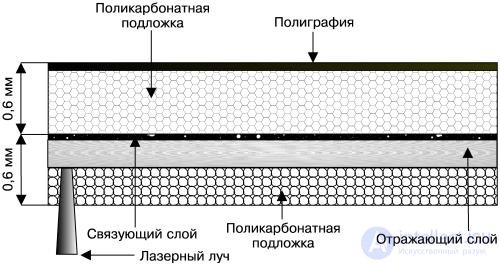
Fig. 1.5. The structure of DVD-1 and DVD-5.
- DVD-9 (Single-sided, double-layer) - single-sided and dual-layer disc. Capacity - up to 8.5 GB.
- DVD-10 (Double-sided, double-layer) - double-layer disc with one information layer on each side. Contains up to 9.4 GB of information.
- DVD-18 (Double-sided, double-layer) - a dual-layer disc with two information layers on each side. Capable to hold up to 17 GB of information.
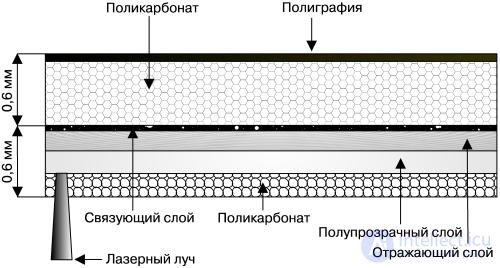
Fig. 1.6. The structure of DVD-2 and DVD-9.
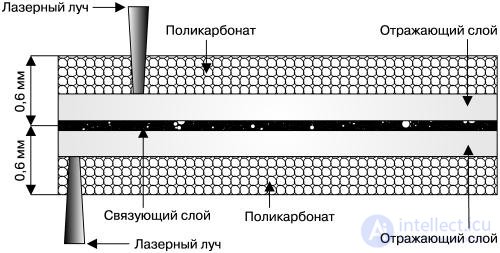
Fig. 1.7. The structure of DVD-3 and DVD-10.
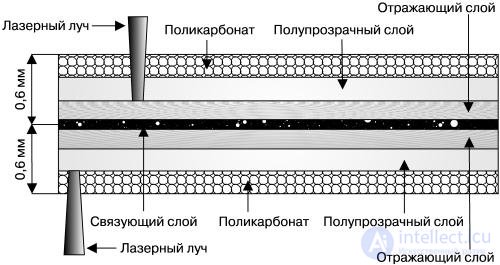
Fig. 1.8. The structure of DVD-4 and DVD-18.
Note.
The number in the disc name — DVD-1, DVD-4, DVD-10, etc., is the rounded value of the capacity.
Burning single-layer DVDs is similar to writing a CD, but recording dual-layer discs is significantly different from the process described earlier.
DVD-2 and DVD-9 dual layer discs have two working layers for recording information. These layers are separated using a special translucent material. To perform its function, such a material must have mutually exclusive properties: well reflect the laser beam in the process of reading the outer layer and at the same time be as transparent as possible when reading the inner layer. By order of Philips and Sony corporations, 3M has created a material that meets these requirements: it has a reflection coefficient of 40% and the necessary transparency.
During the reading of information from such a disk, the laser beam first passes through the semitransparent layer, focusing on the tracks of the inner layer. Having read all the information of the inner layer, the laser beam automatically changes its focus and reads the information from the translucent layer. The presence in the DVD drive of the buffer and the ability to quickly change the focus allows you to continuously submit data to the motherboard.
In the manufacture of a double-layer disc, the first layer based on polycarbonates is first stamped. Then applied translucent material, which in turn is covered with a film of photopolymer material. Using ultraviolet radiation, photopolymer is stiffened and the DVD is filled with polycarbonate, which serves as a protective layer on the disc.
DVD имеют толщину 0,6 мм. Для физической совместимости с CD на DVD дополнительно приклеивалась поликарбонатная подложка толщиной 0,6 мм. С целью не только увеличить толщину DVD до 1,2 мм, но и одновременно улучшить его функциональность, увеличив емкость носителя в два раза, компанией Toshiba был создан двухсторонний диск (типы DVD-3 и DVD-10). Чтобы получить диск типа DVD-3, достаточно склеить между собой со стороны этикеток два DVD-1; для получения же DVD-10 соединяются два DVD-5. Таким образом, склеивая между собой два диска толщиной 0,6 мм, мы получаем один диск, по толщине равный CD и обладающий возможностью записать вдвое больше информации.
Для получения дисков типа DVD-4 следует склеить два DVD-2, для DVD-18 – соответственно два DVD-9.
Принцип записи информации на DVD-R (Digital Versatile Disk Read-only – однократно записываемый DVD) и считывания с него аналогичен записи и считыванию CD-R. Во время записи DVD в специальных рекордерах лазерный луч повышенной мощности «прожигает» в активном слое отверстия (питы). При считывании информации лазерный луч обычной мощности, свободно проходя сквозь образовавшееся отверстие, отражается от металлизированного слоя и попадает на фотодатчик, а потом на микропроцессор.
To write and read information from DVD-RW (Digital Versatile Disk ReWritable - rewritable DVD), Phase Change Technology is used. The laser beam moves along a spiral track during recording. During the period of increased beam activity, the recording layer changes its structure, moving from a crystalline to an amorphous state. When reading information, the detector recognizes from which surface the laser beam is reflected - crystalline or amorphous - and converts the data into a digital stream. Under the influence of a laser beam of a certain power, the active (recording) layer returns to its original state, and the disk can be rewritten many times.
Материал, способный неоднократно менять свою структуру, был разработан компанией TDK и получил название AVIST (Advanced Versatile Information Storage Technology – современная универсальная технология запоминания информации).
Note.
Материал AVIST в кристаллическом состоянии обладает 25–35 %-ной отражающей способностью, а при переходе в аморфное состояние темнеет и не отражает лазерный луч.
Для DVD-ROM, VideoDVD, AudioDVD и т. д. применяется файловая система UDF (Universal Disk Format – универсальный дисковый формат), разработанная ассоциацией OSTA (Optical Storage Technology Association – ассоциация по поддержке технологии хранения данных на оптических носителях). Данная файловая система является развитием файловой системы CD-ROM (CDFS или ISO 9660).
DVD technology was originally designed to record and play movies. VideoDVD should provide the following features:
• playing movies of at least 133 minutes;
• various options for displaying widescreen video;
• up to 32 subtitles in different languages;
• surround sound;
• copy protection and regional coding;
• interactivity viewing.
The data contained in VideoDVD are divided into two types:
• navigation data;
• playback objects.
Objects of reproduction are divided into video, audio and graphics.
Для воспроизведения цифрового видео требуется цифровой поток скоростью 167 Мбит/с. Следовательно, на диске объемом 4,7 Гбайт могут вместиться четыре минуты оцифрованного видео. Чтобы сохранить не менее 133 минут качественного изображения, применяется сжатие данных. Видео кодируется в специальном формате MPEG-2, разработанном группой MPEG (Moving Picture Experts Group – экспертная группа по движущимся изображениям).
Во время просмотра фильмов вы, наверное, обращали внимание на то, что задний план, на фоне которого двигаются герои, как правило, остается неизменным. Дело в том, что примерно 95 % повторяющихся изображений заднего плана могут быть исключены при оцифровке без заметной потери в качестве, при этом значительно снижается объем цифрового потока.
Звук кодируют и сжимают с помощью различных технологий: Dolby Digital, MPEG-1 и MPEG-2. В AudioDVD используется технология LPCM (Linear Pulse Code Modulation – линейная импульсно-кодовая модуляция), в которой не применяется компрессия. Формат LPCM позволяет наиболее качественно и точно передать звуковые волны (частота дискретизации – 48 или 96 кГц, глубина оцифровки – 16, 20 или 24 бит), используя от одного до восьми звуковых каналов, и получить динамический диапазон записи до 120 дБ. При этом цифровой поток данных может составлять 6,144 Мбит/с.
Компрессия звукового сигнала с применением технологии Dolby Digital – AC-3 (Audio Cannels) – обеспечивает звук по схеме 5.1 (5 основных звуковых каналов и один низкочастотный) с диапазоном 20–20 000 Гц. Для компрессии звука используется разработанный компанией Dolby специальный алгоритм, получивший название Multichannel Perceptual Coding (многоканальное перцепционное кодирование). Человеческий слух, в зависимости от пола и возраста, с разной чувствительностью воспринимает звуки в различных частотных диапазонах. Кроме того, существуют определенные частоты и тембры, плохо различаемые всеми людьми. При применении технологии Dolby Digital некоторые частотные диапазоны, с трудом воспринимаемые человеческим ухом, подавляются, что приводит к определенным потерям данных. Однако в результате значительно уменьшается цифровой поток, например для шести каналов достаточно всего 348 Кбит/с.
Компрессия звукового сигнала с применением технологий MPEG-1 и MPEG-2 также связана с потерей данных. Формат MPEG-1 предназначен только для моно– или стереозвучания. Формат MPEG-2 может быть многоканальным и способен обеспечивать объемный звук по схеме 5.1 или 7.1.
Компрессия звукового сигнала с применением технологии DTS (Digital Theatre System – цифровой театр с окружающим звуком), разработанной в США, является альтернативой Dolby Digital. Качество звука при этом несколько выше, восприятие звуковых эффектов пространственно более реалистично, но поток данных в этом случае может достигать 1536 Кбит/с.
Для контроля за распространением дисков и защиты авторских прав производители DVD разделили мир на шесть географических зон и разработали специальные пиктограммы и коды для каждой зоны. Использование такого регионального кодирования как самих дисков, так и проигрывателей для них сделало невозможным воспроизведение дисков одной зоны на DVD-приводах другой зоны.
• Зона 1 – США и Канада.
• Зона 2 – Западная Европа, Япония, ЮАР, Ближний Восток.
• Зона 3 – Юго-Восточная и Восточная Азия, включая Тайвань и Гонконг.
• Зона 4 – Латинская Америка, Южная Америка, Карибские острова, Австралия и Новая Зеландия.
• Зона 5 – страны бывшего Советского Союза, Африка (кроме ЮАР), Индия, Пакистан, Монголия и Северная Корея.
• Зона 6 – Китай.
В настоящее время производители проигрывателей DVD выпускают так называемые «мультизонные» устройства, поддерживающие большинство форматов.
Правила эксплуатации компакт-дисков
Компакт-диск – это достаточно сложное устройство, требующее правильного обращения и ухода.
• Не допускайте загрязнения рабочей поверхности. Держите диск за края, не трогайте рабочую поверхность руками. Для удаления случайно попавшей на диск пыли и ваших отпечатков пальцев применяйте мягкую, чистую и сухую тряпочку, изготовленную из натуральных тканей и не обладающую абразивными свойствами. Движения не должны быть сильными, протирать диск следует от его центра к краю. Не применяйте для чистки рабочей поверхности растворители: ацетон, бензин, керосин и т. д.
• Не допускайте повреждения рабочей поверхности. Не роняйте, не царапайте и не изгибайте диск.
• Храните компакт-диски в специальной пластмассовой упаковке при комнатной температуре и не допускайте попадания прямого солнечного света на их рабочую поверхность.
• Не пишите на этикетке компакт-диска шариковыми и перьевыми ручками, а также твердыми карандашами, так как вы можете поцарапать тонкое защитное покрытие. Используйте для этой цели мягкие карандаши или фломастеры или делайте пометки на упаковке, в которой хранится диск.
• Во избежание смещения центра тяжести и повышения вибрации при вращении компакт-диска в приводе не наклеивайте на диск дополнительных этикеток.
Привод CD/DVD
Приводы компакт-дисков могут быть внутренними или внешними. Они могут подключаться с помощью SCSI-устройства, и такой способ подключения является самым эффективным, надежным и качественным по следующим причинам:
• allows you to work in the background while recording;
• the drive does not conflict with other devices;
• uses less computer resources;
• does not require optimization of the operating system.
The disadvantages of such a connection are as follows:
• cost;
• the need to purchase an additional controller to which you can connect from seven to fifteen different devices;
• more complex installation.
External drives connected via FireWire or USB buses run much slower than internal drives with an IDE interface, but you can connect and disconnect them while the computer is running, without shutting down the computer itself and without restarting the operating system.
Note.
The throughput of USB 2.0 is 480 Mbps. Installing a CD-ROM drive in Windows XP and Windows 2000 does not require additional software. USB 2.0 allows you to connect up to 127 devices. The connected device is automatically detected. The driver software required for each peripheral is turned on without user intervention.
In addition to the SCSI connector, internal models can be connected to the IDE (ATAPI) connectors located on the motherboard using an 80-pin loop. The vast majority of CD recorders use the IDE interface, as it is present in all modern computers. Most modern motherboards allow you to connect four IDE-devices using two loops. DVD or CD drives are connected as one of the hard drives, while the BIOS itself recognizes the type of equipment connected. But if for some reason the BIOS does not detect one of the drives, then this malfunction can be solved by using the BIOS Setup utility.
To access the BIOS CMOS Setup Utility while the computer is booting, you must press the Delete key. This should be done after loading the BIOS video, before loading Windows. If you have problems with determining the moment of pressing the Delete key, you can start pressing and releasing it immediately after turning on the computer. If everything is done correctly, a blue screen will appear with inscriptions in English. Select Standard CMOS Features and press Enter.
Note.
To select the desired menu item, simply move the red rectangle to the desired name and press the Enter key. Navigate through the menu items left, up, down and right by using the arrow keys: ←, →, ↑ and ↓. To return or cancel an action, use the Esc key. If you press the Esc key several times (the number of clicks depends on how deeply you went into the BIOS), the Quit Without Saving (Y / N) dialog box will appear on the screen - this short phrase can be translated as “exit the program without saving it changes. ” This window provides an irreplaceable opportunity for the novice user to leave the program, leaving in it the parameters that were set before entering BIOS Setup.
In the pop-up menu, we are interested in four parameters:
• IDE Primary Master [ST310211A];
• IDE Primary Slave [None];
• IDE Secondary Master [TEAC CD-W552E];
• IDE Secondary Slave [NEC DV-5800].
Note.
The names given in square brackets will correspond to the devices on your computer.
Two cables can be connected to the motherboard, two devices are connected to each of them. For example, you can connect one hard disk (in our case [ST310211A]) to the first connector of the first loop (Primary Master); you can connect another hard disk to the second connector of the first loop (Primary Slave) or nothing is connected to this connector, so you can see [None] in square brackets).
To the first connector of the second loop, which is called the Secondary Master, you can connect a CD-ROM drive (in this case it is [TEAC CD-W552E]). To the second connector of the second loop, which is called the Secondary Slave, another CD or DVD drive is connected or nothing is connected (in our case, this connector is occupied by [NEC DV-5800]).
Sometimes, in order to save money, a single cable is connected to the motherboard and a hard disk and a CD-ROM are connected to it, but in any case, if you connect two devices to one cable, one device will be the master (Master) and the second will be dependent (Slave ).
As a rule, the BIOS correctly determines the connection of devices, and in the settings you do not need to change anything yourself. If the system for some reason cannot determine the new device, you need to specify by yourself which connector it is connected to. This is done using the parameters Primary Master, Primary Slave, Secondary Master, Secondary Slave.
The most common mistake of novice users is the incorrect setting of the jumper on the device itself. The jumper is a small metal bracket inserted into the connectors that are located on the back of the CD or DVD drive. If two devices are connected to one loop, the jumper position must strictly distinguish between their levels: one device is Master (Main) and the other is Slave (Dependent).
Select the Advanced BIOS Features option and press the Enter key. In the menu that opens, pay attention to four parameters characterizing the sequence of testing devices. This BIOS sequence does not always install correctly.
First Boot Device (the device from which the operating system will be booted first) - [CDROM]. Choice available:
• FloppyHDD-1USB-ZIP;
• LS120 HDD-2USB-CDROM;
• HDD-0HDD-3USB-HDD;
• SCSIZIP100LAN;
• CDROMUSB-FDDDisabled.
Second Boot Device (the device from which the operating system will be loaded in the second place) - [HDD-0]. The same devices are available for selection as in the First Boot Device parameter.
Third Boot Device (the device from which the operating system will be loaded into third place) - [Floppy]. The same devices are available for selection as in the First Boot Device parameter.
Boot Other Device (boot the operating system from another device) - [Disabled]. For example, on a local network. The same devices are available.
During the scan of the computer, before loading the operating system, the BIOS will alternately scan the CD-ROM drive, the hard disk drive, and the drive in the sequence in which you specify. If your computer is running Windows XP, then First Boot Device should be set to CDROM. If the default computer starts to boot from the hard disk, it will freeze. In this case, "cure" the operating system using a CD will be quite difficult. The installation of Windows operating systems is automated, and the user is only required to set the BIOS parameters so that the CD-ROM drive is detected before the hard disk. The BIOS will perform the following actions completely independently; the user only needs to agree with all the proposals. The brackets in the example above show devices for Windows XP.
If you have Windows 95 or 98 installed on your computer, then the First Boot Device parameter should be set to Floppy (floppy disk drive), since emergency loading of these operating systems is most often performed from a floppy disk. The Second Boot Device parameter should be set to the CDROM value, otherwise the operating system will have to be installed using the command line, which does not always lead to the desired results. In the Third Boot Device parameter, select the hard disk.
After setting the necessary parameters, press F10. As a result, the Save & Exit Setup (Y / N) window will appear - this phrase can be translated as “exit the program, saving the settings made”. Press Y (Yes), and then Enter. The computer will continue to boot.
The quality of the recording drive of the compact discs is significantly affected by the processor clock speed and the amount of RAM. It is not recommended to work in Windows 2000 or XP systems with RAM less than 128 MB, in this case errors will occur during recording, which will lead to damage to the blanks. In order to avoid undesirable consequences, it is necessary to burn disks on unproductive computers, having previously disabled unused applications.
The principle of operation of compact discs
The scheme of the device reading - write CDs is quite simple.
1. The laser diode emits a low-power beam of light with a length of 730–780 nm, which, passing through the guide prism and the beam splitter, hits the reflecting mirror.
Note.
During recording, the power of the laser beam increases significantly, and when erasing data decreases.
2. Following the instructions of the microprocessor, the carriage with a reflecting mirror moves to the desired track.
3. The laser beam is reflected from the disk, hits the mirror, then the beam splitter, and then the guide prism.
4. From the prism, the beam enters the photo sensor, the photo sensor sends signals to the microprocessor built into the CD-ROM drive, where data is processed and transmitted via a loop to the motherboard.
CD drives are produced by different companies: Yamaha, Plextor, Hitachi, HP, Sony, Ricoh, Philips, Panasonic, TEAS, AOpen, Mitsumi, etc. The cost of CD– and DVD drives depends on the quality of the model, the level of the manufacturer, functions and technical specifications. For example, consider the technical characteristics of some CD, DVD drives, as well as combo drives and their meanings.
• Samsung SC / H152 CD-ROM (OEM).
- Speed formula - 52x.
- The mechanism for loading CDs - tray (tray).
- Buffer size - 128 KB.
- Data access time - 80 milliseconds.
- Supports formats: CD-ROM, Audio CD, Video CD, CD-i / FMW, CD-R, CD-RW, CD-Extra, Photo CD, Karaoke CD.
- Interface - IDE (ATAPI).
- Time between failures - 125 thousand hours.
• CD-ROM SONY CDU 415.
- Interface - SCSI.
- The mechanism for loading CDs - tray (tray).
- Supports formats: CD-DA, CD Extra, CD-ROM (Mode1), CD-ROM XA (Mode 2 Form 1 & 2), CD-I (Mode 2 Form 1 & 2), CD-I Ready, CD Bridge , Photo CD (single and multisession), Video CD.
- Buffer size - 0.25 MB.
- Supported disk sizes - 8 and 12 cm in diameter.
- Time between failures - 100 thousand hours.
- Dimensions - 14.6 x 4.1 x 20.3 cm.
• Benq CB523B combo drive.
- Interface - E-IDE (ATAPI).
- The mechanism for loading CDs - tray (tray).
- CD / CD-R read speed - up to 7800 Kb / s (52x max CAV).
- DVD reading speed - up to 2100 Kb / s (16x max CAV).
- CD-R recording speed - up to 7800 Kb / s (52x max P-CAV).
- CD-RW recording speed - up to 4800 Kb / s (32x max P-CAV).
- Supports formats: CD-I, CD-ROM, Audio CD, Video CD, CD-R, CD-RW, Photo CD, Karaoke CD, Text CD, Enhanced CD, Bootable CD, Data CD, DVD-ROM, DVD R, DVD-RW, DVD + R DVD + RW.
- Record formats - TAO (Track at Once), DAO (Dick at Once), SAO (Session at Once), Multi-Session, Packet Writing, UDF.
- CD access time is 120 milliseconds, DVD is 140 milliseconds.
- The size of the data buffer is 2048 Kbytes, using the Seamless Link buffer underrun prevention technology.
- Supported disk sizes - 8 and 12 cm in diameter.
- Installation method - vertical and horizontal.
- Time between failures - 125 thousand hours.
- Dimensions - 146 x 42 x 198 cm.
• Writemaster TS-H552.
- Interface - IDE (ATAPI).
- The mechanism for loading CDs - tray (tray).
- CD / CD-R read speed - 48x max.
- CD-RW reading speed - 32x max.
- DVD reading speed —16x max.
- DVD-R, DVD + R DVD-RW, CD-RW, DVD + R DL reading speed - 16x max.
- CD-R recording speed - 40x max.
- CD-RW recording speed - 32x max.
- DVD + RW recording speed - 4x max.
- DVD-RW recording speed - 4x max
- DVD + R burning speed - 16x max.
- DVD-R burn speed - 12x max.
- DVD + R DL recording speed - 2.4x max.
- Supports formats for CD - CD-ROM, CD-ROM XA, CD-DA, Video CD, Photo CD, Text CD, CD-R, CD-RW.
- Supports formats for DVD - DVD-ROM (Single / dual layer), Video DVD, DVD-ROM, DVD-R, DVD-RW, DVD + R, DVD + R DL, DVD + RW.
- Data access time: CD - 110 milliseconds, DVD - 130 milliseconds.
- The size of the data buffer is 2 MB.
- Supported disk sizes - 8 and 12 cm in diameter.
- Dimensions - 148.2 x 42 x 184 mm.
• NEC ND-3520A
- Interface - IDE (ATAPI, UDMA / 33).
- The mechanism for loading CDs - tray (tray).
- CD / CD-R read speed - 48x max.
- DVD reading speed - 16x max.
- CD-R recording speed - 24x max.
- CD-RW recording speed - 6x max.
- DVD + RW recording speed - 8x max.
- DVD + R / DVD-R burning speed - 16x max.
- DVD + R / -R DL recording speed - 4x max.
- Supports formats for CD - CD-DA, CD-ROM, CD-ROM / XA, Photo CD, Video CD, Extra CD, Text CD, Bridge CD.
- Supports formats for DVD - DVD single / dual layer, DVD-R / + R, DVD-RW / + RW, DVD + R9 / -R9.
- Record Formats - TAO with Zero gap, DAO (at Once), SAO (Session at Once), Multi-Session, Fixed and Variable Packet.
- Data access time: CD - 120 milliseconds, DVD - 140 milliseconds.
- The size of the data buffer is 2 MB.
- Supported disk sizes - 8 and 12 cm in diameter.
- Dimensions - 148 x 42 x 190 mm.
• ASUS CRW-5232AS-U. External CD drive.
- Interface - USB 2.0 (USB 1.1).
- The mechanism for loading CDs - tray (tray).
- CD-ROM read speed - up to 7800 Kb / s (52x max CAV).
- CD-R recording speed - up to 7800 Kb / s (52x max P-CAV).
- CD-RW recording speed - up to 4800 Kb / s (32x max P-CAV).
- The speed of digitizing audio tracks - 52x max.
- Supports formats: Audio CD, CD-ROM, CD-ROM / XA, Photo CD, Extra CD, Video CD, Text CD, Karaoke CD, I-Trax.
- The size of the data buffer is 2 MB.
- Supported disk sizes - 8 and 12 cm in diameter.
- Installation method - vertical and horizontal.
- Dimensions - 156 x 50 x 226 mm.
CD-ROM Parameters
Consider the parameters that affect the quality of the CD-ROM drive.
• Speed formula for CD. Initially, CDs were designed to record and store music, and the data reading speed was 153,600 bytes / s. With the advent of CD-ROMs designed for computer data, the speed increased, but still remained a multiple of 153,600 bytes / s. In the future, the speed of reading information from disks increased, but at the same time it remained a multiple of this initial value. Based on this, it is possible to calculate the speeds inherent in modern drives: if your drive has a read speed of 52x, then by multiplying 52 by 153,600 bytes / s, we get 7987200 bytes / s. If the write speed of your drive is 24x, then this is respectively 24 x 52 = 3,686,400 bytes / s.
Note.
Often, for ease of calculation, the speed of the first CD-ROM drive is taken at 150 Kb / s, rather than 153,600 bytes / s.
In a similar way, let's try to calculate the read speed for DVD drives. For the first speed in this case you should take nine speeds CD. Therefore, 153,600 x 9 = 1,382,400 bytes / s, or, roundly, 1385 KB / s. Accordingly, the data reading speed for DVD 16x is equal to 16x1382 400 = 22,118,400 bytes / s. With the help of these simple mathematical calculations, you can calculate the data flow at any speed.
• CD loading mechanism can be of several types.
- Tray - tray. Sliding mechanism for loading CDs.
- Caddy - assistant. First, a disk is inserted into a special box, and then this box is inserted into a drive receiving device. Such a CD loading mechanism is more reliable, but less convenient.
- Slot-in - can be roughly translated as "entrance slot". The disc is directly inserted into the drive slot. Loading a CD in this way resembles loading a regular floppy.
• Buffer size.
During recording, all kinds of data must be continuously transferred to a recording device; if this process is interrupted, the workpiece will be corrupted. To ensure error-free operation, all modern drives have a special chipset where the information intended for recording is placed in advance. This is the buffer. There are three types of buffers.
- Static buffer - saves in memory all the information entering the CD-ROM drive.
- Dynamic buffer - increases the speed of transmission of fragmented data and small files.
- Read-ahead buffer - the data is pre-buffered and transferred to the recording device as needed. The computer as if predicts which file will be needed for recording.
The larger the buffer size, the better and more reliable the CD-ROM drive.
• Time to access data. This is the delay between receiving a command to read data and directly read the data. This option significantly affects the recording of highly fragmented files, as well as a large number of small data on different parts of the hard disk.
The passport of the drive indicates the average data access time. On the inner lanes the delay will be longer, and on the outer ones - less than that indicated in the specifications. The shorter the data access time, the faster the CD-ROM drive.
• CD-ROM drives can support the following CD formats.
- Audio CD, or CD-DA. Red Book is a format designed for recording music CDs. After recording such a disc, you can listen to it on a domestic CD player.
- CD-ROM. Yellow Book is a format designed for recording and storing computer data. Such compact disks are made on the special equipment by a stamping method.
- Video CD - format for recording and storing video data.
- CD-R - the CD-ROM drive can play and record disposable discs.
- CD-RW - the drive plays and records discs for reuse.
- CD Extra - CD-ROM drive allows you to create discs that can contain both audio data and computer.
- Photo CD is a format developed by Kodak. Used to record photo collections.
The DVD formats that CD-ROM drives can handle are as follows.
- DVD-ROM - disc recorded by industrial method of stamping.
- DVD-R - DVD-Recordable - write-once disc, from the factory DVD-ROM is distinguished by the presence of a special pigment layer between the transparent substrate and the reflective surface. Holes (pitas) in such a layer are not stamped, but burned out with a laser beam of increased power.
- DVD + R - is similar to the DVD-R format. The formats of DVD + R and DVD-R are similar, their technical characteristics are the same. The difference between these formats is only in the fact that different organic substances are used as dyes for them. The presence of such similar formats caused by competition among manufacturers.
- DVD-RW - rewritable discs. The format was developed by Pioneer.
- DVD + RW is an analogue of the DVD-RW format. Developed by Sony and Philips.
• MTBF time. This is the period during which your CD-ROM drive should work smoothly according to the MTBF standard. По истечении данного времени детали привода выработают свой ресурс, и фирма-производитель не может дать гарантии, что изделие будет и дальше работать правильно и качественно. Чем больше времени сможет проработать привод компакт-дисков, тем лучше, он не может работать бесконечно.
Главными врагами качественной работы приводов являются вибрация и нагрев. После штамповки профиль диска обычно представляет собой кривую линию с двумя характерными изгибами, и только центральная часть соответствует норме. Этого недостатка не лишены даже очень дорогие диски. Чтобы продлить срок службы привода компакт-дисков, необходимо правильно его эксплуатировать.
– Старайтесь не создавать большое количество копий компакт-дисков подряд. Бытовые записывающие приводы сильно нагреваются во время записи, что может привести к преждевременному износу механизма. Рекомендуется делать максимум две-три копии подряд, затем приводу необходимо дать отдохнуть полчаса, после чего можно сделать еще две-три копии, и т. д. Во время перерыва лучше отключать компьютер от сети.
– Не используйте сильно деформированные или поцарапанные компакт-диски. Помните: стоимость привода компакт-дисков значительно больше стоимости диска.
– При сильном загрязнении привода компакт-дисков сам привод может царапать диски. Царапины в таком случае расположены по окружности.
Чтобы предотвратить сильное загрязнение приводов, необходимо использовать программу PMC Clean.
Купите в магазине компакт-диск для чистки привода. На рабочей стороне такого диска расположена небольшая щеточка. Нанесите на щеточку одну каплю специальной жидкости, входящей в комплект, вставьте компакт-диск в привод. Выполните команду Пуск → Мой компьютер. Двойным щелчком мышью на значке привода откройте содержимое чистящего диска. Найдите значок запуска программы PMC Clean и запустите ее двойным щелчком. Выберите язык, на котором будут отображаться команды. В появившемся окне нажмите кнопку START, после чего заиграет музыка и начнется чистка привода (рис. 1.9). По завершении чистки нажатием кнопки TEST следует запустить программу тестирования. Ознакомившись с результатами, можно выйти из программы чистки привода, нажав кнопку END.
Второй способ работы с PMC Clean состоит в инсталляции программы на жесткий диск и запуске ее с помощью ярлыка, который можно поместить на Рабочий стол. Как вы понимаете, чистящий диск все равно придется вставить в привод. После установки программы можно настроить ее автоматический запуск. При этом, например, через неделю после чистки привода на экране вашего компьютера после загрузки операционной системы появится окно с напоминанием о необходимости произвести профилактические работы.
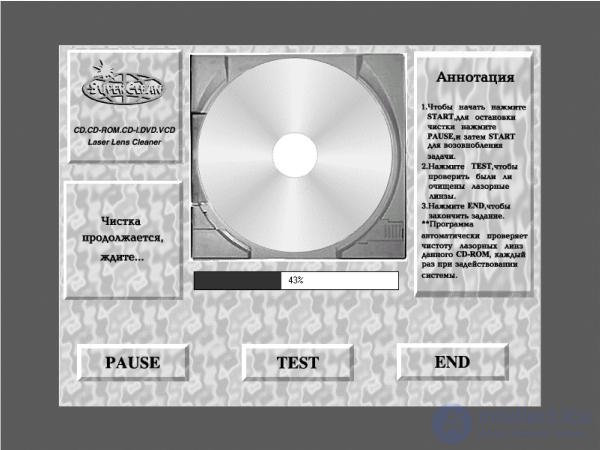
Fig. 1.9. Чистка привода компакт-дисков.
Attention!
Запускать программу для чистки привода компакт-дисков следует только по мере необходимости. Излишнее усердие в этом случае может только повредить.
Еще один способ продлить срок службы привода компакт-дисков заключается в установке программ, позволяющих создавать виртуальные приводы компакт-дисков и виртуальные компакт-диски.
Comments
To leave a comment
Electromechanical devices of electronic devices
Terms: Electromechanical devices of electronic devices