
Lecture
Principles of visual programming. The Visual Studio integrated development environment.
Microsoft Visual Studio .NET is an integrated development environment for creating, documenting, running and debugging programs written in .NET languages.
This development environment is an open language environment. Alongside the programming languages originally included in the environment — C++, C#, J#, Visual Basic — any programming languages whose compilers are created by third-party developers can be added to it. A necessary condition for including languages in the Visual Studio .NET environment is the use of a single common framework — the .NET Framework platform.
The .NET Framework platform makes it possible to:
The .NET Framework platform contains two main components:
Within this platform, the standard Common Type System (CTS) is used, which fully describes all the data types supported by the runtime environment, defines the interaction of data types, and their representation in .NET metadata format.
The set of rules defining the subset of common data types that are guaranteed to be usable safely across all .NET languages is described within the Common Language Specification (CLS). In order for classes developed in different languages to be usable together within a single application, they must satisfy certain constraints set by the CLS. A class that satisfies the CLS is called CLS-compliant. It is available for use in other languages, whose classes can be clients or descendants of the compliant class.
The .NET platform provides the programmer with a base class library available from any .NET programming language. Since the number of classes in the FCL library reaches several thousand, for the sake of structure, functionally related classes are grouped together into what are called namespaces.
The main namespace of the FCL library is the System namespace, containing both classes and other nested namespaces. For example, the System.Collections namespace contains classes and interfaces that support working with collections of objects — lists, queues, dictionaries. The System.Windows.Forms namespace contains classes used when creating Windows applications.
It should be remembered that C# generates code intended to run only within the .NET runtime environment (managed code). The binary file itself, containing the managed code, is called an assembly. An assembly contains code in the intermediate language MSIL (Microsoft Intermediate Language), or simply IL. Similarly to Java bytecode, IL code is compiled into platform-specific instructions at the moment the .NET runtime environment directly accesses a block of IL instructions. .NET binary modules, in addition to instructions, also contain metadata. Metadata describes not only the types used in the assembly, but also the assembly itself. This part of the metadata is called the manifest.
In most cases there is a one-to-one relationship between a .NET binary file and an assembly. However, an assembly can consist of either a single binary file or several.
A single-file assembly contains the manifest, the metadata, and the IL instructions.
Binary files that together form a shared assembly are called modules. In this case, one of the binary files must contain the assembly manifest. The remaining modules may contain only type metadata and IL instructions.
Multi-file assemblies allow the runtime environment to selectively load only those assemblies that are actually needed at a given moment of the application's execution, which reduces network traffic and increases program performance.
What did the C# language bring that was new compared to languages that already existed before it?
Projects are used to develop applications in Visual Studio .NET.
A Project is the basic unit the developer deals with. First they must choose the project type, after which Visual Studio creates a project skeleton according to the chosen type. A project consists of classes gathered into one or more namespaces. Namespaces let you structure projects that contain a large number of classes, grouping related classes together.
Several projects can be combined into a Solution, which can also include resources needed by those projects.
From the developer's point of view, the end result of their work, obtained after compiling the source code, is a solution, while from the point of view of the CLR (Common Language Runtime), it is an assembly containing a PE file, i.e. a module in the PE (Portable Executable) file format for 32-bit Windows OS, or a DLL (Dynamic Link Library) file.
Visual Studio .NET offers a wide variety of possible project types.
The C++ language standard includes the following set of fundamental types.
The void type indicates the absence of information.
The constructed types include the following:
The language also allows the developer to construct their own types:
In C#, all types can also be looked at from another angle, dividing them into four categories:
For a reference type, the value specifies a reference to an area of memory on the "heap" where the corresponding object is located. For a value type, the value is the actual data itself, and memory for it is allocated on the stack.
Booleans, arithmetic types, structures and enumerations belong to value types. Arrays, strings and classes belong to reference types.
Both reference and ordinary types are derived from the base class object. In cases where an ordinary type needs to behave like an object, a wrapper is created, which can be thought of as a reference object placed on the heap, into which the value of the ordinary-type variable is copied. The wrapper is automatically marked in such a way that the system knows which value it holds. This process is called boxing, and the reverse process is called unboxing.
Boxing happens automatically; to do it you only need to assign a value of an ordinary type to a variable of type object. Boxing and unboxing let you treat any type as an object. For example, in the expression
3.ToString();
the integer 3 is boxed by calling the Int32.ToString() function.
Arrays in C# can be multidimensional or jagged. More complex data structures, such as the stack and the hash table, are defined in the System.Collections namespace.
The C# language defines the char[] class, and it can be used to represent fixed-length strings. However, a char[] array is an ordinary array, so it cannot be initialized with a character string. C# does not define a conversion from the char[] class to the String class. String has a dynamic method, ToCharArray, that provides such a conversion to char[].
The String class does not allow existing objects to be modified. The StringBuilder class lets you get around this limitation. This class belongs to the mutable classes and can be found in the System.Text namespace.
In Visual Studio .NET, and in C# in particular, any software system is viewed as a set of classes combined into projects, namespaces, and solutions.
A class declaration has the following syntax:
[attributes][modifiers]class class_name[:list_of_parents] {class_body}
The following can be declared in the body of a class:
Syntactically, class fields are ordinary variables (objects) of the language. Their declaration follows the usual rules for declaring variables. Fields characterize the properties of objects of a class.
Syntactically, class methods are ordinary procedures and functions of the language. Methods contain descriptions of the operations available on objects of the class. Methods called properties are a special syntactic construct intended to provide efficient work with classes.
A constructor is a special class method that lets you create objects of the class. Its name must match the name of the class. If the developer does not define a class constructor, a default constructor — a constructor with no arguments — is automatically added to the class.
A delegate in C# represents a description of a class instance and defines a functional data type (class). Functions are instances of the class. Each delegate describes a set of functions with a given signature. Any function (method) whose signature matches the delegate's signature can be regarded as an instance of the class defined by the delegate. The syntax for declaring a delegate is as follows:
[<access specifier>] delegate <result type> <class name> (<argument list>);
Expressions are built from operands — constants, variables, functions — combined with operation signs and parentheses. Evaluating an expression determines its value and type.
The table below lists the C# operations.
|
Operation category |
Operations |
|
Arithmetic |
+ – * / % |
|
Logical (boolean and bitwise) |
& | ^ ! ~ && || |
|
String |
+ |
|
Increment and decrement |
++ -- |
|
Shift |
>> << |
|
Comparison |
== != < > <= >= |
|
Assignment |
= += –= *= /= %= &= |= ^= <<= >>= |
|
Class member access |
. |
|
Indexing |
[] |
|
Cast |
() |
|
Conditional |
?: |
|
Object creation |
new() |
|
Type information |
is sizeof typeof |
|
Exception management |
checked unchecked |
|
Indirection and addressing |
* –> [] & |
The name and type of a variable are set at its declaration and remain unchanged for its entire lifetime. A distinctive feature of C# is the requirement that a variable must be initialized before it is used. Attempting to use an uninitialized variable leads to errors that are detected already at the compilation stage.
In terms of the expressions and operators it uses, C# is similar to C++. Thus C# programs use statements such as:
In addition, several new statements have been introduced. For example, the foreach statement lets you access all elements of an array or collection in turn, in order of increasing index. Its syntax is:
foreach (type identifier in container) statement
An interface is a fully abstract class, all of whose methods are abstract. However, interface methods are declared without specifying an access modifier, and a class that inherits an interface must fully implement all of the interface's methods. This is the difference from a class that inherits an abstract class, where the descendant can implement only some of the methods of the parent abstract class while remaining an abstract class.
An interface lets you describe certain desirable properties that objects of different classes may have.
Among the interfaces built into the .NET base class library, the following deserve special mention:
The System.Collections namespace, intended for working with sets of objects, supports the interfaces:
When working with a software system, the need for object serialization often arises. Serialization is understood as the process of saving objects to persistent storage (files) while the system is running. Deserialization is understood as the reverse process — restoring the state of objects stored in persistent storage.
The serialization mechanisms of C# and the .NET Framework support two data-storage formats — a binary file and an XML file. In the first case, during serialization the data is converted into a binary stream of characters, which during deserialization is automatically converted back into the required object state. The other possible converter stores the object's state in XML format.
If a class is declared with the [Serializable] attribute, a standard serialization mechanism supporting deep serialization is built into it. If for some reason the standard serialization does not suit the developer, the class should be declared as inheriting the ISerializable interface, whose method implementations let you control the serialization process.

By working through this step-by-step walkthrough, you will become familiar with many of the tools and dialog boxes that can be used to create applications with Visual Studio. You will create a simple "Hello, World"-style application to learn more about working in the integrated development environment (IDE).
This section contains the following subsections.
Signing in to Visual Studio
Creating a simple application
Adding code to the application
Debugging and testing the application
Building the final version of the application
The first time you start Visual Studio, you are given the option to sign in using a Microsoft account, such as Live or Outlook. Signing in lets you keep your user settings synchronized across all your devices. How to Unlock Visual Studio." xml:space="preserve">For more information, see Signing in to Visual Studio.
After you open Visual Studio you can see three main parts of the integrated development environment: tool windows, a menu with toolbars, and the main window area. Quick Launch, the menu bar, and the standard toolbar at the top." xml:space="preserve">Tool windows are docked to the left and right sides of the application window, while the Quick Launch bar, the menu bar, and the standard toolbar are docked at the top of it. Start Page." xml:space="preserve">The Start Page is in the center of the application window. When you open a solution or project, editors and designers are displayed in this space.
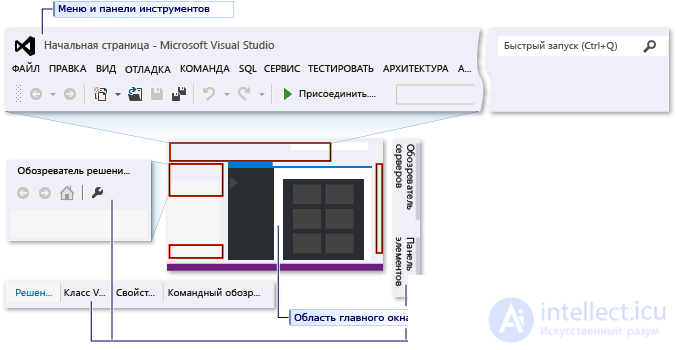
Figure 1. The Visual Studio integrated development environment
When creating an application in Visual Studio, you must first create a project and a solution. In this example, a Windows console application is created.
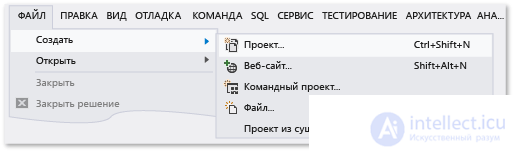
File, New, Project." xml:space="preserve">On the menu bar, choose File, New, Project.
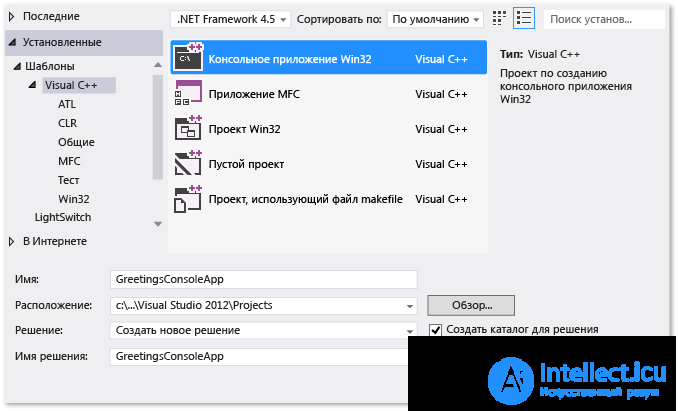
Visual C++ category, choose the Win32 Console Application template, and then name the project GreetingsConsoleApp." xml:space="preserve">In the Visual C++ category, choose the Win32 Console Application template, and name the project GreetingsConsoleApp.
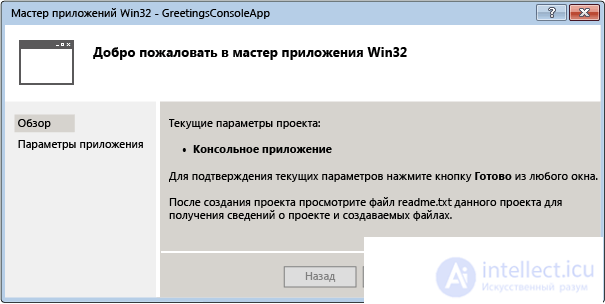
Finish button." xml:space="preserve">When the Win32 Application Wizard appears, click the Finish button.
Solution Explorer." xml:space="preserve">The GreetingsConsoleApp project and a solution with the basic files for the Win32 console application are created and automatically loaded into Solution Explorer. The GreettingsConsoleApp.cpp file opens in the code editor. Solution Explorer:" xml:space="preserve">The following elements are displayed in Solution Explorer:
Figure 4. Project elements
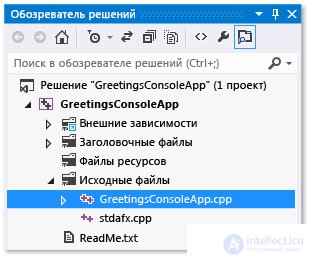
Next, you need to add code to display the word "Hello" in the console window.
return 0; and then enter the following code:" xml:space="preserve">In the GreetingsConsoleApp.cpp file, enter a blank line before the return 0; line, and then enter the following code into it:
cout <<"Hello\n";
cout." xml:space="preserve">A red squiggly line will appear under cout. Hovering over it displays an error message.
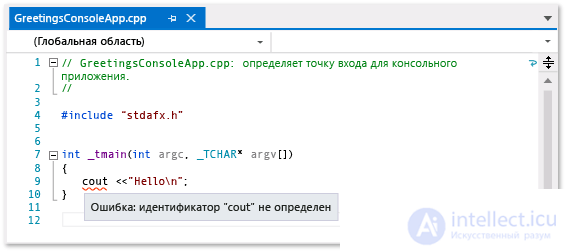
Error List window." xml:space="preserve">The error message will also appear in the Error List window. View, Error List." xml:space="preserve">You can display this window by choosing View, Error List on the menu bar.
cout is included in the <iostream> header file." xml:space="preserve">cout is included from the <iostream> header file.
#include "stdafx.h":" xml:space="preserve">To include the iostream header, enter the following code after #include "stdafx.h":
#include <iostream>
using namespace std;
You may have noticed that after inserting this code, a window appeared offering suggestions for the characters that were typed. This box is part of C++ IntelliSense technology, which provides code hints, including the display of class or interface members and information about parameters. In addition, you can use code snippets in the form of predefined blocks of code. Using IntelliSense and Code Snippets." xml:space="preserve">For more information, see Using IntelliSense and Code Snippets.
cout disappears when you fix the error." xml:space="preserve">The red squiggly line under cout will disappear once you fix the error.
Save the changes to the file.
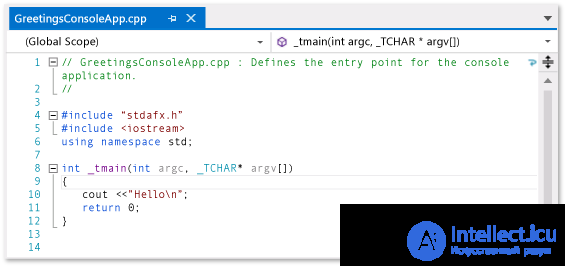
By debugging GreetingsConsoleApp, you can see whether the word Hello is displayed in the console window.
Start the debugger.
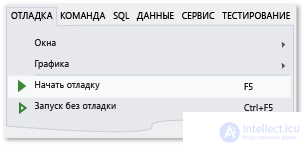
The debugger starts and executes the code. The console window (a separate window similar to a command prompt) is displayed for a few seconds, but closes quickly once the debugger stops. To view the text, you need to set a breakpoint in the program's execution.
return 0;." xml:space="preserve">Add a breakpoint from the menu on the return 0; line. You can also set a breakpoint simply by clicking the margin on the left.
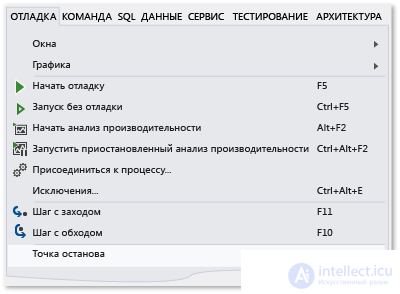
A red circle appears next to the line of code, at the edge of the left margin of the editor window.
Press F5 to start debugging.
The debugger starts, and a console window appears displaying the word Hello.
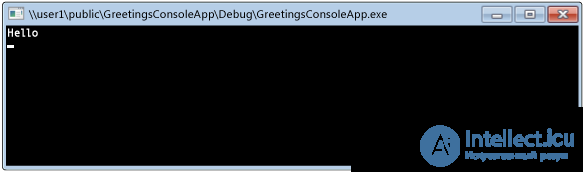
To stop the debugging process, press SHIFT + F5.
Debugging Preparation: Console Projects." xml:space="preserve">For more information, see Debugging Preparation: Console Projects.
Now that you've verified that everything works, you can prepare the final build of the application.
Using the command on the main menu, remove the intermediate files as well as the output files created during previous builds.
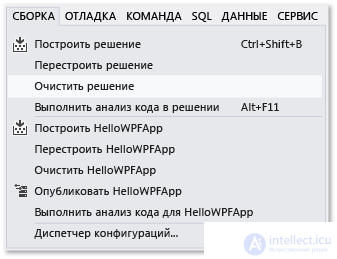
Debug to Release." xml:space="preserve">Change the build configuration for GreetingsConsoleApp from Debug to Release.

Build the solution.
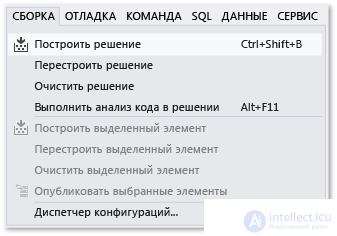

Comments