
Lecture
CSS, like any language, has its own syntax. It has no elements, no parameters, no tags. It has rules. A rule consists of a selector and a declaration block enclosed in curly braces: The declaration block itself consists of properties and their values, separated by semicolons: Let's try it in practice. Open the html page and the css page you created in the last lesson. Let's give our page a blue background. As you remember, the body tag is responsible for this, so let's go to the style.css page and write the following code: body{ background: blue; } Open your html page in the browser and make sure its background has turned blue. Now let's make the text on the page white: body{ background: blue; color: white; } Refresh the html page in the browser (Ctrl+F5) and make sure all the text is now white. Now let's make the heading colors red (for h1) and yellow (for h2): body{ background: blue; color: white; } h1{ color:red; } h2{ color:yellow; } Refresh the page in the browser again and make sure everything is as intended. I think the principle is already clear: we specify a selector, i.e. the element the style is applied to, and inside the curly braces - its properties and their values. Properties and values will be the subject of separate lessons; for now we're looking at the general principle of building a style sheet. CSS Selectors Selectors by identifier In our example, page elements were used as selectors: body, h1, h2. But what if our html page has several identical elements (for example, paragraphs), and we want the text of all paragraphs to be black, except one of them, which should be pink. Then we'll need to give that paragraph a unique identifier and create a style for it. In HTML, an element's identifier is set using the id parameter, whose value is a unique name. For example:
Paragraph text with an identifier (id).
You can give any name, except reserved words (these include the names of HTML and CSS element tags and parameters); for example, you can't name an identifier body. Let's add a couple of paragraphs to our html page and give one of them an identifier:
Just some text here
Just some text here
A plain paragraph
A paragraph with an identifier (id)
If we look at our page in the browser now, both of our paragraphs are white. Let's add styles for our paragraphs to the style sheet (style.css): body{ background: blue; color: white; } h1{ color:red; } h2{ color:yellow; } p{ color:black; } p#pink{ color:pink; } We first specified that the text of all paragraphs should be black, and that the text of the paragraph with id "pink" should be pink. In this case our selector consists of the element (p), a separator (#), and the identifier name (pink). It's important to remember that a page can only have one of any given identifier (id). That is, for our example, you can't create two paragraphs with id "pink" - there can be only one paragraph with that id. But each paragraph can have its own identifier; for example, you can create a paragraph with id="green" and set a style for that paragraph in the style sheet. Selectors by class In the example above we created a paragraph with pink text and noted that such an id can only exist once. But what if we want two or three paragraphs to have pink text? For this, HTML has the class parameter, whose value specifies its name. Let's add a couple more paragraphs to our html page and give them class="pink":
Just some text here
Just some text here
A plain paragraph
A paragraph with an identifier
A paragraph with the class pink
A paragraph with the class pink
To set a style for this class, we'll write a rule in the style sheet where the selector will again be the element p and the name pink, but in this case it's a class name, so the separator used will be a period (.): body{ background: blue; color: white; } h1{ color:red; } h2{ color:yellow; } p{ color:black; } p#pink{ color:pink; } p.pink{ color:pink; } There can be as many paragraphs with this class as you like. Let's sum up so far: if all similar elements (for example, all h1 headings) should have the same style, then the selector consists of just that element (for example, p{color:black;}); if an element (any: paragraph, heading...) needs to stand out from all the others, it's given an identifier (id), and the separator in the style sheet is a hash sign (#), for example p#pink{color:pink;}; if there will be several elements on the page with the same style, they are given a class (class), and the separator in the style sheet is a period (.), for example p.pink{color:pink;}. An identifier has higher priority than a class. So if an element is given both a class and an identifier (which doesn't contradict the principles of CSS), the identifier's style will be applied. As already mentioned, identifiers and classes can be assigned to any html element. But it often happens that we want to highlight several different elements with a single style, for example green. In that case you can use a unified selector. In such selectors the element name isn't specified - only a period or hash sign is given, as a marker for a class or identifier, followed by the name. For example: .red{ color:red; } #yellow{ color:yellow; } This way, whatever element we give class="red" (a heading, a paragraph or a link), its text color will turn red. We can give one element on the page (any element) id="yellow" and that element's text color will turn yellow. Descendant selector Suppose we have an html page with the following code:
This text is in a paragraph
This is just text. This text is italicized
This text is in a paragraph, but this part is italicized
We want the italic text to also be green. So in the style sheet we'll write a type selector, i.e. i{ color:green; } Now our page in the browser looks like this: But what if we want not all italic text to be green, but only the text that's inside paragraphs. For this we'll make a change to the style sheet: p i{ color:green; } This way we've specified that this style should apply to i elements that are inside p elements. The element names are separated by a space in this case. Such selectors are called descendant selectors. Now our page in the browser looks like this: Grouping selectors If the declaration blocks for several selectors are the same (for example, we want the headings of the first three levels to be green), they can be grouped. To do this, list the selectors that the same style will apply to, separated by commas. Example: h1, h2, h3{ color:green; } Suppose that besides the color, we also want to set a size for our headings. Then we can simply add to our style sheet: h1, h2, h3{ color:green; } h1{ font-size:18px; } h2{ font-size:16px; } h3{ font-size:14px; } Our headings will have the specified size, but they'll all be green. Actually, there's disagreement about grouping. Some consider the code above correct, since grouping helped avoid repeating the same property for three elements, which shortens the code. Others believe this makes the code less logical - because when you find the selector for the h3 heading, it's not immediately clear why its text is green. Proponents of logic recommend grouping only elements whose declaration blocks fully match. In general, whether to group or not is a matter of taste. But you should keep the different approaches in mind when reading someone else's code, for example in templates. This concludes the lesson on selectors. In the next lesson we'll get acquainted with concepts such as pseudo-elements and pseudo-classes.
The pattern-matching rules that exist in CSS determine how style rules are applied to elements in the document tree. These patterns, called selectors, can range from simple element names to complex text structures. If a given element satisfies all the criteria set by the pattern, then the corresponding selector matches that element.
The case sensitivity of document language element names is determined by the document language. For example, element names are not case-sensitive in HTML documents, but are case-sensitive in XML documents.
The following table gives a brief summary of selector syntax in CSS 2.1:
| Pattern | Meaning | Described in section |
|---|---|---|
| * | Matches any element. | Universal selector |
| E | Matches any element E (i.e. any element of type E). | Type selectors |
| E F | Matches any element F that is a descendant of element E. | Descendant selectors |
| E > F | Matches any element F that is a child element of element E. | Child selectors |
| E:first-child | Matches element E when E is the first child of its parent element. | The :first-child pseudo-class |
| E:link E:visited |
Matches element E if E is the source anchor of a hyperlink whose target has not yet been visited (:link) or has already been visited (:visited). | Link pseudo-classes |
| E:active E:hover E:focus |
Matches E during certain user actions. | Dynamic pseudo-classes |
| E:lang(c) | Matches element E if it is in (spoken) language c (the document language specifies how the spoken language is determined). | The :lang() pseudo-class |
| E + F | Matches any element F immediately preceded by a sibling element E. | Adjacent sibling selectors |
| E[foo] | Matches any element E with the "foo" attribute set (whatever the value). | Attribute selectors |
| E[foo="warning"] | Matches any element E whose "foo" attribute value is exactly equal to "warning". | Attribute selectors |
| E[foo~="warning"] | Matches any element E whose "foo" attribute value is a whitespace-separated list of values, one of which is exactly equal to "warning". | Attribute selectors |
| E[lang|="en"] | Matches any element E whose "lang" attribute has a hyphen-separated list of values beginning (from the left) with "en". | Attribute selectors |
| DIV.warning | Language dependent. (In HTML this is the same as DIV[class~="warning"]). | Class selectors |
| E#myid | Matches any element E with the ID attribute equal to "myid". | ID selectors |
A simple selector is either a type selector or a universal selector, immediately followed, in any order, by zero or more attribute selectors, ID selectors, or pseudo-classes. A simple selector matches if all of its components match.
Note: the terminology used here in CSS 2.1 differs from that used in CSS3. For example, "simple selector" refers to a smaller part of the selectors in CSS3 than in CSS 2.1. See CSS3 Selectors, Module [CSS3SEL].
A selector is a chain of one or more simple selectors separated by combinators. Combinators are: whitespace, the ">" character, and "+". Whitespace may appear between a combinator and the simple selectors around it.
Elements of the document tree that are matched by a selector are called the subjects of the selector. A selector consisting of a single simple selector matches any element that satisfies the requirements of that selector. If a selector and a combinator are additionally prepended to the sequence, this imposes additional matching requirements, so the subjects of the selector should always be considered a subset of the elements matched by the last simple selector.
A single pseudo-element may be appended to the last simple selector in the sequence, in which case the style information will apply to a part of each subject.
If several selectors share the same declarations, they can be grouped into a comma-separated list.
In this example, three rules with identical declarations are combined into one. Thus, the following:
h1 { font-family: sans-serif }
h2 { font-family: sans-serif }
h3 { font-family: sans-serif }
is equivalent to the following:
h1, h2, h3 { font-family: sans-serif }
Along with this option, CSS offers other shorthand mechanisms, including multiple declarations and shorthand properties.
The universal selector, written as the "*" character, matches the name of an element of any type. It matches any single element in the document tree.
If the universal selector is not the only component of a simple selector, the "*" character may be omitted. For example:
*[lang=fr] and [lang=fr] are equivalent.*.warning and .warning are equivalent.*#myid and #myid are equivalent.A type selector matches the name of a document language element type. A type selector matches every instance of that type in the document tree.
The following rule matches all H1 elements in the document tree:
h1 { font-family: sans-serif }
Sometimes it's necessary for selectors to match an element that is a descendant of some other element in the document tree (for example, EM elements contained in an H1 element). Descendant selectors allow such associations to be expressed in a pattern. A descendant selector consists of two or more selectors separated by whitespace. A descendant selector of the form "A B" matches if element B is an arbitrary descendant of some ancestor element A.
For example, consider the following rules:
h1 { color: red }
em { color: red }
Despite the fact that the purpose of these rules is to draw attention to a certain fragment of text by changing its color, this effect will not be achieved if the following occurs:
<H1>This heading is <EM>very</EM> important</H1>
Let us give the same example, supplementing the previous rules with one more, which sets the text color to blue whenever the EM element is located inside the H1 element:
h1 { color: red }
em { color: red }
h1 em { color: blue }
The third rule in the following fragment will match the EM element:
<H1>This <SPAN class="myclass">heading
<EM>very</EM> important</SPAN></H1>
The following selector:
div * p
matches a P element that is a descendant of the second or older generation of the DIV element. Note that the whitespace on each side of "*" is not part of the universal selector; the whitespace is a combinator indicating that DIV must be an ancestor of some element, and that this element must be an ancestor of P.
The selector that appears in the following rule, which combines descendant selectors and attribute selectors, matches any element that, first, has the given attribute "href" and, second, is located inside a P element, which, in turn, is itself located inside a DIV element:
div p *[href]
A child selector matches if an element is a child of some other element. This type of selector consists of two or more selectors separated by the ">" character.
The following rule sets the style of all P elements that are children of the BODY element:
body > P { line-height: 1.3 }
The example below combines descendant selectors and child selectors:
div ol>li p
The selector constructed in this example matches a P element that is a descendant of an LI element; the LI element must be a child of the OL element; the OL element must be a descendant of the DIV element. Note that the optional whitespace around the ">" combinator is omitted.
For information on selecting the first child element, see the section on the first-child pseudo-class below.
Sibling selectors have the following syntax: E1 + E2, where E2 is the scope of this selector. It matches if E1 and E2 are children of the same parent element in the document tree, and E1 immediately precedes E2, ignoring nodes that are not elements (such as text nodes and comments).
Thus, the following rule states that if a P element immediately follows a MATH element, there must be no indentation between them:
math + p { text-indent: 0 }
In the example below, the amount of vertical space between an H1 element and the H2 element immediately following it is reduced:
h1 + h2 { margin-top: -5mm }
The following rule is similar to the rule in the previous example, except that a class selector has been added to it. Thus, special formatting is applied only if the H1 element has the class class="opener":
h1.opener + h2 { margin-top: -5mm }
CSS 2.1 allows developers to create rules that match elements having certain attributes described in the source document.
Attribute selectors can match in four cases:
[att][att=val][att~=val][att~=val]Attribute values must be identifiers or strings. The case sensitivity of attribute and attribute name values is determined by the document language.
For example, the following attribute selector matches all H1 elements that define the "title" attribute, regardless of its value:
h1[title] { color: blue; }
In the following example, the selector matches all SPAN elements whose "class" attribute value is exactly equal to "example":
span[class=example] { color: blue; }
Several attribute selectors can be used to address multiple attributes of an element or to address the same attribute multiple times.
In this example, the selector matches all SPAN elements whose "hello" attribute value is exactly equal to "Cleveland" and whose "goodbye" attribute value is exactly equal to "Columbus":
span[hello="Cleveland"][goodbye="Columbus"] { color: blue; }
The following selectors illustrate the differences between "=" and "~=". The first selector will match, for example, the value "copyright copyleft copyeditor" of the "rel" attribute. The second selector will only match if the value of the "href" attribute is equal to "http://www.w3.org/".
a[rel~="copyright"]
a[href="http://www.w3.org/"]
The following rule hides all elements whose "lang" attribute has the value "fr" (i.e. a document in French).
*[lang=fr] { display : none }
The following rule will match those values of the "lang" attribute that begin with "en", including "en", "en-US" and "en-cockney":
*[lang|="en"] { color : red }
Similarly, the following rules of an aural style sheet allow a script to read aloud using different voices for each role:
DIALOGUE[character=romeo]
     { voice-family: "Laurence Olivier", charles, male }

DIALOGUE[character=juliet]
     { voice-family: "Vivien Leigh", victoria, female }
Matching is performed against attribute values in the document tree. Default attribute values may be defined in the DTD or elsewhere, but they are not always able to be matched by attribute selectors. Style sheets should be designed so that they work even if information about the default values used is not included in the document tree.
Rather, user agents are not required to read the "external subset" of the DTD, but are required to scan for default attribute values used in the "internal subset" of the document. (See the definition of these subsets in [XML10].)
User agents that recognize the XML namespace [XMLNAMESPACES] are not required to use this namespace awareness to process default attribute values if they are present in the document. (For example, an XHTML user agent is not required to use built-in knowledge of the XHTML DTD.)
Note that, typically, implementations prefer to ignore external subsets.
For example, consider the EXAMPLE element with the "notation" attribute, which by default takes the value "decimal". A fragment of the DTD might look like this:
<!ATTLIST EXAMPLE notation (decimal,octal) "decimal">
If the style sheet contains the rules
EXAMPLE[notation=decimal] { /*... default settings ...*/ }
EXAMPLE[notation=octal] { /*... other settings...*/ }
the first rule does not match elements whose "notation" attribute is set by default, i.e. not set explicitly. To cover all cases, the attribute selector for the default value must be dropped:
EXAMPLE                   { /*... default settings used ...*/ }
EXAMPLE[notation=octal]   { /*... remaining settings...*/ }
Here, since the selector EXAMPLE[notation=octal] is more specific than a single tag selector, the style declaration in the second rule overrides the one in the first, for elements whose "notation" attribute value is "octal". Care is needed, because all property declarations that apply only to default cases are overridden by style rules for the cases that are not accepted by default.
When working with HTML, authors can use dot notation (.) as an alternative to the ~= notation when representing the class attribute. Thus, for HTML div.value anddiv[class~=value] have the same meaning. The attribute value must come immediately after the "dot" (.). User agents may apply selectors that use dot notation (.) in XML documents if the user agents have namespace-related knowledge that allows them to recognize which attributes in the "class" attribute are intended for the corresponding namespace. One example of such namespace-related knowledge is text in the specification for a specific namespace (for example, SVG 1.1 [SVG11] describes the SVG "class" attribute and how user agents should interpret it, and likewise MathML 2.0 [MATH20] describes the MathML "class" attribute.)
For example, style information can be set for all elements with class~="pastoral" as follows:
*.pastoral { color: green } /* all elements with class~=pastoral */
or simply
.pastoral { color: green } /* all elements with class~=pastoral */
The following rule assigns a style only to the H1 element with class~="pastoral":
H1.pastoral { color: green } /* the H1 element with class~=pastoral */
Thanks to these rules, in the following example, the H1 elements will not be displayed in green color the first time they appear, but will be the second time:
<H1>Not the green color</H1>
<H1 class="pastoral">The real green color</H1>
To match a subset of "class" values, each of them must be preceded by a dot ".".
For example, the following rule matches any P element whose "class" attribute is assigned, as its value, a space-separated list of values that includes the words "pastoral" and "marine":
p.marine.pastoral { color: green }
This rule matches if class="pastoral blue aqua marine" but does not match if class="pastoral blue".
Note. In the CSS language, the "class" attribute is endowed with great descriptive power, allowing authors to create their own "document language", based on elements with which no presentation information is associated (for example, the DIV and SPAN elements in HTML) and to assign style information via the "class" attribute. Authors should avoid using such capabilities in practice, since the structural elements of a document language generally have generally accepted meanings, whereas author-defined classes most often do not.
Note: If an element has several class attributes, their values must be combined with spaces between the values before the class is searched for. At present the working group is not aware of any way in which this situation can be worked around, however, such behavior is explicitly non-normative in this specification.
A document language may contain attributes that are declared to be of ID type. Since no two of them can have the same value, this makes attributes of ID type unique; whatever the document language, the ID attribute can be used to uniquely identify its element. In HTML all ID attributes are denoted "id"; XML applications may denote ID attributes differently, but the same restriction holds for them.
The ID attribute of a document language allows authors to assign an identifier to a single instance of an element in the document tree. In CSS, ID selectors match an instance of an element based on its identifier. In CSS an ID selector contains the "#" character, immediately followed by the value of the ID to be identified.
Note that CSS does not define how user agents learn an element's ID attribute. User agents may, for example, read the document's DTD, which has hard-coded information, or ask the user.
The following ID selector matches the H1 element whose ID attribute value is equal to "chapter1":
h1#chapter1 { text-align: center }
In the following example, the style rule matches the element whose ID attribute value is equal to "z98y". The rule will thus match the P element:
<HEAD>
  <TITLE>Matching P</TITLE>
  <STYLE type="text/css">
    *#z98y { letter-spacing: 0.3em }
  </STYLE>
</HEAD>
<BODY>
   <P id=z98y>Wide text</P>
</BODY>
However, in the following example this style rule will only match the H1 element whose ID attribute value is equal to "z98y". In this example the rule does not match the P element:
<HEAD>
  <TITLE>Matching only H1</TITLE>
  <STYLE type="text/css">
    H1#z98y { letter-spacing: 0.5em }
  </STYLE>
</HEAD>
<BODY>
   <P id=z98y>Wide text</P>
</BODY>
ID selectors have greater specificity than attribute selectors. For example, in HTML the selector #p123 is more specific than [id=p123] in terms of the cascade.
Note. In XML 1.0 [XML10] information about which attribute holds the IDs of elements is located in the DTD. When parsing an XML document, user agents do not always read the DTD and therefore may not be able to know the element's ID information. If the style sheet developer knows or suspects that this may happen, they should use ordinary attribute selectors instead of ID selectors: [name=p371]instead of #p371 However, the cascade order of ordinary attribute selectors differs from the cascade order of ID selectors. It may be necessary to add the "!important" priority to the declaration: [name=p371] {color: red ! important}.
If an element has several ID attributes, all of them must be treated as IDs for that element in the sense of the ID selector. Such a situation should be resolved using xml:id [XMLID], DOM3 Core [DOM-LEVEL-3-CORE], XML DTDs [XML10], and namespace-related knowledge.
In CSS 2.1, style is usually attached to an element depending on its location in the document tree. In most cases this simple model turns out to be adequate, but sometimes, because of the structure of the document tree, it does not allow certain well-established publication-building scenarios to be implemented. For example, in HTML 4 (see [HTML4]) there is no element that would point to the first line of a paragraph, and therefore there is no simple CSS selector that could point to it.
CSS introduces the concept of and , which allow formatting to be applied based on information not included in the document tree.
Neither pseudo-elements nor pseudo-classes appear in the source document or the document tree.
Pseudo-classes can be placed anywhere in selectors, while pseudo-elements can only occur after the last simple selector.
The names of pseudo-classes and pseudo-elements are case-sensitive.
Some pseudo-classes are mutually exclusive, while others can be applied simultaneously to the same element. In the event of a rule conflict, the result is determined by the adopted cascading order.
The :first-child pseudo-class matches an element that is the first child element of some other element.
In the following example, the selector matches every P element that is the first child element of a DIV element. This rule prevents indentation for the first paragraph of a DIV element:
div > p:first-child { text-indent: 0 }
This selector matches the P element inside DIV in the following fragment:
<P>The last P before the note.
<DIV class="note">
   <P>The first P inside the note.
Chicago</P>
but does not match the second P element in the following fragment:
<P> The last P before the note.
<DIV class="note">
   <H2>Note</H2>
   <P> The first P inside the note.
</DIV>
In the following example, a font weight of 'bold' is set for every EM element that is a descendant of the first child element of P:
p:first-child em { font-weight : bold }
Please note that, since anonymous boxes are not part of the document tree, they are not taken into account when determining the first child element.
For example, the EM in:
<P>abc <EM>by default</EM>is the first child element of the P element.
The following two selectors are equivalent:
* > a:first-child   /* A - the first child element of any element */
a:first-child       /* Same thing */
User agents typically display unvisited links differently from links that have already been visited at least once. CSS provides the ':link' and ':visited' pseudo-classes to distinguish between these types of links:
Note. After a certain amount of time has passed, user agents may return a visited link to the ':link' state (unvisited).
These two states are mutually exclusive.
The document language determines the elements that serve as hyperlink anchor points. For example, in HTML4 the link pseudo-classes apply to A elements with an "href" attribute. Thus, the following two CSS 2.1 declarations are equivalent:
a:link { color: red }
:link  { color: red }
If the following link:
<A class="external" href="http://out.side/">external link</A>has been visited, then according to the rule:
a.external:visited { color: blue }
it will be displayed in blue.Note. It is possible for style sheet authors to abuse the :link and :visited pseudo-classes to determine, without the user's consent, which sites they have visited.
Therefore, user agents may treat all links as unvisited, or take other measures to preserve the user's privacy despite the separate representation of visited and unvisited links. For more information on managing privacy, see [P3P].
Sometimes interactive user agents change the presentation of a document after the user performs certain actions. CSS provides three pseudo-classes for the most commonly encountered cases:
An element can match several pseudo-classes at the same time.
CSS does not define which elements can be in the states described above, how they enter those states, or how they leave them. A script may choose whether elements respond to user actions or not, and different devices and user agents may use different ways of highlighting or activating elements.
CSS 2.1 does not define what happens if the parent of an element that is ':active' or ':hover' is also in such a state.
User agents are not required to reformat the displayed document because of transitions induced by pseudo-classes. For example, a style sheet might specify that the 'font-size' of an active (:active) link is larger than that of an inactive one, but since this could cause the letters to shift position while the user is selecting that link, the user agent may ignore the corresponding style rule.
a:link    { color: red }    /* unvisited links */
a:visited { color: blue }   /* visited links   */
a:hover   { color: yellow } /* selected, but not activated */
a:active  { color: lime }   /* active links    */
Note that the A:hover rule must be placed after the A:link and A:visited rules, since otherwise the cascading rules would hide the 'color' property of the A:hover rule. Similarly, because A:active is placed after A:hover, the active link is displayed in white when the user positions the pointer over the A element and activates it at the same time.
Example(s): An example of combining dynamic pseudo-classes:
a:focus { background: yellow }
a:focus:hover { background: white }
The last selector matches A elements that are in both the :focus and :hover pseudo-classes.
Information on displaying the focus area (focus) can be found in the section on dynamic focus areas.
Note. In CSS1, the ':active' pseudo-class and the group of ':link' and ':visited' pseudo-classes were mutually exclusive. This is no longer the case. An element can simultaneously belong to the ':visited' and ':active' pseudo-classes (or ':link' and ':active'), and the application of style declarations is determined by the principles of normal cascading.
Note. Also keep in mind that in CSS1 the ':active' pseudo-class applied only to links.
If the document language provides a way of specifying the natural language of an element, then CSS can be used to create selectors that match an element using that language. For example, in HTML [HTML4] the language is determined by a combination of the "lang" attribute, the META element, and, possibly, information from the protocol (such as HTTP headers). In XML, an attribute called xml:lang is used, and there may be other methods related to the document's language that allow the language to be determined.
The ':lang(C)' pseudo-class matches an element using language C. Whether a match occurs is based solely on whether the identifier C is equivalent to the element's language value, or to a hyphen-separated substring of the element's language value, in the same way as if it were represented by the '|=' operator. The identifier C need not be a valid language name.
The identifier C must not be empty.
Note: It is recommended that documents and protocols specify the language using codes from RFC 3066 [RFC3066] or the document that replaces it, and keep the "xml:lang" attribute in mind when developing documents based on XML [XML10]. See "FAQ: Two-letter or three-letter language codes."
The following rules place quotation marks in a document written in HTML, in either Canadian French or German:
html:lang(fr-ca) { quotes: '« ' ' »' }
html:lang(de) { quotes: '»' '«' '\2039' '\203A' }
:lang(fr) > Q { quotes: '« ' ' »' }
:lang(de) > Q { quotes: '»' '«' '\2039' '\203A' }
The second pair of rules effectively sets the 'quotes' property for Q elements according to the language of their parent elements. This is done because the choice of quotation marks usually depends on the language of the elements surrounding the quotation marks, rather than on the quotation itself, as is the case in the fragment of French text “à l'improviste”, located in English text and using English quotation marks.
Keep in mind the differences between [lang|=xx] and :lang(xx). In this HTML example, only BODY matches [lang|=fr] (since it has the LANG attribute) but both BODY and P match :lang(fr) (since both are in French).
<body lang=fr>
  <p>Je suis Français.</p>
</body>
The :first-line pseudo-element is used to apply special styles to the content of the first formatted line of a paragraph. For example:
p:first-line { text-transform: uppercase }
The rule shown above means "make the letters of the first line of each paragraph uppercase". However, the "P:first-line" selector does not match any real HTML element. It matches a pseudo-element that conforming user agents will place at the beginning of each paragraph.
Keep in mind that the length of the first line depends on many factors, such as the page width, font size, and so on. So a typical paragraph of an HTML document, such as:
<P>This is a rather long paragraph
of an HTML document that will be broken into several
 lines. The first line will be identified
by a sequence of functional tags. The other lines
will be treated as ordinary lines
of the paragraph.</P>
whose lines will undergo the following reorganization:
THIS IS A RATHER LONG PARAGRAPH OF AN HTML DOCUMENT,
which will be broken into several lines. The first
line will be marked by a sequence of functional tags.
The remaining lines will be treated as
 ordinary lines of the paragraph.
and will be "rewritten" by user agents so that it contains a sequence of functional tags for :first-line. This fictitious sequence helps show how properties are inherited.
<P><P:first-line> This is a rather long paragraph
of an HTML document, which </P:first-line> will be broken into several
lines. The first line will be marked
by a sequence of functional tags. The remaining lines
will be treated as ordinary lines
of the paragraph.</P>
If a pseudo-element breaks up a real element, the desired effect can often be achieved using a sequence of functional tags that closes and reopens that element. Thus, if we use a SPAN element in the previous paragraph, we get:
<P><SPAN class="test"> This is a rather long paragraph
of an HTML document that will be broken into several
lines.</SPAN> The first line will be marked
by a sequence of functional tags. The remaining lines
will be treated as ordinary lines
of the paragraph.</P>
and the user agent will be able to simulate the opening and closing tags for SPAN while inserting the sequence of functional tags for :first-line.
<P><P:first-line><SPAN class="test"> This
is a rather long paragraph of an HTML document,
which  </SPAN></P:first-line><SPAN class="test"> will be
broken into several lines.
lines.</SPAN> The first line will be marked
by a sequence of functional tags. The remaining lines
will be treated as ordinary lines
of the paragraph.</P>
The :first-line pseudo-element may only attach to a block-level element, inline-block, table-caption, or table-cell.
In some flows the "first formatted line" of an element may occur inside a block-level descendant (i.e., a block-level descendant that is not positioned and not floated). For example, the first line of the DIV element in <DIV><P>This line...</P></DIV> is the first line of the P element (given that both P and DIV are block-level elements).
The first line of table-cell or inline-block elements cannot be the first formatted line of the ancestor element. Thus, in <DIV><P STYLE="display: inline-block">Hello<BR>Goodbye</P> and so on</DIV> the first formatted line of the DIV element is not the line "Hello".
Note that the first line of the P element in the fragment: <p><br>First... does not contain any letters (given the default style for the BR element in HTML 4). The word "First" is not on the first formatted line.
The user agent should behave as if the simulated start tags of first-line pseudo-elements are inserted directly inside the innermost enclosing block-level element. (Since CSS1 and CSS2 make no mention of such cases, authors should not rely on this behavior.) An example follows. The sequence of functional tags for
<DIV>
  <P>First paragraph</P>
  <P>Second paragraph</P>
</DIV>
is
<DIV>
  <P><DIV:first-line><P:first-line>First paragraph</P:first-line></DIV:first-line></P>
  <P><P:first-line>Second paragraph</P:first-line></P>
</DIV>
The :first-line pseudo-element resembles an inline-level element, but with certain restrictions. The following properties apply to the :first-line pseudo-element: font properties, color properties, background properties, 'word-spacing', 'letter-spacing', 'text-decoration', 'vertical-align', 'text-transform', 'line-height'. User agents may also apply other properties.
The :first-letter pseudo-element should select the first letter of the first line of a block, provided that letter is not preceded by any other content on that line (such as images or inline tables). The :first-letter pseudo-element can be used to create simple typographic effects such as "drop caps" and "initial caps". This type of initial letter is similar to an inline-level element if its 'float' property is set to 'none'; otherwise it is similar to a floated object.
The following properties apply to :first-letter pseudo-elements: font properties, 'text-decoration', 'text-transform', 'letter-spacing', 'word-spacing' (when applicable), 'line-height', 'float', 'vertical-align' (only if 'float' is set to 'none'), margin properties, padding properties, border properties, color properties, background properties. User agents may also apply other properties. To let user agents render a drop cap or initial cap in a typographically correct way, user agents may choose the line height, width and height based on the shape of the letter, unlike ordinary elements. It is expected that CSS3 will have properties specific to first-letter.
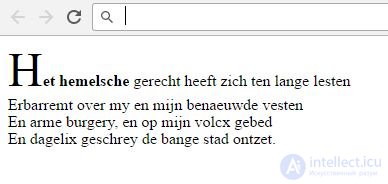
This example shows a possible rendering of an initial letter. Note that the 'line-height' property inherited by the first-letter pseudo-element is 1.1, but the user agent in this example calculated the height of the first letter differently, so that no extra space appears between the first two lines. Also note that the functional start tags of the first letter are inside the SPAN element, and so the font weight of the first letter is normal, not bold as in SPAN:
p { line-height: 1.1 }
p:first-letter { font-size: 3em; font-weight: normal }
span { font-weight: bold }
...
<p><span>Het hemelsche</span> gerecht heeft zich ten lange lesten<br>
Erbarremt over my en mijn benaeuwde vesten<br>
En arme burgery, en op mijn volcx gebed<br>
En dagelix geschrey de bange stad ontzet.
In the following CSS 2.1 example, an initial drop cap is created by combining two lines:
<!DOCTYPE HTML PUBLIC "-//W3C//DTD HTML 4.01//EN">
<HTML>
 <HEAD>
  <TITLE>Drop cap initial letter</TITLE>
  <STYLE type="text/css">
   P              { font-size: 12pt; line-height: 1.2 }
   P:first-letter { font-size: 200%; font-style: italic;
                    font-weight: bold; float: left }
   SPAN           { text-transform: uppercase }
  </STYLE>
 </HEAD>
 <BODY>
  <P><SPAN>First</SPAN> few words of an article
    in the journal "The Economist".</P>
 </BODY>
</HTML>
This example might be formatted as follows:
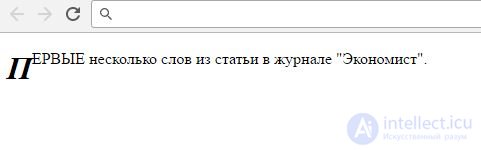
Sequence of functional tags:
<P>
<SPAN>
<P:first-letter>
F
</P:first-letter>irst
</SPAN>
few words of the article in the journal "The Economist".
</P>
Note that the tags of the :first-letter pseudo-element are adjacent to the content (e.g., to the initial character), whereas the start tag of the :first-line pseudo-element is inserted right after the start tag of the block-level element.
To achieve traditional drop cap styling, user agents may set approximate font size values, for example to align baselines. In addition, the glyph outline may be taken into account during formatting.
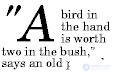
Punctuation marks (i.e., characters defined in the Unicode punctuation classes "open" (Ps), "close" (Pe), "initial" (Pi), "final" (Pf), and "other" (Po) [UNICODE]) should be placed before or after the first letter, as done in the following example:
The ':first-letter' pseudo-element also applies if the first letter is in fact a digit, for example, "6" in "67 million dollars is a pile of money."
The :first-letter pseudo-element applies to block, list-item, table-cell, table-caption, and inline-block elements.
The :first-letter pseudo-element can be used with any such elements that contain text, or that have descendants in the same flow that contain text. The user agent should behave as if the functional start tag of the first-letter pseudo-element is placed right before the first text of the element, even if that first text is inside a descendant element.
An example follows. The sequence of functional tags for this HTML fragment:
<div>
<p>First text.
is:
<div>
<p><div:first-letter><p:first-letter>F</...></...>irst text.
The first letter of table-cell or inline-block elements cannot be the first letter of the ancestor element. Thus, in <DIV><P STYLE="display: inline-block">Hello<BR>Goodbye</P> and so on</DIV> the first letter of the DIV element is not the letter "F". In practice, the DIV element has no first letter.
The first letter must be on the first formatted line. For example, in this fragment: <p><br>First... the first line does not contain any letters, and the ':first-letter' pseudo-element will not match anything (given the default style for the BR element in HTML 4). In particular, it does not match the letter "F" in the word "First."
If the element is a list-item element ('display: list-item'), then ':first-letter' applies to the first letter in the principal block after the marker. User agents may ignore ':first-letter' on list items with the 'list-style-position: inside' setting. If the element has ':before' or ':after' content, then ':first-letter' applies to the first letter of the element, including that content.
For example, after the rule 'p:before {content: "Note: "}', the selector 'p:first-letter' matches the letter "N" of the word "Note".
Some languages may have special rules for handling certain letter combinations. For example, in Dutch, if the letter combination "ij" occurs at the start of a word, both letters are treated as part of the :first-letter pseudo-element.
If the letters that would form the first-letter are not in the same element, as with "F" in <p>'<em>F..., then the user agent may create the first-letter pseudo-element from one of the elements, from both elements, or simply not create the pseudo-element at all.
Similarly, if the first letter(s) of a block are not at the start of the line (for example, due to bidirectional reordering), the user agent need not create the pseudo-element(s).
The following example shows how overlapping pseudo-elements can affect one another. The first letter of each P element is highlighted in green, with the font size set to '24pt'. The rest of the first formatted line will be shown in blue ('blue'), and the rest of the paragraph in red ('red').
p { color: red; font-size: 12pt }
p:first-letter { color: green; font-size: 200% }
p:first-line { color: blue }

<P>Some text, divided into two lines</P>
Suppose the line break occurs before the word "finishes"; then the sequence of functional tags for this fragment might be as follows:
<P>
<P:first-line>
<P:first-letter>
S
</P:first-letter>ome text,
</P:first-line>
divided into two lines
</P>
Note that the :first-letter element is inside the :first-line element. Properties set for the :first-line element are inherited by the :first-letter element, but they can be overridden if a value is assigned to the same property on the :first-letter element.
The ':before' and ':after' pseudo-elements can be used to insert generated content before or after an element's content. More about them is covered in the section on generated text.
h1:before {content: counter(chapno, upper-roman) ". "}
When the :first-letter and :first-line pseudo-elements are combined with the :before and :after pseudo-elements, they apply to the first letter or line of the element, including the inserted text.
p.special:before {content: "Special! "}
p.special:first-letter {color: #ffd800}
The letter "S" of the word "Special!" will be shown in a golden color.
So, you've got the basic selectors down: id, class, descendant selectors. That's it? If so, you're missing out on a lot of flexibility in controlling the appearance of elements on the page.
Even though many of the selectors mentioned here are part of the CSS3 specification and are accordingly only supported by modern browsers, you should still get familiar with them and keep them in mind.
1. *
* {
 margin: 0;
 padding: 0;
}
Let's start with the simplest things for beginners, before moving on to advanced selectors.
The asterisk character lets you select all elements on the page. Many web developers use this to "zero out" all external and internal margins and padding.
The * symbol can also be used for the child elements of an object.
#container * {
 border: 1px solid black;
}
This code targets all elements that are children of the block with the identifier container.
Compatibility:
* IE6+
* Firefox
* Chrome
* Safari
* Opera
2. #X
#container {
   width: 960px;
   margin: auto;
}
The hash symbol lets us select elements by identifier. This is one of the most common ways to select elements, but be careful when using it.
"Ask yourself: Do I really need to use an id for some element in order to reference it?"
id selectors are inflexible and hard to reuse across different projects. If possible, try using a tag name or even a pseudo-class first.
Compatibility:
* IE6+
* Firefox
* Chrome
* Safari
* Opera
3. .X
.error {
  color: red;
}
This is the class selector. The difference between id and classes is that with classes you can select several elements at once. Use classes when you need to apply one style to a group of elements.
Otherwise use id to find the "needle in the haystack" and apply a style to only one specific object.
Compatibility:
* IE6+
* Firefox
* Chrome
* Safari
* Opera
4. X Y
li a {
  text-decoration: none;
}
The next commonly used type of selector is the descendant selector. It should be used when you need to make a more precise selection of elements.
For example, what if you need to select not all link tags, but only those inside an unordered list? This is exactly the case where you should use the descendant selector.
"Tip: If your selector looks like X Y Z A B.error, you're probably doing something wrong. Always ask yourself whether this is really the simplest way"
Compatibility:
* IE6+
* Firefox
* Chrome
* Safari
* Opera
5. X
a {color: red;}
ul {margin-left: 0px;}
What if you want to refer to all elements of a certain type on the page when they have no id or classes? Keep it simple, use type selectors. If you need to select all unordered lists, use ul{}.
Compatibility:
* IE6+
* Firefox
* Chrome
* Safari
* Opera
6. X:visited and X:link
a:link {color: red;}
a:visited {color: purple;}
Here we use the :link pseudo-class to select all links that have not yet been clicked.
There's also the :visited pseudo-class, which, as you'd expect, lets us apply a style only to those links that have been clicked or visited.
Compatibility:
* IE7+
* Firefox
* Chrome
* Safari
* Opera
7. X + Y
ul + p {
   color: red;
}
This is the so-called adjacent sibling selector. In this case, every paragraph immediately following each ul element will be colored red.
Compatibility:
* IE7+
* Firefox
* Chrome
* Safari
* Opera
8. X > Y
#container > ul {
  border: 1px solid black;
}
The difference between X Y and X > Y is that the latter selects only direct children. Consider the following example:
<div id="container">
      <ul>
         <li>List item
           <ul>
              <li>Descendant</li>
           </ul>
         </li>
         <li>List item</li>
         <li>List item</li>
         <li>List item</li>
      </ul>
</div>
The selector #container > ul will select only those ul elements that are direct children of the div block with the identifier container. That is, in this case the selector will not select the ul element that is a descendant of the first li element.
Compatibility:
* IE7+
* Firefox
* Chrome
* Safari
* Opera
9. X ~ Y
ul ~ p {
   color: red;
}
This combination of sibling elements is similar to X + Y, but it is less strict. While in the case of ul + p only the first p elements immediately following ul would be selected (i.e., there is adjacency in the selection), the selector we are looking at now is more general.
In our case it will select all p elements that follow the ul element.
Compatibility:
* IE7+
* Firefox
* Chrome
* Safari
* Opera
10. X[title]
a[title] {
   color: green;
}
Here we are addressing the attribute selector. In our example, only links that have a title attribute will be colored green.
Compatibility:
* IE7+
* Firefox
* Chrome
* Safari
* Opera
11. X[href="foo"]
a[href="http://www.codeharmony.ru"] {
  color: red;
}
The code above will apply the style to all links whose href attribute equals http://www.codeharmony.ru. These links will be red. The other links will not get this style.
This works well, but it's a bit inflexible. What if the link actually leads to Codeharmony.ru, but the address happens to be specified as codeharmony.ru rather than http://www.codeharmony.ru? In such cases we can use the basics of regular expressions.
Compatibility:
* IE7+
* Firefox
* Chrome
* Safari
* Opera
12. X[href*="codeharmony"]
a[href*="codeharmony"] {
  color: red;
}
Let's move on; this is exactly what we need. The asterisk means that the value we're looking for can be located anywhere inside the href attribute. Thus, we can select http://www.codeharmony.ru, www.codeharmony.ru, and codeharmony.ru alike.
Compatibility:
* IE7+
* Firefox
* Chrome
* Safari
* Opera
13. X[href^="http"]
a[href^="http"] {
   background: url(path/to/external/icon.png) no-repeat;
   padding-left: 10px;
}
Have you ever wondered how, on some sites, next to links that lead to other sites (external to the current one), there are small icons that let the user know about this? These are great "reminders" to the user that the link leads to another site.
This is done using the ^ character (caret). It is normally used in regular expressions to denote the beginning of a string. If we want to select links whose href attribute starts with http, we can use the selector from the example above.
"Note that we are not searching for http://. This is optional, and it also does not account for links using the https:// protocol."
Compatibility:
* IE7+
* Firefox
* Chrome
* Safari
* Opera
14. X[href$=".jpg"]
a[href$=".jpg"] {
   color: red;
}
Once again we use a regular expression and the $ character to denote the end of a string. In this example we are looking for all links that point to images with the .jpg extension. Of course, this approach won't work for images with the .gif, .png, etc. extensions.
Compatibility:
* IE7+
* Firefox
* Chrome
* Safari
* Opera
15. X[data-*="foo"]
a[data-filetype="image"] {
   color: red;
}
How can we cover different types of images? We could, for example, create several selectors:
a[href$=".jpg"],
a[href$=".jpeg"],
a[href$=".png"],
a[href$=".png"] {
   color: red;
}
But this is tedious and inelegant. Another option is to create a custom data-filetype attribute and add it to every link that leads to an image.
<a href="path/to/image.jpg" data-filetype="image">Link</a>
Having done this, we can use the code from this example:
a[data-filetype="image"] {
   color: red;
}
Compatibility:
* IE7+
* Firefox
* Chrome
* Safari
* Opera
16. X[foo~="bar"]
a[data-info~="external"] {
   color: red;
}

a[data-info~="image"] {
   border: 1px solid black;
}
Here's another interesting trick that not everyone knows about. The ~ sign (tilde) lets us select attributes with space-separated values, i.e.
<a href="path/to/image.jpg" data-info="external image">Click here</a>
Using this technique we can make selections with the combinations we need:
/* Select the data-info attribute that contains the value external */
a[data-info~="external"] {
   color: red;
}

/* and select the data-info attribute that contains the value image */
a[data-info~="image"] {
  border: 1px solid black;
}
Compatibility:
* IE7+
* Firefox
* Chrome
* Safari
* Opera
17. X:checked
input[type=radio]:checked {
   border: 1px solid black;
}
This pseudo-class selects elements that have been checked, for example a radio button or a checkbox.
Compatibility:
* IE9+
* Firefox
* Chrome
* Safari
* Opera
18. X:after
This pseudo-class lets you generate content around the selected element.
.clearfix:after {
    content: "";
    display: block;
    clear: both;
    visibility: hidden;
    font-size: 0;
    height: 0;
    }

.clearfix {
   *display: inline-block;
   _height: 1%;
}
This example shows how, using the :after pseudo-class, an empty line is created after the block with the class .clearfix and then cleared. A good method for when you can't apply overflow: hidden.
Compatibility:
* IE8+
* Firefox
* Chrome
* Safari
* Opera
19. X:hover
div:hover {
  background: #e3e3e3;
}
You definitely know this one. The official name sounds something like "a pseudo-class based on a user action." Sounds a bit scary, though in practice it's all simple. Want to apply a particular style to an element when the mouse pointer hovers over it? This is it!
"Remember that older versions of IE do not understand this pseudo-class in relation to anything other than the a tag."
This technique is often used to set a bottom border for links when the mouse pointer hovers over them:
a:hover {
 border-bottom: 1px solid black;
}
"Mega-cheat: border-bottom: 1px solid black; looks better than text-decoration: underline;"
Compatibility:
* IE6+ (in IE6 it works only in relation to links)
* Firefox
* Chrome
* Safari
* Opera
20. X:not(selector)
div:not(#container) {
   color: blue;
}
Negation can also be very useful. Suppose I want to select all div blocks except the one with the identifier container. The code above works perfectly for this.
If, however, I need to select all elements except paragraph tags, I can write it like this:
*:not(p) {
  color: green;
}
Compatibility:
* IE9+
* Firefox
* Chrome
* Safari
* Opera
21. X::pseudoElement
p::first-line {
   font-weight: bold;
   font-size: 1.2em;
}
Pseudo-elements can be used to style a fragment of an element, for example the first line or the first letter. It applies only to block-level elements.
Selecting the first letter of a paragraph:
p::first-letter {
   float: left;
   font-size: 2em;
   font-weight: bold;
   font-family: cursive;
   padding-right: 2px;
}
This piece of code will find all paragraphs on the page and apply the specified styles to the first letter of each one. This is often used to create a "newspaper headline" effect.
Selecting the first line of a paragraph:
p::first-line {
   font-weight: bold;
   font-size: 1.2em;
}
Similar to the previous example, but in this case the first line of each paragraph will be selected.
Compatibility:
* IE6+
* Firefox
* Chrome
* Safari
* Opera
22. X:nth-child(n)
li:nth-child(3) {
   color: red;
}
Remember the times when we had no way to address a specific ordinal descendant element? This pseudo-class solves that problem!
An integer is accepted as the parameter. If you need to select the 2nd list item, use the construct: li:nth-child(2).
We can even select groups of descendant elements. For example, to select every fourth list item, use the construct: li:nth-child(4n).
Compatibility:
* IE9+
* Firefox
* Chrome
* Safari
23. X:nth-last-child(n)
li:nth-last-child(2) {
   color: red;
}
What if you have a large unordered list and need, for example, to select the third element from the end. Instead of writing li:nth-child(397), you can use the nth-last-child pseudo-class.
Compatibility:
* IE9+
* Firefox 3.5+
* Chrome
* Safari
* Opera
24. X:nth-of-type(n)
ul:nth-of-type(3) {
   border: 1px solid black;
}
Sometimes there are situations where, instead of selecting specific descendants, you need to make a selection by element type.
Imagine there are five unordered lists on the page. If you need to apply styles only to the third list, but it has no unique identifier or other "hooks," you can use the nth-of-type(n) pseudo-class. The code above shows a way to style only the third unordered list.
Compatibility:
* IE9+
* Firefox 3.5+
* Chrome
* Safari
25. X:nth-last-of-type(n)
ul:nth-last-of-type(3) {
   border: 1px solid black;
}
Yes, for the sake of completeness there's also this variant. This way you can select the n-th element of a given type from the end.
Compatibility:
* IE9+
* Firefox 3.5+
* Chrome
* Safari
* Opera
26. X:first-child
ul li:first-child {
   border-top: none;
}
This pseudo-class lets you select only the first child of a parent element. It's often used to remove the borders of the first and last list items.
For example, if you have a list of rows, each of which has a border-top and a border-bottom, then the last and first items in the list will stand out a bit from the rest.
To fix this shortcoming, you can use this pseudo-class.
Compatibility:
* IE7+
* Firefox
* Chrome<
* Safari
* Opera
27. X:last-child
ul > li:last-child {
   color: green;
}
In contrast to the first-child class, last-child will select the last element of the parent element.
Compatibility:
* IE9+
* Firefox
* Chrome
* Safari
* Opera
28. X:only-child
div p:only-child {
   color: red;
}
Honestly, this is a fairly rarely used pseudo-class, but it can still be useful. It lets you select those elements that are the only children of their parents.
In our example, the style will be applied only to the paragraph that is the sole child of the div block.
Let's look at the following markup as an illustration:
<div><p>Here is the only paragraph in the block.</p></div>

<div>
   <p>Here is the first paragraph in the block.</p>
   <p>Here is the second paragraph in the block.</p>
</div>
In this case, the paragraphs in the second div block will not be selected. The style will be applied only to the paragraph in the first div block.
Compatibility:
* IE9+
* Firefox
* Chrome
* Safari
* Opera
29. X:only-of-type
li:only-of-type {
   font-weight: bold;
}
This pseudo-class selects elements that have no sibling elements within their containing element. For example, let's select all ul elements that contain lone li elements.
You could write ul li, but this approach would select all li elements. The only way is to use only-of-type.
ul > li:only-of-type {
   font-weight: bold;
}
Compatibility:
* IE9+
* Firefox 3.5+
* Chrome
* Safari
* Opera
30. X:first-of-type
This pseudo-class lets you select the first sibling of the same type.
To better understand this, copy the following code into your editor:
<div>
   <p>Here's a paragraph.</p>
   <ul>
      <li>Item 1.</li>
      <li>Item 2.</li>
   </ul>

   <ul>
      <li>Item 3.</li>
      <li>Item 4.</li>
   </ul>
</div>
Now, without reading further, try to style only "item 2." Once you've figured it out (or given up), keep reading.
Solution 1
There are many ways to solve this task. Let's look at just a few of them. Let's start with using first-of-type:
ul:first-of-type > li:nth-child(2) {
   font-weight: bold;
}
This code reads: "Find the first unordered list on the page, then find only its direct children that are li elements. Then select only the second li element in order."
Solution 2
Another option is to use an adjacent sibling selector:
p + ul li:last-child {
   font-weight: bold;
}
Here we find the ul that immediately follows the paragraph tag, and then find its very last child element.
Solution 3
We can play around with the selectors a bit more and do it this way:
ul:first-of-type li:nth-last-child(1) {
   font-weight: bold;
}
Now we get the first ul element on the page, then look for the very first li element, but starting from the end.
Compatibility:
* IE9+
* Firefox 3.5+
* Chrome
* Safari
* Opera
Conclusion
If you're still writing code with IE6 in mind, you need to be extremely careful when using new selectors. But don't use that as an excuse, don't say you don't need to know this — you'll only make life harder for yourself.
If you work with any JavaScript libraries, for example jQuery, always try to use "native" CSS3 selectors whenever possible. In that case your code will run faster.

Comments