
Lecture 45 min.
To store data, we can use various databases - Oracle, MS SQL Server, MySQL, Postgres, and so on. All of these database management systems have their own particular features. What unites them is that they interact with the data store through SQL commands. To define a single mechanism for interacting with these DBMSs, a special application programming interface (API) called JDBC. was introduced in Java as early as 1996.
That is, if we want a Java application to interact with a database, we need to use the functionality of JDBC. This API is part of Java; in particular, to work with JDBC in a Java program it is enough to import the java.sql package. In Java EE there is a similar package, javax.sql, which extends the capabilities of JDBC.
Working with databases in Java is done with JDBC (Java Database Connectivity), a standard programming interface that allows you to interact with various types of databases.
Here is an example of the steps for working with a database in Java:
Load the database driver: Each database has a corresponding JDBC driver that you need to load into your project. This is usually done with the Class.forName() statement.
Establish a connection to the database: To connect to the database, use the Connection class. You can specify connection parameters such as the user name and password.
Create a query: To execute queries against the database in Java, use the Statement interface. You can execute any SQL query, including queries that insert, update, and delete data.
Get the results: The results of a query can be obtained through the ResultSet interface. You can use ResultSet to retrieve individual values or to iterate over the query results.
Close the connection: When you have finished working with the database, close the connection with the Connection.close() method.
Example code:
import java.sql.*;
public class Example {
public static void main(String[] args) {
try {
// Load the database driver
Class.forName("com.mysql.jdbc.Driver");// Establish a connection to the database
Connection con = DriverManager.getConnection("jdbc:mysql://intellect.icu:3306/mydatabase", "root", "password");// Create a query
Statement stmt = con.createStatement();
ResultSet rs = stmt.executeQuery("SELECT * FROM mytable");// Get the query results
while(rs.next())
System.out.println(rs.getString(1) + " " + rs.getString(2) + " " + rs.getString(3));// Close the connection
con.close();
} catch(Exception e) {
System.out.println(e);
}
}
}
This is an example of a simple application that connects to a MySQL database, executes a query that selects data from a table, and prints the results to the console. However, ORM libraries such as Hibernate or JPA are usually used for working with databases in Java.
Note, however, that not every database can be supported through JDBC. Working with a particular DBMS also requires a special driver. The developer of each DBMS usually provides its own driver for working with JDBC. That is, if we want to work with MySQL, we need a driver made specifically for MySQL. As a rule, most drivers are freely available on the websites of the corresponding DBMSs. They are usually JAR files. And the advantage of JDBC is precisely that we abstract away from the internal structure of a specific database and use a unified interface that is the same for all of them.
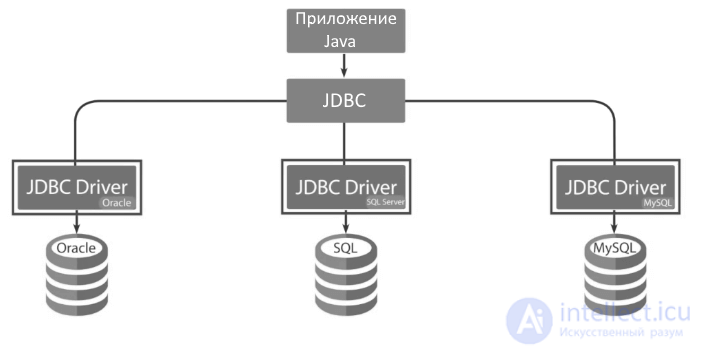
SQL queries are used to interact with the database through JDBC. At the same time, the SQL capabilities can differ for each specific DBMS. For example, in MS SQL Server it is T-SQL, and in Oracle it is PL/SQL. But in general these varieties of the SQL language do not differ very much.
JDBC (Java Database Connectivity) is a standard programming interface that allows applications written in Java to interact with various types of databases. It provides a unified way to access databases, regardless of the type of database being used.
The JDBC interface includes the following key components:
DriverManager - a class that manages the list of registered JDBC drivers.
Driver - an interface that defines the methods required for interacting with a specific database.
Connection - an interface that represents a connection to a database. It allows you to execute SQL queries and obtain results.
Statement - an interface that allows you to execute an SQL query and obtain the results as a ResultSet object.
ResultSet - an interface that represents the set of rows returned by an SQL query. It allows you to iterate over the query results and retrieve field values.
PreparedStatement - an interface that represents a precompiled SQL query. It allows the same query to be reused many times with different parameters.
CallableStatement - an interface that represents a callable database procedure or function. It allows you to pass parameters to the called procedure and obtain results.
Some applications process data that the user has to enter after the program starts. For example, a calculator waits to receive two numbers from the user before computing their sum. Neither the addends nor the sum are saved anywhere afterward, and when the calculator is launched again, the user will need to enter new data to be processed.
Other programs remember some small pieces of information about previous sessions. For example, the game "Minesweeper" (and many others) maintains a list of the players who scored the most points in previous games. This information is most often stored in a small file of arbitrary format and is retrieved from it when the program starts or when the user selects the corresponding menu item.
Many software products are designed to process large amounts of data that cannot be requested from the user every time. Moreover, the main task of modern applications may lie not so much in processing as in storing and searching for data. And ordinary files are not suitable for large volumes of data: to find a record that satisfies the required conditions, the file has to be scanned from beginning to end.
Therefore, most modern applications accumulate data in a database and interact with that database through a DBMS. The DBMS takes care of organizing the optimal placement of data on the hard disk, retrieving the required data, protecting it from unauthorized access, and so on. All the application has to do is send the DBMS the appropriate requests to add, edit, or search for the needed information in the database.
In recent years, relational databases, in which data is stored in the form of tables, have been the most popular. There are several dozen popular relational DBMSs. They differ in a number of parameters: performance, scalability, security, cost, additional data manipulation features, and so on, but they are all based on the same mathematical model.
All relational DBMSs support the standardized query language SQL. With it you can create tables (that is, define the structure of the database), fill them with data, and select the required data by query.
Developers who are familiar with SQL can use any relational DBMS to store their application's data without spending much time figuring out the details of how it works.
A program that uses a relational DBMS to store data must somehow connect to a specific database, send SQL queries to it, and analyze the result it receives.
There is a universal, programming-language-independent mechanism for programs to interact with a DBMS: the Open Database Connectivity interface, ODBC. This is a low-level API that can be used to work with any relational database, accessing the database through system calls. The only requirement is that the necessary ODBC driver be installed on the system (sometimes it may not be included in the DBMS distribution, so you will need to find it and install it separately).
Using a low-level API is rather laborious. It is much more convenient to work with a library of the language in which the whole program is being developed - in our case, Java.
Java provides its own interface for interacting with relational databases. It is called JDBC (Java Database Connectivity). From a programming point of view, JDBC can be regarded simply as a set of classes that make it easy to perform actions such as:
The Java classes used to work with a relational database interact with that database through a so-called JDBC driver. It is an intermediary between the Java libraries and the internal mechanism of the DBMS. There are several kinds of JDBC drivers.
The most readily available option is the JDBC-ODBC bridge driver. It is included in the Java SDK distribution by default, so there is no need to find it and install it on the system. This driver converts all calls to the JDBC interface into calls to the ODBC interface.
Another option is a driver written entirely in Java. Such a driver converts JDBC requests directly into requests specific to a particular database. Such drivers have been developed for almost all popular DBMSs, but you must find the driver you need and integrate it with your own program.
In both cases the program code is the same, except for the command that loads the required driver. But the second option is preferable for two reasons.
To begin organizing the storage of a program's data in a database (through the JDBC mechanism), you need to choose the DBMS the program will work with, install and configure it, and then create the database itself. A database is usually not created while the application is running, but is supplied with it in ready-made form (although possibly empty). This makes sense, because the structure of a database (the description of its tables) usually remains unchanged.
We will use the Firebird DBMS, whose main advantages include that it is free and open. In addition, both an ODBC driver and a JDBC driver are available for this DBMS (the JDBC driver is called Jaybird). Although, as noted above, we need only one of them to develop the program (and we will use Jaybird), it is always useful to have the ODBC driver for the DBMS at hand - a need may always arise to write a program in another programming language that interacts with it.
Firebird is a powerful, compact relational DBMS with a client-server architecture. It can run on a variety of client and server platforms, including Windows, Linux, and MacOS.
The Firebird core consists of two main programs: the database server and the client library (also called the Firebird server and the Firebird client). Interaction with the database goes through the server, which must be installed and running on the computer where the databases are physically located. The client library is used to communicate with the database server from remote workstations. Therefore, it must be installed on the computer where the application that accesses the database is running. Note that:
As an example of a local application, we will consider a program designed to keep track of household expenses. This program stores information about the purchases made in a database and generates various reports based on this information. Obviously, each user who installs it on their computer must work only with their own database.
An example of a distributed application is task No. 1 - electronic voting. Users can install the voting program on different computers (connected to a common network). But the database that stores the information about the votes cast is one for everyone, and it is located on the computer where the Firebird server is installed.
Installing Firebird at home does not cause any problems. You will need the distribution of this program (which you can download from the Internet, get from your instructor, or get right here).
A short guide to installing Firebird is available at http://www.firebirdsql.org/file/documentation/html/en/firebirddocs/qsg3/firebird-3-quickstartguide.html.
Firebird, like a number of other DBMSs (for example, MySQL), has no graphical interface by default (such as the one in Microsoft Access). Every action, starting with creating the database, has to be performed through command-line utilities using SQL queries.
However, you can use a graphical tool for administering Firebird databases offered by a third-party developer. In particular, there are two good free programs: IB Expert (install) and FlameRobin (install). Below we will refer only to IB Expert, which has greater capabilities and a simpler interface.
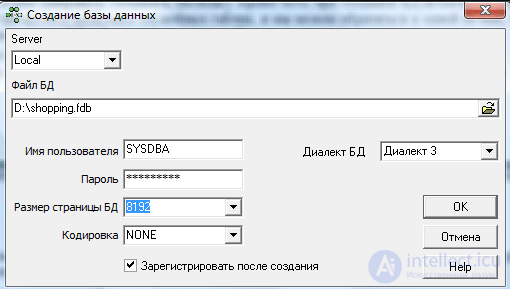
A database is created with the CREATE DATABASE statement, to which you must specify:
For example, the following command creates the database shopping.fdb:
CREATE DATABASE 'D:\data\shopping.fdb' page_size 8192 user 'SYSDBA' password 'masterkey';
Of course, the path to the database file should be replaced with the one you need.
The user name and password in this command were not chosen arbitrarily. The user SYSDBA is the administrator of the Firebird DBMS, with all possible privileges. It is registered in the system when the Firebird server is installed and, in the Windows operating system, has the password masterkey by default (more precisely, masterke, since Firebird treats only the first 8 characters of a password as significant). On Linux, a random password is generated during installation and written to the file /opt/firebird/SYSDBA.password.
The page_size attribute specifies the size of the database's internal page. Additional information can be found in the Firebird literature.
To execute the CREATE DATABASE command (as well as to run any other SQL queries against the database), use the command-line utility isql, which can be found in the bin directory.
When it starts, the following prompt appears:
SQL>
Now we can execute our command. The database will be created and the prompt will appear again, showing that we are connected to it and can issue SQL queries (for example, create tables).
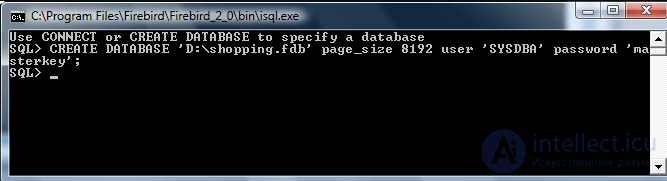
In addition, when a database is created, several system tables are constructed automatically, and we can query one of them to make sure the database has really been created. For example, run the query
SELECT * FROM RDB$RELATIONS;
If the database was created correctly, a fairly large amount of data will be displayed on the screen. An "empty" database actually stores metadata about its characteristics, and there will be more of it as new tables are created. To finish working with isql, run the command
QUIT;
Creating a new database with a graphical administration tool is much simpler. For example, in IB Expert you can run the command Database --> Create Database..., and then fill in the corresponding fields in the dialog box that appears. However, a graphical tool may not be at hand, whereas the command-line utilities are part of Firebird.
The development of any database begins with defining its structure (schema). You need to decide which tables the database will consist of, which fields (columns) they will contain, and how they will be related to one another. It makes no sense to start building a database when its structure has not been defined and sketched on paper or, much preferably, in specialized software such as ERWIN, Rational Rose Data Modeler, or DBDesigner. DBDesigner is, moreover, a free and freely distributed software tool.
Professional developers start by developing an entity-relationship model (ER model). They identify the entities (the things about which information must be stored in the database), their attributes (exactly what information), and the relationships between them. After that it is fairly easy to convert the ER model into a relational model.
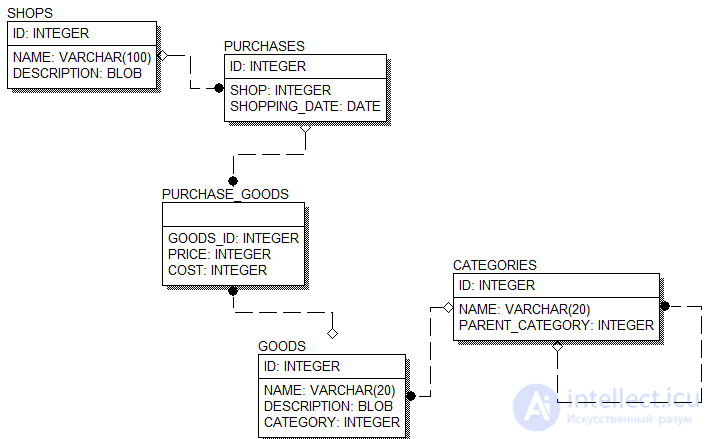
The household expense tracking program will store information about:
Accordingly, the database will consist of four tables: CATEGORIES, GOODS, SHOPS, PURCHASES, as well as one auxiliary table for storing the many-to-many relationship between the PRODUCT and PURCHASE entities. The database structure will be as follows:
The database tables can be created with the IB Expert graphical administration tool. To do this, you need to connect to the database with the command Database --> Connect to Database, having first registered it with the command Database --> Register Database, and then choose the command New Table... in the context menu of the Tables node. An editor similar to the table designer in Microsoft Access will open, in which the fields of the new table are described.
A professional developer of databases (and/or of programs that use databases) will write SQL code consisting of CREATE statements to create the database tables. With this code (saved in an ordinary text file with the .sql extension), you can recreate the database "from scratch" at any time simply by running it.
You can also be quite clever: create a table in IB Expert, then on the Script tab of the table view and edit window (it appears if you double-click the name of an existing table) look at the SQL query used to create it, and copy this query into a separate file.
The tables for the household expense program are created with five CREATE TABLE statements. They present no difficulty for anyone who is at all familiar with the SQL language (and knowledge of SQL is required to do the exercises in this chapter).
It should be noted that the SQL dialects of different DBMSs can differ. For example, MySQL allows you to specify the PRIMARY KEY or AUTO INCREMENT attributes when describing a field. The Firebird SQL dialect has no such attributes. To specify the primary key of a table, a separate parameter is used.
CREATE TABLE CATEGORIES (ID INTEGER NOT NULL,NAME VARCHAR(50),PARENT_CATEGORY INTEGER,PRIMARY KEY (ID));
CREATE TABLE GOODS (
ID INTEGER NOT NULL,
NAME VARCHAR(100),
DESCRIPTION BLOB SUB_TYPE 1 SEGMENT SIZE 80,
CATEGORY INTEGER,PRIMARY KEY (ID)
);
CREATE TABLE SHOPS (
ID INTEGER NOT NULL,
NAME VARCHAR(100),
DESCRIPTION BLOB SUB_TYPE 1 SEGMENT SIZE 80,
PRIMARY KEY (ID)
);
CREATE TABLE PURCHASES (
ID INTEGER NOT NULL,
SHOPPING_DATE DATE,
SHOP INTEGER,
PRIMARY KEY (ID)
);
CREATE TABLE PURCHASE_GOODS(
PURCHASE_ID INTEGER,
GOODS_ID INTEGER,
PRICE INTEGER,
COST INTEGER
);
Note that the BLOB type describes a field for storing arbitrary data of any size and format. The SUB TYPE 1 parameter specifies that the data in this field will be stored as text, and the SEGMENT SIZE 80 parameter has no significance in our example.
The Firebird DBMS supports integrity constraints on foreign keys. That is, you can specify that a given table field is a foreign key, and the DBMS will not allow values that are absent from the primary key of the related table to be written into this field. A foreign key constraint can be defined in the CREATE TABLE statement itself, or in a separate statement after all the tables have been created. For a complex database the latter is preferable, because you do not have to carefully watch the order in which the tables are created (after all, a foreign key can be declared only when the table it refers to already exists).
For example, the following statement creates an integrity constraint for the foreign key PARENT_CATEGORY of the CATEGORIES table, which refers to the same table (the PARENT_CATEGORY field points to the parent category of which the given category is a subcategory):
ALTER TABLE CATEGORIES ADD CONSTRAINT FK_CATEGORIESFOREIGN KEY (PARENT_CATEGORY) REFERENCES CATEGORIES (ID)ON DELETE SET NULL;
The ON DELETE SET NULL parameter indicates that when a parent category is deleted, the foreign key value for all of its subcategories should be set to NULL. If the value of the ON DELETE parameter is CASCADE, then when a row referenced by the foreign keys of other rows is deleted, those rows will be deleted as well.
The following statements are used to create the remaining foreign key integrity constraints:
ALTER TABLE GOODS
ADD CONSTRAINT FK_GOODSFOREIGN KEY (CATEGORY) REFERENCES CATEGORIES (ID)ON UPDATE SET NULL;
ALTER TABLE PURCHASES
ADD CONSTRAINT FK_PURCHASESFOREIGN KEY (SHOP) REFERENCES SHOPS (ID)ON DELETE SET NULL;
ALTER TABLE PURCHASE_GOODS
ADD CONSTRAINT FK1_PURCHASE_GOODSFOREIGN KEY (GOODS_ID) REFERENCES GOODS (ID)ON DELETE CASCADE;
ALTER TABLE PURCHASE_GOODS
ADD CONSTRAINT FK2_PURCHASE_GOODSFOREIGN KEY (PURCHASE_ID) REFERENCES PURCHASES (ID)ON DELETE CASCADE;
It is very convenient when, on adding a new record to a table, you do not need to specify the primary key value because it is generated automatically. Many SQL dialects allow you to specify the AUTO INCREMENT instruction for the primary key field in the CREATE TABLE statement, but the Firebird DBMS does not provide this feature. For the primary key value of a table to be generated automatically, you need to:
We will not study the full syntax of Firebird triggers, but will simply look at how triggers and generators can be used to auto-fill a primary key, using the CATEGORIES table as an example.
First we create the generator:
CREATE GENERATOR CATEGORIES_ID_GEN;
The SQL query for creating the trigger will look as follows:
SET TERM ^ ;CREATE TRIGGER SET_CATEGORIES_ID FOR CATEGORIESACTIVE BEFORE INSERT POSITION 0ASBEGINif (NEW.ID is NULL) THENNEW.ID = GEN_ID(CATEGORIES_ID_GEN, 1);END^SET TERM ; ^
Generators and triggers for auto-filling the primary keys of the GOODS, SHOPS, and PURCHASES tables are created by analogy.
The full SQL code for creating the SHOPPINGS database can be found in the file createDB.sql. You can repeat the procedure of creating the database "from scratch" by executing the statements in this file or by using a graphical administration tool (IB Expert or FlameRobin). Or you can take a file with a ready-made database and proceed directly to studying JDBC (learning the database creation process on the example of your own main assignment). Incidentally, this is exactly how databases - as a ready-made file - are most often distributed together with applications.
Before starting to work with the JDBC interface, you need to become familiar with the exception handling mechanism of the Java language. We have not touched on exceptions before, because there was no need for them (although professional Java programmers use this mechanism very actively). However, almost all of the methods discussed below can throw exceptions and require that they be handled.
An emergency situation may arise while a program is running. This happens when you try to divide by zero, when an index goes outside the bounds of an array, when a file that needs to be loaded is missing, and so on.
An exception is an object that describes an emergency situation that occurred in some fragment of code. It is created at the moment the emergency situation arises and is thrown into the method that caused the error.
Emergency situations come in two kinds: checked and unchecked.
Unchecked exceptions do not require the programmer to take any special action to track them (although the programmer may do so on their own initiative). Such exceptions include:
The occurrence of such a situation means that the program most likely contains a gross error, and the best solution is to fix it by rewriting the code. Therefore, Java simply prints a diagnostic message to the console and terminates the program.
However, there are many potential errors that do not mean the program is irredeemably flawed, but that prevent it from continuing. For example, the program cannot open a required file (it is locked or missing), establish a network connection, or send a request to a database. Of course, if the file could not be opened, it makes no sense to execute the following commands (say, those that read data from or write data to this file). But the program does not have to "crash". It is enough to display an error message and let the user decide whether or not to close the program.
Such emergency situations are called checked. Java obliges the programmer to provide the program's reaction to these situations.
For this purpose, the methods whose execution may cause an emergency situation include in their declaration a list of such situations (in the form of the classes of the corresponding exception objects). And the methods that call them must provide a reaction to all of these situations. The reaction may, in principle, be null — that is, the program calmly ignores the error and continues to work — but even that must be stated explicitly.
It is said that the former methods throw exceptions, and the latter handle them.
In principle, instead of throwing exceptions, methods could simply return a value of type boolean (true or false) signaling whether they succeeded, and the programmer could perform the check with an if statement. But the exception mechanism turns out to be preferable for a number of reasons. In particular:
When calling a method that throws exceptions (of one or several kinds), the program must provide for the possibility of handling them. For this, an exception handling block try{} catch(){} is used.
The general form of the exception handling block:
try {// a block of code that may cause exceptions}
catch (ExceptionType1 ex) {
// handler for an exception of type ExceptionType1
} catch (ExceptionType2 ex) {
// handler for an exception of type ExceptionType2
}// ...
finally {
// a block of code to execute before exiting the try
}
The call to a method that throws an exception is placed in curly braces after the keyword try. The curly braces may enclose not just one command but several (including commands that cannot throw any exceptions). In essence, the entire body of a method can be enclosed in a single try{} block.
After the try{} block come one or more catch(){} blocks. In the parentheses after the keyword catch, a variable is declared whose type is the type of the exception being caught. Next, in curly braces, comes the exception handler — a set of commands that will be executed if an exception of this type occurs in the try{} block. In that case, the part of the try{} block that was not reached because of the exception will not be executed.
All exception classes are descendants of the class Throwable and inherit from it a useful method, printStackTrace(). It prints messages about all the methods encountered along the path of the exception: first the method in which the exception occurred, then the method that called that method, and so on, up to the method in which the exception was stopped in the try{} block. Or, if the exception is unchecked and is not caught, all the way up to the main() method. The printStackTrace() method is called by default for unchecked exceptions, which makes it possible to find the exact place where the error occurred.
You can observe this yourself. Create two classes. In the first class, define a method that returns an object of the second class, but put only one command in the body of this method: return null. In the second class, define any method with an empty implementation. In the main() method, declare a variable of the second class's type and assign to it the result of the first method (this will be null, but at compile time Java will not "guess" this). Then write a command that uses this variable to call the second method. Run the program and observe the resulting exception and the stack trace (a printout of the sequence of methods that led to this exception) displayed in the console.
The class Throwable has two direct descendants: Error and Exception. They do not add new methods, but serve to divide the exception classes into two large groups: error classes and exception classes proper. Error classes (descendants of Error) describe emergency situations that occurred in the Java virtual machine, and it is not recommended to use them in an ordinary program. Exception classes that are descendants of Exception can, and even should, be handled.
We have touched only the edge of the exception class hierarchy (in fact this hierarchy is very large, around two hundred classes scattered across a wide variety of packages) in order to note a simple and important detail: after the try{} block you can specify a single catch{} block whose parentheses declare an object of the class Exception. This block will handle all possible exceptions that may occur in the try{} block.
Finally, the try{} catch(){} construct may include an optional part: the finally{} block. It contains commands that must be executed no matter what: whether an exception occurred or not, and whether it was handled in catch{} or not. In any case, this block of commands will be executed at the end
.
Consider a simple example. Suppose it is known that the method dangerousMethod1() of the object importantObject can throw an exception of class A, and the method dangerousMethod2() can throw an exception of class B. Suppose we are programming a method work() that must call both of these methods in sequence, but if an exception occurs, no special action needs to be taken. In this case we use the following code:
public void work() {
try {
importantObject.dangerousMethod1();
importantObject.dangerousMethod2();
} catch (A ex) {
} catch (B ex) {
}
}
or even shorter (taking advantage of the fact that both A and B are descendants of the class Exception).
public void work() {
try {
importantObject.dangerousMethod1();
importantObject.dangerousMethod2();
} catch ( Exception ex) {
}
}
The method in which an exception is thrown may not know how to handle it. At the same time, it may be undesirable to use an empty handler that simply "swallows" the exception. In some cases it is appropriate to throw the exception outward, where a higher-level method — the one that calls this method — can handle it.
To throw an exception, you need to:
catch{} block), use the keyword throw. It is followed by the object that will be thrown as the exception.try{} catch(){} mechanism.Suppose that in the example above, the method work() is able to handle (though still doing nothing) an exception of class A, but does not know what to do with an exception of class B, so it throws it outward in the hope that the method that called it will prove more competent.
public void work()
throws B {
try {
importantObject.dangerousMethod1();
importantObject.dangerousMethod2();
} catch (A ex) {} catch (B ex) {throw ex;}}
You can "teach" a method to throw its own exceptions, not only those it has "caught" in a try{} catch(){} block. The same throw directive is used for this, and in the method header the keyword throws, but the exception class object must be created "manually" by calling its constructor.
The Jaybird JDBC driver, written entirely in Java, does not require installation with an installer. It is enough to unpack the archive into any convenient folder.
For the program that will work with the database to "find" the corresponding driver, you must tell it the paths to the jar archives included in Jaybird. This is done on the Classpath tab in the run configuration window (Run --> Run... --> Java Application). Select the User Entries node in the tree and click the Add External JARs... button. Add all files with the .jar extension that are present in the directory where you unpacked Jaybird, as well as in the lib subdirectory. The result should look roughly like what is shown in the figure.
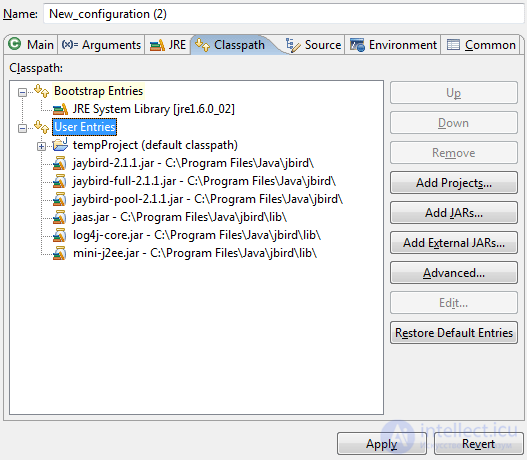
To start working with a Firebird database, you must perform two mandatory actions:
The Firebird JDBC driver can be registered with the following command:
Class.forName("org.firebirdsql.jdbc.FBDriver");
We will not go into the workings of this command here: those interested can find the details in the literature recommended for further study. We will only note that the forName() method throws an exception of type ClassNotFoundException (the required class was not found and cannot be loaded), which will occur if the paths to the Jaybird driver were entered incorrectly on the Classpath tab, or if the driver turned out to be the wrong one.
To obtain a connection to the database (which is an object of the class Connection), you need to call the getConnection() method defined in the class DriverManager.
There are four versions of this method, but the most commonly used is the variant with three string parameters. The first parameter describes the data source (that is, the database we intend to work with), the second is the user name, and the third is the password for accessing the database.
The data source is a URL string of the following format:
jdbc:subprotocol_name:additional_parameters
Here subprotocol_name depends on the DBMS and JDBC driver being used. When using the Firebird DBMS and the Jaybird driver, the protocol name to use is firebirdsql.
The additional parameters follow the URL format and may contain the network address of the host on which the Firebird server is running (if the Firebird server is installed on the same computer on which the program is run, the address 127.0.0.1 or its alias localhost is used), the port number (3050 for the Firebird DBMS), and the database file name itself.
For example, if the database file has the path D:\data\shopping.fdb, the data source is specified by the string "jdbc:firebirdsql:localhost/3050:D:\\data\\shopping.fdb" (remember that the "\" separators in the file path must be doubled, because "\" is a special character in Java).
The method getConnection(String dataSource, String user, String password) is static (like all methods of the class DriverManager), so it can be called without creating any object — directly through the class name:
Connection connection = DriverManager.getConnection("jdbc:firebirdsql:localhost/3050:D:\\data\\shopping.fdb", "SYSDBA", "masterkey");
This command should return a connection to the database stored in the file D:\data\shopping.fdb, established on behalf of the administrator SYSDBA with the password masterkey.
The getConnection() method throws an exception of class SQLException if the connection to the required database fails.
Note that the classes Connection, DriverManager and other classes for working with databases through the JDBC interface are contained in the packages java.sql and javax.sql.
A home expense tracking program must be able to add to the database information about new products, their categories, purchases and stores, as well as retrieve from the database the information needed to build various reports.
We must determine which classes of the program will be responsible for interacting with the database. At first glance, the worthy candidates are:
The second option certainly corresponds better to the essence of object-oriented programming, in which each class is responsible for storing and processing its own data. However, it too has a drawback: the code that interacts with the database ends up distributed across many classes. If the structure of the database or the connection parameters change, or if it even becomes necessary to switch the program to a different DBMS, many fragments of the program will have to be changed, which is always fraught with hidden errors.
There is a third option: introduce a separate intermediary class whose sole purpose is to interact with the database. The other classes will access the DB by calling the methods of this class. Then all the code that works with the DB will be gathered in one place in the program, and if necessary it can be changed without affecting the other classes.
Let us call the intermediary class for interacting with the DB DBManager. All of its fields and methods can be declared static.
To save new data to the DB, the DBManager class must have four methods: saveCategory(), saveShop(), saveGoods() and savePurchase(). As for loading data, there are various options. The simplest one from a programming standpoint, although not optimal in terms of efficiency, is to create a single method loadData(), which will be called at the start of the program and load the entire contents of the DB into the program's memory, creating objects of the classes Category, Shop, Goods and Purchase.
Let us settle on this option for now.
Note that, since the DB is accessed in every method of DBManager, at the beginning of each method we would need to establish a connection in the way described above. It is natural to move these actions into a separate helper method of the DBManager class.
Moreover, a question arises: is it really necessary to establish a connection every time? What if the user has entered descriptions of several, say, goods into the program and pressed the "Save" button? Obviously, in this case the saveGoods() method will be called several times in a row in a loop, and connecting to the DB again each time is completely inefficient.
Therefore we will use a fairly common programming technique. We will create a separate field that will hold an object of the Connection class — the current connection to the database. In addition, we will create a helper method getConnection(), which will establish a connection only if it has not been established before, and otherwise will return the object created earlier.
Thus, the DBManager class will look as follows:
public class DBManager {private static final String dataSource ="jdbc:firebirdsql:localhost/3050:D:\\data\\shopping.fdb";private static final String userID = "sysdba";private static final String password = "masterkey";private static final String driverClass = "org.firebirdsql.jdbc.FBDriver";
private static Connection connection = null;
private static Connection getConnection(){
try {
if (connection == null || connection.isClosed()) {
Class.forName(driverClass);
connection = DriverManager.getConnection(dataSource, userID, password);
}}
catch (SQLException exception) {JoptionPane.showMessageDialog(null, exception.getMessage());}
catch (ClassNotFoundException exception) {JoptionPane.showMessageDialog(null, exception.getMessage());}
return connection;
}// METHODS FOR SAVING AND LOADING DATA...}
We declared the DB connection parameters as string constants, which made our code clearer, and introduced the connection field to hold the current connection (initially equal to null). The getConnection() method checks whether a connection exists and whether it has been closed for some reason. The latter check is performed by the isClosed() method of the Connection class. Note that a null pointer dereference error cannot occur in the line
if (connection == null || connection.isClosed()) {
because the logical "or" operator || will call connection.isClosed() only if the first part of the condition connection == null is false. Otherwise the logical expression in parentheses immediately evaluates to true and the second part is never reached. This is precisely how the || operator differs from the | operator (see Chapter 1).
To send SQL queries to the DB, you need to create an object of the Statement class. To do this, call the createStatement() method on the Connection object, which represents an active connection to the database.
Simple programs use the createStatement() method without parameters. But for professional work with databases, it is recommended to become familiar with the more powerful version of this method with three parameters.
To send an SQL query of type UPDATE, INSERT or DELETE (as well as the CREATE TABLE and DROP TABLE commands), the executeUpdate(String query) method is used, whose parameter is the query string.
For example, to add the category "Toys" (which has no parent category) to the CATEGORIES table, you can execute the command:
statement.executeUpdate("INSERT INTO CATEGORIES (NAME, PARENT_CATEGORY) VALUES ('Toys', NULL)");
where statement is a previously created object of the Statement class.
Of course, such a hard-coded command makes no sense. We need a saveCategory() method that will save to the DB an arbitrary category passed to it as a parameter. For this to be possible, the Category class must have the following methods:
getName() — returns the name of the category;
getParent() — returns a reference to the parent category, or null if there is none
getID() — returns the value of the primary key of this category in the database. Without knowing this value, it would be impossible to preserve the link to the parent category.
The code of the method will look as follows:
public static void saveCategory(Category category){
try {
Statement statement = getConnection().createStatement();
String parentID;
if (category.getCategory() == null) parentID = "NULL";
else parentID = category.getCategory().getID();
String query = "INSERT INTO CATEGORIES (NAME, PARENT_CATEGORY) VALUES ('" +category.getName() + "', " + parentID + ");";statement.executeUpdate(query);}
catch (SQLException exception) {
JoptionPane.showMessageDialog(null, exception.getMessage());
}
}
As the example shows, the executeUpdate() method throws a SQLException, and this must be handled.
To retrieve information from the DB, an SQL query of type SELECT is used. Its result is always a table. In the simplest case it may coincide with one of the tables stored in the DB (for example, the query SELECT * FROM CATEGORIES will return the entire CATEGORIES table).
A SELECT SQL query is sent to the database from a Java program using the executeQuery(String query) method of the Statement class. The parameter of the method is a string containing the SQL query.
The executeQuery() method returns a result of type ResultSet, which represents a set of rows of the resulting table, as well as a cursor pointing to one of these rows.
Initially the cursor points nowhere. It can be moved to the first row of the result by calling the next() method. The next call of next() moves the cursor to the second row, and so on, until the rows run out. After that, calling next() will cause an error.
The next() method returns true if the cursor has successfully moved to a new row and false if the rows have run out.
Thus, all rows of the result of a SELECT query can easily be iterated over with a while loop of the following form:
// query is some SELECT query
ResultSet rs = statement.executeQuery(query);
while (rs.next()) {
// process the current row of the query results
}
The row that the cursor points to can be processed. Namely, knowing the name and data type of a column of the resulting table, you can extract the data from the cell at the intersection of this column and the current row.
For this purpose, the ResultSet class defines many methods that return a result of a particular type: getInt(), getString(), getDate(), the universal method getObject(), and so on. The parameter of these methods can be a string — the column name — or a number denoting the ordinal position of the column in the resulting table (starting from zero).
Suppose, for example, that the loadData() method must load from the DB the names of all product categories and put them into a List. Then the code of this method could be as follows:
public static List loadData(){
try {
List result = new Vector();
Statement statement = getConnection().createStatement();
ResultSet rs = statement.executeQuery("SELECT * FROM CATEGORIES");
while (rs.next()) {
String categoryName = rs.getString("NAME");result.add(categoryName);
}
return result;
} catch (SQLException exception)
{
JoptionPane.showMessageDialog(null, exception.getMessage());
}return null;
// If an exception occurred, no list is returned
}
One important fact should be kept in mind: a single Statement object can support no more than one ResultSet object. On the next call of the executeQuery() method, the previous ResultSet is closed, and an attempt to call next() or any of the get methods will indeed cause a SQLException to be thrown.
In practice, frameworks with ORM are used, which speed up and simplify development, since raw queries are then written very rarely

Comments